Create an Amazon EC2 launch template
You can create an Amazon EC2 launch template by specifying your own values for the instance
configuration parameters, or by getting the values from an existing launch template or
Amazon EC2 instance.
You don't need to specify a value for every parameter in the launch template; you need
only specify one instance configuration parameter to create a launch template. To
indicate parameters that you choose not to specify, select Don't include in
launch template when using the console. When using a command line tool,
don't include the parameters to indicate that you're choosing not to specify them in the
launch template.
If you want to specify an AMI in the launch template, you can either select an AMI, or
specify a Systems Manager parameter that will point to an AMI on instance launch.
When an instance is launched with a launch template, the values that are specified in
the launch template are used to configure the corresponding instance parameters. If a
value isn't specified in the launch template, then the default value for the
corresponding instance parameter is used.
Create a launch template
by specifying parameters
To create a launch template, you must specify the launch template name and at
least one instance configuration parameter.
For a description of each parameter, see Reference for Amazon EC2 instance configuration parameters.
- Console
-
To create a launch template
Open the Amazon EC2 console at
https://console.aws.amazon.com/ec2/.
-
In the navigation pane, choose Launch
Templates, and then choose Create
launch template.
-
Under Launch template name and
description, do the following:
-
For Launch template name, enter a
descriptive name for the launch template.
-
For Template version description,
provide a brief description of this version of the
launch template.
-
To tag the launch
template on creation, expand Template
tags, choose Add new
tag, and then enter a tag key and value
pair. Choose Add new tag again for
each additional tag to add.
To tag the resources that are created when an
instance is launched, you must specify the tags
under Resource tags. For more
information, see Step 9 in this procedure.
-
Under Application and OS Images (Amazon Machine
Image), you can either keep Don't
include in launch template selected, or choose
the operating system (OS) for the instance, and then choose an
AMI. Alternatively, you can specify a Systems Manager parameter instead of
specifying an AMI. For more information, see Use a Systems Manager parameter
instead of an AMI ID.
An AMI is a template that contains the operating system and
software required to launch an instance.
-
Under Instance type, you can either keep
Don't include in launch template
selected, or select an instance type, or specify instance
attributes and let Amazon EC2 identify the instance types with those
attributes.
The instance type determines the hardware configuration (CPU,
memory, storage, and networking capacity) and size of the host
computer used for an instance.
If you're not sure which instance type to choose, you can do
the following:
-
Choose Compare instance types to
compare different instance types by the following
attributes: number of vCPUs, architecture, amount of
memory (GiB), amount of storage (GB), storage type, and
network performance.
-
Choose Get advice to get guidance
and suggestions for instance types from the EC2 instance type finder.
For more information, see Get recommendations from EC2 instance type finder.
Depending on when you created your account, you might be
eligible to use Amazon EC2 under the Free Tier.
If your created your AWS account before
July 15, 2025 and it's less than 12 months old, you can use
Amazon EC2 under the Free Tier by selecting the
t2.micro instance type, or the
t3.micro instance type in Regions
where t2.micro is unavailable. Be aware
that when you launch a t3.micro
instance, it defaults to Unlimited mode, which
might incur additional charges based on CPU usage. If an
instance type can be used under the Free Tier, it is
labeled Free tier eligible.
If you created your AWS account on or after July 15,
2025, you can use t3.micro,
t3.small,
t4g.micro,
t4g.small,
c7i-flex.large, and
m7i-flex.large instance types for 6
months or until your credits are used up.
For more information, see Free Tier benefits before and after July
15, 2025.
-
Under Key pair (login), for Key
pair name, either keep Don't include in
launch template selected, or choose an existing
key pair, or create a new one.
-
Under Network settings, you can either
keep Dont include in launch template
selected, or you can specify values for the various network
settings.
-
Under Configure storage, if you specified
an AMI in the launch template, the AMI includes one or more
volumes of storage, including the root volume (Volume
1 (AMI Root). You can optionally specify
additional volumes to attach to the instance. To add a new
volume, choose Add new volume.
-
Under Resource tags, to tag the resources that are
created when an instance is launched, choose Add
tag, and then enter a tag key and value pair. For
Resource types, specify the resources
to tag on creation. You can specify the same tag for all the
resources, or specify different tags for different resources.
Choose Add tag again for each additional
tag to add.
You can specify tags for the following resources that are
created when a launch template is used:
-
Instances
-
Volumes
-
Elastic graphics
-
Spot Instance requests
-
Network interfaces
To tag the launch template itself, you must specify the
tags under Template tags. For more
information, see Step 3 in this procedure.
-
For Advanced details, expand the section
to view the fields and optionally specify any additional
parameters for your instance.
-
Use the Summary panel to review your
launch template configuration. You can navigate to any section
by choosing its link and then make any necessary changes.
-
When you're ready to create your launch template, choose
Create launch template.
- AWS CLI
-
To create a launch template
Use the create-launch-template command.
aws ec2 create-launch-template \
    --launch-template-name TemplateForWebServer \
    --version-description WebVersion1 \
    --tag-specifications 'ResourceType=launch-template,Tags=[{Key=purpose,Value=production}]' \
    --launch-template-data file://template-data.json
The following is example JSON that specifies the launch template data
for the instance configuration. Save the JSON to a file and include it
in the --launch-template-data parameter as shown in the
example command.
{
    "NetworkInterfaces": [{
        "AssociatePublicIpAddress": true,
        "DeviceIndex": 0,
        "Ipv6AddressCount": 1,
        "SubnetId": "subnet-0abcdef1234567890"
    }],
    "ImageId": "ami-0abcdef1234567890",
    "InstanceType": "r5.4xlarge",
    "TagSpecifications": [{
        "ResourceType": "instance",
        "Tags": [{
            "Key":"Name",
            "Value":"webserver"
        }]
    }],
    "CpuOptions": {
        "CoreCount":4,
        "ThreadsPerCore":2
    }
}
The following is example output.
{
    "LaunchTemplate": {
        "LatestVersionNumber": 1,
        "LaunchTemplateId": "lt-01238c059e3466abc",
        "LaunchTemplateName": "TemplateForWebServer",
        "DefaultVersionNumber": 1,
        "CreatedBy": "arn:aws:iam::123456789012:root",
        "CreateTime": "2017-11-27T09:13:24.000Z"
    }
}
- PowerShell
-
To create a launch template
Use the New-EC2LaunchTemplate cmdlet.
$launchTemplateData = [Amazon.EC2.Model.RequestLaunchTemplateData]@{
    ImageId = 'ami-0abcdef1234567890'
    InstanceType = 'r5.4xlarge'
    NetworkInterfaces = @(
        [Amazon.EC2.Model.LaunchTemplateInstanceNetworkInterfaceSpecificationRequest]@{
            AssociatePublicIpAddress = $true
            DeviceIndex = 0
            Ipv6AddressCount = 1
            SubnetId = 'subnet-0abcdef1234567890'
        }
    )
    TagSpecifications = @(
        [Amazon.EC2.Model.LaunchTemplateTagSpecificationRequest]@{
            ResourceType = 'instance'
            Tags = [Amazon.EC2.Model.Tag]@{
                Key = 'Name'
                Value = 'webserver'
            }
        }
    )
    CpuOptions = [Amazon.EC2.Model.LaunchTemplateCpuOptionsRequest]@{
        CoreCount = 4
        ThreadsPerCore = 2
    }
}
$tagSpecificationData = [Amazon.EC2.Model.TagSpecification]@{
    ResourceType = 'launch-template'
    Tags = [Amazon.EC2.Model.Tag]@{
        Key = 'purpose'
        Value = 'production'
    }
}
New-EC2LaunchTemplate -LaunchTemplateName 'TemplateForWebServer' `
    -VersionDescription 'WebVersion1' `
    -LaunchTemplateData $launchTemplateData `
    -TagSpecification $tagSpecificationData
The following is example output.
CreatedBy            : arn:aws:iam::123456789012:root
CreateTime           : 9/19/2023 16:57:55
DefaultVersionNumber : 1
LatestVersionNumber  : 1
LaunchTemplateId     : lt-01238c059eEXAMPLE
LaunchTemplateName   : TemplateForWebServer
Tags                 : {purpose}
Create a
launch template from an existing launch template
You can clone an existing launch template and then adjust the parameters to create
a new launch template. However, you can only do this when using the Amazon EC2 console.
The AWS CLI does not support cloning a template. For a description of each parameter,
see Reference for Amazon EC2 instance configuration parameters.
- Console
-
To create a launch template from an existing launch
template
Open the Amazon EC2 console at
https://console.aws.amazon.com/ec2/.
-
In the navigation pane, choose Launch
Templates, and then choose Create
launch template.
-
For Launch template name, enter a
descriptive name for the launch template.
-
For Template version description, provide
a brief description of this version of the launch
template.
-
To tag the launch template on creation, expand
Template tags, choose Add new
tag, and then enter a tag key and value
pair.
-
Expand Source template, and for
Launch template name choose a launch
template on which to base the new launch template.
-
For Source template version, choose the
launch template version on which to base the new launch
template.
-
Adjust any launch parameters as required, and then choose
Create launch template.
Create a launch template from
an instance
You can clone the parameters of an existing Amazon EC2 instance and then adjust the
parameters to create a launch template. For a description of each parameter, see
Reference for Amazon EC2 instance configuration parameters.
- Console
-
To create a launch template from an instance
Open the Amazon EC2 console at
https://console.aws.amazon.com/ec2/.
-
In the navigation pane, choose
Instances.
-
Select the instance, and choose Actions,
Image and templates, Create
template from instance.
-
Provide a name, description, and tags, and adjust the launch
parameters as required.
When you create a launch template from an instance, the
instance's network interface IDs and IP addresses are not
included in the template.
-
Choose Create launch template.
- AWS CLI
-
You can use the AWS CLI to create a launch template from an existing
instance by first getting the launch template data from an instance, and
then creating a launch template using the launch template data.
To get launch template data from an instance
-
Use the get-launch-template-data command and specify the
instance ID. You can use the output as a base to create a new
launch template or launch template version. By default, the
output includes a top-level LaunchTemplateData
object, which cannot be specified in your launch template data.
Use the --query option to exclude this
object.
aws ec2 get-launch-template-data \
    --instance-id i-0123d646e8048babc \
    --query "LaunchTemplateData"
The following is example output.
    {
        "Monitoring": {},
        "ImageId": "ami-8c1be5f6",
        "BlockDeviceMappings": [
            {
                "DeviceName": "/dev/xvda",
                "Ebs": {
                    "DeleteOnTermination": true
                }
            }
        ],
        "EbsOptimized": false,
        "Placement": {
            "Tenancy": "default",
            "GroupName": "",
            "AvailabilityZone": "us-east-1a"
        },
        "InstanceType": "t2.micro",
        "NetworkInterfaces": [
            {
                "Description": "",
                "NetworkInterfaceId": "eni-35306abc",
                "PrivateIpAddresses": [
                    {
                        "Primary": true,
                        "PrivateIpAddress": "10.0.0.72"
                    }
                ],
                "SubnetId": "subnet-7b16de0c",
                "Groups": [
                    "sg-7c227019"
                ],
                "Ipv6Addresses": [
                    {
                        "Ipv6Address": "2001:db8:1234:1a00::123"
                    }
                ],
                "PrivateIpAddress": "10.0.0.72"
            }
        ]
    }
You can write the output directly to a file, for
example:
aws ec2 get-launch-template-data \
    --instance-id i-0123d646e8048babc \
    --query "LaunchTemplateData" >> instance-data.json
To create a launch template using launch template data
Use a Systems Manager parameter
instead of an AMI ID
Instead of specifying an AMI ID in your launch templates, you can specify an
AWS Systems Manager parameter. If the AMI ID changes, you can update the AMI ID in one place
by updating the Systems Manager parameter in the Systems Manager Parameter Store. Parameters can also be
shared with other AWS accounts. You can centrally store and manage
AMI parameters in one account and share them with every other account that needs to
reference them. By using a Systems Manager parameter, all your launch templates can be updated
in a single action.
A Systems Manager parameter is a user-defined key-value pair that you create in the AWS Systems Manager Parameter Store. The Parameter Store provides a central place
to store your application configuration values.
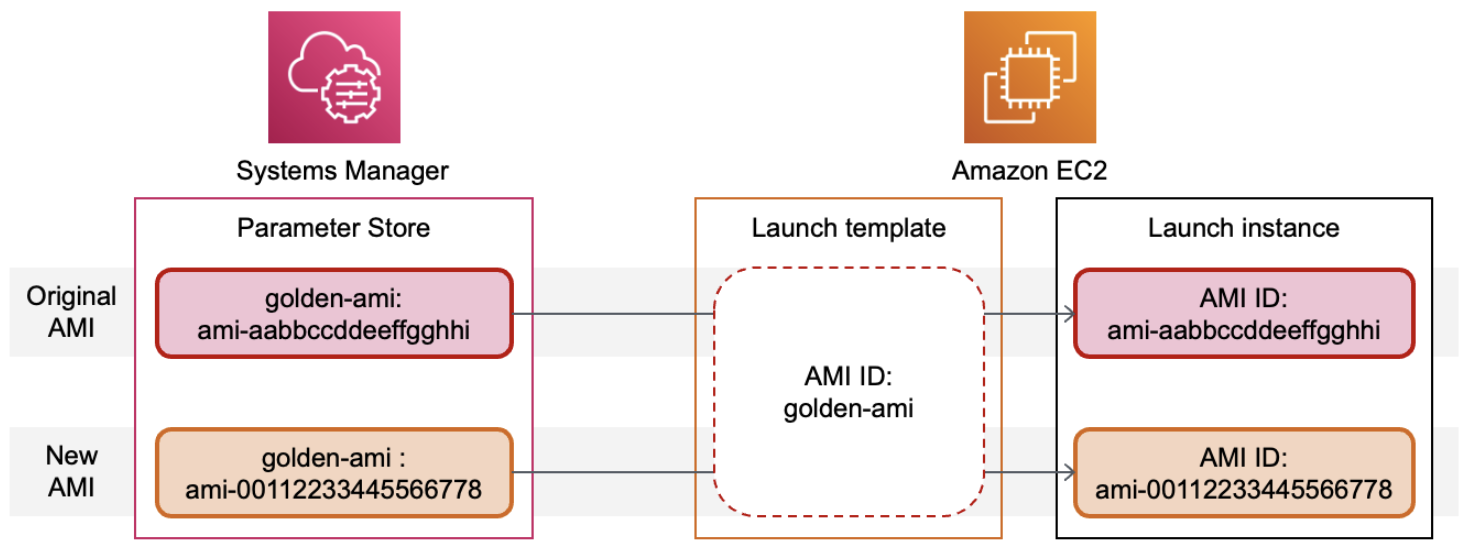
In the following diagram, the golden-ami parameter is first mapped to
the original AMI ami-aabbccddeeffgghhi in the Parameter Store. In the
launch template, the value for the AMI ID is golden-ami. When an
instance is launched using this launch template, the AMI ID resolves to
ami-aabbccddeeffgghhi. Later, the AMI is updated resulting in a new
AMI ID. In the Parameter Store, the golden-ami parameter is mapped to
the new ami-00112233445566778. The launch
template remains unchanged. When an instance is launched using this
launch template, the AMI ID resolves to the new
ami-00112233445566778.
Launch templates require that user-defined Systems Manager parameters adhere to the
following format when used in place of an AMI ID:
For more information about creating a valid parameter for an AMI ID, see
Creating Systems Manager parameters in the
AWS Systems Manager User Guide.
To use a Systems Manager parameter in place of an AMI ID in a launch template, you must
use one of the following formats when specifying the parameter in the launch
template:
To reference a public parameter:
To reference a parameter stored in the same account:
-
resolve:ssm:parameter-name
-
resolve:ssm:parameter-name:version-number
– The version number itself is a default label
-
resolve:ssm:parameter-name:label
To reference a parameter shared from another AWS account:
-
resolve:ssm:parameter-ARN
-
resolve:ssm:parameter-ARN:version-number
-
resolve:ssm:parameter-ARN:label
Parameter versions
Systems Manager parameters are versioned resources. When you update a parameter, you
create new, successive versions of the parameter. Systems Manager supports parameter labels that you can map to specific versions of a
parameter.
For example, the golden-ami parameter can have three versions:
1, 2, and 3. You can create a
parameter label beta that maps to version 2, and a
parameter label prod that maps to version 3.
In a launch template, you can specify version 3 of the golden-ami
parameter by using either of the following formats:
Specifying the version or label is optional. If a version or label is not
specified, the latest version of the parameter is used.
Specify a
Systems Manager parameter in a launch template
You can specify a Systems Manager parameter in a launch template instead of an AMI ID
when you create a launch template or a new version of a launch template.
- Console
-
To specify a Systems Manager parameter in a launch template
Open the Amazon EC2 console at
https://console.aws.amazon.com/ec2/.
-
In the navigation pane, choose Launch
Templates, and then choose Create
launch template.
-
For Launch template name, enter a
descriptive name for the launch template.
-
Under Application and OS Images (Amazon Machine
Image), choose Browse more
AMIs.
-
Choose the arrow button to the right of the search bar,
and then choose Specify custom value/Systems
Manager parameter.
-
In the Specify custom value or Systems Manager
parameter dialog box, do the
following:
-
For AMI ID or Systems Manager parameter
string, enter the Systems Manager parameter name
using one of the following formats:
To reference a public parameter:
To reference a parameter stored in the same
account:
-
resolve:ssm:parameter-name
-
resolve:ssm:parameter-name:version-number
-
resolve:ssm:parameter-name:label
To reference a parameter shared from another
AWS account:
-
resolve:ssm:parameter-ARN
-
resolve:ssm:parameter-ARN:version-number
-
resolve:ssm:parameter-ARN:label
-
Choose Save.
-
Specify any other launch template parameters as needed,
and then choose Create launch
template.
For more information, see Create a launch template
by specifying parameters.
- AWS CLI
-
To specify a Systems Manager parameter in a launch template
-
Use the create-launch-template command to create the
launch template. To specify the AMI to use, enter the Systems Manager
parameter name using one of the following formats:
To reference a public parameter:
To reference a parameter stored in the same
account:
-
resolve:ssm:parameter-name
-
resolve:ssm:parameter-name:version-number
-
resolve:ssm:parameter-name:label
To reference a parameter shared from another
AWS account:
-
resolve:ssm:parameter-ARN
-
resolve:ssm:parameter-ARN:version-number
-
resolve:ssm:parameter-ARN:label
The following example creates a launch template that
specifies the following:
-
A name for the launch template
(TemplateForWebServer
-
A tag for the launch template
(purposeproduction
-
The data for the instance configuration, specified
in a JSON file:
-
The AMI to use
(resolve:ssm:golden-ami)
-
The instance type to launch
(m5.4xlarge
-
A tag for the instance
(Namewebserver
aws ec2 create-launch-template \
    --launch-template-name TemplateForWebServer \
    --tag-specifications 'ResourceType=launch-template,Tags=[{Key=purpose,Value=production}]' \
    --launch-template-data file://template-data.json
The following is an example JSON file that contains the
launch template data for the instance configuration. The
value for ImageId is the Systems Manager parameter name,
entered in the required format
resolve:ssm:golden-ami.
{"LaunchTemplateData": {
    "ImageId": "resolve:ssm:golden-ami",
    "InstanceType": "m5.4xlarge",
    "TagSpecifications": [{
        "ResourceType": "instance",
        "Tags": [{
            "Key":"Name",
            "Value":"webserver"
        }]
    }]
  }
}
Verify that a launch template gets
the correct AMI ID
To resolve the Systems Manager parameter to the actual AMI ID
Use the describe-launch-template-versions command and include the
--resolve-alias parameter.
aws ec2 describe-launch-template-versions \
    --launch-template-name my-launch-template \
    --versions $Default \
    --resolve-alias
The response includes the AMI ID for ImageId. In this example,
when an instance is launched using this launch template, the AMI ID resolves to
ami-0ac394d6a3example.
{
    "LaunchTemplateVersions": [
        {
            "LaunchTemplateId": "lt-089c023a30example",
            "LaunchTemplateName": "my-launch-template",
            "VersionNumber": 1,
            "CreateTime": "2022-12-28T19:52:27.000Z",
            "CreatedBy": "arn:aws:iam::123456789012:user/Bob",
            "DefaultVersion": true,
            "LaunchTemplateData": {
                "ImageId": "ami-0ac394d6a3example",
                "InstanceType": "t3.micro",
            }
        }
    ]
}
For more information about working with Systems Manager parameters, see the following
reference materials in the Systems Manager documentation.
Limitations
-
Only EC2 Fleets of type instant support using a launch
template that has a Systems Manager parameter specified in place of an
AMI ID.
-
EC2 Fleets of type maintain and request, and
Spot Fleets do not support using a launch template that has a Systems Manager parameter
specified in place of an AMI ID. For EC2 Fleets of type maintain
and request, and for Spot Fleets, if you specify an AMI in the
launch template, you must specify the AMI ID.
-
If you use attribute-based instance selection in your EC2 Fleet, you can't
specify a Systems Manager parameter in place of an AMI ID. When using
attribute-based instance selection, you must specify the AMI ID.
-
Amazon EC2 Auto Scaling provides other restrictions. For more information, see Use AWS Systems Manager parameters instead of AMI IDs in launch
templates in the Amazon EC2 Auto Scaling User Guide.