Tag your Amazon EC2 resources
To help you manage your instances, images, and other Amazon EC2 resources, you can assign your own metadata to each resource in the form of tags. Tags enable you to categorize your AWS resources in different ways, for example, by purpose, owner, or environment. This is useful when you have many resources of the same type—you can quickly identify a specific resource based on the tags that you've assigned to it. This topic describes tags and shows you how to create them.
Warning
Tag keys and their values are returned by many different API calls. Denying access to
DescribeTags
doesn’t automatically deny access to tags returned by
other APIs. As a best practice, we recommend that you do not include sensitive data in
your tags.
Contents
Tag basics
A tag is a label that you assign to an AWS resource. Each tag consists of a key and an optional value, both of which you define.
Tags enable you to categorize your AWS resources in different ways, for example, by purpose, owner, or environment. For example, you could define a set of tags for your account's Amazon EC2 instances that helps you track each instance's owner and stack level.
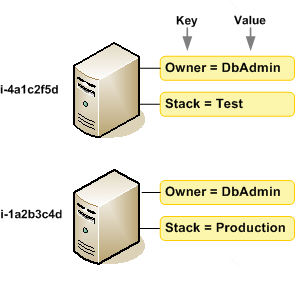
The following diagram illustrates how tagging works. In this example, you've assigned two
tags to each of your instances—one tag with the key Owner
and
another with the key Stack
. Each tag also has an associated value.

We recommend that you devise a set of tag keys that meets your needs for each resource type. Using a consistent set of tag keys makes it easier for you to manage your resources. You can search and filter the resources based on the tags you add. For more information about how to implement an effective resource tagging strategy, see the Tagging Best Practices AWS Whitepaper.
Tags don't have any semantic meaning to Amazon EC2 and are interpreted strictly as a string of characters. Also, tags are not automatically assigned to your resources. You can edit tag keys and values, and you can remove tags from a resource at any time. You can set the value of a tag to an empty string, but you can't set the value of a tag to null. If you add a tag that has the same key as an existing tag on that resource, the new value overwrites the old value. If you delete a resource, any tags for the resource are also deleted.
Note
After you delete a resource, its tags might remain visible in the console, API, and CLI output for a short period. These tags will be gradually disassociated from the resource and be permanently deleted.
Tag your resources
You can tag most Amazon EC2 resources that already exist in your account. The following table lists the resources that support tagging.
If you're using the Amazon EC2 console, you can apply tags to resources by using the
Tags tab on the relevant resource screen, or you can use the
Tags Editor in the AWS Resource Groups console. Some resource screens
enable you to specify tags for a resource when you create the resource; for example, a
tag with a key of Name
and a value that you specify. In most cases, the
console applies the tags immediately after the resource is created (rather than during
resource creation). The console might organize resources according to the
Name
tag, but this tag doesn't have any semantic meaning to the Amazon EC2
service.
If you're using the Amazon EC2 API, the AWS CLI, or an AWS SDK, you can use the
CreateTags
EC2 API action to apply tags to existing resources.
Additionally, some resource-creating actions enable you to specify tags for a resource
when the resource is created. If tags cannot be applied during resource creation, we
roll back the resource creation process. This ensures that resources are either created
with tags or not created at all, and that no resources are left untagged at any time. By
tagging resources at the time of creation, you can eliminate the need to run custom
tagging scripts after resource creation. For more information about enabling users to tag
resources on creation, see Grant permission to tag resources
during creation.
The following table describes the Amazon EC2 resources that can be tagged, and the resources that can be tagged on creation using the Amazon EC2 API, the AWS CLI, or an AWS SDK.
Tagging support for Amazon EC2 resources | |||||||||||||||||||||||||||||||||||||||||||||||||||||||||||||||||||||||||||||||||||||||||||||||||||
---|---|---|---|---|---|---|---|---|---|---|---|---|---|---|---|---|---|---|---|---|---|---|---|---|---|---|---|---|---|---|---|---|---|---|---|---|---|---|---|---|---|---|---|---|---|---|---|---|---|---|---|---|---|---|---|---|---|---|---|---|---|---|---|---|---|---|---|---|---|---|---|---|---|---|---|---|---|---|---|---|---|---|---|---|---|---|---|---|---|---|---|---|---|---|---|---|---|---|---|
Resource | Supports tags | Supports tagging on creation | |||||||||||||||||||||||||||||||||||||||||||||||||||||||||||||||||||||||||||||||||||||||||||||||||
AFI |
Yes |
Yes |
|||||||||||||||||||||||||||||||||||||||||||||||||||||||||||||||||||||||||||||||||||||||||||||||||
AMI |
Yes |
Yes |
|||||||||||||||||||||||||||||||||||||||||||||||||||||||||||||||||||||||||||||||||||||||||||||||||
Bundle task |
No |
No | |||||||||||||||||||||||||||||||||||||||||||||||||||||||||||||||||||||||||||||||||||||||||||||||||
Capacity Reservation |
Yes |
Yes |
|||||||||||||||||||||||||||||||||||||||||||||||||||||||||||||||||||||||||||||||||||||||||||||||||
Carrier gateway | Yes | Yes | |||||||||||||||||||||||||||||||||||||||||||||||||||||||||||||||||||||||||||||||||||||||||||||||||
Client VPN endpoint |
Yes |
Yes |
|||||||||||||||||||||||||||||||||||||||||||||||||||||||||||||||||||||||||||||||||||||||||||||||||
Client VPN route |
No |
No |
|||||||||||||||||||||||||||||||||||||||||||||||||||||||||||||||||||||||||||||||||||||||||||||||||
Customer gateway |
Yes |
Yes | |||||||||||||||||||||||||||||||||||||||||||||||||||||||||||||||||||||||||||||||||||||||||||||||||
Dedicated Host |
Yes |
Yes |
|||||||||||||||||||||||||||||||||||||||||||||||||||||||||||||||||||||||||||||||||||||||||||||||||
Dedicated Host Reservation |
Yes |
Yes | |||||||||||||||||||||||||||||||||||||||||||||||||||||||||||||||||||||||||||||||||||||||||||||||||
DHCP options |
Yes |
Yes | |||||||||||||||||||||||||||||||||||||||||||||||||||||||||||||||||||||||||||||||||||||||||||||||||
EBS snapshot |
Yes |
Yes | |||||||||||||||||||||||||||||||||||||||||||||||||||||||||||||||||||||||||||||||||||||||||||||||||
EBS volume |
Yes |
Yes | |||||||||||||||||||||||||||||||||||||||||||||||||||||||||||||||||||||||||||||||||||||||||||||||||
EC2 Fleet |
Yes |
Yes |
|||||||||||||||||||||||||||||||||||||||||||||||||||||||||||||||||||||||||||||||||||||||||||||||||
Egress-only internet gateway |
Yes |
Yes | |||||||||||||||||||||||||||||||||||||||||||||||||||||||||||||||||||||||||||||||||||||||||||||||||
Elastic IP address |
Yes |
Yes | |||||||||||||||||||||||||||||||||||||||||||||||||||||||||||||||||||||||||||||||||||||||||||||||||
Elastic Graphics accelerator |
Yes |
No | |||||||||||||||||||||||||||||||||||||||||||||||||||||||||||||||||||||||||||||||||||||||||||||||||
Instance | Yes | Yes | |||||||||||||||||||||||||||||||||||||||||||||||||||||||||||||||||||||||||||||||||||||||||||||||||
Instance event window | Yes | Yes | |||||||||||||||||||||||||||||||||||||||||||||||||||||||||||||||||||||||||||||||||||||||||||||||||
Instance store volume |
N/A |
N/A | |||||||||||||||||||||||||||||||||||||||||||||||||||||||||||||||||||||||||||||||||||||||||||||||||
Internet gateway |
Yes |
Yes | |||||||||||||||||||||||||||||||||||||||||||||||||||||||||||||||||||||||||||||||||||||||||||||||||
IP address pool (BYOIP) |
Yes |
Yes |
|||||||||||||||||||||||||||||||||||||||||||||||||||||||||||||||||||||||||||||||||||||||||||||||||
Key pair |
Yes |
Yes | |||||||||||||||||||||||||||||||||||||||||||||||||||||||||||||||||||||||||||||||||||||||||||||||||
Launch template |
Yes |
Yes |
|||||||||||||||||||||||||||||||||||||||||||||||||||||||||||||||||||||||||||||||||||||||||||||||||
Launch template version |
No |
No |
|||||||||||||||||||||||||||||||||||||||||||||||||||||||||||||||||||||||||||||||||||||||||||||||||
Local gateway |
Yes |
No |
|||||||||||||||||||||||||||||||||||||||||||||||||||||||||||||||||||||||||||||||||||||||||||||||||
Local gateway route table |
Yes |
No |
|||||||||||||||||||||||||||||||||||||||||||||||||||||||||||||||||||||||||||||||||||||||||||||||||
Local gateway virtual interface |
Yes |
No |
|||||||||||||||||||||||||||||||||||||||||||||||||||||||||||||||||||||||||||||||||||||||||||||||||
Local gateway virtual interface group |
Yes |
No |
|||||||||||||||||||||||||||||||||||||||||||||||||||||||||||||||||||||||||||||||||||||||||||||||||
Local gateway route table VPC association |
Yes |
Yes |
|||||||||||||||||||||||||||||||||||||||||||||||||||||||||||||||||||||||||||||||||||||||||||||||||
Local gateway route table virtual interface group association |
Yes |
No |
|||||||||||||||||||||||||||||||||||||||||||||||||||||||||||||||||||||||||||||||||||||||||||||||||
NAT gateway |
Yes |
Yes | |||||||||||||||||||||||||||||||||||||||||||||||||||||||||||||||||||||||||||||||||||||||||||||||||
Network ACL |
Yes |
Yes | |||||||||||||||||||||||||||||||||||||||||||||||||||||||||||||||||||||||||||||||||||||||||||||||||
Network interface |
Yes |
Yes | |||||||||||||||||||||||||||||||||||||||||||||||||||||||||||||||||||||||||||||||||||||||||||||||||
Placement group |
Yes |
Yes | |||||||||||||||||||||||||||||||||||||||||||||||||||||||||||||||||||||||||||||||||||||||||||||||||
Prefix list |
Yes |
Yes |
|||||||||||||||||||||||||||||||||||||||||||||||||||||||||||||||||||||||||||||||||||||||||||||||||
Reserved Instance |
Yes |
No | |||||||||||||||||||||||||||||||||||||||||||||||||||||||||||||||||||||||||||||||||||||||||||||||||
Reserved Instance listing |
No |
No | |||||||||||||||||||||||||||||||||||||||||||||||||||||||||||||||||||||||||||||||||||||||||||||||||
Route table |
Yes |
Yes | |||||||||||||||||||||||||||||||||||||||||||||||||||||||||||||||||||||||||||||||||||||||||||||||||
Spot Fleet request |
Yes |
Yes | |||||||||||||||||||||||||||||||||||||||||||||||||||||||||||||||||||||||||||||||||||||||||||||||||
Spot Instance request |
Yes |
Yes | |||||||||||||||||||||||||||||||||||||||||||||||||||||||||||||||||||||||||||||||||||||||||||||||||
Security group | Yes | Yes | |||||||||||||||||||||||||||||||||||||||||||||||||||||||||||||||||||||||||||||||||||||||||||||||||
Security group rule | Yes | No | |||||||||||||||||||||||||||||||||||||||||||||||||||||||||||||||||||||||||||||||||||||||||||||||||
Subnet | Yes | Yes | |||||||||||||||||||||||||||||||||||||||||||||||||||||||||||||||||||||||||||||||||||||||||||||||||
Traffic Mirror filter | Yes | Yes | |||||||||||||||||||||||||||||||||||||||||||||||||||||||||||||||||||||||||||||||||||||||||||||||||
Traffic Mirror session | Yes | Yes | |||||||||||||||||||||||||||||||||||||||||||||||||||||||||||||||||||||||||||||||||||||||||||||||||
Traffic Mirror target | Yes | Yes | |||||||||||||||||||||||||||||||||||||||||||||||||||||||||||||||||||||||||||||||||||||||||||||||||
Transit gateway |
Yes |
Yes |
|||||||||||||||||||||||||||||||||||||||||||||||||||||||||||||||||||||||||||||||||||||||||||||||||
Transit gateway multicast domain |
Yes |
Yes |
|||||||||||||||||||||||||||||||||||||||||||||||||||||||||||||||||||||||||||||||||||||||||||||||||
Transit gateway route table |
Yes |
Yes |
|||||||||||||||||||||||||||||||||||||||||||||||||||||||||||||||||||||||||||||||||||||||||||||||||
Transit gateway VPC attachment |
Yes |
Yes |
|||||||||||||||||||||||||||||||||||||||||||||||||||||||||||||||||||||||||||||||||||||||||||||||||
Virtual private gateway |
Yes |
Yes |
|||||||||||||||||||||||||||||||||||||||||||||||||||||||||||||||||||||||||||||||||||||||||||||||||
VPC |
Yes |
Yes |
|||||||||||||||||||||||||||||||||||||||||||||||||||||||||||||||||||||||||||||||||||||||||||||||||
VPC endpoint |
Yes |
Yes |
|||||||||||||||||||||||||||||||||||||||||||||||||||||||||||||||||||||||||||||||||||||||||||||||||
VPC endpoint service |
Yes |
Yes |
|||||||||||||||||||||||||||||||||||||||||||||||||||||||||||||||||||||||||||||||||||||||||||||||||
VPC endpoint service configuration |
Yes |
Yes |
|||||||||||||||||||||||||||||||||||||||||||||||||||||||||||||||||||||||||||||||||||||||||||||||||
VPC flow log |
Yes |
Yes |
|||||||||||||||||||||||||||||||||||||||||||||||||||||||||||||||||||||||||||||||||||||||||||||||||
VPC peering connection |
Yes |
Yes |
|||||||||||||||||||||||||||||||||||||||||||||||||||||||||||||||||||||||||||||||||||||||||||||||||
VPN connection |
Yes |
Yes |
You can tag instances, volumes, elastic graphics, network interfaces, and Spot Instance requests on creation using the Amazon EC2 launch instance wizard in the Amazon EC2 console. You can tag your EBS volumes on creation using the Volumes screen, or EBS snapshots using the Snapshots screen. Alternatively, use the resource-creating Amazon EC2 APIs (for example, RunInstances) to apply tags when creating your resource.
You can apply tag-based resource-level permissions in your IAM policies to the Amazon EC2 API actions that support tagging on creation to implement granular control over the users and groups that can tag resources on creation. Your resources are properly secured from creation—tags are applied immediately to your resources, therefore any tag-based resource-level permissions controlling the use of resources are immediately effective. Your resources can be tracked and reported on more accurately. You can enforce the use of tagging on new resources, and control which tag keys and values are set on your resources.
You can also apply resource-level permissions to the CreateTags
and
DeleteTags
Amazon EC2 API actions in your IAM policies to control which
tag keys and values are set on your existing resources. For more information, see Example: Tag resources.
For more information about tagging your resources for billing, see Using cost allocation tags in the AWS Billing User Guide.
Tag restrictions
The following basic restrictions apply to tags:
-
Maximum number of tags per resource – 50
-
For each resource, each tag key must be unique, and each tag key can have only one value.
-
Maximum key length – 128 Unicode characters in UTF-8
-
Maximum value length – 256 Unicode characters in UTF-8
-
Allowed characters
-
Although EC2 allows for any character in its tags, other AWS services are more restrictive. The allowed characters across all AWS services are: letters (
a-z
,A-Z
), numbers (0-9
), and spaces representable in UTF-8, and the following characters:+ - = . _ : / @
. -
If you enable instance tags in instance metadata, instance tag keys can only use letters (
a-z
,A-Z
), numbers (0-9
), and the following characters:+ - = . , _ : @
. Instance tag keys can't contain spaces or/
, and can't comprise only.
(one period),..
(two periods), or_index
. For more information, see Work with instance tags in instance metadata.
-
-
Tag keys and values are case-sensitive.
-
The
aws:
prefix is reserved for AWS use. If a tag has a tag key with this prefix, then you can't edit or delete the tag's key or value. Tags with theaws:
prefix do not count against your tags per resource limit.
You can't terminate, stop, or delete a resource based solely on its tags; you must specify
the resource identifier. For example, to delete snapshots that you tagged with a tag key
called DeleteMe
, you must use the DeleteSnapshots
action with
the resource identifiers of the snapshots, such as snap-1234567890abcdef0
.
When you tag public or shared resources, the tags you assign are available only to your AWS account; no other AWS account will have access to those tags. For tag-based access control to shared resources, each AWS account must assign its own set of tags to control access to the resource.
You can't tag all resources. For more information, see Tagging support for Amazon EC2 resources.
Tags and access management
If you're using AWS Identity and Access Management (IAM), you can control which users in your AWS account have permission to create, edit, or delete tags. For more information, see Grant permission to tag resources during creation.
You can also use resource tags to implement attribute-based control (ABAC). You can create IAM policies that allow operations based on the tags for the resource. For more information, see Control access to EC2 resources using resource tags.
Tag your resources for billing
You can use tags to organize your AWS bill to reflect your own cost structure. To do this, sign up to get your AWS account bill with tag key values included. For more information about setting up a cost allocation report with tags, see Monthly cost allocation report in the AWS Billing User Guide. To see the cost of your combined resources, you can organize your billing information based on resources that have the same tag key values. For example, you can tag several resources with a specific application name, and then organize your billing information to see the total cost of that application across several services. For more information, see Using cost allocation tags in the AWS Billing User Guide.
Note
If you've just enabled reporting, data for the current month is available for viewing after 24 hours.
Cost allocation tags can indicate which resources are contributing to costs, but deleting or deactivating resources doesn't always reduce costs. For example, snapshot data that is referenced by another snapshot is preserved, even if the snapshot that contains the original data is deleted. For more information, see Amazon Elastic Block Store volumes and snapshots in the AWS Billing User Guide.
Note
Elastic IP addresses that are tagged do not appear on your cost allocation report.
Work with tags using the console
You can use the Amazon EC2 console to display the tags of an individual resource, and to apply or remove tags from one resource at a time.
You can use the Tag Editor in the AWS Resource Groups console to display the tags of all of your Amazon EC2 resources across all Regions. You can view tags by resource and by resource type, and you can see which resource types are associated with a specified tag. You can apply or remove tags from multiple resources and multiple resource types at a time. The Tag Editor provides a central, unified way to create and manage your tags. For more information, see the Tagging AWS Resources User Guide.
Tasks
Display tags
You can display the tags of an individual resource in the Amazon EC2 console. To display the tags of all your resources, use the Tag Editor in the AWS Resource Groups console.
Display tags of an individual resource
When you select a resource-specific page in the Amazon EC2 console, it displays a list of those resources. For example, if you select Instances from the navigation pane, the console displays your Amazon EC2 instances. When you select a resource from one of these lists (for example, an instance), if the resource supports tags, you can view and manage its tags. On most resource pages, you can view the tags by choosing the Tags tab.
You can add a column to the resource list to display all values for tags with the same key. You can use this column to sort and filter the resource list by the tag.
Display tags for multiple resources
You can display tags across multiple resources by using the Tag
Editor in the AWS Resource Groups console
Add and delete tags on an individual resource
You can manage tags for an individual resource directly from the resource's page.
To add a tag to an individual resource
Open the Amazon EC2 console at https://console.aws.amazon.com/ec2/
. -
From the navigation bar, select the Region where the resource to tag is located. For more information, see Resource locations.
-
In the navigation pane, select a resource type (for example, Instances).
-
Select the resource from the resource list and choose the Tags tab.
-
Choose Manage tags, and then choose Add new tag. Enter the key and value for the tag. Choose Add new tag again for each additional tag to add. When you are finished adding tags, choose Save.
To delete a tag from an individual resource
Open the Amazon EC2 console at https://console.aws.amazon.com/ec2/
. -
From the navigation bar, select the Region where the resource to untag is located. For more information, see Resource locations.
-
In the navigation pane, choose a resource type (for example, Instances).
-
Select the resource from the resource list and choose the Tags tab.
-
Choose Manage tags. For each tag to remove, choose Remove. When you are finished removing tags, choose Save.
Add and delete tags for multiple resources
To add a tag to multiple resources
-
Open the Tag Editor in the AWS Resource Groups console at https://console.aws.amazon.com/resource-groups/tag-editor
. -
For Regions, select one or more Regions where the resources to tag are located.
-
For Resource types, select the type of resources to tag (for example, AWS::EC2::Instance).
-
Choose Search resources.
-
Under Resource search results, select the check box next to each resource to tag.
-
Choose Manage tags of selected resources.
-
Under Edit tags of all selected resources, choose Add tag, and then enter the new tag key and value. Choose Add tag again for each additional tag to add.
Note
If you add a new tag with the same tag key as an existing tag, the new tag overwrites the existing tag.
-
Choose Review and apply tag changes.
-
Choose Apply changes to all selected.
To remove a tag from multiple resources
-
Open the Tag Editor in the AWS Resource Groups console at https://console.aws.amazon.com/resource-groups/tag-editor
. -
For Regions, select the Regions where the resources to untag are located.
-
For Resource types, select the type of resources to untag (for example, AWS::EC2::Instance).
-
Choose Search resources.
-
Under Resource search results, select the check box next to each resource to untag.
-
Choose Manage tags of selected resources.
-
Under Edit tags of all selected resources, next to the tag to remove, choose Remove tag.
-
Choose Review and apply tag changes.
-
Choose Apply changes to all selected.
Add a tag when you launch an instance
Filter a list of resources by tag
You can filter your list of resources based on one or more tag keys and tag values.
To filter a list of resources by tag in the Amazon EC2 console
-
Open the Amazon EC2 console at https://console.aws.amazon.com/ec2/
. -
In the navigation pane, select a resource type (for example, Instances).
-
Choose the search field.
-
In the list, under Tags, choose the tag key.
-
Choose the corresponding tag value from the list.
-
When you are finished, remove the filter.
For more information about using filters in the Amazon EC2 console, see List and filter your resources.
To filter multiple resources across multiple Regions by tag using the Tag Editor
You can use the Tag Editor in the AWS Resource Groups console to filter multiple resources across multiple Regions by tag. For more information, see Finding resources to tag in the Tagging AWS Resources User Guide.
Work with tags using the command line
You can add tags to many EC2 resources when you create them, using the tag specifications parameter for the create command. You can view the tags for a resource using the describe command for the resource. You can also add, update, or delete tags for your existing resources using the following commands.
Task | AWS CLI | AWS Tools for Windows PowerShell |
---|---|---|
Add or overwrite one or more tags |
||
Delete one or more tags |
||
Describe one or more tags |
Add tags on resource creation
The following examples demonstrate how to apply tags when you create resources.
Note
The way you enter JSON-formatted parameters on the command line differs depending on your operating system.
-
Linux, macOS, or Unix and Windows PowerShell – Use single quotes (') to enclose the JSON data structure.
-
Windows – Omit the single quotes when using the commands with the Windows command line.
For more information, see Specifying parameter values for the AWS CLI.
Example: Launch an instance and apply tags to the instance and volume
The following run-instances
command launches an instance and applies a tag with the key webserver
and the value production
to the instance. The command also applies
a tag with the key cost-center
and the value cc123
to any EBS volume that's created (in this case, the root volume).
aws ec2 run-instances \ --image-id ami-abc12345 \ --count 1 \ --instance-type t2.micro \ --key-name MyKeyPair \ --subnet-id subnet-6e7f829e \ --tag-specifications 'ResourceType=
instance
,Tags=[{Key=webserver
,Value=production
}]' 'ResourceType=volume
,Tags=[{Key=cost-center
,Value=cc123
}]'
You can apply the same tag keys and values to both instances and volumes during
launch. The following command launches an instance and applies a tag with a key of
cost-center
and a value of cc123
to
both the instance and any EBS volume that's created.
aws ec2 run-instances \ --image-id ami-abc12345 \ --count 1 \ --instance-type t2.micro \ --key-name MyKeyPair \ --subnet-id subnet-6e7f829e \ --tag-specifications 'ResourceType=
instance
,Tags=[{Key=cost-center,Value=cc123}]' 'ResourceType=volume,Tags=[{Key=cost-center,Value=cc123}]'
Example: Create a volume and apply a tag
The following create-volume
command creates a volume and applies two tags: purpose=production
and cost-center=cc123
.
aws ec2 create-volume \ --availability-zone us-east-1a \ --volume-type gp2 \ --size 80 \ --tag-specifications 'ResourceType=
volume
,Tags=[{Key=purpose
,Value=production
},{Key=cost-center
,Value=cc123
}]'
Add tags to an existing resource
The following examples demonstrate how to add tags to an existing resource using the create-tags command.
Example: Add a tag to a resource
The following command adds the tag Stack=production
to the specified
image, or overwrites an existing tag for the AMI where the tag key is Stack
.
If the command succeeds, no output is returned.
aws ec2 create-tags \ --resources ami-78a54011 \ --tags Key=
Stack
,Value=production
Example: Add tags to multiple resources
This example adds (or overwrites) two tags for an AMI and an instance. One of the tags
contains just a key (webserver
), with no value (we set the value to
an empty string). The other tag consists of a key (stack
) and value
(Production
). If the command succeeds, no output is returned.
aws ec2 create-tags \ --resources ami-1a2b3c4d i-1234567890abcdef0 \ --tags Key=
webserver
,Value= Key=stack
,Value=Production
Example: Add tags with special characters
This example adds the tag [Group]=test
to an instance. The square
brackets ([
and ]
) are special characters,
which must be escaped.
If you are using Linux or OS X, to escape the special characters, enclose the
element with the special character with double quotes ("
), and then enclose
the entire key and value structure with single quotes ('
).
aws ec2 create-tags \ --resources i-1234567890abcdef0 \ --tags 'Key="
[Group]
",Value=test
'
If you are using Windows, to escape the special characters, enclose the element
that has special characters with double quotes ("), and then precede each double quote
character with a backslash (\
) as follows:
aws ec2 create-tags ^ --resources i-1234567890abcdef0 ^ --tags Key=\"
[Group]
\",Value=test
If you are using Windows PowerShell, to escape the special characters, enclose the value
that has special characters with double quotes ("
), precede each double
quote character with a backslash (\
), and then enclose the entire key and
value structure with single quotes ('
) as follows:
aws ec2 create-tags ` --resources i-1234567890abcdef0 ` --tags 'Key=\"
[Group]
\",Value=test
'
Describe tagged resources
The following examples show you how to use filters with the describe-instances to view instances with specific tags. All EC2 describe commands use this syntax to filter by tag across a single resource type. Alternatively, you can use the describe-tags command to filter by tag across EC2 resource types.
Example: Describe instances with the specified tag key
The following command describes the instances with a Stack
tag, regardless of
the value of the tag.
aws ec2 describe-instances \ --filters Name=tag-key,Values=
Stack
Example: Describe instances with the specified tag
The following command describes the instances with the tag
Stack=production
.
aws ec2 describe-instances \ --filters Name=tag:
Stack
,Values=production
Example: Describe instances with the specified tag value
The following command describes the instances with a tag with the value
production
, regardless of the tag key.
aws ec2 describe-instances \ --filters Name=tag-value,Values=
production
Example: Describe all EC2 resources with the specified tag
The following command describes all EC2 resources with the tag
Stack=Test
.
aws ec2 describe-tags \ --filters Name=key,Values=
Stack
Name=value,Values=Test
Work with instance tags in instance metadata
You can access an instance's tags from the instance metadata. By accessing tags from the
instance metadata, you no longer need to use the DescribeInstances
or
DescribeTags
API calls to retrieve tag information, which reduces your
API transactions per second, and lets your tag retrievals scale with the number of
instances that you control. Furthermore, local processes that are running on an instance
can view the instance's tag information directly from the instance metadata.
By default, tags are not available from the instance metadata; you must explicitly allow access. You can allow access at instance launch, or after launch on a running or stopped instance. You can also allow access to tags by specifying this in a launch template. Instances that are launched by using the template allow access to tags in the instance metadata.
If you add or remove an instance tag, the instance metadata is updated while the instance is running, without needing to stop and then start the instance.
Topics
Allow access to tags in instance metadata
By default, there is no access to instance tags in the instance metadata. For each instance, you must explicitly allow access by using one of the following methods.
To allow access to tags in instance metadata using the console
-
Open the Amazon EC2 console at https://console.aws.amazon.com/ec2/
. -
In the navigation pane, choose Instances.
-
Select an instance, and then choose Actions, Instance settings, Allow tags in instance metadata.
-
To allow access to tags in instance metadata, select the Allow check box.
-
Choose Save.
To allow access to tags in instance metadata at launch using the AWS CLI
Use the run-instances command and set InstanceMetadataTags
to
enabled
.
aws ec2 run-instances \ --image-id
ami-0abcdef1234567890
\ --instance-typec3.large
\ ... --metadata-options "InstanceMetadataTags=enabled"
To allow access to tags in instance metadata on a running or stopped instance using the AWS CLI
Use the modify-instance-metadata-options command and set
--instance-metadata-tags
to enabled
.
aws ec2 modify-instance-metadata-options \ --instance-id
i-123456789example
\ --instance-metadata-tags enabled
Turn off access to tags in instance metadata
To turn off access to instance tags in the instance metadata, use one of the following methods. You don't need to turn off access to instance tags on instance metadata at launch because it's turned off by default.
To turn off access to tags in instance metadata using the console
-
Open the Amazon EC2 console at https://console.aws.amazon.com/ec2/
. -
In the navigation pane, choose Instances.
-
Select an instance, and then choose Actions, Instance settings, Allow tags in instance metadata.
-
To turn off access to tags in instance metadata, clear the Allow check box.
-
Choose Save.
To turn off access to tags in instance metadata using the AWS CLI
Use the modify-instance-metadata-options command and set
--instance-metadata-tags
to disabled
.
aws ec2 modify-instance-metadata-options \ --instance-id
i-123456789example
\ --instance-metadata-tags disabled
View if access to tags in instance metadata is allowed
For each instance, you can use the Amazon EC2 console or AWS CLI to view whether access to instance tags from the instance metadata is allowed.
To view if access to tags in instance metadata is allowed using the console
Open the Amazon EC2 console at https://console.aws.amazon.com/ec2/
. -
In the navigation pane, choose Instances, and then select an instance.
-
On the Details tab, check the Allow tags in instance metadata field. If the value is Enabled, tags in instance metadata is allowed. If the value is Disabled, tags in instance metadata is not allowed.
To view if access to tags in instance metadata is allowed using the AWS CLI
Use the describe-instances command and specify the instance ID.
aws ec2 describe-instances \ --instance-ids
i-1234567890abcdef0
The following example output is truncated for space. The
"InstanceMetadataTags"
parameter indicates whether tags in instance
metadata is allowed. If the value is enabled
, tags in instance metadata
is allowed. If the value is disabled
, tags in instance metadata is not
allowed.
{
"Reservations": [
{
"Groups": [],
"Instances": [
{
"AmiLaunchIndex": 0,
"ImageId": "ami-0abcdef1234567890",
"InstanceId": "i-1234567890abcdef0",
...
"MetadataOptions": {
"State": "applied",
"HttpTokens": "optional",
"HttpPutResponseHopLimit": 1,
"HttpEndpoint": "enabled",
"HttpProtocolIpv6": "disabled",
"InstanceMetadataTags": "enabled"
},
...
Retrieve tags from instance metadata
If instance tags are allowed in the instance metadata, the tags/instance
category is accessible from the instance metadata. For examples on how to retrieve
tags from the instance metadata, see Get the instance tags for an
instance.
Add tags to a resource using CloudFormation
With Amazon EC2 resource types, you specify tags using either a Tags
or
TagSpecifications
property.
The following examples add the tag Stack=Production
to AWS::EC2::Instance using its Tags
property.
Example: Tags in YAML
Tags: - Key: "Stack" Value: "Production"
Example: Tags in JSON
"Tags": [ { "Key": "Stack", "Value": "Production" } ]
The following examples add the tag Stack=Production
to AWS::EC2::LaunchTemplate LaunchTemplateData using its TagSpecifications
property.
Example: TagSpecifications in YAML
TagSpecifications: - ResourceType: "instance" Tags: - Key: "Stack" Value: "Production"
Example: TagSpecifications in JSON
"TagSpecifications": [ { "ResourceType": "instance", "Tags": [ { "Key": "Stack", "Value": "Production" } ] } ]