Launch an instance from a launch template
You can create a launch template that contains the configuration information to launch an instance. You can use launch templates to store launch parameters so that you do not have to specify them every time you launch an instance. For example, a launch template can contain the AMI ID, instance type, and network settings that you typically use to launch instances. When you launch an instance using the Amazon EC2 console, an AWS SDK, or a command line tool, you can specify the launch template to use.
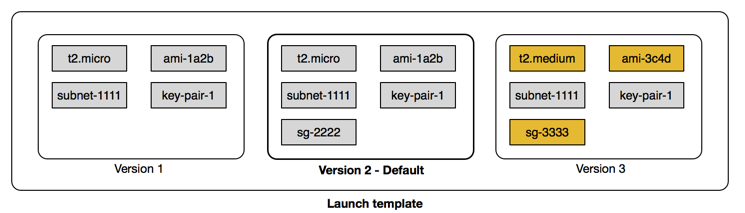
For each launch template, you can create one or more numbered launch template versions. Each version can have different launch parameters. When you launch an instance from a launch template, you can use any version of the launch template. If you do not specify a version, the default version is used. You can set any version of the launch template as the default version—by default, it's the first version of the launch template.
The following diagram shows a launch template with three versions. The first version specifies the instance type, AMI ID, subnet, and key pair to use to launch the instance. The second version is based on the first version and also specifies a security group for the instance. The third version uses different values for some of the parameters. Version 2 is set as the default version. If you launched an instance from this launch template, the launch parameters from version 2 would be used if no other version were specified.

Contents
- Launch template restrictions
- Use launch templates to control launch parameters
- Control the use of launch templates
- Create a launch template
- Modify a launch template (manage launch template versions)
- Launch an instance from a launch template
- Use launch templates with Amazon EC2 Auto Scaling
- Use launch templates with EC2 Fleet
- Use launch templates with Spot Fleet
- Delete a launch template
Launch template restrictions
The following rules apply to launch templates and launch template versions:
-
You are limited to creating 5,000 launch templates per Region and 10,000 versions per launch template.
-
Launch template parameters are optional. However, you must ensure that your request to launch an instance includes all the required parameters. For example, if your launch template does not include an AMI ID, you must specify both the launch template and an AMI ID when you launch an instance.
-
Launch template parameters are not fully validated when you create the launch template. If you specify incorrect values for parameters, or if you do not use supported parameter combinations, no instances can launch using this launch template. Ensure that you specify the correct values for the parameters and that you use supported parameter combinations. For example, to launch an instance in a placement group, you must specify a supported instance type.
-
You can tag a launch template, but you cannot tag a launch template version.
-
Launch templates are immutable. To modify a launch template, you must create a new version of the launch template.
-
Launch template versions are numbered in the order in which they are created. When you create a launch template version, you cannot specify the version number yourself.
Use launch templates to control launch parameters
A launch template can contain all or some of the parameters to launch an instance. When you launch an instance using a launch template, you can override parameters that are specified in the launch template. Or, you can specify additional parameters that are not in the launch template.
You cannot remove launch template parameters during launch (for example, you cannot specify a null value for the parameter). To remove a parameter, create a new version of the launch template without the parameter and use that version to launch the instance.
To launch instances, IAM users must have permissions to use the
ec2:RunInstances
action. IAM users must also have permissions to
create or use the resources that are created or associated with the instance. You can
use resource-level permissions for the ec2:RunInstances
action to control
the launch parameters that users can specify. Alternatively, you can grant users
permissions to launch an instance using a launch template. This enables you to manage
launch parameters in a launch template rather than in an IAM policy, and to use a
launch template as an authorization vehicle for launching instances. For example, you
can specify that users can only launch instances using a launch template, and that they
can only use a
specific
launch template. You can also control the launch parameters that
users can override in the launch template. For example policies, see Launch templates.
Control the use of launch templates
By default, IAM users do not have permissions to work with launch templates. You can create an IAM user policy that grants users permissions to create, modify, describe, and delete launch templates and launch template versions. You can also apply resource-level permissions to some launch template actions to control a user's ability to use specific resources for those actions. For more information, see the following example policies: Example: Work with launch templates.
Take care when granting users permissions to use the
ec2:CreateLaunchTemplate
and
ec2:CreateLaunchTemplateVersion
actions. You cannot use resource-level
permissions to control which resources users can specify in the launch template. To
restrict the resources that are used to launch an instance, ensure that you grant
permissions to create launch templates and launch template versions only to appropriate
administrators.
Create a launch template
Create a new launch template using parameters that you define, or use an existing launch template or an instance as the basis for a new launch template.
Tasks
Create a new launch template using parameters you define
Console
To create a launch template, you must specify the launch template name and at least one instance configuration parameter.
The launch template parameters are grouped in the launch template. The following instructions take you through each parameter group.
Parameters for launch template configuration
Start launch template creation
Open the Amazon EC2 console at https://console.aws.amazon.com/ec2/
. -
In the navigation pane, choose Launch Templates, and then choose Create launch template.
Launch template name, description, and tags
-
For Launch template name, enter a descriptive name for the launch template.
-
For Template version description, provide a brief description of this version of the launch template.
-
To tag the launch template on creation, expand Template tags, choose Add tag, and then enter a tag key and value pair. Choose Add tag again for each additional tag to add.
Note To tag the resources that are created when an instance is launched, you must specify the tags under Resource tags. For more information, see Resource tags.
Application and OS Images (Amazon Machine Image)
An Amazon Machine Image (AMI) contains the information required to create an instance. For example, an AMI might contain the software that's required to act as a web server, such as Windows, Apache, and your website.
You can find a suitable AMI as follows. With each option for finding an AMI, you can choose Cancel (at top right) to return to the launch template without choosing an AMI.
- Search bar
-
To search through all available AMIs, enter a keyword in the AMI search bar and then press Enter. To select an AMI, choose Select.
- Recents
-
The AMIs that you've recently used.
Choose Recently launched or Currently in use, and then, from Amazon Machine Image (AMI), select an AMI.
- My AMIs
-
The private AMIs that you own, or private AMIs that have been shared with you.
Choose Owned by me or Shared with me, and then, from Amazon Machine Image (AMI), select an AMI.
- Quick Start
-
AMIs are grouped by operating system (OS) to help you get started quickly.
First select the OS that you need, and then, from Amazon Machine Image (AMI), select an AMI. To select an AMI that is eligible for the free tier, make sure that the AMI is marked Free tier eligible.
- Browse more AMIs
-
Choose Browse more AMIs to browse the full AMI catalog.
-
To search through all available AMIs, enter a keyword in the search bar and then press Enter.
-
To search by category, choose Quickstart AMIs, My AMIs, AWS Marketplace AMIs, or Community AMIs.
The AWS Marketplace is an online store where you can buy software that runs on AWS, including AMIs. For more information about launching an instance from the AWS Marketplace, see Launch an AWS Marketplace instance. In Community AMIs, you can find AMIs that AWS community members have made available for others to use. AMIs from Amazon or a verified partner are marked Verified provider.
-
To filter the list of AMIs, select one or more check boxes under Refine results on the left of the screen. The filter options are different depending on the selected search category.
-
Check the Virtualization type listed for each AMI. Notice which AMIs are the type that you need: either hvm or paravirtual. For example, some instance types require HVM.
-
Check the Boot mode listed for each AMI. Notice which AMIs use the boot mode that you need: either legacy-bios or uefi. For more information, see Boot modes.
-
Choose an AMI that meets your needs, and then choose Select.
-
Instance type
The instance type defines the hardware configuration and size of the instance. Larger instance types have more CPU and memory. For more information, see Instance types.
For Instance type, you can either select an instance type, or you can specify instance attributes and let Amazon EC2 identify the instance types with those attributes.
Specifying instance attributes is supported only when using Auto Scaling groups, EC2 Fleet, and Spot Fleet to launch instances. For more information, see Creating an Auto Scaling group using attribute-based instance type selection, Attribute-based instance type selection for EC2 Fleet, and Attribute-based instance type selection for Spot Fleet.
If you plan to use the launch template in the launch instance wizard or with the RunInstances API, you must select an instance type.
-
Instance type: Ensure that the instance type is compatible with the AMI that you've specified. For more information, see Instance types.
-
Compare instance types: You can compare different instance types by the following attributes: number of vCPUs, architecture, amount of memory (GiB), amount of storage (GB), storage type, and network performance.
-
Advanced: To specify instance attributes and let Amazon EC2 identify the instance types with those attributes, choose Advanced, and then choose Specify instance type attributes.
-
Number of vCPUs: Enter the minimum and maximum number of vCPUs for your compute requirements. To indicate no limits, enter a minimum of
0
, and leave the maximum blank. -
Amount of memory (MiB): Enter the minimum and maximum amount of memory, in MiB, for your compute requirements. To indicate no limits, enter a minimum of
0
, and leave the maximum blank. -
Expand Optional instance type attributes and choose Add attribute to express your compute requirements in more detail. For information about each attribute, see InstanceRequirementsRequest in the Amazon EC2 API Reference.
-
Resulting instance types: You can preview the instance types that match the specified attributes. To exclude instance types, choose Add attribute, and from the Attribute list, choose Excluded instance types. From the Attribute value list, select the instance types to exclude.
-
Key pair (login)
The key pair for the instance.
For Key pair name, choose an existing key pair, or choose Create new key pair to create a new one. For more information, see Amazon EC2 key pairs and Windows instances.
Network settings
Configure the network settings, as necessary.
-
(Only appears if EC2-Classic is available in your account) Networking platform: If applicable, whether to launch the instance into a VPC or EC2-Classic.
-
If you choose Virtual Private Cloud (VPC), specify the subnet.
-
If you choose EC2-Classic, ensure that the specified instance type is supported in EC2-Classic and specify the Availability Zone for the instance. Note that we are retiring EC2-Classic on August 15, 2022.
-
-
Subnet: You can launch an instance in a subnet associated with an Availability Zone, Local Zone, Wavelength Zone, or Outpost.
To launch the instance in an Availability Zone, select the subnet in which to launch your instance. To create a new subnet, choose Create new subnet to go to the Amazon VPC console. When you are done, return to the wizard and choose the Refresh icon to load your subnet in the list.
To launch the instance in a Local Zone, select a subnet that you created in the Local Zone.
To launch an instance in an Outpost, select a subnet in a VPC that you associated with the Outpost.
-
Firewall (security groups): Use one or more security groups to define firewall rules for your instance. These rules specify which incoming network traffic is delivered to your instance. All other traffic is ignored. For more information about security groups, see Amazon EC2 security groups for Windows instances.
If you add a network interface, you must specify the same security groups in the network interface.
Select or create a security group as follows:
-
To select an existing security group, choose Select existing security group, and select your security group from Common security groups.
-
To create a new security group, choose Create security group.
You can add rules to suit your needs. For example, if your instance will be a web server, open ports 80 (HTTP) and 443 (HTTPS) to allow internet traffic.
To add a rule, choose Add security group rule. For Type, select the network traffic type. The Protocol field is automatically filled in with the protocol to open to network traffic. For Source type, select the source type. To let the launch template add your computer's public IP address, choose My IP. However, if you are connecting through an ISP or from behind your firewall without a static IP address, you need to find out the range of IP addresses used by client computers.
Warning Rules that enable all IP addresses (
0.0.0.0/0
) to access your instance over SSH or RDP are acceptable if you are briefly launching a test instance and will stop or terminate it soon, but are unsafe for production environments. You should authorize only a specific IP address or range of addresses to access your instance.
-
-
Advanced network configuration
Network interface
-
Device index: The device number for the network interface, for example,
eth0
for the primary network interface. If you leave the field blank, AWS creates the primary network interface. -
Network interface: Select New interface to let Amazon EC2 create a new interface, or select an existing, available network interface.
-
Description: (Optional) A description for the new network interface.
-
Subnet: The subnet in which to create the new network interface. For the primary network interface (
eth0
), this is the subnet in which the instance is launched. If you've entered an existing network interface foreth0
, the instance is launched in the subnet in which the network interface is located. -
Security groups: One or more security groups in your VPC with which to associate the network interface.
-
Auto-assign public IP: Specify whether your instance receives a public IPv4 address. By default, instances in a default subnet receive a public IPv4 address and instances in a nondefault subnet do not. You can select Enable or Disable to override the subnet's default setting. For more information, see Public IPv4 addresses.
-
Primary IP: A private IPv4 address from the range of your subnet. Leave blank to let Amazon EC2 choose a private IPv4 address for you.
-
Secondary IP: One or more additional private IPv4 addresses from the range of your subnet. Choose Manually assign and enter an IP address. Choose Add IP to add another IP address. Alternatively, choose Automatically assign to let Amazon EC2 choose one for you, and enter a value to indicate the number of IP addresses to add.
-
(IPv6-only) IPv6 IPs: An IPv6 address from the range of the subnet. Choose Manually assign and enter an IP address. Choose Add IP to add another IP address. Alternatively, choose Automatically assign to let Amazon EC2 choose one for you, and enter a value to indicate the number of IP addresses to add.
-
IPv4 Prefixes: The IPv4 prefixes for the network interface.
-
IPv6 Prefixes: The IPv6 prefixes for the network interface.
-
Delete on termination: Whether the network interface is deleted when the instance is deleted.
-
Elastic Fabric Adapter: Indicates whether the network interface is an Elastic Fabric Adapter. For more information, see Elastic Fabric Adapter.
-
Network card index: The index of the network card. The primary network interface must be assigned to network card index 0. Some instance types support multiple network cards.
Choose Add network interface to add more network interfaces. The number of network interfaces that you can add depends on the number that is supported by the selected instance type. A secondary network interface can reside in a different subnet of the VPC, provided it's in the same Availability Zone as your instance.
For more information, see Elastic network interfaces. If you specify more than one network interface, your instance cannot receive a public IPv4 address. Additionally, if you specify an existing network interface for eth0, you cannot override the subnet's public IPv4 setting using Auto-assign Public IP. For more information, see Assign a public IPv4 address during instance launch.
-
Configure storage
If you specify an AMI for the launch template, the AMI includes one or more volumes of storage, including the root volume (Volume 1 (AMI Root)). You can specify additional volumes to attach to the instance.
You can use the Simple or Advanced view. With the Simple view, you specify the size and type of volume. To specify all volume parameters, choose the Advanced view (at top right of the card).
To add a new volume, choose Add new volume.
By using the Advanced view, you can configure each volume as follows:
-
Storage type: The type of volume (EBS or ephemeral) to associate with your instance. The instance store (ephemeral) volume type is only available if you select an instance type that supports it. For more information, see Amazon EC2 instance store and Amazon EBS volumes.
-
Device name: Select from the list of available device names for the volume.
-
Snapshot: Select the snapshot from which to create the volume. You can search for available shared and public snapshots by entering text into the Snapshot field.
-
Size (GiB): For EBS volumes, you can specify a storage size. If you have selected an AMI and instance that are eligible for the free tier, keep in mind that to stay within the free tier, you must stay under 30 GiB of total storage. For more information, see Constraints on the size and configuration of an EBS volume.
-
Volume type: For EBS volumes, select a volume type. For more information, see Amazon EBS volume types.
-
IOPS: If you have selected a Provisioned IOPS SSD (
io1
andio2
) or General Purpose SSD (gp3
) volume type, then you can enter the number of I/O operations per second (IOPS) that the volume can support. This is required for io1, io2, and gp3 volumes. It is not supported for gp2, st1, sc1, or standard volumes. If you omit this paramater for the launch template, you must specify a value for it when you launch an instance from the launch template. -
Delete on termination: For Amazon EBS volumes, choose Yes to delete the volume when the instance is terminated, or choose No to keep the volume. For more information, see Preserve Amazon EBS volumes on instance termination.
-
Encrypted: If the instance type supports EBS encryption, you can choose Yes to enable encryption for the volume. If you have enabled encryption by default in this Region, encryption is enabled for you. For more information, see Amazon EBS encryption.
-
KMS key: If you selected Yes for Encrypted, then you must select a customer managed key to use to encrypt the volume. If you have enabled encryption by default in this Region, the default customer managed key is selected for you. You can select a different key or specify the ARN of any customer managed key that you created.
Resource tags
To tag the resources that are created when an instance is launched, under Resource tags, choose Add tag, and then enter a tag key and value pair. For Resource types, specify the resources to tag on creation. You can specify the same tag for all the resources, or specify different tags for different resources. Choose Add tag again for each additional tag to add.
You can specify tags for the following resources that are created when a launch template is used:
-
Instances
-
Volumes
-
Elastic graphics
-
Spot Instance requests
-
Network interfaces
To tag the launch template itself, you must specify the tags under Template tags. For more information, see Launch template name, description, and tags.
Advanced details
For Advanced details, expand the section to view the fields and specify any additional parameters for the instance.
-
Purchasing option: Choose Request Spot Instances to request Spot Instances at the Spot price, capped at the On-Demand price, and choose Customize to change the default Spot Instance settings. You can set your maximum price (not recommended), and change the request type, request duration, and interruption behavior. If you do not request a Spot Instance, EC2 launches an On-Demand Instance by default. For more information, see Spot Instances.
-
IAM instance profile: Select an AWS Identity and Access Management (IAM) instance profile to associate with the instance. For more information, see IAM roles for Amazon EC2.
-
Hostname type: Select whether the guest OS hostname of the instance will include the resource name or the IP name. For more information, see Amazon EC2 instance hostname types.
-
DNS Hostname: Determines if the DNS queries to the resource name or the IP name (depending on what you selected for Hostname type) will respond with the IPv4 address (A record), IPv6 address (AAAA record), or both. For more information, see Amazon EC2 instance hostname types.
-
Shutdown behavior: Select whether the instance should stop or terminate when shut down. For more information, see Change the instance initiated shutdown behavior.
-
Stop - Hibernate behavior: To enable hibernation, choose Enable. This field is only valid for instances that meet the hibernation prerequisites. For more information, see Hibernate your On-Demand Windows instance.
-
Termination protection: To prevent accidental termination, choose Enable. For more information, see Enable termination protection.
-
Stop protection: To prevent accidental stopping, choose Enable. For more information, see Enable stop protection.
-
Detailed CloudWatch monitoring: Choose Enable to enable detailed monitoring of the instance using Amazon CloudWatch. Additional charges apply. For more information, see Monitor your instances using CloudWatch.
-
Elastic GPU: Select an Elastic Graphics accelerator to attach to the instance. Not all instance types support Elastic Graphics. For more information, see Amazon Elastic Graphics.
-
Elastic inference: An elastic inference accelerator to attach to your EC2 CPU instance. For more information, see Working with Amazon Elastic Inference in the Amazon Elastic Inference Developer Guide.
-
Credit specification: Choose Unlimited to enable applications to burst beyond the baseline for as long as needed. This field is only valid for T instances. Additional charges may apply. For more information, see Burstable performance instances.
-
Placement group name: Specify a placement group in which to launch the instance. You can select an existing placement group, or create a new one. Not all instance types can be launched in a placement group. For more information, see Placement groups.
-
EBS-optimized instance: Select Enable to provide additional, dedicated capacity for Amazon EBS I/O. Not all instance types support this feature. Additional charges apply. For more information, see Amazon EBS–optimized instances.
-
Capacity Reservation: Specify whether to launch the instance into any open Capacity Reservation (Open), a specific Capacity Reservation (Target by ID), or a Capacity Reservation group (Target by group). To specify that a Capacity Reservation should not be used, choose None. For more information, see Launch instances into an existing Capacity Reservation.
-
Tenancy: Choose whether to run your instance on shared hardware (Shared), isolated, dedicated hardware (Dedicated), or on a Dedicated Host (Dedicated host). If you choose to launch the instance onto a Dedicated Host, you can specify whether to launch the instance into a host resource group or you can target a specific Dedicated Host. Additional charges may apply. For more information, see Dedicated Instances and Dedicated Hosts.
-
RAM disk ID: (Only valid for paravirtual (PV) AMIs) Select a RAM disk for the instance. If you have selected a kernel, you might need to select a specific RAM disk with the drivers to support it.
-
Kernel ID: (Only valid for paravirtual (PV) AMIs) Select a kernel for the instance.
-
Nitro Enclave: Allows you to create isolated execution environments, called enclaves, from Amazon EC2 instances. Select Enable to enable the instance for AWS Nitro Enclaves. For more information, see What is AWS Nitro Enclaves? in the AWS Nitro Enclaves User Guide.
-
License configurations: You can launch instances against the specified license configuration to track your license usage. For more information, see Create a license configuration in the AWS License Manager User Guide.
-
Specify CPU options: Choose Specify CPU options to specify a custom number of vCPUs during launch. Set the number of CPU cores and threads per core. For more information, see Optimize CPU options.
-
Metadata transport: You can enable or disable the access method to the instance metadata service that's available for this EC2 instance based on the IP address type (IPv4, IPv6, or IPv4 and IPv6) of the instance. For more information, see Retrieve instance metadata.
-
Metadata accessible: You can enable or disable access to the instance metadata. For more information, see Configure instance metadata options for new instances.
-
Metadata version: If you enable access to the instance metadata, you can choose to require the use of Instance Metadata Service Version 2 when requesting instance metadata. For more information, see Configure instance metadata options for new instances.
-
Metadata response hop limit: If you enable instance metadata, you can set the allowable number of network hops for the metadata token. For more information, see Configure instance metadata options for new instances.
-
Allow tags in metadata: If you select Enable, the instance will allow access to all of its instance's tags from its metadata. If you do not include this setting in the template, by default, access to the tags in instance metadata is not allowed. For more information, see Allow access to tags in instance metadata.
-
User data: You can specify user data to configure an instance during launch, or to run a configuration script. For more information, see Run commands on your Windows instance at launch.
Summary
Use the Summary panel to review your launch template configuration and to create your launch template.
-
Review the details of your launch template, and make any necessary changes. You can navigate directly to a section by choosing its link in the Summary panel.
-
When you're ready to create your launch template, choose Create launch template.
AWS CLI
To create a launch template, you must specify the launch template name and at least one instance configuration parameter.
To create a launch template using the AWS CLI
-
Use the create-launch-template command. The following example creates a launch template that specifies the following:
-
A name for the launch template (
)TemplateForWebServer
-
A description for the launch template (
)WebVersion1
-
A tag for the launch template (
=purpose
)production
-
The data for the instance configuration, specified in a JSON file:
-
The instance type (
) and AMI (r4.4xlarge
) to launchami-8c1be5f6
-
The number of cores (
) and threads per core (4
) for a total of 8 vCPUs (4 cores x 2 threads)2
-
The subnet in which to launch the instance (
)subnet-7b16de0c
-
A public IP address and an IPv6 address to be assigned to the instance
-
A tag for the instance (
=Name
)webserver
-
aws ec2 create-launch-template \ --launch-template-name
TemplateForWebServer
\ --version-descriptionWebVersion1
\ --tag-specifications 'ResourceType=launch-template,Tags=[{Key=purpose
,Value=production
}]' \ --launch-template-data file://template-data
.jsonThe following is an example JSON file that contains the launch template data for the instance configuration.
{ "NetworkInterfaces": [{ "AssociatePublicIpAddress": true, "DeviceIndex": 0, "Ipv6AddressCount":
1
, "SubnetId": "subnet-7b16de0c
" }], "ImageId": "ami-8c1be5f6
", "InstanceType": "r4.4xlarge
", "TagSpecifications": [{ "ResourceType": "instance", "Tags": [{ "Key":"Name
", "Value":"webserver
" }] }], "CpuOptions": { "CoreCount":4
, "ThreadsPerCore":2
} }The following is example output.
{ "LaunchTemplate": { "LatestVersionNumber": 1, "LaunchTemplateId": "lt-01238c059e3466abc", "LaunchTemplateName": "TemplateForWebServer", "DefaultVersionNumber": 1, "CreatedBy": "arn:aws:iam::123456789012:root", "CreateTime": "2017-11-27T09:13:24.000Z" } }
-
Create a launch template from an existing launch template
You can clone an existing launch template and then adjust the parameters to create a new launch template. However, you can only do this when using the Amazon EC2 console; the AWS CLI does not support cloning a template.
Create a launch template from an instance
Modify a launch template (manage launch template versions)
Launch templates are immutable; after you create a launch template, you can't modify it. Instead, you can create a new version of the launch template that includes any changes you require.
You can create different versions of a launch template, set the default version, describe a launch template version, and delete versions that you no longer require.
Tasks
Create a launch template version
When you create a launch template version, you can specify new launch parameters or use an existing version as the base for the new version. For more information about the launch parameters, see Create a launch template.
Set the default launch template version
You can set the default version for the launch template. When you launch an instance from a launch template and do not specify a version, the instance is launched using the parameters of the default version.
Describe a launch template version
Using the console, you can view all the versions of the selected launch template, or get a list of the launch templates whose latest or default version matches a specific version number. Using the AWS CLI, you can describe all versions, individual versions, or a range of versions of a specified launch template. You can also describe all the latest versions or all the default versions of all the launch templates in your account.
Delete a launch template version
If you no longer require a launch template version, you can delete it. You cannot replace the version number after you delete it. You cannot delete the default version of the launch template; you must first assign a different version as the default.
Launch an instance from a launch template
You can use the parameters contained in a launch template to launch an instance. You have the option to override or add launch parameters before you launch the instance.
Instances that are launched using a launch template are automatically assigned two
tags with the keys aws:ec2launchtemplate:id
and
aws:ec2launchtemplate:version
. You cannot remove or edit these
tags.
Use launch templates with Amazon EC2 Auto Scaling
You can create an Auto Scaling group and specify a launch template to use for the group. When Amazon EC2 Auto Scaling launches instances in the Auto Scaling group, it uses the launch parameters defined in the associated launch template. For more information, see Creating an Auto Scaling Group Using a Launch Template in the Amazon EC2 Auto Scaling User Guide.
Before you can create an Auto Scaling group using a launch template, you must create a launch template that includes the parameters required to launch an instance in an Auto Scaling group, such as the ID of the AMI. The console provides guidance to help you create a template that you can use with Auto Scaling.
To create a launch template to use with Auto Scaling using the console
Open the Amazon EC2 console at https://console.aws.amazon.com/ec2/
. -
In the navigation pane, choose Launch Templates, and then choose Create launch template.
-
For Launch template name, enter a descriptive name for the launch template.
-
For Template version description, provide a brief description of this version of the launch template.
-
Under Auto Scaling guidance, select the check box to have Amazon EC2 provide guidance to help create a template to use with Auto Scaling.
-
Modify the launch parameters as required. Because you selected Auto Scaling guidance, some fields are required and some fields are not available. For considerations to keep in mind when creating a launch template, and for information about how to configure the launch parameters for Auto Scaling, see Creating a launch template for an Auto Scaling group in the Amazon EC2 Auto Scaling User Guide.
-
Choose Create launch template.
-
(Optional) To create an Auto Scaling group using this launch template, in the Next steps page, choose Create Auto Scaling group.
To create or update an Amazon EC2 Auto Scaling group with a launch template using the AWS CLI
-
Use the create-auto-scaling-group or the update-auto-scaling-group command and specify the
--launch-template
parameter.
Use launch templates with EC2 Fleet
You can create an EC2 Fleet request and specify a launch template in the instance configuration. When Amazon EC2 fulfills the EC2 Fleet request, it uses the launch parameters defined in the associated launch template. You can override some of the parameters that are specified in the launch template.
For more information, see Create an EC2 Fleet.
To create an EC2 Fleet with a launch template using the AWS CLI
-
Use the create-fleet command. Use the
--launch-template-configs
parameter to specify the launch template and any overrides for the launch template.
Use launch templates with Spot Fleet
You can create a Spot Fleet request and specify a launch template in the instance configuration. When Amazon EC2 fulfills the Spot Fleet request, it uses the launch parameters defined in the associated launch template. You can override some of the parameters that are specified in the launch template.
For more information, see Spot Fleet request types.
To create a Spot Fleet request with a launch template using the AWS CLI
-
Use the request-spot-fleet command. Use the
LaunchTemplateConfigs
parameter to specify the launch template and any overrides for the launch template.
Delete a launch template
If you no longer require a launch template, you can delete it. Deleting a launch template deletes all of its versions.