Share an AMI with specific organizations or organizational units - Amazon Elastic Compute Cloud

Share an AMI with specific organizations or organizational units

AWS Organizations is an account management service that enables you to consolidate multiple AWS accounts into an organization that you create and centrally manage. You can share an AMI with an organization or an organizational unit (OU) that you have created, in addition to sharing it with specific accounts.

An organization is an entity that you create to consolidate and centrally manage your AWS accounts. You can organize the accounts in a hierarchical, tree-like structure, with a root at the top and organizational units nested under the organization root. Each account can be added directly to the root, or placed in one of the OUs in the hierarchy. For more information, see AWS Organizations terminology and concepts in the AWS Organizations User Guide.

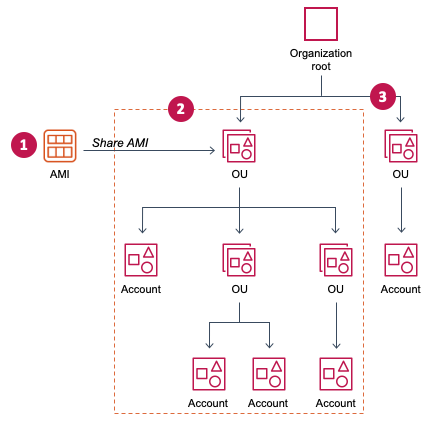
When you share an AMI with an organization or an OU, all of the children accounts gain access to the AMI. For example, in the following diagram, the AMI is shared with a top-level OU (indicated by the arrow at the number 1). All of the OUs and accounts that are nested underneath that top-level OU (indicated by the dotted line at number 2) also have access to the AMI. The accounts in the organization and OU outside the dotted line (indicated by the number 3) do not have access to the AMI because they are not children of the OU that the AMI is shared with.


				The AMI is shared with an OU, and all children OUs and accounts get access to the AMI.

Considerations

Consider the following when sharing AMIs with specific organizations or organizational units.

  • Ownership – To share an AMI, your AWS account must own the AMI.

  • Sharing limits – The AMI owner can share an AMI with any organization or OU, including organizations and OUs that they’re not a member of.

    For the maximum number of entities to which an AMI can be shared within a Region, see the Amazon EC2 service quotas.

  • Tags – You can't share user-defined tags (tags that you attach to an AMI). When you share an AMI, your user-defined tags are not available to any AWS account in an organization or OU with which the AMI is shared.

  • ARN format – When you specify an organization or OU in a command, make sure to use the correct ARN format. You'll get an error if you specify only the ID, for example, if you specify only o-123example or ou-1234-5example.

    Correct ARN formats:

    • Organization ARN: arn:aws:organizations::account-id:organization/organization-id

    • OU ARN: arn:aws:organizations::account-id:ou/organization-id/ou-id

    Where:

    • account-id is the 12-digit management account number, for example, 123456789012. If you don't know the management account number, you can describe the organization or the organizational unit to get the ARN, which includes the management account number. For more information, see Get the ARN.

    • organization-id is the organization ID, for example, o-123example.

    • ou-id is the organizational unit ID, for example, ou-1234-5example.

    For more information about the format of ARNs, see Amazon Resource Names (ARNs) in the IAM User Guide.

  • Encryption and keys – You can share AMIs that are backed by unencrypted and encrypted snapshots.

    • The encrypted snapshots must be encrypted with a customer managed key. You can’' share AMIs that are backed by snapshots that are encrypted with the default AWS managed key.

    • If you share an AMI that is backed by encrypted snapshots, you must allow the organizations or OUs to use the customer managed keys that were used to encrypt the snapshots. For more information, see Allow organizations and OUs to use a KMS key.

  • Region – AMIs are a Regional resource. When you share an AMI, it is available only in the Region from which you shared it. To make an AMI available in a different Region, copy the AMI to the Region and then share it. For more information, see Copy an AMI.

  • Usage – When you share an AMI, users can only launch instances from the AMI. They can’t delete, share, or modify it. However, after they have launched an instance using your AMI, they can then create an AMI from the instance they launched.

  • Billing – You are not billed when your AMI is used by other AWS accounts to launch instances. The accounts that launch instances using the AMI are billed for the instances that they launch.

Allow organizations and OUs to use a KMS key

If you share an AMI that is backed by encrypted snapshots, you must also allow the organizations or OUs to use the AWS KMS keys that were used to encrypt the snapshots.

Use the aws:PrincipalOrgID and aws:PrincipalOrgPaths keys to compare the AWS Organizations path for the principal who is making the request to the path in the policy. That principal can be a user, IAM role, federated user, or AWS account root user. In a policy, this condition key ensures that the requester is an account member within the specified organization root or OUs in AWS Organizations. For more example condition statements, see aws:PrincipalOrgID and aws:PrincipalOrgPaths in the IAM User Guide.

For information about editing a key policy, see Allowing users in other accounts to use a KMS key in the AWS Key Management Service Developer Guide.

To give an organization or OU permission to use a KMS key, add the following statement to the key policy.

{ "Sid": "Allow access for organization root", "Effect": "Allow", "Principal": "*", "Action": [ "kms:Describe*", "kms:List*", "kms:Get*", "kms:Encrypt", "kms:Decrypt", "kms:ReEncrypt*", "kms:GenerateDataKey*" ], "Resource": "*", "Condition": { "StringEquals": { "aws:PrincipalOrgID": "o-123example" } } }

To share a KMS key with multiple OUs, you can use a policy similar to the following example.

{ "Sid": "Allow access for specific OUs and their descendants", "Effect": "Allow", "Principal": "*", "Action": [ "kms:Describe*", "kms:List*", "kms:Get*", "kms:Encrypt", "kms:Decrypt", "kms:ReEncrypt*", "kms:GenerateDataKey*" ], "Resource": "*", "Condition": { "StringEquals": { "aws:PrincipalOrgID": "o-123example" }, "ForAnyValue:StringLike": { "aws:PrincipalOrgPaths": [ "o-123example/r-ab12/ou-ab12-33333333/*", "o-123example/r-ab12/ou-ab12-22222222/*" ] } } }

Share an AMI

You can use the Amazon EC2 console or the AWS CLI to share an AMI with an organization or OU.

Share an AMI (console)

To share an AMI with an organization or an OU using the console
  1. Open the Amazon EC2 console at https://console.aws.amazon.com/ec2/.

  2. In the navigation pane, choose AMIs.

  3. Select your AMI in the list, and then choose Actions, Edit AMI permissions.

  4. Under AMI availability, choose Private.

  5. Next to Shared organizations/OUs, choose Add organization/OU ARN.

  6. For Organization/OU ARN, enter the organization ARN or OU ARN with which you want to share the AMI, and then choose Share AMI. Note that you must specify the full ARN, not just the ID.

    To share this AMI with multiple organizations or OUs, repeat this step until you have added all of the required organizations or OUs.

    Note

    You do not need to share the Amazon EBS snapshots that an AMI references in order to share the AMI. Only the AMI itself needs to be shared, and the system automatically provides the instance with access to the referenced Amazon EBS snapshots for the launch. However, you do need to share the KMS keys used to encrypt snapshots that the AMI references. For more information, see Allow organizations and OUs to use a KMS key.

  7. Choose Save changes when you're done.

  8. (Optional) To view the organizations or OUs with which you have shared the AMI, select the AMI in the list, choose the Permissions tab, and scroll down to Shared organizations/OUs. To find AMIs that are shared with you, see Find shared AMIs.

Share an AMI (Tools for Windows PowerShell)

Use the Edit-EC2ImageAttribute command (Tools for Windows PowerShell) to share an AMI as shown in the following examples.

To share an AMI with an organization or an OU

The following command grants launch permissions for the specified AMI to the specified organization.

PS C:\> Edit-EC2ImageAttribute -ImageId ami-0abcdef1234567890 -Attribute launchPermission -OperationType add -OrganizationArn "arn:aws:organizations::123456789012:organization/o-123example"
Note

You do not need to share the Amazon EBS snapshots that an AMI references in order to share the AMI. Only the AMI itself needs to be shared, and the system automatically provides the instance with access to the referenced Amazon EBS snapshots for the launch. However, you do need to share the KMS keys used to encrypt snapshots that the AMI references. For more information, see Allow organizations and OUs to use a KMS key.

To stop sharing an AMI with an organization or OU

The following command removes launch permissions for the specified AMI from the specified organization:

PS C:\> Edit-EC2ImageAttribute -ImageId ami-0abcdef1234567890 -Attribute launchPermission -OperationType remove -OrganizationArn "arn:aws:organizations::123456789012:organization/o-123example"

To stop sharing an AMI with all organizations, OUs, and AWS accounts

The following command removes all public and explicit launch permissions from the specified AMI. Note that the owner of the AMI always has launch permissions and is therefore unaffected by this command.

PS C:\> Reset-EC2ImageAttribute -ImageId ami-0abcdef1234567890 -Attribute launchPermission

Share an AMI (AWS CLI)

Use the modify-image-attribute command (AWS CLI) to share an AMI.

To share an AMI with an organization using the AWS CLI

The modify-image-attribute command grants launch permissions for the specified AMI to the specified organization. Note that you must specify the full ARN, not just the ID.

aws ec2 modify-image-attribute \ --image-id ami-0abcdef1234567890 \ --launch-permission "Add=[{OrganizationArn=arn:aws:organizations::123456789012:organization/o-123example}]"
To share an AMI with an OU using the AWS CLI

The modify-image-attribute command grants launch permissions for the specified AMI to the specified OU. Note that you must specify the full ARN, not just the ID.

aws ec2 modify-image-attribute \ --image-id ami-0abcdef1234567890 \ --launch-permission "Add=[{OrganizationalUnitArn=arn:aws:organizations::123456789012:ou/o-123example/ou-1234-5example}]"
Note

You do not need to share the Amazon EBS snapshots that an AMI references in order to share the AMI. Only the AMI itself needs to be shared, and the system automatically provides the instance with access to the referenced Amazon EBS snapshots for the launch. However, you do need to share the KMS keys used to encrypt snapshots that the AMI references. For more information, see Allow organizations and OUs to use a KMS key.

Stop sharing an AMI

You can use the Amazon EC2 console or the AWS CLI to stop sharing an AMI with an organization or OU.

Stop sharing an AMI (console)

To stop sharing an AMI with an organization or OU using the console
  1. Open the Amazon EC2 console at https://console.aws.amazon.com/ec2/.

  2. In the navigation pane, choose AMIs.

  3. Select your AMI in the list, and then choose Actions, Edit AMI permissions.

  4. Under Shared organizations/OUs, select the organizations or OUs with which you want to stop sharing the AMI, and then choose Remove selected.

  5. Choose Save changes when you're done.

  6. (Optional) To confirm that you have stopped sharing the AMI with the organizations or OUs, select the AMI in the list, choose the Permissions tab, and scroll down to Shared organizations/OUs.

Stop sharing an AMI (AWS CLI)

Use the modify-image-attribute or reset-image-attribute commands (AWS CLI) to stop sharing an AMI.

To stop sharing an AMI with an organization or OU using the AWS CLI

The modify-image-attribute command removes launch permissions for the specified AMI from the specified organization. Note that you must specify the ARN.

aws ec2 modify-image-attribute \ --image-id ami-0abcdef1234567890 \ --launch-permission "Remove=[{OrganizationArn=arn:aws:organizations::123456789012:organization/o-123example}]"
To stop sharing an AMI with all organizations, OUs, and AWS accounts using the AWS CLI

The reset-image-attribute command removes all public and explicit launch permissions from the specified AMI. Note that the owner of the AMI always has launch permissions and is therefore unaffected by this command.

aws ec2 reset-image-attribute \ --image-id ami-0abcdef1234567890 \ --attribute launchPermission
Note

You can't stop sharing an AMI with a specific account if it's in an organization or OU with which an AMI is shared. If you try to stop sharing the AMI by removing launch permissions for the account, Amazon EC2 returns a success message. However, the AMI continues to be shared with the account.

View the organizations and OUs with which an AMI is shared

You can use the Amazon EC2 console or the AWS CLI to check with which organizations and OUs you've shared your AMI.

View the organizations and OUs with which an AMI is shared (console)

To check with which organizations and OUs you've shared your AMI using the console
  1. Open the Amazon EC2 console at https://console.aws.amazon.com/ec2/.

  2. In the navigation pane, choose AMIs.

  3. Select your AMI in the list, choose the Permissions tab, and scroll down to Shared organizations/OUs.

    To find AMIs that are shared with you, see Find shared AMIs.

View the organizations and OUs with which an AMI is shared (AWS CLI)

You can check which organizations and OUs you've shared your AMI with by using the describe-image-attribute command (AWS CLI) and the launchPermission attribute.

To check with which organizations and OUs you've shared your AMI using the AWS CLI

The describe-image-attribute command describes the launchPermission attribute for the specified AMI, and returns the organizations and OUs with which you've shared the AMI.

aws ec2 describe-image-attribute \ --image-id ami-0abcdef1234567890 \ --attribute launchPermission

Example response

{ "ImageId": "ami-0abcdef1234567890", "LaunchPermissions": [ { "OrganizationalUnitArn": "arn:aws:organizations::111122223333:ou/o-123example/ou-1234-5example" } ] }

Get the ARN

The organization and the organizational unit ARNs contain the 12-digit management account number. If you don't know the management account number, you can describe the organization and the organizational unit to get the ARN for each. In the following examples, 123456789012 is the management account number.

Before you can get the ARNs, you must have the permission to describe organizations and organizational units. The following policy provides the necessary permission.

{ "Version": "2012-10-17", "Statement": [ { "Effect": "Allow", "Action": [ "organizations:Describe*" ], "Resource": "*" } ] }
To get the ARN of an organization

Use the describe-organization command and the --query parameter set to 'Organization.Arn' to return only the organization ARN.

aws organizations describe-organization --query 'Organization.Arn'

Example response

"arn:aws:organizations::123456789012:organization/o-123example"
To get the ARN of an organizational unit

Use the describe-organizational-unit command, specify the OU ID, and set the --query parameter to 'OrganizationalUnit.Arn' to return only the organizational unit ARN.

aws organizations describe-organizational-unit --organizational-unit-id ou-1234-5example --query 'OrganizationalUnit.Arn'

Example response

"arn:aws:organizations::123456789012:ou/o-123example/ou-1234-5example"