Using canary blueprints
This section provides details about each of the canary blueprints and the tasks each blueprint is best suited for. Blueprints are provided for the following canary types:
-
Heartbeat Monitor
-
API Canary
-
Broken Link Checker
-
Visual Monitoring
-
Canary Recorder
-
GUI Workflow
When you use a blueprint to create a canary, as you fill out the fields in the CloudWatch console, the Script editor area of the page displays the canary you are creating as a Node.js script. You can also edit your canary in this area to customize it further.
Heartbeat monitoring
Heartbeat scripts load the specified URL and store a screenshot of the page and an HTTP archive file (HAR file). They also store logs of accessed URLs.
You can use the HAR files to view detailed performance data about the web pages. You can analyze the list of web requests and catch performance issues such as time to load for an item.
If your canary uses the syn-nodejs-puppeteer-3.1 or later
runtime version, you can use the heartbeat monitoring blueprint to monitor multiple
URLs and see the status, duration, associated screenshots, and failure reason for each URL
in the step summary of the canary run report.
API canary
API canaries can test the basic Read and Write functions of a REST API. REST stands for representational state transfer and is a set of rules that developers follow when creating an API. One of these rules states that a link to a specific URL should return a piece of data.
Canaries can work with any APIs and test all types of functionality. Each canary can make multiple API calls.
In canaries that use runtime version syn-nodejs-2.2 or later,
the API canary blueprint supports multi-step canaries that monitor your APIs as
HTTP steps. You can test multiple APIs in a single canary. Each step is a
separate request that can
access a different URL, use different headers, and use different rules for whether
headers and response bodies are captured. By not capturing headers and response body, you can
prevent sensitive data from being recorded.
Each request in an API canary consists of the following information:
-
The endpoint, which is the URL that you request.
-
The method, which is the type of request that is sent to the server. REST APIs support GET (read), POST (write), PUT (update), PATCH (update), and DELETE (delete) operations.
-
The headers, which provide information to both the client and the server. They are used for authentication and providing information about the body content. For a list of valid headers, see HTTP Headers
. -
The data (or body), which contains information to be sent to the server. This is used only for POST, PUT, PATCH, or DELETE requests.
Note
API canary blueprints are not supported by Playwright runtimes.
The API canary blueprint supports GET and POST methods. When you use this blueprint,
you must specify headers. For example, you can specify
Authorization as a Key and specify
the necessary authorization data as the Value for that key.
If you are testing a POST request, you also specify the content to post in the Data field.
Integration with API Gateway
The API blueprint is integrated with Amazon API Gateway. This enables you to select an API Gateway API and stage from the same AWS account and Region as the canary, or to upload a Swagger template from API Gateway for cross-account and cross-Region API monitoring. You can then choose the rest of the details in the console to create the canary, instead of entering them from scratch. For more information about API Gateway, see What is Amazon API Gateway?
Using a private API
You can create a canary that uses a private API in Amazon API Gateway. For more information, see Creating a private API in Amazon API Gateway?
Broken link checker
The broken link checker collects all the links inside the URL that you are testing by using
document.getElementsByTagName('a'). It tests only up to the number of links
that you specify, and the URL itself is counted as the first link. For example, if you want to check all
the links on a page that contains five links, you must specify for the canary to follow six links.
Broken link checker canaries created using the syn-nodejs-2.0-beta runtime or later
support the following additional features:
-
Provides a report that includes the links that were checked, status code, failure reason (if any), and source and destination page screenshots.
-
When viewing canary results, you can filter to see only the broken links and then fix the link based on the reason for failure.
-
This version captures annotated source page screenshots for each link and highlights the anchor where the link was found. Hidden components are not annotated.
-
You can configure this version to capture screenshots of both source and destination pages, just source pages, or just destination pages.
-
This version fixes an issue in the earlier version where the canary script stops after the first broken link even when more links are scraped from the first page.
Note
Broken link checker blueprints are not supported by Playwright runtimes.
To update an existing canary using syn-1.0 to use
the new runtime, you must delete and re-create the canary. Updating an existing canary
to the new runtime does not make these features available.
A broken link checker canary detects the following types of link errors:
404 Page Not Found
Invalid Host Name
Bad URL. For example, the URL is missing a bracket, has extra slashes, or uses the wrong protocol.
Invalid HTTP response code.
The host server returns empty responses with no content and no response code.
The HTTP requests constantly time out during the canary's run.
The host consistently drops connections because it is misconfigured or is too busy.
Visual monitoring blueprint
The visual monitoring blueprint includes code to compare screenshots taken during a canary run with screenshots taken during a baseline canary run. If the discrepancy between the two screenshots is beyond a threshold percentage, the canary fails. Visual monitoring is supported in canaries running syn-puppeteer-node-3.2 and later. It is not currently supported in canaries running Python and Selenium, or using Playwright runtimes.
The visual monitoring blueprint includes the following line of code in the default blueprint canary script, which enables visual monitoring.
syntheticsConfiguration.withVisualCompareWithBaseRun(true);
The first time that the canary runs successfully after this line is added to the script, it uses the screenshots taken during that run as the baseline for comparison. After that first canary run, you can use the CloudWatch console to edit the canary to do any of the following:
Set the next run of the canary as the new baseline.
Draw boundaries on the current baseline screenshot to designate areas of the screenshot to ignore during visual comparisons.
Remove a screenshot from being used for visual monitoring.
For more information about using the CloudWatch console to edit a canary, see Edit or delete a canary.
You can also change the canary run that is used as the baseline by using
the nextrun or lastrun parameters or specifing a canary run
ID in the
UpdateCanary API.
When you use the visual monitoring blueprint, you enter the URL where you want the screenshot to be taken, and specify a difference threshold as a percentage. After the baseline run, future runs of the canary that detect a visual difference greater than that threshold trigger a canary failure. After the baseline run, you can also edit the canary to "draw" boundaries on the baseline screenshot that you want to ignore during the visual monitoring.
The visual monitoring feature is powered by the the ImageMagick open source software toolkit.
For more information, see ImageMagick
Canary recorder
With the canary recorder blueprint, you can use the CloudWatch Synthetics Recorder to record your click and type actions on a website and automatically generate a Node.js script that can be used to create a canary that follows the same steps. The CloudWatch Synthetics Recorder is a Google Chrome extension provided by Amazon. The canary recorder is not supported for canaries that use the Playwright runtime.
Credits: The CloudWatch Synthetics Recorder is based on the
Headless recorder
For more information, see Using the CloudWatch Synthetics Recorder for Google Chrome.
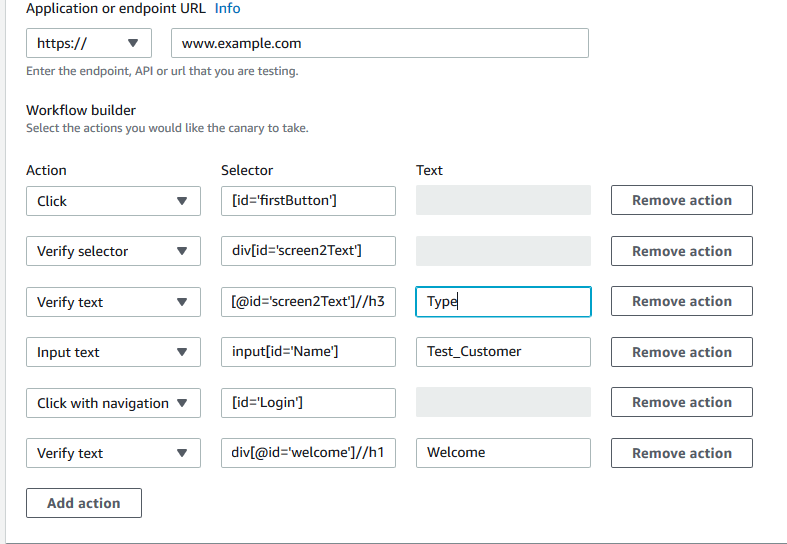
GUI workflow builder
The GUI Workflow Builder blueprint verifies that actions can be taken on your webpage. For example, if you have a webpage with a login form, the canary can populate the user and password fields and submit the form to verify that the webpage is working correctly.
When you use a blueprint to create this type of canary, you specify the actions that you want the canary to take on the webpage. The actions that you can use are the following:
Click— Selects the element that you specify and simulates a user clicking or choosing the element.
To specify the element in a Node.js script, use
[id=]ora[class=].To specify the element in a Python script, use
xpath //*[@id=]or//*[@class=].Verify selector— Verifies that the specified element exists on the webpage. This test is useful for verifying that a previous action has causes the correct elements to populate the page.
To specify the element to verify in a Node.js script, use
[id=]ora[class=].To specify the element to verify in a Python script, use
xpath //*[@id=]or//*[class=].Verify text— Verifies that the specified string is contained within the target element. This test is useful for verifying that a previous action has caused the correct text to be displayed.
To specify the element in a Node.js script, use a format such as
div[@id=]//h1because this action uses thewaitForXPathfunction in Puppeteer.To specify the element in a Python script, use xpath format such as
//*[@id=]or //*[@class=] because this action uses theimplicitly_waitfunction in Selenium.Input text— Writes the specified text in the target element.
To specify the element to verify in a Node.js script, use
[id=]ora[class=].To specify the element to verify in a Python script, use
xpath //*[@id=]or//*[@class=].Click with navigation— Waits for the whole page to load after choosing the specified element. This is most useful when you need to reload the page.
To specify the element in a Node.js script, use
[id=]ora[class=].To specify the element in a Python script, use
xpath //*[@id=]or//*[@class=].
For example, the following blueprint uses Node.js. It clicks the firstButton
on the specified URL, verifies that the expected selector with the expected text appears,
inputs the name Test_Customer into the Name field,
clicks the Login button, and then verifies that the login is
successful by checking for the Welcome text on the next page.
GUI workflow canaries that use the following runtimes also provide a summary of the steps executed for each canary run. You can use the screenshots and error message associated with each step to find the root cause of failure.
syn-nodejs-2.0or latersyn-python-selenium-1.0or later
