Connecting to a cache running in an Amazon VPC
This example shows how to launch an Amazon EC2 instance in your Amazon VPC. You can then log in to this instance and access the ElastiCache cache that is running in the Amazon VPC.
Connecting to a cache running in an Amazon VPC (Console)
In this example, you create an Amazon EC2 instance in your Amazon VPC. You can use this Amazon EC2 instance to connect to cache nodes running in the Amazon VPC.
Note
For information about using Amazon EC2, see the Amazon EC2 Getting Started Guide in the Amazon EC2 documentation
To create an Amazon EC2 instance in your Amazon VPC using the Amazon EC2 console
-
Sign in to the AWS Management Console and open the Amazon EC2 console at https://console.aws.amazon.com/ec2/
. -
In the console, choose Launch Instance and follow these steps:
-
On the Choose an Amazon Machine Image (AMI) page, choose the 64-bit Amazon Linux AMI, and then choose Select.
-
On the Choose an Instance Type page, choose 3. Configure Instance.
-
On the Configure Instance Details page, make the following selections:
-
In the Network list, choose your Amazon VPC.
-
In the Subnet list, choose your public subnet.

When the settings are as you want them, choose 4. Add Storage.
-
-
On the Add Storage page, choose 5. Tag Instance.
-
On the Tag Instance page, type a name for your Amazon EC2 instance, and then choose 6. Configure Security Group.
-
On the Configure Security Group page, choose Select an existing security group. For more information on security groups, see Amazon EC2 security groups for Linux instances.
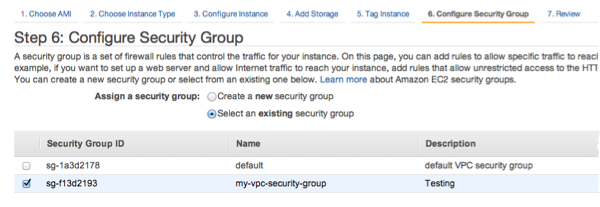
Choose the name of your Amazon VPC security group, and then choose Review and Launch.
-
On the Review Instance and Launch page, choose Launch.
-
In the Select an existing key pair or create a new key pair window, specify a key pair that you want to use with this instance.
Note
For information about managing key pairs, see the Amazon EC2 Getting Started Guide.
-
When you are ready to launch your Amazon EC2 instance, choose Launch.
You can now assign an Elastic IP address to the Amazon EC2 instance that you just created. You need to use this IP address to connect to the Amazon EC2 instance.
To assign an elastic IP address (Console)
-
Open the Amazon VPC console at https://console.aws.amazon.com/vpc/
. -
In the navigation list, choose Elastic IPs.
-
Choose Allocate Elastic IP address.
-
In the Allocate Elastic IP address dialog box, accept the default Network Border Group and choose Allocate .
-
Choose the Elastic IP address that you just allocated from the list and choose Associate Address.
-
In the Associate Address dialog box, in the Instance box, choose the ID of the Amazon EC2 instance that you launched.
In the Private IP address box, select the box to obtain the private IP address and then choose Associate.
You can now use SSH to connect to the Amazon EC2 instance using the Elastic IP address that you created.
To connect to your Amazon EC2 instance
-
Open a command window. At the command prompt, issue the following command, replacing mykeypair.pem with the name of your key pair file and 54.207.55.251 with your Elastic IP address.
ssh -imykeypair.pemec2-user@54.207.55.251Important
Do not log out of your Amazon EC2 instance yet.
You are now ready to interact with your ElastiCache cluster. Before you can do that, if you haven't already done so, you need to install the telnet utility.
To install telnet and interact with your cluster (AWS CLI)
-
Open a command window. At the command prompt, issue the following command. At the confirmation prompt, type y.
sudo yum install telnetLoaded plugins: priorities, security, update-motd, upgrade-helper Setting up Install Process Resolving Dependencies --> Running transaction check ...(output omitted)... Total download size: 63 k Installed size: 109 k Is this ok [y/N]: y Downloading Packages: telnet-0.17-47.7.amzn1.x86_64.rpm | 63 kB 00:00 ...(output omitted)... Complete!
You can now connect to a VPC with either Memcached or Redis.
Connecting to a VPC with Memcached
Go to the ElastiCache console at https://console.aws.amazon.com/elasticache/
and obtain the endpoint for one of the nodes in your cluster. For more information, see Finding connection endpoints. -
Use telnet to connect to your cache node endpoint over port 11211. Replace the hostname shown below with the hostname of your cache node.
telnet my-cache-cluster.7wufxa.0001.use1.cache.amazonaws.com 11211You are now connected to the cache engine and can issue commands. In this example, you add a data item to the cache and then get it immediately afterward. Finally, you'll disconnect from the cache node.
To store a key and a value, type the following two lines:
add mykey 0 3600 28
This is the value for mykey
The cache engine responds with the following:
OKTo retrieve the value for
mykey, type the following:get mykeyThe cache engine responds with the following:
VALUE mykey 0 28
This is the value for my key
END
To disconnect from the cache engine, type the following:
quit
Connecting to a VPC with Redis
Go to the ElastiCache console at https://console.aws.amazon.com/elasticache/
and obtain the endpoint for one of the nodes in your cluster. For more information, see Finding connection endpoints for Redis. -
Use telnet to connect to your cache node endpoint over port 6379. Replace the hostname shown below with the hostname of your cache node.
telnet my-cache-cluster.7wufxa.0001.use1.cache.amazonaws.com 6379You are now connected to the cache engine and can issue commands. In this example, you add a data item to the cache and then get it immediately afterward. Finally, you'll disconnect from the cache node.
To store a key and a value, type the following two lines:
setmykeymyvalueThe cache engine responds with the following:
OKTo retrieve the value for
mykey, type the following:get mykeyTo disconnect from the cache engine, type the following:
quit -
Go to the ElastiCache console at https://console.aws.amazon.com/elasticache/
and obtain the endpoint for one of the nodes in your cluster. For more information, Finding connection endpoints for Redis OSS. -
Use telnet to connect to your cache node endpoint over port 6379. Replace the hostname shown below with the hostname of your cache node.
telnet my-cache-cluster.7wufxa.0001.use1.cache.amazonaws.com 6379You are now connected to the cache engine and can issue commands. In this example, you add a data item to the cache and then get it immediately afterward. Finally, you'll disconnect from the cache node.
To store a key and a value, type the following:
setmykeymyvalueThe cache engine responds with the following:
OKTo retrieve the value for
mykey, type the following:get mykeyThe cache engine responds with the following:
get mykeymyvalueTo disconnect from the cache engine, type the following:
quit
Important
To avoid incurring additional charges on your AWS account, be sure to delete any AWS resources you no longer want after trying these examples.
