Cloning a volume for an Amazon Aurora DB cluster
By using Aurora cloning, you can create a new cluster that initially shares the same data pages as the original, but is a separate and independent volume. The process is designed to be fast and cost-effective. The new cluster with its associated data volume is known as a clone. Creating a clone is faster and more space-efficient than physically copying the data using other techniques, such as restoring a snapshot.
Topics
Overview of Aurora cloning
Aurora uses a copy-on-write protocol to create a clone. This mechanism uses minimal additional space to create an initial clone. When the clone is first created, Aurora keeps a single copy of the data that is used by the source Aurora DB cluster and the new (cloned) Aurora DB cluster. Additional storage is allocated only when changes are made to data (on the Aurora storage volume) by the source Aurora DB cluster or the Aurora DB cluster clone. To learn more about the copy-on-write protocol, see How Aurora cloning works.
Aurora cloning is especially useful for quickly setting up test environments using your production data, without risking data corruption. You can use clones for many types of applications, such as the following:
-
Experiment with potential changes (schema changes and parameter group changes, for example) to assess all impacts.
-
Run workload-intensive operations, such as exporting data or running analytical queries on the clone.
-
Create a copy of your production DB cluster for development, testing, or other purposes.
You can create more than one clone from the same Aurora DB cluster. You can also create multiple clones from another clone.
After creating an Aurora clone, you can configure the Aurora DB instances differently from the source Aurora DB cluster. For example, you might not need a clone for development purposes to meet the same high availability requirements as the source production Aurora DB cluster. In this case, you can configure the clone with a single Aurora DB instance rather than the multiple DB instances used by the Aurora DB cluster.
When you create a clone using a different deployment configuration from the source, the clone is created using the latest minor version of the source's Aurora DB engine.
When you create clones from your Aurora DB clusters, the clones are created in your AWS account—the same account that owns the source Aurora DB cluster. However, you can also share Aurora serverless and provisioned Aurora DB clusters and clones with other AWS accounts. For more information, see Cross-account cloning with AWS RAM and Amazon Aurora.
When you finish using the clone for your testing, development, or other purposes, you can delete it.
Limitations of Aurora cloning
Aurora cloning currently has the following limitations:
-
You can create as many clones as you want, up to the maximum number of DB clusters allowed in the AWS Region.
-
You can create up to 15 clones with copy-on-write protocol. After you have 15 clones, the next clone that you create is a full copy. The full-copy protocol acts like a point-in-time recovery.
-
You can't create a clone in a different AWS Region from the source Aurora DB cluster.
-
You can't create a clone from an Aurora DB cluster without the parallel query feature to a cluster that uses parallel query. To bring data into a cluster that uses parallel query, create a snapshot of the original cluster and restore it to the cluster that's using the parallel query feature.
-
You can't create a clone from an Aurora DB cluster that has no DB instances. You can only clone Aurora DB clusters that have at least one DB instance.
-
You can create a clone in a different virtual private cloud (VPC) than that of the Aurora DB cluster. If you do, the subnets of the VPCs must map to the same Availability Zones.
-
You can create an Aurora provisioned clone from a provisioned Aurora DB cluster.
-
Clusters with Aurora serverless instances follow the same rules as provisioned clusters.
How Aurora cloning works
Aurora cloning works at the storage layer of an Aurora DB cluster. It uses a copy-on-write protocol that's both fast and space-efficient in terms of the underlying durable media supporting the Aurora storage volume. You can learn more about Aurora cluster volumes in the Overview of Amazon Aurora storage.
Understanding the copy-on-write protocol
An Aurora DB cluster stores data in pages in the underlying Aurora storage volume.
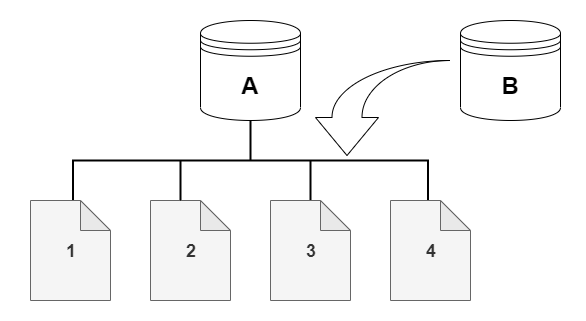
For example, in the following diagram you can find an Aurora DB cluster (A) that has four data pages, 1, 2, 3, and 4. Imagine that a clone, B, is created from the Aurora DB cluster. When the clone is created, no data is copied. Rather, the clone points to the same set of pages as the source Aurora DB cluster.
When the clone is created, no additional storage is usually needed. The copy-on-write protocol uses the same segment on the physical storage media as the source segment. Additional storage is required only if the capacity of the source segment isn't sufficient for the entire clone segment. If that's the case, the source segment is copied to another physical device.
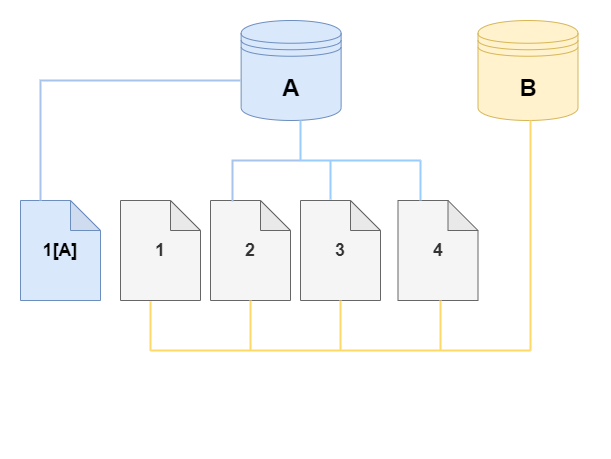
In the following diagrams, you can find an example of the copy-on-write protocol in action using the same cluster A and its clone, B, as shown preceding. Let's say that you make a change to your Aurora DB cluster (A) that results in a change to data held on page 1. Instead of writing to the original page 1, Aurora creates a new page 1[A]. The Aurora DB cluster volume for cluster (A) now points to page 1[A], 2, 3, and 4, while the clone (B) still references the original pages.
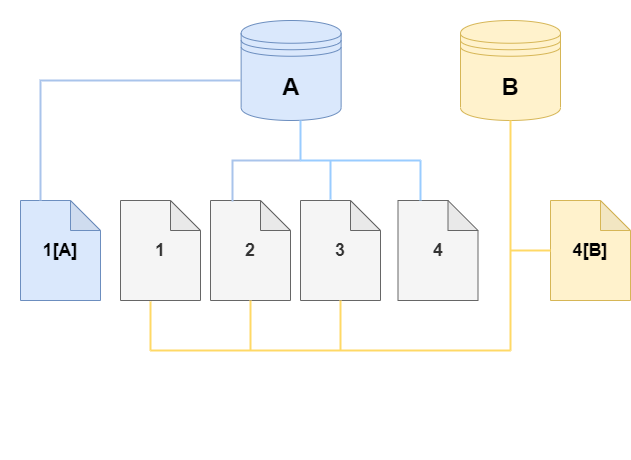
On the clone, a change is made to page 4 on the storage volume. Instead of writing to the original page 4, Aurora creates a new page, 4[B]. The clone now points to pages 1, 2, 3, and to page 4[B], while the cluster (A) continues pointing to 1[A], 2, 3, and 4.
As more changes occur over time in both the source Aurora DB cluster volume and the clone, more storage is needed to capture and store the changes.
Deleting a source cluster volume
Initially, the clone volume shares the same data pages as the original volume
from which the clone is created. As long as the original volume exists, the clone volume
is only considered the owner of the pages that the clone created or modified. Thus, the
VolumeBytesUsed metric for the clone volume starts out small and only grows
as the data diverges between the original cluster and the clone. For pages that are identical
between the source volume and the clone, the storage charges apply only to the original cluster.
For more information about the VolumeBytesUsed metric, see
Cluster-level metrics for Amazon Aurora.
When you delete a source cluster volume that has one or more clones associated with it, the data in the cluster volumes of the clones isn't changed. Aurora preserves the pages that were previously owned by the source cluster volume. Aurora redistributes the storage billing for the pages that were owned by the deleted cluster. For example, suppose that an original cluster had two clones and then the original cluster was deleted. Half of the data pages owned by the original cluster would now be owned by one clone. The other half of the pages would be owned by the other clone.
If you delete the original cluster, then as you create or delete more clones, Aurora continues
to redistribute ownership of the data pages among all the clones that share the same pages. Thus,
you might find that the value of the VolumeBytesUsed metric changes for the cluster volume of a clone.
The metric value can decrease as more clones are created and page ownership is spread across more
clusters. The metric value can also increase as clones are deleted and page ownership is assigned
to a smaller number of clusters. For information about how write operations affect data pages on clone volumes, see
Understanding the copy-on-write protocol.
When the original cluster and the clones are owned by the same AWS account, all the storage charges for those clusters apply to that same AWS account. If some of the clusters are cross-account clones, deleting the original cluster can result in additional storage charges to the AWS accounts that own the cross-account clones.
For example, suppose that a cluster volume has 1000 used data pages before you create any clones. When you clone that cluster, initially the clone volume has zero used pages. If the clone makes modifications to 100 data pages, only those 100 pages are stored on the clone volume and marked as used. The other 900 unchanged pages from the parent volume are shared by both clusters. In this case, the parent cluster has storage charges for 1000 pages and the clone volume for 100 pages.
If you delete the source volume, the storage charges for the clone include the 100 pages that it changed, plus the 900 shared pages from the original volume, for a total of 1000 pages.
Creating an Amazon Aurora clone
You can create a clone in the same AWS account as the source Aurora DB cluster. To do so, you can use the AWS Management Console or the AWS CLI and the procedures following.
To allow another AWS account to create a clone or to share a clone with another AWS account, use the procedures in Cross-account cloning with AWS RAM and Amazon Aurora.
The following procedure describes how to clone an Aurora DB cluster using the AWS Management Console.
Creating a clone using the AWS Management Console results in an Aurora DB cluster with one Aurora DB instance.
These instructions apply for DB clusters owned by the same AWS account that is creating the clone. If the DB cluster is owned by a different AWS account, see Cross-account cloning with AWS RAM and Amazon Aurora instead.
To create a clone of a DB cluster owned by your AWS account using the AWS Management Console
Sign in to the AWS Management Console and open the Amazon RDS console at https://console.aws.amazon.com/rds/
. In the navigation pane, choose Databases.
Choose your Aurora DB cluster from the list, and for Actions, choose Create clone.

The Create clone page opens, where you can configure Settings, Connectivity, and other options for the Aurora DB cluster clone.
-
For DB instance identifier, enter the name that you want to give to your cloned Aurora DB cluster.
-
For Aurora serverless or provisioned DB clusters, choose either Aurora I/O-Optimized or Aurora Standard for Cluster storage configuration.
For more information, see Storage configurations for Amazon Aurora DB clusters.
-
Choose the DB instance size or DB cluster capacity:
-
For a provisioned clone, choose a DB instance class.
You can accept the provided setting, or you can use a different DB instance class for your clone.
-
For an Aurora serverless clone, choose the Capacity settings.

You can accept the provided settings, or you can change them for your clone.
-
-
Choose other settings as needed for your clone. To learn more about Aurora DB cluster and instance settings, see Creating an Amazon Aurora DB cluster.
-
Choose Create clone.
When the clone is created, it's listed with your other Aurora DB clusters in the console Databases section and displays its current state. Your clone is ready to use when its state is Available.
Using the AWS CLI for cloning your Aurora DB cluster involves separate steps for creating the clone cluster and adding one or more DB instances to it.
The restore-db-cluster-to-point-in-time AWS CLI command that you use results in an Aurora DB cluster
with the same storage data as the original cluster, but no Aurora DB instances. You create the DB instances
separately after the clone is available. You can choose the number of DB instances and their instance classes to
give the clone more or less compute capacity than the original cluster. The steps in the process are as follows:
-
Create the clone by using the restore-db-cluster-to-point-in-time CLI command.
-
Create the writer DB instance for the clone by using the create-db-instance CLI command.
-
(Optional) Run additional create-db-instance CLI commands to add one or more reader instances to the clone cluster. Using reader instances helps improve the high availability and read scalability aspects of the clone. You might skip this step if you only intend to use the clone for development and testing.
Topics
Creating the clone
Use the
restore-db-cluster-to-point-in-time
CLI command to create the initial clone cluster.
To create a clone from a source Aurora DB cluster
-
Use the
restore-db-cluster-to-point-in-timeCLI command. Specify values for the following parameters. In this typical case, the clone uses the same engine mode as the original cluster, either provisioned or Aurora serverless.-
--db-cluster-identifier– Choose a meaningful name for your clone. You name the clone when you use the restore-db-cluster-to-point-in-time CLI command. You then pass the name of the clone in the create-db-instance CLI command. -
--restore-type– Usecopy-on-writeto create a clone of the source DB cluster. Without this parameter, therestore-db-cluster-to-point-in-timerestores the Aurora DB cluster rather than creating a clone. -
--source-db-cluster-identifier– Use the name of the source Aurora DB cluster that you want to clone. -
--use-latest-restorable-time– This value points to the latest restorable volume data for the source DB cluster. Use it to create clones.
-
The following example creates a clone named my-clone from a cluster named
my-source-cluster.
For Linux, macOS, or Unix:
aws rds restore-db-cluster-to-point-in-time \ --source-db-cluster-identifiermy-source-cluster\ --db-cluster-identifiermy-clone\ --restore-type copy-on-write \ --use-latest-restorable-time
For Windows:
aws rds restore-db-cluster-to-point-in-time ^ --source-db-cluster-identifiermy-source-cluster^ --db-cluster-identifiermy-clone^ --restore-type copy-on-write ^ --use-latest-restorable-time
The command returns the JSON object containing details of the clone. Check to make sure that your cloned DB cluster is available before trying to create the DB instance for your clone. For more information, see Checking the status and getting clone details.
For example, suppose you have a cluster named tpch100g that you want to clone. The following
Linux example creates a cloned cluster named tpch100g-clone, an Aurora serverless writer
instance named tpch100g-clone-instance, and a provisioned reader instance named
tpch100g-clone-instance-2 for the new cluster.
You don't need to supply some parameters, such as --master-username and
--master-user-password. Aurora automatically determines those from the original cluster. You do
need to specify the DB engine to use. Thus, the example tests the new cluster to determine the right value to
use for the --engine parameter.
This example also includes the --serverless-v2-scaling-configuration option when creating the
clone cluster. That way, you can add Aurora serverless instances to the clone even if the original cluster
didn't use Aurora serverless.
$aws rds restore-db-cluster-to-point-in-time \ --source-db-cluster-identifier tpch100g \ --db-cluster-identifier tpch100g-clone \ --serverless-v2-scaling-configuration MinCapacity=0.5,MaxCapacity=16\ --restore-type copy-on-write \ --use-latest-restorable-time$aws rds describe-db-clusters \ --db-cluster-identifier tpch100g-clone \ --query '*[].[Engine]' \ --output textaurora-mysql$aws rds create-db-instance \ --db-instance-identifier tpch100g-clone-instance \ --db-cluster-identifier tpch100g-clone \ --db-instance-class db.serverless \ --engine aurora-mysql$aws rds create-db-instance \ --db-instance-identifier tpch100g-clone-instance-2 \ --db-cluster-identifier tpch100g-clone \ --db-instance-class db.r6g.2xlarge \ --engine aurora-mysql
Checking the status and getting clone details
You can use the following command to check the status of your newly created clone cluster.
$aws rds describe-db-clusters --db-cluster-identifiermy-clone--query '*[].[Status]' --output text
Or you can obtain the status and the other values that you need to create the DB instance for your clone by using the following AWS CLI query.
For Linux, macOS, or Unix:
aws rds describe-db-clusters --db-cluster-identifiermy-clone\ --query '*[].{Status:Status,Engine:Engine,EngineVersion:EngineVersion,EngineMode:EngineMode}'
For Windows:
aws rds describe-db-clusters --db-cluster-identifiermy-clone^ --query "*[].{Status:Status,Engine:Engine,EngineVersion:EngineVersion,EngineMode:EngineMode}"
This query returns output similar to the following.
[
  {
        "Status": "available",
        "Engine": "aurora-mysql",
        "EngineVersion": "8.0.mysql_aurora.3.04.1",
        "EngineMode": "provisioned"
    }
]
Creating the Aurora DB instance for your clone
Use the create-db-instance CLI command to create the DB instance for your Aurora serverless or provisioned clone.
The DB instance inherits the --master-username and --master-user-password properties
from the source DB cluster.
The following example creates a DB instance for a provisioned clone.
For Linux, macOS, or Unix:
aws rds create-db-instance \ --db-instance-identifiermy-new-db\ --db-cluster-identifiermy-clone\ --db-instance-classdb.r6g.2xlarge\ --engine aurora-mysql
For Windows:
aws rds create-db-instance ^ --db-instance-identifiermy-new-db^ --db-cluster-identifiermy-clone^ --db-instance-classdb.r6g.2xlarge^ --engine aurora-mysql
The following example creates an Aurora serverless DB instance, for a clone that uses an engine version that supports Aurora serverless.
For Linux, macOS, or Unix:
aws rds create-db-instance \ --db-instance-identifiermy-new-db\ --db-cluster-identifiermy-clone\ --db-instance-class db.serverless \ --engine aurora-postgresql
For Windows:
aws rds create-db-instance ^ --db-instance-identifiermy-new-db^ --db-cluster-identifiermy-clone^ --db-instance-class db.serverless ^ --engine aurora-mysql
Parameters to use for cloning
The following table summarizes the various parameters used with
restore-db-cluster-to-point-in-time to clone Aurora DB clusters.
| Parameter | Description |
|---|---|
|
|
Use the name of the source Aurora DB cluster that you want to clone. |
|
|
Choose a meaningful name for your clone when you create it with the
|
|
|
Specify |
|
|
This value points to the latest restorable volume data for the source DB cluster. Use it to create clones. |
|
|
(Newer versions that support Aurora serverless) Use this parameter to configure the minimum and maximum capacity for an Aurora serverless clone. If you don't specify this parameter, you can't create any Aurora serverless instances in the clone cluster until you modify the cluster to add this attribute. |
For information about cross-VPC and cross-account cloning, see the following sections.
