Amazon Monitron is no longer open to new customers. Existing customers can
continue to use the service as normal. For capabilities similar to Amazon
Monitron, see our blog post
Adding assets and installing devices
Once you've created a project, you or reliability managers and technicians from your team can use the Amazon Monitron mobile app to add gateways, create assets and pair sensors to them, and start monitoring your equipment. Only smartphones using Android 8.0+ or iOS 14+ with Near Field Communication (NFC) and Bluetooth are supported by Amazon Monitron.
Your IT manager or reliability manager will generate an email describing how to log in for the first time and connect to your project and send this to you. Once you've logged in for the first time, you can follow the steps to add gateways and install devices.
Step 1: Add a Gateway
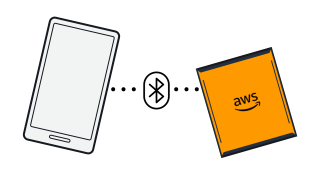
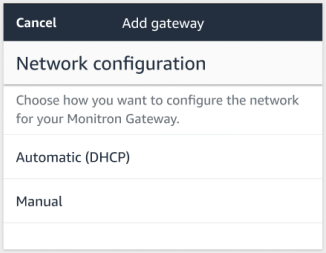
In Amazon Monitron, sensors collect data from machines and pass it to gateways, which transmit the data to the AWS Cloud and thus to Amazon Monitron for analysis. These gateways are usually mounted on the wall of a factory within 20 to 30 meters from the sensor and connect to the AWS Cloud using the local Wi-Fi network.
Before adding a gateway, make sure that Bluetooth is turned on for your smartphone.
Step 2: Adding Assets
In Amazon Monitron, the machines you monitor are known as assets. Assets are usually individual machines, but they can also be specific sections of equipment. Assets are paired to sensors, which directly monitor temperature and vibration to check for potential failures.
To add an asset
-
On the Getting Started page, choose Add asset.

-
For Asset name, enter a name for the asset that you want to create.
-
For Machine class, choose the machine class of the asset.
Asset machine class is based on ISO 20816 Standards. For more information about machine classes, see Assets.
Note
Asset machine class is based on ISO 20816 Standards. Amazon Monitron administrators can also create custom machine asset classes for all positions within a project. For more information about machine classes and customizing them, see Assets.

-
Choose Add.
When you've added your first asset, it's displayed on the Assets list page.
Step 3: Attach Sensors
Assets are paired to sensors, which directly monitor an asset's health. You place each sensor on the asset in a position that you want to monitor. You can place one or more sensors on each asset. Each sensor takes vibration and temperature measurements at the position to which it is paired and sends it to the AWS Cloud for analysis of machine health using the gateway.
Where to Place Sensors
When placing a sensor, choose a location where it can accurately detect the machine's temperature or vibration.
To achieve the greatest accuracy:
-
Mount the sensor directly onto the housing of the target component.
-
Minimize the length of the vibration transmission path, the distance between the source of vibration and sensor.
-
Avoid mounting the sensor in a location that can oscillate due to natural frequencies, such as sheet metal covers.
Vibration will attenuate up to 30-36"/75-90 cm) from the source. Attributes of the vibration transmission path length that can reduce the transmission path length include:
-
The number of mounting surfaces, causing signal reflection
-
Materials such as rubber and plastic that can absorb vibration
The following examples show where to place sensors. For more information and examples, see Where to Place Your Sensors in the Amazon Monitron User Guide.


How to Place Sensors
When you've decided where to place a sensor on an asset, make sure that a minimum of one-third of the sensor base is fixed to the asset. The sensors can pick up vibration and temperature measurements across the entire base of the sensor, but it's important to have the asset target area centered as much as possible on the sensor as shown in the following image.

Attach the sensor with an industrial adhesive. We recommend a cyanoacrylate-type epoxy. For additional information about attaching the sensor to your asset, see How to Place the Sensors in the Amazon Monitron User's Guide.
Warning
Amazon Monitron sensors can be attached to the equipment using industrial adhesive. We suggest you check the surface before selecting the adhesive. For surfaces up to 5 mm roughness/gaps, you can select an adhesive that fills the gap, such as LOCTITE® 3090. For flat surfaces (<0.1mm roughness), you can select a more generic adhesive, such as LOCTITE® 454. Always check and follow the processing guidelines outlined by the adhesive vendor.
For more information about safely using the adhesive, see Loctite 454 Technical Information
To attach the Amazon Monitron sensor
-
Apply a thin layer of the adhesive on the bottom of the sensor, maximizing the contact area.
-
Hold the sensor to the mounting location on the machine part, pressing firmly for the length of time specified by the adhesive instructions.
Step 4: Pairing Sensors to an Asset
Each sensor that you pair to an asset has a designated position and is set to monitor a specific part of the asset. For example, a sensor set up to monitor bearings on a conveyor belt might have the position of Left bearing 1 with a position type of Bearing.
Amazon Monitron uses Near Field Communications (NFC), a short-range (4 cm or less) wireless technology for communication between two electronic devices. To use Amazon Monitron, you need an iOS or Android 8.0+ smartphone with NFC installed natively.
Important
The equipment that you want to monitor must be in a healthy state before you pair it to a sensor. Amazon Monitron must establish a baseline for the equipment based on its normal state so that it can later determine abnormalities.
To pair a sensor with an asset
-
Attach your sensor in the correct position, as described in Step 3: Attach Sensors . You can also attach the sensor after pairing it to the asset in this step 4.
-
Make sure that the NFC feature on your smartphone is on and functioning.
-
From the Assets list, choose the asset that you just created.
-
Choose Pair sensor.
-
For Position name, provide a name for the sensor position.
-
Choose the Type of position that best fits the location that you're going to monitor:
-
Bearing
-
Compressor
-
Fan
-
Gearbox
-
Motor
-
Pump
-
Other
Note
After you pair the sensor, you can't change the position type.
-
-
Hold your phone close to the sensor to register it. A progress bar shows when registration is complete.

It can take a few moments for the sensor to be commissioned. If you have trouble pairing the sensor, see Pairing Your Sensor for more information.
Tip
If your smartphone fails to detect the sensor, try holding it so that the NFC antenna is close to the sensor. For iPhone models, the antenna is located at the top edge of the device. For Android models, the antenna location varies. The following resources might help you locate the NFC antenna on an Android device:
On the Assets page, the sensor is now paired to the asset and is identified by its position.


