Converting ETL processes to AWS Glue in AWS Schema Conversion Tool
Following, you can find an outline of the process to convert ETL scripts to AWS Glue with AWS SCT. For this example, we convert an Oracle database to Amazon Redshift, along with the ETL processes used with the source databases and data warehouses.
Topics
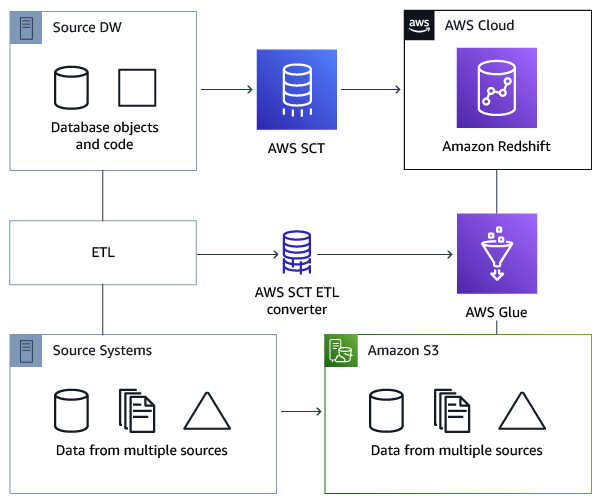
The following architecture diagram shows an example database migration project that includes the conversion of ETL scripts to AWS Glue.
Prerequisites
Before you begin, do the following:
-
Migrate any source databases that you intend to migrate to AWS.
-
Migrate the target data warehouses to AWS.
-
Collect a list of all the code involved in your ETL process.
-
Collect a list of all the necessary connection information for each database.
Also, AWS Glue needs permissions to access other AWS resources on your behalf. You provide those permissions by using AWS Identity and Access Management (IAM). Make sure that you created an IAM policy for AWS Glue. For more information, see Create an IAM policy for the AWS Glueservice in the AWS Glue Developer Guide.
Understanding the AWS Glue Data Catalog
As part of the process of conversion, AWS Glue loads information regarding the source and target databases. It organizes this information into categories, in a structure called a tree. The structure includes the following:
-
Connections – Connection parameters
-
Crawlers – A list of crawlers, one crawler for each schema
-
Databases – Containers that hold tables
-
Tables – Metadata definitions that represent the data in the tables
-
ETL jobs – Business logic that performs the ETL work
-
Triggers – Logic that controls when an ETL job runs in AWS Glue (whether on demand, by schedule, or triggered by job events)
The AWS Glue Data Catalog is an index to the location, schema, and runtime metrics of your data. When you work with AWS Glue and AWS SCT, the AWS Glue Data Catalog contains references to data that is used as sources and targets of your ETL jobs in AWS Glue. To create your data warehouse, catalog this data.
You use the information in the Data Catalog to create and monitor your ETL jobs. Typically, you run a crawler to take inventory of the data in your data stores, but there are other ways to add metadata tables into your Data Catalog.
When you define a table in your Data Catalog, you add it to a database. A database is used to organize tables in AWS Glue.
Limitations for converting using AWS SCT with AWS Glue
The following limitations apply when converting using AWS SCT with AWS Glue.
| Resource | Default limit |
| Number of databases for each account | 10,000 |
| Number of tables for each database | 100,000 |
| Number of partitions for each table | 1,000,000 |
| Number of table versions for each table | 100,000 |
| Number of tables for each account | 1,000,000 |
| Number of partitions for each account | 10,000,000 |
| Number of table versions for each account | 1,000,000 |
| Number of connections for each account | 1,000 |
| Number of crawlers for each account | 25 |
| Number of jobs for each account | 25 |
| Number of triggers for each account | 25 |
| Number of concurrent job runs for each account | 30 |
| Number of concurrent job runs for each job | 3 |
| Number of jobs for each trigger | 10 |
| Number of development endpoints for each account | 5 |
| Maximum data processing units (DPUs) used by a development endpoint at one time | 5 |
| Maximum DPUs used by a role at one time | 100 |
| Database name length |
Unlimited For compatibility with other metadata stores, such as Apache Hive, the name is changed to use lowercase characters. If you plan to access the database from Amazon Athena, provide a name with only alphanumeric and underscore characters. |
| Connection name length | Unlimited |
| Crawler name length | Unlimited |
Step 1: Create a new project
To create a new project, take these high-level steps:
-
Create a new project in AWS SCT. For more information, see Starting and managing Projects in AWS SCT.
-
Add your source and target databases to the project. For more information, see Adding servers to project in AWS SCT.
Make sure that you have chosen Use AWS Glue in the target database connection settings. To do so, choose the AWS Glue tab. For Copy from AWS profile, choose the profile that you want to use. The profile should automatically fill in the AWS access key, secret key, and Amazon S3 bucket folder. If it doesn't, enter this information yourself. After you choose OK, AWS Glue analyzes the objects and loads metadata into the AWS Glue Data Catalog.
Depending on your security settings, you might get a warning message that says your account doesn't have sufficient privileges for some of the schemas on the server. If you have access to the schemas that you're using, you can safely ignore this message.
-
To finish preparing to import your ETL, connect to your source and target databases. To do so, choose your database in the source or target metadata tree, and then choose Connect to the server.
AWS Glue creates a database on the source database server and one on the target database server to help with the ETL conversion. The database on the target server contains the AWS Glue Data Catalog. To find specific objects, use search on the source or target panels.
To see how a specific object converts, find an item you want to convert, and choose Convert schema from its context (right-click) menu. AWS SCT transforms this selected object into a script.
You can review the converted script from the Scripts folder in the right panel. Currently, the script is a virtual object, which is available only as part of your AWS SCT project.
To create an AWS Glue job with your converted script, upload your script to Amazon S3. To upload the script to Amazon S3, choose the script, then choose Save to S3 from its context (right-click) menu.
Step 2: Create an AWS Glue job
After you save the script to Amazon S3, you can choose it and then choose Configure AWS Glue Job to open the wizard to configure the AWS Glue job. The wizard makes it easier to set this up:
-
On the first tab of the wizard, Design Data Flow, you can choose an execution strategy and the list of scripts you want to include in this one job. You can choose parameters for each script. You can also rearrange the scripts so that they run in the correct order.
-
On the second tab, you can name your job, and directly configure settings for AWS Glue. On this screen, you can configure the following settings:
-
AWS Identity and Access Management (IAM) role
-
Script file names and file paths
-
Encrypt the script using server-side encryption with Amazon S3–managed keys (SSE-S3)
-
Temporary directory
-
Generated Python library path
-
User Python library path
-
Path for the dependent .jar files
-
Referenced files path
-
Concurrent DPUs for each job run
-
Maximum concurrency
-
Job timeout (in minutes)
-
Delay notification threshold (in minutes)
-
Number of retries
-
Security configuration
-
Server-side encryption
-
-
On the third step, or tab, you choose the configured connection to the target endpoint.
After you finish configuring the job, it displays under the ETL jobs in the AWS Glue Data Catalog. If you choose the job, the settings display so you can review or edit them. To create a new job in AWS Glue, choose Create AWS Glue Job from the context (right-click) menu for the job. Doing this applies the schema definition. To refresh the display, choose Refresh from database from the context (right-click) menu.
At this point, you can view your job in the AWS Glue console. To do so, sign in to
the AWS Management Console and open the AWS Glue console at https://console.aws.amazon.com/glue/
You can test the new job to make sure that it's working correctly. To do so, first check the data in your source table, then verify that the target table is empty. Run the job, and check again. You can view error logs from the AWS Glue console.
