Step 3: Deploy in production using the DynamoDB service
Topics
In the preceding sections, you deployed and tested the Tic-Tac-Toe application locally on your computer using DynamoDB local. Now, you deploy the application in production as follows:
-
Deploy the application using AWS Elastic Beanstalk, an easy-to-use service for deploying and scaling web applications and services. For more information, see Deploying a flask application to AWS Elastic Beanstalk.
Elastic Beanstalk launches one or more Amazon Elastic Compute Cloud (Amazon EC2) instances, which you configure through Elastic Beanstalk, on which your Tic-Tac-Toe application will run.
-
Using the Amazon DynamoDB service, create a
Gamestable that exists on AWS rather than locally on your computer.
In addition, you also have to configure permissions. Any AWS resources you create,
such as the Games table in DynamoDB, are private by default. Only the resource
owner, that is the AWS account that created the Games table, can access
this table. Thus, by default your Tic-Tac-Toe application cannot update the
Games table.
To grant necessary permissions, you create an AWS Identity and Access Management (IAM) role and grant this
role permissions to access the Games table. Your Amazon EC2 instance first
assumes this role. In response, AWS returns temporary security credentials that the
Amazon EC2 instance can use to update the Games table on behalf of the
Tic-Tac-Toe application. When you configure your Elastic Beanstalk application, you specify the
IAM role that the Amazon EC2 instance or instances can assume. For more information about
IAM roles, see IAM roles for
amazon EC2 in the Amazon EC2 User Guide.
Note
Before you create Amazon EC2 instances for the Tic-Tac-Toe application, you must first
decide the AWS Region where you want Elastic Beanstalk to create the instances. After you create
the Elastic Beanstalk application, you provide the same Region name and endpoint in a
configuration file. The Tic-Tac-Toe application uses information in this file to
create the Games table and send subsequent requests in a specific AWS
Region. Both the DynamoDB Games table and the Amazon EC2 instances that Elastic Beanstalk
launches must be in the same Region. For a list of available Regions, see Amazon DynamoDB in the
Amazon Web Services General Reference.
In summary, you do the following to deploy the Tic-Tac-Toe application in production:
-
Create an IAM role using the IAM service. You attach a policy to this role granting permissions for DynamoDB actions to access the
Gamestable. -
Bundle the Tic-Tac-Toe application code and a configuration file, and create a
.zipfile. You use this.zipfile to give the Tic-Tac-Toe application code to Elastic Beanstalk to put on your servers. For more information about creating a bundle, see Creating an application source bundle in the AWS Elastic Beanstalk Developer Guide.In the configuration file (
beanstalk.config), you provide AWS Region and endpoint information. The Tic-Tac-Toe application uses this information to determine which DynamoDB Region to talk to. -
Set up the Elastic Beanstalk environment. Elastic Beanstalk launches an Amazon EC2 instance or instances and deploys your Tic-Tac-Toe application bundle on them. After the Elastic Beanstalk environment is ready, you provide the configuration file name by adding the
CONFIG_FILEenvironment variable. -
Create the DynamoDB table. Using the Amazon DynamoDB service, you create the
Gamestable on AWS, rather than locally on your computer. Remember, this table has a simple primary key made of theGameIdpartition key of string type. -
Test the game in production.
3.1: Create an IAM role for Amazon EC2
Creating an IAM role of the Amazon EC2 type allows the Amazon EC2
instance that is running your Tic-Tac-Toe application to assume the correct role and
make application requests to access the Games table. When creating the
role, choose the Custom Policy option and copy and paste the
following policy.
For further instructions, see Creating a role for an AWS service (AWS Management Console) in the IAM User Guide.
3.2: Create the games table in Amazon DynamoDB
The Games table in DynamoDB stores game data. If the table does not
exist, the application creates the table for you. In this case, let the application
create the Games table.
3.3: Bundle and deploy the tic-tac-toe application code
If you followed this example's steps, then you already have the downloaded the Tic-Tac-Toe application. If not, download the application and extract all the files to a folder on your local computer. For instructions, see Step 1: Deploy and test locally.
After you extract all files, you will have a code folder. To hand off
this folder to Elastic Beanstalk, you bundle the contents of this folder as a
.zip file. First, you add a configuration file to that
folder. Your application uses the Region and endpoint information to create a DynamoDB
table in the specified Region and make subsequent table operation requests using the
specified endpoint.
-
Switch to the folder where you downloaded the Tic-Tac-Toe application.
-
In the root folder of the application, create a text file named
beanstalk.configwith the following content.[dynamodb] region=<AWS region>endpoint=<DynamoDB endpoint>For example, you might use the following content.
[dynamodb]
region=us-west-2
endpoint=dynamodb.us-west-2.amazonaws.com
For a list of available Regions, see Amazon DynamoDB in the Amazon Web Services General Reference.
Important
The Region specified in the configuration file is the location where the Tic-Tac-Toe application creates the
Gamestable in DynamoDB. You must create the Elastic Beanstalk application discussed in the next section in the same Region.Note
When you create your Elastic Beanstalk application, you request to launch an environment where you can choose the environment type. To test the Tic-Tac-Toe example application, you can choose the Single Instance environment type, skip the following, and go to the next step.
However, the Load balancing, autoscaling environment type provides a highly available and scalable environment, something you should consider when you create and deploy other applications. If you choose this environment type, you also need to generate a UUID and add it to the configuration file, as shown following.
[dynamodb]
region=us-west-2
endpoint=dynamodb.us-west-2.amazonaws.com
[flask]
secret_key= 284e784d-1a25-4a19-92bf-8eeb7a9example
In client-server communication, when the server sends a response, for security's sake the server sends a signed cookie that the client sends back to the server in the next request. When there is only one server, the server can locally generate an encryption key when it starts. When there are many servers, they all need to know the same encryption key; otherwise, they won't be able to read cookies set by the peer servers. By adding
secret_keyto the configuration file, you tell all servers to use this encryption key. -
Zip the content of the root folder of the application (which includes the
beanstalk.configfile)—for example,TicTacToe.zip. -
Upload the
.zipfile to an Amazon Simple Storage Service (Amazon S3) bucket. In the next section, you provide this.zipfile to Elastic Beanstalk to upload on the server or servers.For instructions on how to upload to an Amazon S3 bucket, see Create a bucket and Add an object to a bucket in the Amazon Simple Storage Service User Guide.
3.4: Set up the AWS Elastic Beanstalk environment
In this step, you create an Elastic Beanstalk application, which is a collection of components including environments. For this example, you launch one Amazon EC2 instance to deploy and run your Tic-Tac-Toe application.
-
Enter the following custom URL to set up an Elastic Beanstalk console to set up the environment.
https://console.aws.amazon.com/elasticbeanstalk/?region=<AWS-Region>#/newApplication ?applicationName=TicTacToeyour-name&solutionStackName=Python &sourceBundleUrl=https://s3.amazonaws.com/<bucket-name>/TicTacToe.zip&environmentType=SingleInstance &instanceType=t1.microFor more information about custom URLs, see Constructing a Launch Now URL in the AWS Elastic Beanstalk Developer Guide. For the URL, note the following:
-
You must provide an AWS Region name (the same as the one you provided in the configuration file), an Amazon S3 bucket name, and the object name.
-
For testing, the URL requests the SingleInstance environment type, and
t1.microas the instance type. -
The application name must be unique. Thus, in the preceding URL, we suggest you prepend your name to the
applicationName.
Doing this opens the Elastic Beanstalk console. In some cases, you might need to sign in.
-
-
In the Elastic Beanstalk console, choose Review and Launch, and then choose Launch.
-
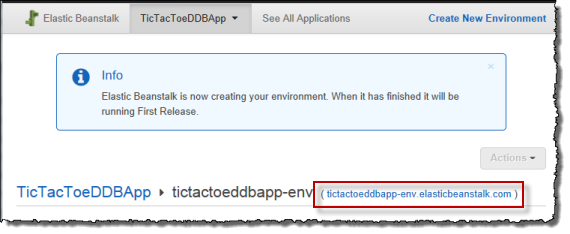
Note the URL for future reference. This URL opens your Tic-Tac-Toe application home page.
-
Configure the Tic-Tac-Toe application so it knows the location of the configuration file.
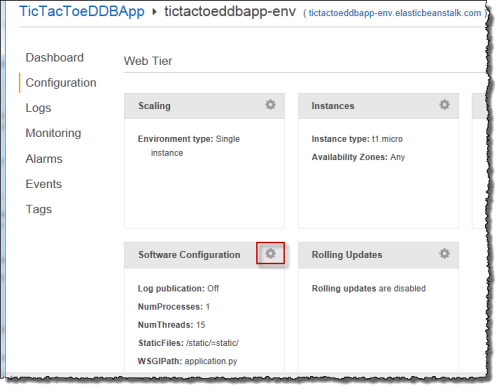
After Elastic Beanstalk creates the application, choose Configuration.
-
Choose the gear icon next to Software Configuration, as shown in the following screenshot.
-
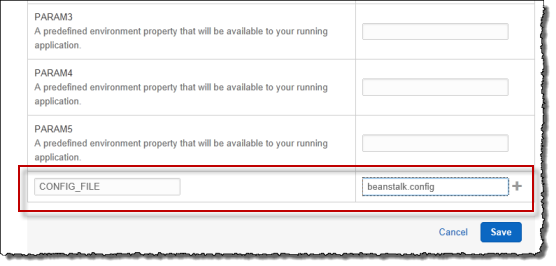
At the end of the Environment Properties section, enter
CONFIG_FILEand its valuebeanstalk.config, and then choose Save.It might take a few minutes for this environment update to complete.
After the update completes, you can play the game.
-
-
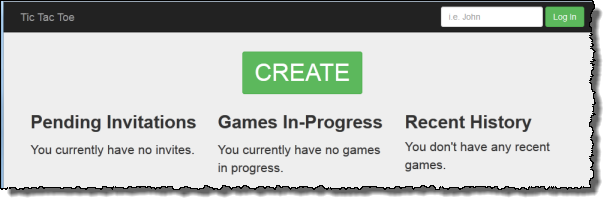
In the browser, enter the URL you copied in the previous step, as shown in the following example.
http://<pen-name>.elasticbeanstalk.comDoing this opens the application home page.
-
Log in as testuser1, and choose CREATE to start a new tic-tac-toe game.
-
Enter
testuser2in the Choose an Opponent box.
-
Open another browser window.
Make sure that you clear all cookies in your browser window so you won't be logged in as same user.
-
Enter the same URL to open the application home page, as shown in the following example.
http://<env-name>.elasticbeanstalk.com -
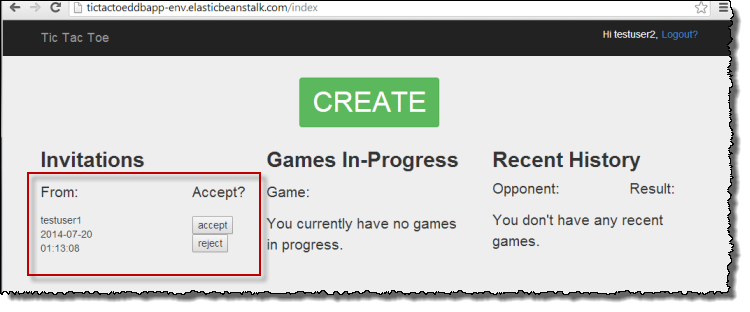
Log in as testuser2.
-
For the invitation from testuser1 in the list of pending invitations, choose accept.
-
Now the game page appears.

Both testuser1 and testuser2 can play the game. For each move, the application saves the move in the corresponding item in the
Gamestable.