AWS .NET Modernization Tools Porting Assistant (PA) for .NET, AWS App2Container (A2C), AWS Toolkit for .NET Refactoring (TR), and AWS Microservice Extractor (ME) for .NET is no longer open to new customers. If you would like to use the service, sign up prior to November 7, 2025. Alternatively use AWS Transform
Containerizing complex Windows .NET applications with App2Container
Containerization for complex multi-tier Windows .NET applications requires careful planning. When functionality is shared between the root application and one or more lower-level or system applications, you need to make decisions about packaging, deployment, and orchestration for all of the components.
To summarize how AWS App2Container works to containerize a complex Windows .NET application, we'll visit each step in the App2Container workflow, and call out the highlights and things to consider.
Step 1: Setup and initialization
Setup and initialization are the same for complex Windows .NET applications as for other types of applications. Setup tasks include installing software, configuring your AWS profile and IAM permissions, and deciding which servers the App2Container commands should run on. To learn more about setting up your environment before running App2Container for the first time, see Prerequisites: Set up your servers.
After you have completed the setup tasks, but before you use App2Container for the first time, you must initialize the servers where you plan to run App2Container commands. To learn more about initialization and worker machine configuration, see the Initialize section in the App2Container command reference.
Step 2: Analysis phase
After you have completed setup and initialization tasks on your servers, App2Container helps you to take an inventory of your running applications, and perform analysis to determine what should be included in your application containers.
Inventory
The first step in the analysis phase is to take an inventory of your applications. When you run the app2container inventory command (or the app2container remote inventory command, if you have configured a worker machine), App2Container detects the applications that are running in IIS. It also detects the Windows services that could be configured as dependent application components.
App2Container identifies each IIS application or Windows service as a separate application, with
its own application ID in the inventory.json file. App2Container makes an
effort to exclude basic operating system services that you would not want to add to your
containers. However, even when these services are excluded, the inventory list can still
be quite long.
To narrow the results of the app2container inventory or
app2container remote inventory commands, you can specify what type of
application you are looking for with the --type option:
-
To run an inventory of your IIS applications, you can set the
--typeoption to "iis". -
To run an inventory of your Windows services, you can set the
--typeoption to "service".
If you don't want App2Container to filter inventory results at all, you can use the
--nofilter option. This option prevents App2Container from filtering out default
system services when building the inventory list. For more information and command syntax,
see the inventory or
remote inventory command in the command
reference section.
Analysis
When you run the app2container analyze or app2container
remote analyze commands, App2Container analyzes the application component that you
specify with the --application-id parameter.
App2Container creates the folder structure for the application component, inside of the App2Container
directory on your application server or worker machine. It produces the
analysis.json file, and saves it to the new folder structure,
along with other artifacts that are required for containerization. The
analysis.json file is where you begin to define your container
structure.
Tip
Run the app2container analyze or app2container remote analyze command for every component in your multi-tier application before you configure your container structure.
You can implement the following container structures for a multi-tier Windows .NET application:
-
Multiple application components running in separate containers (recommended)
In this scenario, each application component in your multi-tier Windows .NET application runs in a separate container. Relationships between the root application and up to two dependent applications are configured in the
deployment.jsonfile for the root application. This file is produced during the containerization phase.When your application components are running in separate containers, leave the
additionalAppsarray in theanalysis.jsonfile empty for all components. -
Multiple application components running in a single container
In this scenario, the application components in a multi-tier Windows .NET application run together in one container. We recommend that packaging multiple application components in a single container is only done when there are cross-dependencies between the components.
To specify multiple application components running in a single container, you can include up to five dependent component application IDs in the
additionalAppsarray in theanalysis.jsonfile for the root application.Note
This configuration has the following limitations:
-
Only the port that is defined for the root application is exposed to outside traffic through your load balancer. Ports that are defined for other application components are exposed only from the container, and are not accessible through the load balancer.
-
If you are using remote commands on a worker machine, all of the application components in a multi-tier application must be running on the same application server if you want them to run in a single container.
-
To learn more about configuring containers, see Configuring application containers. To compare configuration examples for a simple .NET application, and for complex multi-tier .NET applications, expand the Containers running on Windows section, and explore the example tabs.
For more information and command syntax, see the analyze or remote analyze command in the command reference section.
Step 3: Containerization
This phase creates containers for your application, based on the output of the analysis
phase and on your configuration in the analysis.json file.
Extract
If you are using a worker machine to run App2Container commands, or if you want to store an application archive for reference, this phase starts with an app2container extract or app2container remote extract command. Because this has no effect on the configuration for multi-tier application containers, we will not cover that here.
Containerize
The app2container containerize command performs the following
tasks for the application that's specified in the --application id
parameter:
-
Extracts application artifacts from the server it runs on, or reads from an extract archive. For complex multi-tier applications, the extract includes all artifacts that are needed for all of the components running in the container.
-
Generates a Dockerfile and a container image, based on the application artifacts and the application settings in the
analysis.jsonfile. -
Creates the
deployment.jsonfile that defines initial settings for container deployment during the deployment phase.
You must run the app2container containerize command for the root application container, and for each additional application component that runs in a separate container. Do not run the command for any components that are included in the root application container. The command displays real-time task completion messages, followed by instructions for next steps. This includes the AWS commands that you run if you are deploying manually.
To configure the deployment.json file for a complex multi-tier
application, refer to the following scenario that describes your implementation:
-
Multiple application components running in separate containers
In this scenario, each application component is running in a separate container, and each has its own deployment file. Before running the generate app-deployment command, configure the
deployment.jsonfile for the root application to include all dependent applications or services in thedependentAppsarray, including the application ID, private root domain, and DNS record name for each one. -
Multiple application components running in a single container
If you are running multiple application components in a single container, the process for configuring the
deployment.jsonfile is the same as for any other containerized application. Leave thedependentAppsarray empty.
Note
If you are deploying to a specific VPC, make sure that all components point to
that VPC in the vpcId parameter in the reuseResources
array in the deployment.json file.
To learn more about configuring your deployment.json file,
see Configuring container deployment. For more
information and command syntax for creating your application container, see the
containerize
command in the command reference section.
Step 4: Deployment
Deployment steps for complex Windows .NET applications with multiple application components running in a single container are handled the same as any other application deployment. For more information and command syntax for deploying your application container, see the generate app-deployment command in the command reference section.
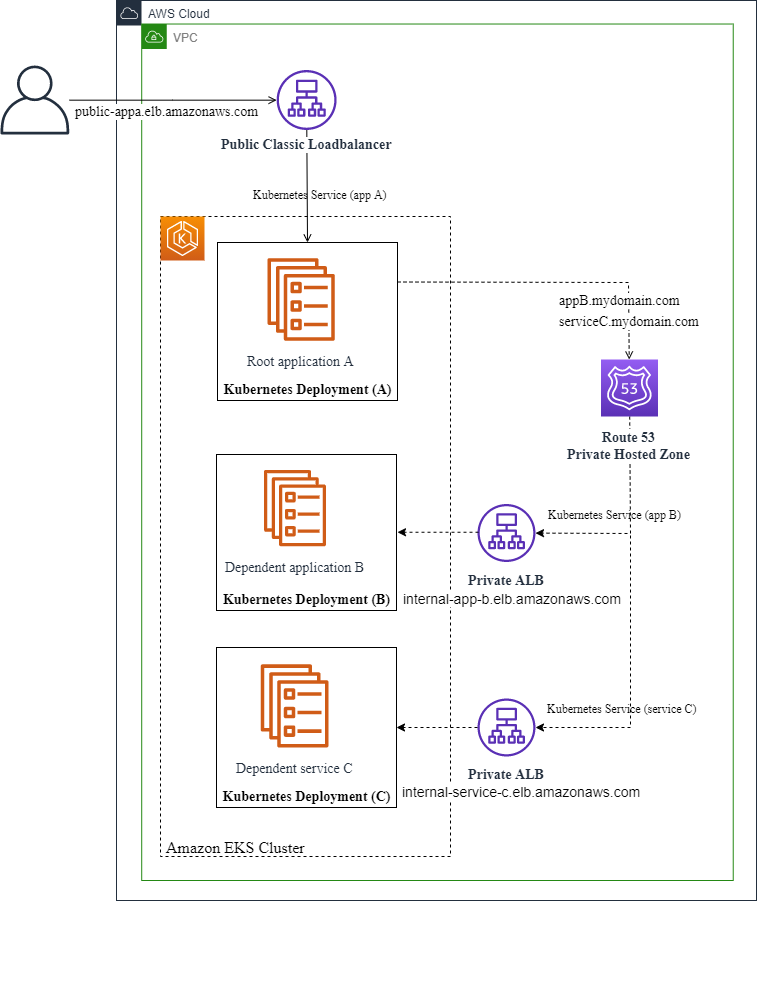
The remainder of the content in this section applies to complex Windows .NET applications that have multiple application components running in separate containers, similar to the application example shown in the following diagrams:
Amazon ECS deployment
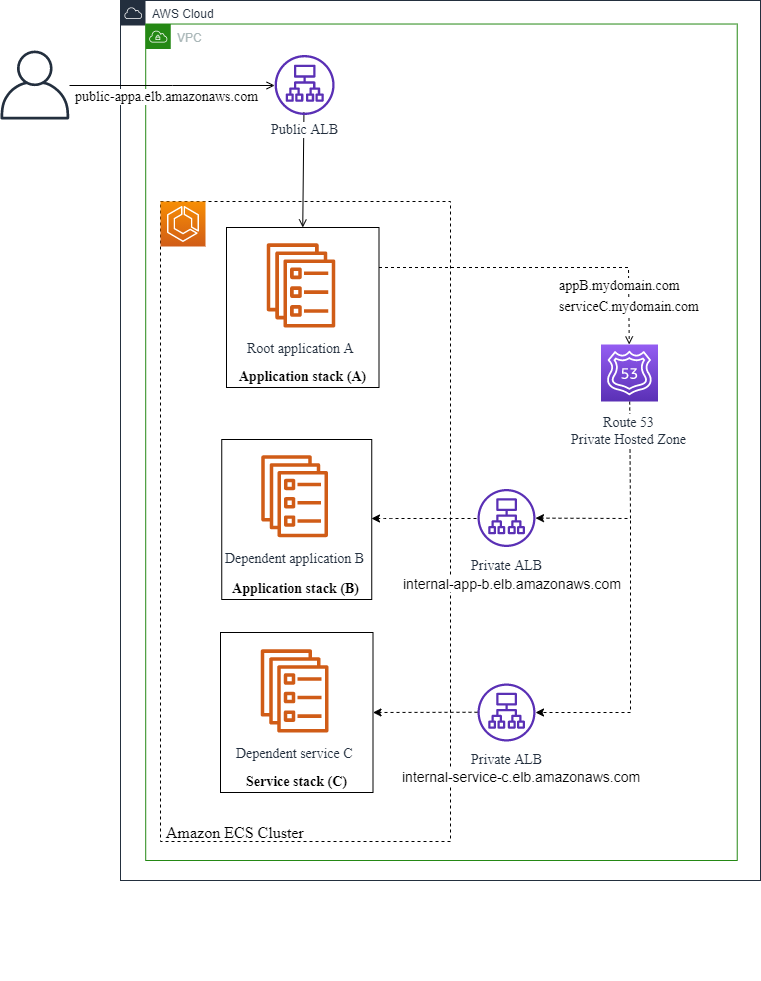
Amazon EKS deployment
Normally, you run the generate app-deployment command for each application container that you create. However, with complex Windows .NET applications that have dependent applications running in separate containers, App2Container takes care of some of that for you. When you run the generate app-deployment command for the root application, App2Container completes the following tasks for the root application and each of its dependent application components:
-
Checks for AWS and Docker prerequisites.
-
Creates an Amazon ECR repository.
-
Pushes the container image to the Amazon ECR repository.
-
Generates the following artifacts, depending on your target container management service:
Amazon ECS
-
An Amazon ECS task definition.
-
The
ecs-master.ymlfile that you can use for Amazon ECS deployment.
Amazon EKS
-
The Kubernetes
eks-master.ymlfile that you can use for Amazon EKS deployment. -
The
eks_deployment.yamlandeks_service.yamlfiles that you can use with the kubectl command.
-
-
Generates a
pipeline.jsonfile.
Additionally, if you use the --deploy option, App2Container takes care of all
of those deployments in the order in which they need to run, and configures shared
infrastructure settings. When App2Container handles the deployment for you, it follows these
conventions:
-
The root application and all dependent application components are deployed to the same cluster.
-
All dependent application components are configured with an internal load balancer only.
-
Each application component has its own Amazon ECS or Amazon EKS service running in a shared cluster.
If you want to customize the deployment artifacts, you can deploy manually, using the AWS Management Console or AWS CLI when you are ready.
For deployment steps, choose the tab that matches your deployment scenario.
Tip
It can take a few minutes to spin up a CloudFormation stack, along with the other infrastructure that is created for your deployment. You can use one of the following methods to check the stack status for your deployment:
-
Sign in to the AWS Management Console and open the CloudFormation console at https://console.aws.amazon.com/cloudformation
. In the console, you can see stacks that are being created, as well as existing stacks. For more information, see Viewing CloudFormation stack data and resources on the AWS Management Console in the AWS CloudFormation User Guide.
-
Use one of these CloudFormation commands in the AWS CLI: list-stacks or describe-stacks. For more information, see Available Commands in the AWS CLI Command Reference.
-
Use one of these CloudFormation API commands: ListStacks or DescribeStacks. For more information, see Actions in the AWS CloudFormation API Reference.
