Tutorial: Set up a scaled and load-balanced application
Important
Before you explore this tutorial, we recommend that you first review the following introductory tutorial: Create your first Auto Scaling group.
Registering your Auto Scaling group with an Elastic Load Balancing load balancer helps you set up a load-balanced application. Elastic Load Balancing works with Amazon EC2 Auto Scaling to distribute incoming traffic across your healthy Amazon EC2 instances. This increases the scalability and availability of your application. You can enable Elastic Load Balancing within multiple Availability Zones to increase the fault tolerance of your applications.
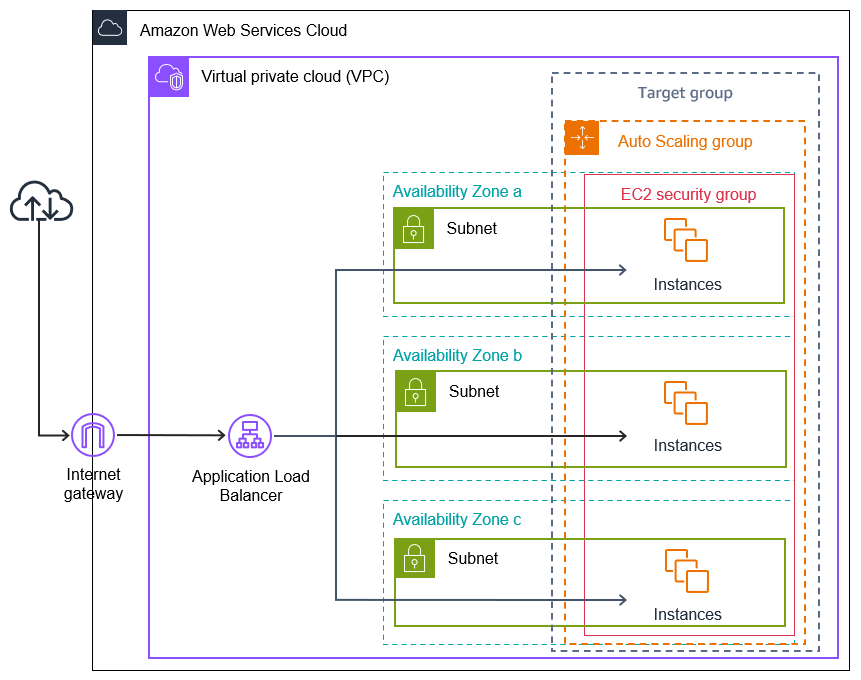
In this tutorial, we cover the basics steps for setting up a load-balanced application when the Auto Scaling group is created. When complete, your architecture should look similar to the following diagram:
Elastic Load Balancing supports different types of load balancers. We recommend that you use an Application Load Balancer for this tutorial.
For more information about introducing a load balancer into your architecture, see Use Elastic Load Balancing to distribute incoming application traffic in your Auto Scaling group .
Tasks
Prerequisites
-
A load balancer and target group. Make sure to choose the same Availability Zones for the load balancer that you plan to use for your Auto Scaling group. For more information, see Getting started with Elastic Load Balancing in the Elastic Load Balancing User Guide.
-
A security group for your launch template or launch configuration. The security group must allow access from the load balancer on both the listener port (usually port 80 for HTTP traffic) and the port that you want Elastic Load Balancing to use for health checks. For more information, see the applicable documentation:
-
Target security groups in the User Guide for Application Load Balancers
-
Target security groups in the User Guide for Network Load Balancers
Optionally, if your instances will have public IP addresses, you can allow SSH traffic for connecting to the instances.
-
-
(Optional) An IAM role that grants your application access to AWS.
-
(Optional) An Amazon Machine Image (AMI) defined as the source template for your Amazon EC2 instances. To create one now, launch an instance. Specify the IAM role (if you created one) and any configuration scripts that you need as user data. Connect to the instance and customize it. For example, you can install software and applications, copy data, and attach additional EBS volumes. Test your applications on your instance to ensure that it is configured correctly. Save this updated configuration as a custom AMI. If you don't need the instance later, you can terminate it. Instances launched from this new custom AMI include the customizations that you made when you created the AMI.
-
A virtual private cloud (VPC). This tutorial refers to the default VPC, but you can use your own. If using your own VPC, make sure that it has a subnet mapped to each Availability Zone of the Region you are working in. At minimum, you must have two public subnets available to create the load balancer. You must also have either two private subnets or two public subnets to create your Auto Scaling group and register it with the load balancer.
Step 1: Set up a launch template or launch configuration
Use either a launch template or a launch configuration for this tutorial.
Select or create a launch template
If you already have a launch template that you'd like to use, select it by using the following procedure.
To select an existing launch template
-
Open the Launch templates page
of the Amazon EC2 console. -
On the navigation bar at the top of the screen, choose the Region where the load balancer was created.
-
Select a launch template.
-
Choose Actions, Create Auto Scaling group.
Alternatively, to create a new launch template, use the following procedure.
To create a launch template
-
Open the Launch templates page
of the Amazon EC2 console. -
On the navigation bar at the top of the screen, choose the Region where the load balancer was created.
-
Choose Create launch template.
-
Enter a name and provide a description for the initial version of the launch template.
-
For Application and OS Images (Amazon Machine Image), choose the ID of the AMI for your instances. You can search through all available AMIs, or select an AMI from the Recents or Quick Start list. If you don't see the AMI that you need, choose Browse more AMIs to browse the full AMI catalog.
-
For Instance type, select a hardware configuration for your instances that is compatible with the AMI that you specified.
-
(Optional) For Key pair (login), choose the key pair to use when connecting to your instances.
-
For Network settings, expand Advanced network configuration and do the following:
-
Choose Add network interface to configure the primary network interface.
-
For Auto-assign public IP, specify whether your instances receive public IPv4 addresses. By default, Amazon EC2 assigns a public IPv4 address if the EC2 instance is launched into a default subnet or if the instance is launched into a subnet that's been configured to automatically assign a public IPv4 address. If you don't need to connect to your instances, you can choose Disable to prevent instances in your group from receiving traffic directly from the internet. In this case, they will receive traffic only from the load balancer.
-
For Security group ID, specify a security group for your instances from the same VPC as the load balancer.
-
For Delete on termination, choose Yes. This deletes the network interface when the Auto Scaling group scales in, and terminates the instance to which the network interface is attached.
-
-
(Optional) To securely distribute credentials to your instances, for Advanced details, IAM instance profile, enter the Amazon Resource Name (ARN) of your IAM role.
-
(Optional) To specify user data or a configuration script for your instances, paste it into Advanced details, User data.
-
Choose Create launch template.
-
On the confirmation page, choose Create Auto Scaling group.
Select or create a launch configuration
Note
We strongly discourage using launch configurations in new applications because it is a legacy feature with no planned investment. In addition, new accounts created on or after June 1, 2023 will not have the option to create new launch configurations through the console. For more information, see Auto Scaling launch configurations.
To select an existing launch configuration
-
Open the Launch configurations page
of the Amazon EC2 console. -
On the top navigation bar, choose the Region where the load balancer was created.
-
Select a launch configuration.
-
Choose Actions, Create Auto Scaling group.
Alternatively, to create a new launch configuration, use the following procedure.
To create a launch configuration
-
Open the Launch configurations page
of the Amazon EC2 console. When prompted for confirmation, choose View launch configurations to confirm that you want to view the Launch configurations page. -
On the top navigation bar, choose the Region where the load balancer was created.
-
Choose Create launch configuration, and enter a name for your launch configuration.
-
For Amazon machine image (AMI), enter the ID of the AMI for your instances as search criteria.
-
For Instance type, select a hardware configuration for your instance.
-
Under Additional configuration, pay attention to the following fields:
-
(Optional) To securely distribute credentials to your EC2 instance, for IAM instance profile, select your IAM role. For more information, see IAM role for applications that run on Amazon EC2 instances.
-
(Optional) To specify user data or a configuration script for your instance, paste it into Advanced details, User data.
-
(Optional) For Advanced details, IP address type, keep the default value. When you create your Auto Scaling group, you can assign a public IP address to instances in your Auto Scaling group by using subnets that have the public IP addressing attribute enabled, such as the default subnets in the default VPC. Alternatively, if you don't need to connect to your instances, you can choose Do not assign a public IP address to any instances to prevent instances in your group from receiving traffic directly from the internet. In this case, they will receive traffic only from the load balancer.
-
-
For Security groups, choose an existing security group from the same VPC as the load balancer. If you keep the Create a new security group option selected, a default SSH rule is configured for Amazon EC2 instances running Linux. A default RDP rule is configured for Amazon EC2 instances running Windows.
-
For Key pair (login), choose an option under Key pair options.
If you've already configured an Amazon EC2 instance key pair, you can choose it here.
If you don't already have an Amazon EC2 instance key pair, choose Create a new key pair and give it a recognizable name. Choose Download key pair to download the key pair to your computer.
Important
If you need to connect to your instances, do not choose Proceed without a key pair.
-
Select the acknowledgment check box, and then choose Create launch configuration.
-
Select the check box next to the name of your new launch configuration and choose Actions, Create Auto Scaling group.
Step 2: Create an Auto Scaling group
Use the following procedure to continue where you left off after creating or selecting your launch template or launch configuration.
To create an Auto Scaling group
-
On the Choose launch template or configuration page, for Auto Scaling group name, enter a name for your Auto Scaling group.
-
[Launch template only] For Launch template, choose whether the Auto Scaling group uses the default, the latest, or a specific version of the launch template when scaling out.
-
Choose Next.
The Choose instance launch options page appears, allowing you to choose the VPC network settings you want the Auto Scaling group to use and giving you options for launching On-Demand and Spot Instances (if you chose a launch template).
-
In the Network section, for VPC, choose the VPC that you used for your load balancer. If you chose the default VPC, it is automatically configured to provide internet connectivity to your instances. This VPC includes a public subnet in each Availability Zone in the Region.
-
For Availability Zones and subnets, choose one or more subnets from each Availability Zone that you want to include, based on which Availability Zones the load balancer is in. For more information, see Considerations when choosing VPC subnets.
-
[Launch template only] In the Instance type requirements section, use the default setting to simplify this step. (Do not override the launch template.) For this tutorial, you will launch only On-Demand Instances using the instance type specified in your launch template.
-
Choose Next to go to the Configure advanced options page.
-
To attach the group to an existing load balancer, in the Load balancing section, choose Attach to an existing load balancer. You can choose Choose from your load balancer target groups or Choose from Classic Load Balancers. You can then choose the name of a target group for the Application Load Balancer or Network Load Balancer you created, or choose the name of a Classic Load Balancer.
-
(Optional) For Health checks, Additional health check types, select Turn on Elastic Load Balancing health checks.
-
(Optional) For Health check grace period, enter the amount of time, in seconds. This amount of time is how long Amazon EC2 Auto Scaling needs to wait before checking the health status of an instance after it enters the
InServicestate. For more information, see Set the health check grace period for an Auto Scaling group. -
When you have finished configuring the Auto Scaling group, choose Skip to review.
-
On the Review page, review the details of your Auto Scaling group. You can choose Edit to make changes. When you are finished, choose Create Auto Scaling group.
After you have created the Auto Scaling group with the load balancer attached, the load balancer automatically registers new instances as they come online. You have only one instance at this point, so there isn't much to register. However, you can add additional instances by updating the desired capacity of the group. For step-by-step instructions, see Change the desired capacity of your Auto Scaling group.
Step 3: Verify that your load balancer is attached
To verify that your load balancer is attached
-
From the Auto Scaling groups page
of the Amazon EC2 console, select the check box next to your Auto Scaling group. -
On the Details tab, Load balancing shows any attached load balancer target groups or Classic Load Balancers.
-
On the Activity tab, in Activity history, you can verify that your instances launched successfully. The Status column shows whether your Auto Scaling group has successfully launched instances. If your instances fail to launch, you can find troubleshooting ideas for common instance launch issues in Troubleshoot issues in Amazon EC2 Auto Scaling.
-
On the Instance management tab, under Instances, you can verify that your instances are ready to receive traffic. Initially, your instances are in the
Pendingstate. After an instance is ready to receive traffic, its state isInService. The Health status column shows the result of the Amazon EC2 Auto Scaling health checks on your instances. Although an instance may be marked as healthy, the load balancer will only send traffic to instances that pass the load balancer health checks. -
Verify that your instances are registered with the load balancer. Open the Target groups page
of the Amazon EC2 console. Select your target group, and then choose the Targets tab. If the state of your instances is initial, it's probably because they are still in the process of being registered, or they are still undergoing health checks. When the state of your instances ishealthy, they are ready for use.
Step 4: Next steps
Now that you have completed this tutorial, you can learn more:
-
Amazon EC2 Auto Scaling determines whether an instance is healthy based on the status of the health checks that your Auto Scaling group uses. If you enable load balancer health checks and an instance fails the health checks, your Auto Scaling group considers the instance unhealthy and replaces it. For more information, see Health checks.
-
You can expand your application to an additional Availability Zone in the same Region to increase fault tolerance if there is a service disruption. For more information, see Add an Availability Zone.
-
You can configure your Auto Scaling group to use a target tracking scaling policy. This automatically increases or decreases the number of instances as the demand on your instances changes. This allows the group to handle changes in the amount of traffic that your application receives. For more information, see Target tracking scaling policies.
Step 5: Clean up
After you're finished with the resources that you created for this tutorial, you should consider cleaning them up to avoid incurring unnecessary charges.
To delete your Auto Scaling group
-
Open the Auto Scaling groups page
of the Amazon EC2 console. -
Select the check box next to your Auto Scaling group.
-
Choose Delete.
-
When prompted for confirmation, type
deleteto confirm deleting the specified Auto Scaling group and then choose Delete.A loading icon in the Name column indicates that the Auto Scaling group is being deleted. When the deletion has occurred, the Desired, Min, and Max columns show
0instances for the Auto Scaling group. It takes a few minutes to terminate the instance and delete the group. Refresh the list to see the current state.
Skip the following procedure if you would like to keep your launch template.
To delete your launch template
-
Open the Launch templates page
of the Amazon EC2 console. -
Select your launch template.
-
Choose Actions, Delete template.
-
When prompted for confirmation, type
Deleteto confirm deleting the specified launch template and then choose Delete.
Skip the following procedure if you would like to keep your launch configuration.
To delete your launch configuration
-
Open the Launch configurations page
of the Amazon EC2 console. -
Select your launch configuration.
-
Choose Actions, Delete launch configuration.
-
When prompted for confirmation, choose Delete.
Skip the following procedure if you want to keep the load balancer for future use.
To delete your load balancer
-
Open the Load balancers page
of the Amazon EC2 console. -
Choose the load balancer and choose Actions, Delete.
-
When prompted for confirmation, choose Yes, Delete.
To delete your target group
-
Open the Target groups page
of the Amazon EC2 console. -
Choose the target group and choose Actions, Delete.
-
When prompted for confirmation, choose Yes, Delete.
Related resources
With AWS CloudFormation, you can create and provision AWS infrastructure deployments predictably and repeatedly, by using template files to create and delete a collection of resources together as a single unit (a stack). For more information, see the AWS CloudFormation User Guide.
For a walkthrough that uses a stack template to provision an Auto Scaling group and Application Load Balancer, see Walkthrough: Create a scaled and load-balanced application in the AWS CloudFormation User Guide. Use the walkthrough and sample template as a starting point to create similar templates to meet your needs.
