Configuring Auto Replenishment
By using Auto Replenishment, you can view the amount of inventory to hold and when to order more inventory by automating inventory management.
Topics
Using Supply Planning for the first time
You can define how and when you want to plan your supply chain.
Note
When you log in to Supply Planning for the first time, you can view the onboarding pages that highlight its key features. This helps you to get familiar with the Supply Planning capabilities.
-
In the left navigation pane on the AWS Supply Chain dashboard, choose Supply Planning.
The Supply Planning page appears.
Choose Get Started.
On the Choose your plan page, select Auto Replenishment.
Choose Get Started.
On the Supply Planning page, choose Next.
You can read through the description to understand what Supply Planning offers, or you can choose Next to the Supply Planning Setup page.
On the Supply Planning Setup page, there are four steps to configure Supply Planning:
Name and Scope – Enter the name of the supply plan, and select the products and regions to be included in the supply plan.
Horizon and Schedule – Define the time frame for Supply Planning to generate plan schedules.
Inputs – Define how you want Supply Planning to use process demand forecasts.
Output – Choose the Supply Planning output to publish to your Amazon S3 connector. You can also use material deviation percentage for material plans.
Under Horizon and Schedule, you can do the following:
Planning Horizon – You can set the planning period by defining the following:
Start day of the week – You can define your weekly supply planning. For example, if your Start day of the week is Monday, and today is July 3, then the supply planning period will be from July 3 to 9.
Time Bucketization – Define the time details. Daily and Weekly options are supported.
Time Horizon – Define the planning time horizon. The supported range is from 1 to 90 days, or from 1 to 104 weeks.
Plan Schedule – Define when your supply plans must be executed.
Planning Frequency – Define how frequently you want to execute the supply plan.
Start Time – Define when to start planning on a scheduled day.
Release Times – Define the time Supply Planning releases the approved purchase orders into the ERP system.
Demand and Forecast – Define the source for demand forecasts.
Demand Planning – Supply Planning will use the published forecasts from Demand Planning .
External – Supply Planning with use the demand forecasts ingested into the Forecast data entity in data lake.
Past days for average demand calculation in consumption-based planning – For product, site combinations with inventory policy set as doc_dem, Supply Planning looks at the past days of sales history from the OutboundOrderLine data entity to determine the average daily demand. You can choose between 30, 60, 90, 180, 270, or 365 days and Supply Planning will consider the corresponding number of days of historical sales data when generating the average.
-
Forecast Netting – Independent demand includes both actual customer orders and forecasted demand. Forecast Netting offers four different methods to manage and conslidate these demand measures. By combining actual customer needs with forecast data effectively, businesses can better manage inventory levels and improve operational processes. Selecting the appropriate netting method helps align supply with demand, reducing inefficiencies and enhancing customer satisfaction.
-
Do not change forecasted demand Do not change forecasted demand – Rely solely on forecasted demand to drive supply planning, discregarding actual customer orders.
-
Replace forecasted demand with actual orders if higher than forecast – If both forecasted demand and actual customer orders fall within the same time bucket, use the higher of the two values.
-
Add actual orders to forecasted demandAdd actual orders to forecasted demand – If both forecasted demand and actual customer orders fall within the same time bucket, add the two values toghether.
-
Enable demand time fence and forecast consumption – Forecasted demand within the demand time fence is ignored. Ourside the time fence, forecasted demand is adjusted by substrating actual order quantity within the forecast consumption window. To use this option, users should also specify the demand time fence days, forecast consumption backward days, and forecast consumption forward days.
-
Demand Time Fence Days –The number of days between the current date and the demand time fence date. All forecasts on or before the demand time fence date will be ignored by the planning engine.
-
Forecast Consumption Backward Days –The number of days that the planning engine will go backward to find a matching forecast entry to consume starting from the due date of the sales order.
-
Forecast Consumption Forward Days– The number of days that the planning engine will go forward to find a matching forecast entry to consume starting from the due date of the sales order.
-
-
-
Carry over unmet demand (backorders) in your planning? – Select Yes to carry over the orders that are not fulfilled in the current time period to the next time period.
Supply – Define your supply related inputs.
Past Due Orders – When an order in the InboundOrderLine data entity is not delivered and the expected delivery date is before the execution date, by default, Supply Planning ignores this order. However, you can configure the number of past due days to be considered for inbound inventory to reorder stock. For example, if you set the Past Due Orders for 7 days and if an order was expected 4 days ago, the item will still be considered for inbound inventory.
Choose Continue.
Choose Finish.
Overview
You can view the overall supply plan for your organization, as shown in the following example page.
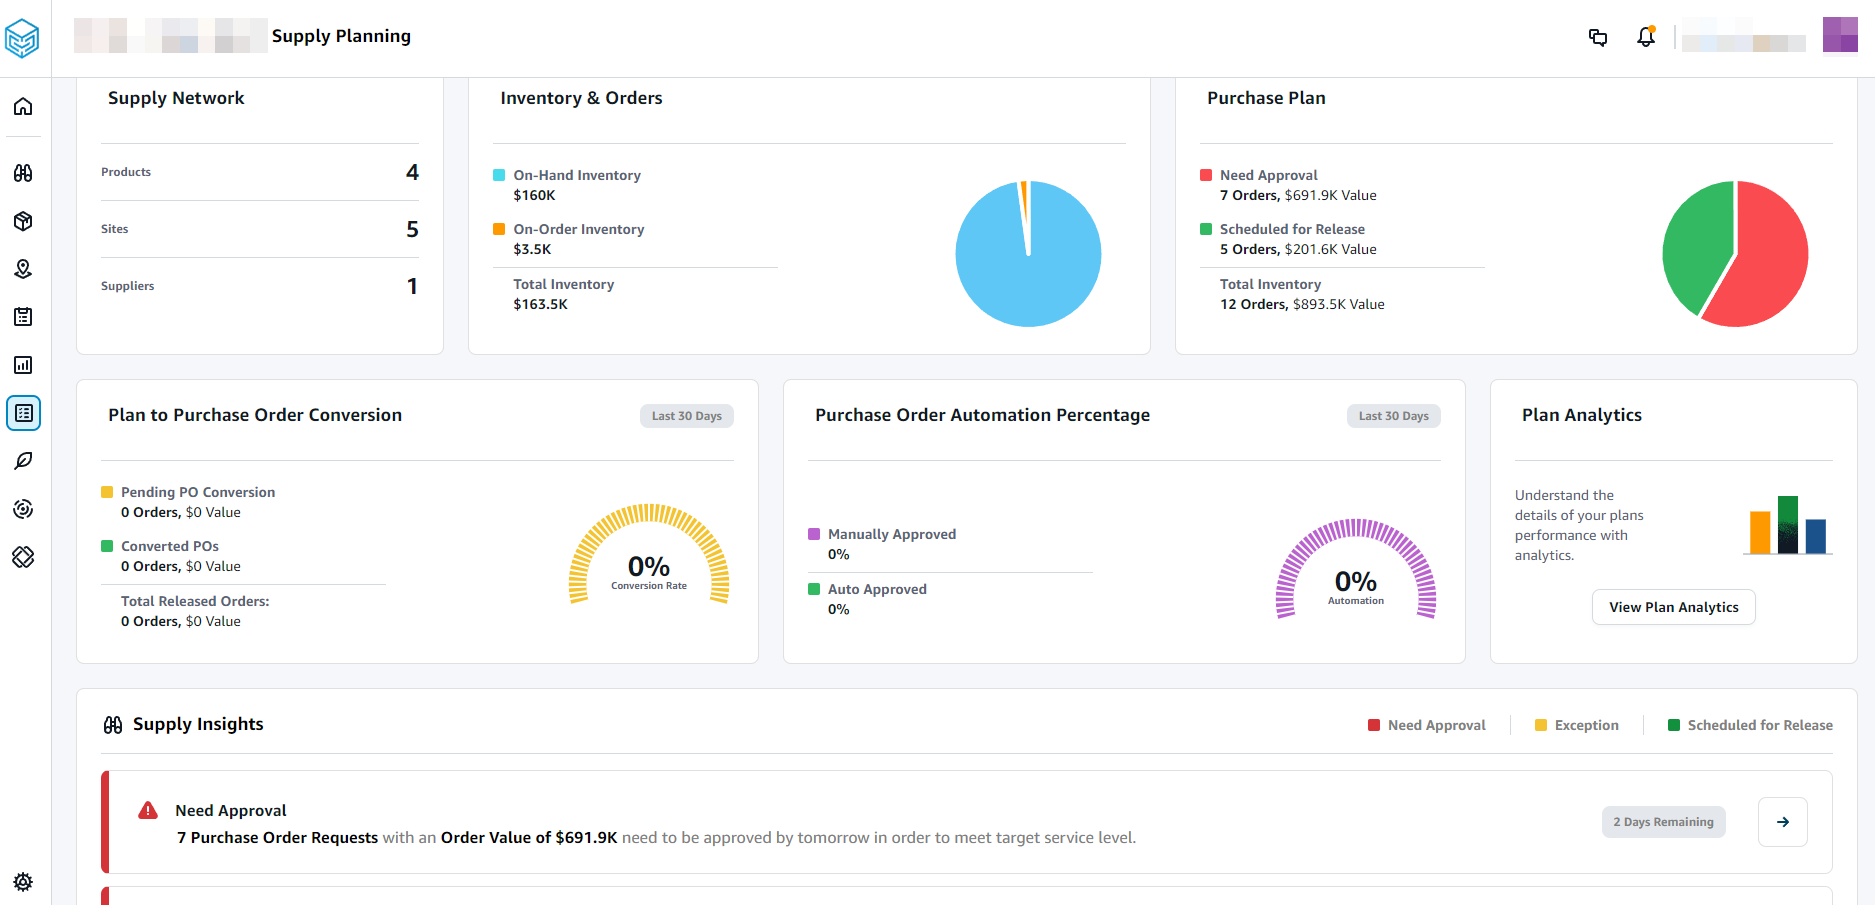
Supply Network – Under supply network, you can view the current products, sites, and suppliers in the current supply plan.
Inventory and Orders – Displays the total inventory across sites, including inventory on-hand and the inventory that is currently on-order with the suppliers.
Purchase Plan – Displays the system-generated purchase order requests to replenish inventory at sites.
Need Approval – Supply Planning uses the approval criteria you set under Settings to flag purchase order requests for approval.
Scheduled for Release – Approved or auto-approved purchase order requests scheduled to be released to outbound connectors at the time you scheduled under Settings.
Plan to Purchase Order Conversion – Purchase order requests converted to POs in your ERP or purchasing systems. To calculate the accurate metrics, Purchase Order data coming from your source system must carry the reference back to the Purchase Order Request ID published to the outbound. This metric helps planners identify purchase order requests that are not converted to POs and take corrective actions.
Purchase Order Automation Percentage – Percentage of Purchase Order Requests that are auto-approved and released to outbound without user overrides to order quantity.
Supply Insights – You can view all the purchase orders that are currently in-progress or awaiting approval. You can choose each insight to view and take action on. For more information, see Plan exceptions.
You can download the supply plan report, which includes the inputs, intermediate calculations, and outputs for an auto-replenishment plan to your local computer.
On the Supply Planning Overview page, choose Export.
The Export Supply Plan window appears.
Choose Download.
Purchase order requests
You can view current purchase order request details and status.
You can use the Filters option to filter your purchase orders according to your search criteria. Your can search purchase orders based on vendors, products, sites, order value, order quantity, and requested delivery date.
Choose Apply to apply your filter criteria to the current purchase orders, and choose Save filter group to save the search filter.

Under Order Quantity, choose Edit to view and update the quantity.
You can update the quantity based on the following inputs:
On-Hand – Inventory currently in-stock.
On-Order – Total product quantity of released purchase orders in the selected site.
Reorder Quantity – The product quantity required to meet the inventory.
Required – Reorder quantity required to meet the inventory and fulfill the forecast.
Minimum – Minimum order quantity defined under VendorProduct.min_order_unit in the dataset. Supply Planning rounds the number to meet the minimum quantity.
Suggested – Final reorder quantity after adjustment.
Days of Cover – Number of days to replenish.
Choose Update to update the quantity request.
Under Product, choose the product to view the planned demand for the product.
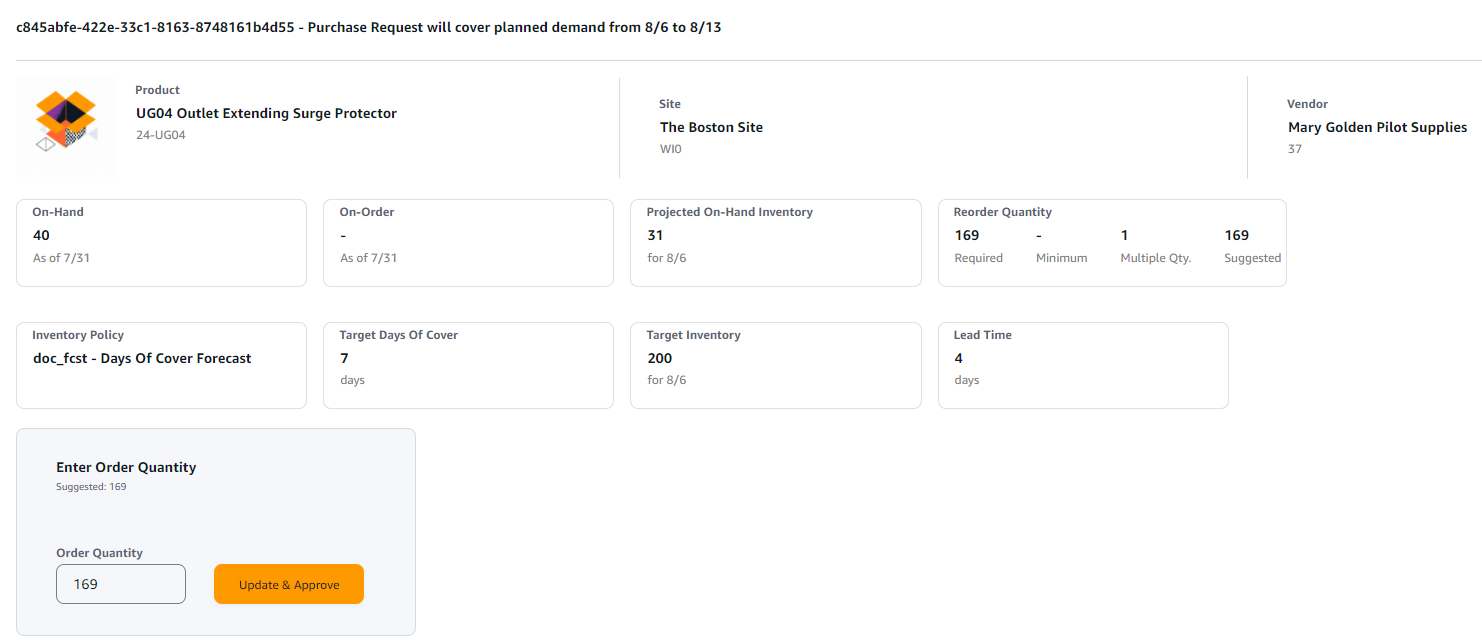
Under Planned Demand, select the site to view the replenishment plan.
The Replenishment Plan tab appears.
Note
The Replenishment Plan page will appear empty. Make sure to select the product and site to view the demand forecast.
Choose Change Product/Site.
The Choose a product and site combination page appears.
Under Product, enter the product.
Under Site, enter the site.
Choose Apply.
Under Enter order quantity, you can update the suggested Order Quantity.
Choose Update and Approve.
Under Actions, choose Approve to approve a purchase order.
You can also use the Show dropdown to filter your purchase orders based on status and release time.
Plan exceptions
You can view the list of product-site combinations that could not be planned. The Exception Type column displays the root cause of the exemption. You can provide the missing information, such as inventory policy-related attributes or lead times through data connectors, or you can upload the updated dataset in Amazon S3.
Under Product, you can choose multiple exceptions to delete or choose the Product header to delete all exceptions. Once selected, from the Actions drop-down, choose Delete Exception(s).
Supply planning settings
You can define how and when you want to plan and execute purchase orders.
In the left navigation pane on the AWS Supply Chain dashboard, choose the Settings icon. Choose Enterprise and Configuration, and then choose Supply Planning.
The Plan Settings page appears.
Follow the steps in Using Supply Planning for the first time to edit the Supply Planning configuration settings.
Under Reset Plan, choose Reset Plan to delete the existing plan and start a new supply plan.
Note
Only an administrator can reset a supply plan.
The Reset entire plan page appears.
Choose Yes, reset the plan to delete the current supply plan and all the existing purchase orders requests.
Choose Save.
