Configuring a Slack channel
After you authorize your Slack workspace, you can configure your Slack channels to use the AWS Support App.
In the channel where you invite and add the AWS Support App, you can create and search for cases, and receive case notifications. This channel displays case updates, including newly created or resolved cases, added correspondence, and shared case details.
Your Slack channel inherits permissions from the IAM role. All users in the Slack channel have the same permissions that are specified in the IAM policy attached to the role. For example, if your IAM policy grants full read and write permissions to your support cases, anyone in your Slack channel can create, update, and resolve your support cases. If your IAM policy allows the role read-only permissions, then users in your Slack channel can only view your support cases.
You can add up to 20 channels per AWS account. Each Slack channel supports up to 100 AWS accounts. This means that only 100 accounts can add the same Slack channel to the AWS Support App. To minimize distractions, we recommend adding only the accounts necessary for managing your organization's support cases.
Each AWS account must configure a Slack channel separately in the AWS Support App. This way, the AWS Support App can access the support cases in that AWS account. If another AWS account in your organization already invited the AWS Support App to that Slack channel, skip to step 3.
Note
You can configure channels that are part of Slack Connect
To configure a Slack channel
-
From your Slack application, choose the Slack channel that you want to use with the AWS Support App.
-
Complete the following steps to invite the AWS Support App to your channel:
-
Open the context (right-click) menu on the channel name, and then choose View channel details.
Choose the Integrations tab, and then choose Add an App.
-
To search for the app, enter AWS Support App.
-
Choose Add next to the AWS Support App.

-
-
Sign in to the Support Center Console
and choose Slack configuration. -
Choose Add channel.
-
On the Add channel page, under Workspace, choose the workspace name that you previously authorized. You can choose the refresh icon if the workspace name doesn't appear in the list.

-
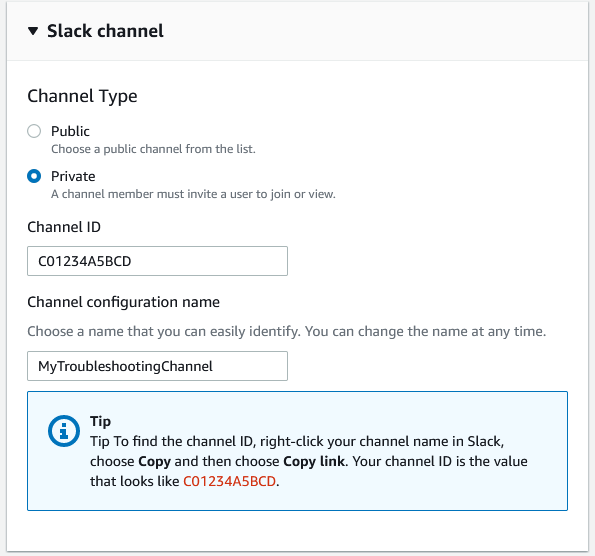
Under Slack channel, for Channel type, choose one of the following:
-
Public – Under Public channel, choose the Slack channel that you invited the AWS Support App to (step 2). If your channel doesn't appear in the list, choose the refresh icon and try again.
-
Private – Under Channel ID, enter the ID or the URL of the Slack channel that you invited the AWS Support App to.
Tip
To find the channel ID, open the context (right-click) menu for the channel name in Slack, and then choose Copy, and then choose Copy link. Your channel ID is the value that looks like
C01234A5BCD.
-
-
Under Channel configuration name, enter a name that easily identifies your Slack channel configuration for the AWS Support App. This name appears only in your AWS account and doesn't appear in Slack. You can rename your channel configuration later.
Your Slack channel type might look like the following example.
-
Under Permissions, for IAM role for the AWS Support App in Slack, choose a role that you created for the AWS Support App. Only roles that have the AWS Support App as a trusted entity appear in the list.

Note
If you haven't created a role or don't see your role in the list, see Managing access to the AWS Support App.
-
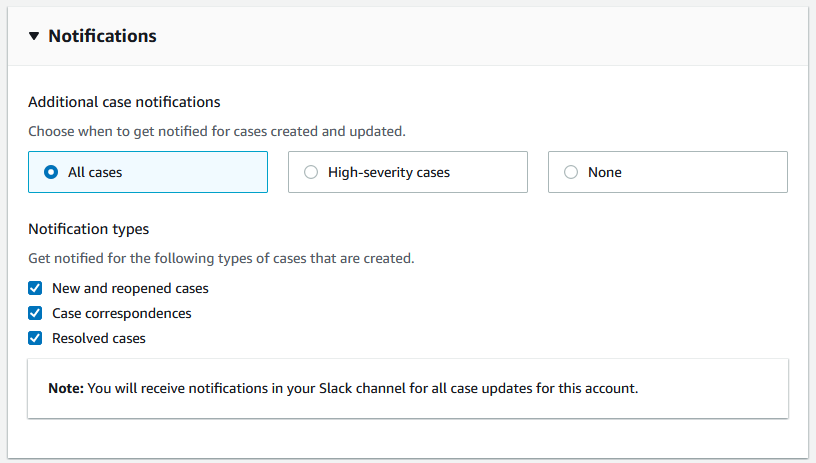
Under Notifications, specify how to get notified for cases.
-
All cases – Get notified for all case updates.
-
High-severity cases – Get notified for only cases that affect a production system or higher. For more information, see Choosing an initial support case severity level.
-
None – Don't get notified for case updates.
-
-
(Optional) If you choose All cases or High-severity cases, you must select at least one of the following options:
-
New and reopened cases
-
Case correspondences
-
Resolved cases
The following channel receives case notifications for all case updates in Slack.
-
-
Review your configuration and choose Add channel. Your channel appears in the Slack configuration page.
Update your Slack channel configuration
After you configured your Slack channel, you can update them later to change the IAM role or case notification.
To update your Slack channel configuration
-
Sign in to the Support Center Console
and choose Slack configuration. -
Under Channels, choose the channel configuration that you want.
-
On the
channelNamepage, you can do the following tasks:-
Choose Rename to update your channel configuration name. This name only appears in your AWS account and won't appear in Slack.
-
Choose Delete to delete the channel configuration from the AWS Support App. See Deleting a Slack channel configuration from the AWS Support App.
-
Choose Open in Slack to open the Slack channel in your browser.
-
Choose Edit to change the IAM role or notifications.
-
