AWS Cloud9 is no longer available to new customers. Existing customers of
AWS Cloud9 can continue to use the service as normal.
Learn more
Tour of the AWS Cloud9 IDE
This topic provides a basic tour of the AWS Cloud9 integrated development environment (IDE). To take full advantage of this tour, follow the steps shown below in sequence.
Topics
Prerequisites
To go on this tour, you must have an AWS account and an open AWS Cloud9 development environment. To learn how to do these things, you can follow the steps in Getting started with AWS Cloud9. Alternatively, you can explore separate related topics such as Setting up AWS Cloud9 and Working with environments in AWS Cloud9.
Warning
Having an AWS Cloud9 development environment might result in charges to your AWS account. These include
possible charges for Amazon EC2 if you are using an EC2 environment. For more information, see
Amazon EC2 Pricing
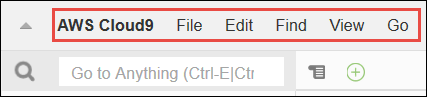
Step 1: Menu bar
The menu bar, at the top edge of the IDE, contains common commands for working with files and code and changing IDE settings. You can also preview and run code from the menu bar.
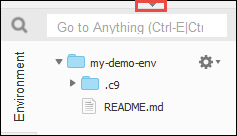
You can hide the menu bar by choosing the arrow at its edge, as follows.

You can show the menu bar again by choosing the arrow in the middle of where the menu bar was earlier, as follows.
Compare your results to the following.

You can use the IDE to work with a set of files in the next several sections in this tutorial. To set up these files, choose File, New File.
Next, copy the following text into the Untitled1 editor tab.
fish.txt
--------
A fish is any member of a group of organisms that consist of
all gill-bearing aquatic craniate animals that lack limbs with
digits. They form a sister group to the tunicates, together
forming the olfactores. Included in this definition are
lampreys and cartilaginous and bony fish as well as various
extinct related groups.
To save the file, choose File, Save. Name the
file fish.txt, and then choose Save.
Repeat these instructions, saving the second file as cat.txt, with
the following contents.
cat.txt
-------
The domestic cat is a small, typically furry, carnivorous mammal.
They are often called house cats when kept as indoor pets or
simply cats when there is no need to distinguish them from
other felids and felines. Cats are often valued by humans for
companionship and for their ability to hunt.
There are often several ways to do things in the IDE. For example, to hide the menu
bar, instead of choosing the arrow at its edge, you can choose View,
Menu Bar. To create a new file, instead of choosing File,
New File you can press Alt-N (for Windows/Linux) or
Control-N (for MacOS). To reduce this tutorial's length, we only describe
one way to do things. As you get more comfortable with the IDE, feel free to experiment
and figure out the way that works best for you.
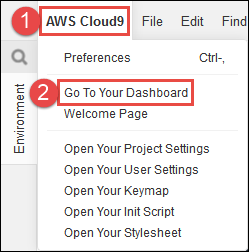
Step 2: Dashboard
The dashboard gives you quick access to each of your environments. From the dashboard, you can create, open, and change the setting for an environment.
To open the dashboard, on the menu bar, choose AWS Cloud9, Go To Your Dashboard.
To view the settings for your environment, choose the title inside of the my-demo-environment card. To go back to the dashboard, use your web browser's back button or the navigation breadcrumb called Environments.
To open to the IDE for your environment, choose Open IDE inside of the my-demo-environment card.
Note
It can take a few moments for the IDE to display again.
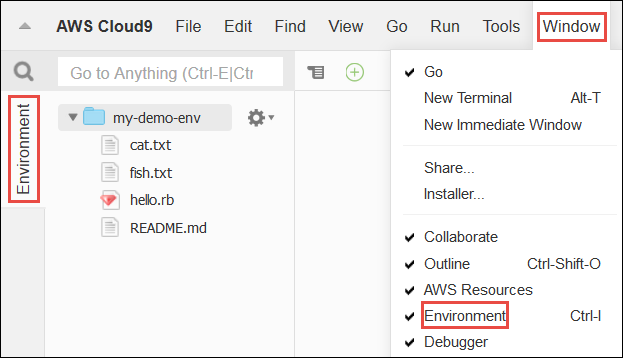
Step 3: Environment window
The Environment window shows a list of your folders and files in the environment. You can also show different types of files, such as hidden files.
To show or hide the contents of the Environment window, choose the Environment button.
To show or hide the Environment window and the Environment button, choose Window, Environment on the menu bar.
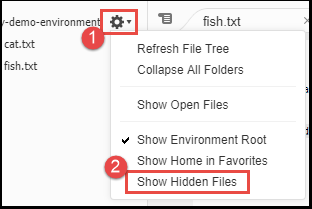
To show or hide hidden files, in the Environment window, choose the gear icon, and then choose Show Hidden Files.
Step 4: Editor, tabs, and panes
The editor is where you can do things such as write code, run a terminal session, and change IDE settings. Each instance of an open file, terminal session, and so on is represented by a tab. Tabs can be grouped into panes. Tabs are shown at the edge of their pane.

To show or hide tabs, choose View, Tab Buttons on the menu bar.
To open a new tab, choose the + icon at the edge of the row of tabs. Then choose one of the available commands, for example, New File, as follows.

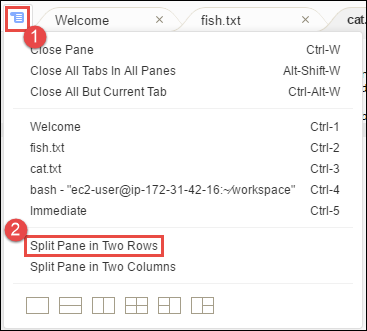
To display two panes, choose the icon that looks like a drop-down menu, which is at the edge of the row of tabs. Then choose Split Pane in Two Rows, as follows.
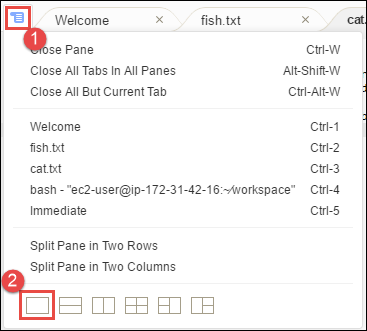
To return to a single pane, choose the drop-down menu icon again, and then choose the single square icon, as follows.
Step 5: Console
The console is an alternate place for creating and managing tabs. By default, it contains a Terminal tab, but can also contain other types of tabs.

To show or hide the console, choose View, Console on the menu bar.
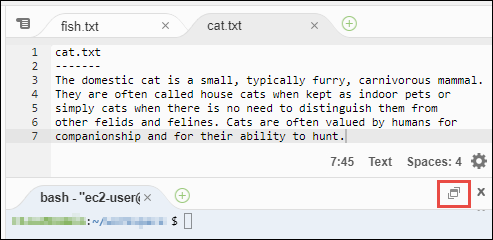
To expand or shrink the console, choose the resize icon, which is at the edge of the console, as follows.
Step 6: Open files section
The Open Files section shows a list of all files that are currently open in the editor. Open Files is part of the Environment window.

To show or hide the Open Files section, choose View, Open Files on the menu bar.
To switch between open files, choose the file of interest from the list.
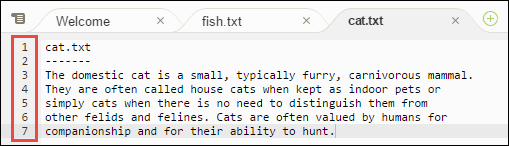
Step 7: Gutter
The gutter, at the edge of each file in the editor, shows things like line numbers and contextual symbols as you work with files.
To show or hide the gutter, choose View, Gutter on the menu bar.
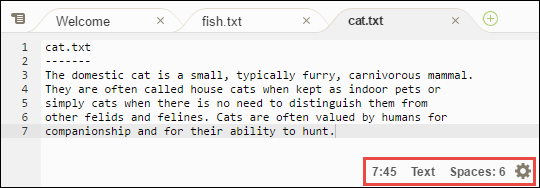
Step 8: Status bar
The status bar, at the edge of each file in the editor, shows things like line and character numbers, file type preference, space and tab settings, and related editor settings.
To show or hide the status bar, choose View, Status Bar on the menu bar.
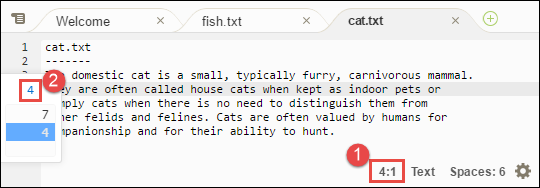
To go to a specific line number, choose a tab with the file of interest. Then in the
status bar, choose the line and character number (it should be something like
7:45). Type a line number (like 4), and then press
Enter, as follows.
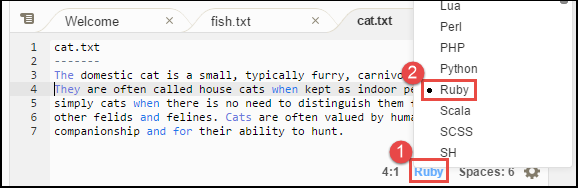
To change the file type preference, in the status bar, choose a different file type. For example, for cat.txt, choose Ruby to see the syntax colors change. To go back to plain text colors, choose Plain Text, as follows.
Step 9: Outline window
You can use the Outline window to quickly go to a specific file location.
To show or hide the Outline window and the Outline button, choose Window, Outline on the menu bar.
To see how the Outline window works, create a file named
hello.rb. Copy the following code into the file and save it.
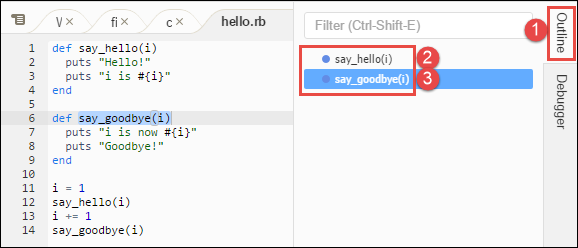
def say_hello(i)
  puts "Hello!"
  puts "i is #{i}"
end

def say_goodbye(i)
  puts "i is now #{i}"
  puts "Goodbye!"
end

i = 1
say_hello(i)
i += 1
say_goodbye(i)
To show or hide the contents of the Outline window, choose the Outline button.
In the Outline window, choose say_hello(i), and then choose say_goodbye(i), as follows.
Step 10: Go window
You can use the Go window to open a file in the editor, go to a symbol's definition, run a command, or go to a line in the active file in the editor.

To show the contents of the Go window, choose the Go button (the magnifying glass icon).
To show or hide the Go window and the Go button, choose Window, Go on the menu bar.
With the Go window open, you can:
-
Type a forward slash (
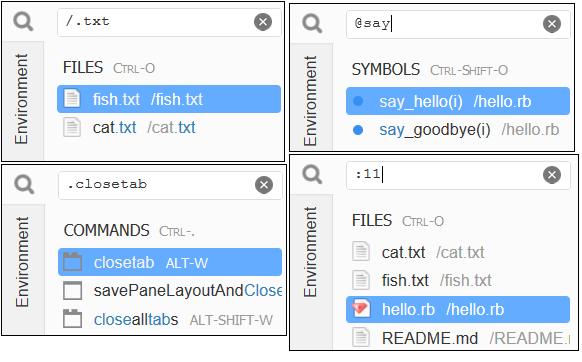
/) followed by part or all of a file name. In the list of matching files that displays, choose a file to open it in the editor. For example, typing/fishlistsfish.txt, while typing/.txtlists bothfish.txtandcat.txt.Note
File search is scoped only to non-hidden files and non-hidden folders in the Environment window.
-
Type an at symbol (
@) followed by the name of a symbol. In the list of matching symbols that displays, choose a symbol to go to it in the editor. For example, with thehello.rbfile open and active in the editor, type@helloto listsay_hello(i), or type@sayto list bothsay_hello(i)andsay_goodbye(i).Note
If the active file in the editor is part of a supported language project, symbol search is scoped to the current project. Otherwise, symbol search is scoped only to the active file in the editor. For more information, see Enhanced TypeScript support and features.
-
Type a dot (
.) followed by the name of a command. In the list of commands that displays, choose a command to run it. For example, typing.closetaband then pressingEntercloses the current tab in the editor. For a list of available commands, see the Commands reference for the AWS Cloud9 IDE. -
Type a colon (
:) followed by a number to go to that line number in the active file in the editor. For example, with thehello.rbfile open and active in the editor, type:11to go to line 11 in that file.
To see the keybindings for each of these actions based on the current keyboard mode and operating system, see each of the available Go To commands on the Go menu in the menu bar.
Step 11: Immediate tab
The Immediate tab enables you to test small snippets of JavaScript code. To see how the Immediate tab works, do the following.
-
Open an Immediate tab by choosing Window, New Immediate Window on the menu bar.
-
Run some code in the Immediate tab. To try this, type the following code into the window, pressing
Shift-Enterafter typing line 1 and again after line 2. PressEnterafter line 3. (If you pressEnterinstead ofShift-Enterafter you type line 1 or line 2, the code will run earlier than you want it to.)for (i = 0; i <= 10; i++) { // Press Shift-Enter after typing this line. console.log(i) // Press Shift-Enter after typing this line. } // Press Enter after typing this line. The numbers 0 to 10 will be printed.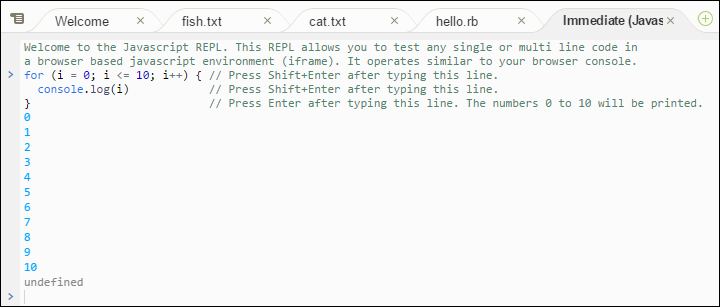
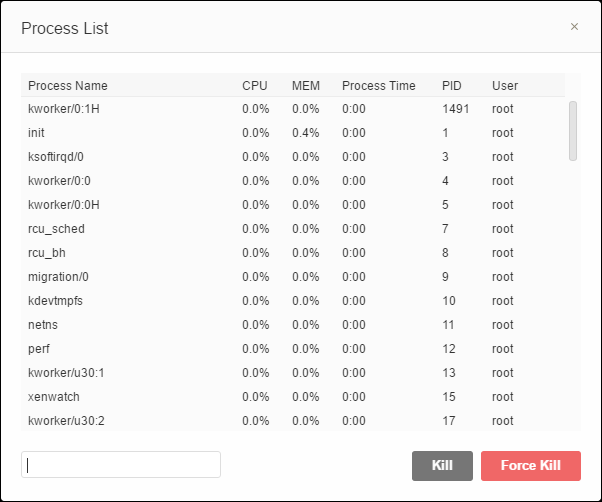
Step 12: Process list
The Process List shows all of the running processes. You can stop or even forcibly stop processes that you don't want to run anymore. To see how the Process List window works, do the following.
-
Show the Process List by choosing Tools, Process List on the menu bar.
-
Find a process. In the Process List, type the name of the process.
-
Stop or forcibly stop a process. In the list of processes, choose the process, and then choose Kill or Force Kill.
Step 13: Preferences
Preferences include the following settings.
-
Settings for the current environment only, such as whether to use soft tabs in the editor, the file types to ignore, and code completion behaviors for languages such as PHP and Python.
-
Your user settings across each of your environments, such as colors, fonts, and editor behaviors.
-
Your keybindings, such as which shortcut key combinations you prefer to use to work with files and the editor.
-
The IDE's overall theme.
To show preferences, choose AWS Cloud9, Preferences on the menu bar. Something like the following is displayed.

Step 14: Terminal
You can run one or more terminal sessions in the IDE. To start a terminal session, choose Window, New Terminal on the menu bar. Or, choose the "plus" icon next to the Console tabs and choose New Terminal.
You can try running a command in the terminal. For example, in the terminal, type
echo $PATH and then press Enter to print the value of the
PATH environment variable.
You can also try running additional commands. For example, try commands such as the following.
-
pwdto print the path to the current directory. -
aws --versionto print version information about the AWS CLI. -
ls -lto print information about the current directory.
Step 15: Debugger window
You can use the Debugger window to debug your code. For example, you can step through running code a portion at a time, watch the values of variables over time, and explore the call stack.
Note
This procedure is similar to Step 2: Basic tour of the IDE from either of the basic IDE tutorials.
To show or hide the Debugger window and the Debugger button, choose Window, Debugger on the menu bar.
For this tutorial, you can experiment with the Debugger window and some JavaScript code by doing the following.
-
Check the Node.js installation in your environment by running the following command in a terminal session:
node --version. If Node.js is installed, the Node.js version number is shown in the output, and you can skip ahead to step 3 in this procedure ("Write some JavaScript code..."). -
If you need to install Node.js, do the following.
-
Run the following two commands, one at a time, to be sure your environment has the latest updates and then download Node Version Manager (nvm). (nvm is a simple Bash shell script that is useful for installing and managing Node.js versions. For more information, see Node Version Manager
on GitHub.) For Amazon Linux:
sudo yum -y update
curl -o- https://raw.githubusercontent.com/creationix/nvm/v0.33.0/install.sh | bash
For Ubuntu Server:
sudo apt update curl -o- https://raw.githubusercontent.com/creationix/nvm/v0.33.0/install.sh | bash -
Use a text editor to update your shell profile file (for example,
~/.bashrc) to enable nvm to load. For example, in the Environment window of the IDE, choose the gear icon, and then choose Show Home in Favorites. Repeat this step and choose Show Hidden Files as well. -
Open the
~/.bashrcfile. -
Type or paste the following code at the end of the file to enable nvm to load.
For Amazon Linux:
export NVM_DIR="/home/ec2-user/.nvm"
[ -s "$NVM_DIR/nvm.sh" ] && \. "$NVM_DIR/nvm.sh"  # This loads nvm.
For Ubuntu Server:
export NVM_DIR="/home/ubuntu/.nvm" [ -s "$NVM_DIR/nvm.sh" ] && \. "$NVM_DIR/nvm.sh" # This loads nvm. -
Save the file.
-
Close that terminal session and start a new one. Then run the following command to install the latest version of Node.js.
nvm install node
-
-
Write some JavaScript code to debug. For example, create a file, add the following code to the file, and save it as
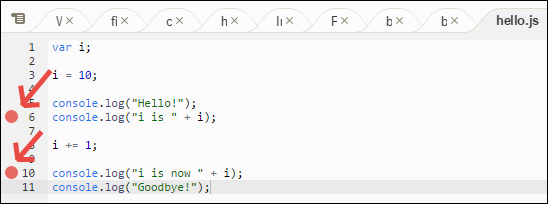
hello.js.var i; i = 10; console.log("Hello!"); console.log("i is " + i); i += 1; console.log("i is now " + i); console.log("Goodbye!"); -
Add some breakpoints to the code. For example, in the gutter, choose the margin next to lines 6 and 10. A red circle is displayed next to each of these line numbers, as follows.
-
Now you're ready to debug the JavaScript code. To try this, do the following.
-
To show or hide the contents of the Debugger window, choose the Debugger button, as shown in the next step.
-
Watch the value of the variable named
iwhile the code is running. In the Debugger window, for Watch Expressions, choose Type an expression here. Type the letteri, and then pressEnter, as follows.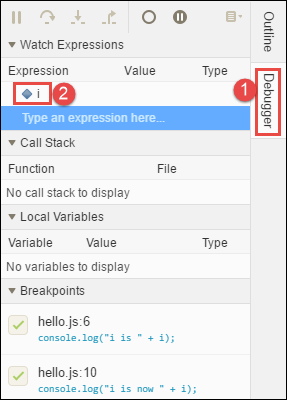
-
Begin running the code. Choose Run, Run With, Node.js, as follows.

-
The code pauses running on line 6. The Debugger window shows the value of
iin Watch Expressions, which is currently10.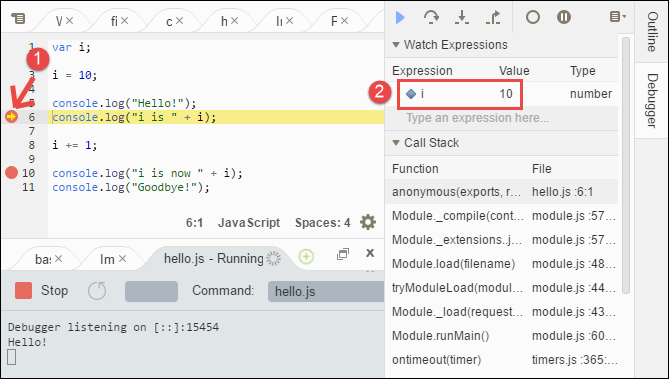
-
In the Debugger window, choose Resume, which is the blue arrow icon, as follows.

-
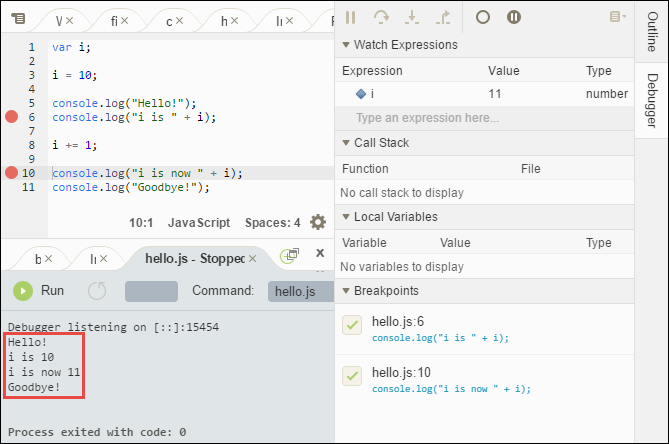
The code pauses running on line 10. The Debugger window now shows the new value of
i, which is currently11. -
Choose Resume again. The code runs to the end. The output is printed to the console's hello.js tab, as follows.
-
Compare your results to the following.
Final thoughts
Warning
Remember that having an AWS Cloud9 development environment might result in charges to your AWS account.
These include possible charges for Amazon EC2 if you are using an EC2 environment. For more
information, see Amazon EC2 Pricing
There are additional topics in the parent section (Working with the IDE) that you might want to explore. However, when you are finished touring the AWS Cloud9 IDE and no longer need the environment, be sure to delete it and its associated resources, as described in Deleting an Environment.
