Initialize the cluster in AWS CloudHSM
After you create your cluster and add your hardware security module (HSM) in AWS CloudHSM, you can initialize the cluster. Complete the steps in the following topics to initialize your cluster.
Note
Before you initialize the cluster, review the process by which you can verify the identity and authenticity of the HSMs. This process is optional and works only until a cluster is initialized. After the cluster is initialized, you cannot use this process to get your certificates or verify the HSMs.
Topics
Overview
The cluster initialization process establishes your ownership and control over the cluster and your HSMs through a certificate-based authentication system. This process cryptographically proves that you are the sole owner of the HSMs in your cluster and creates the foundation of trust that will be required for all future connections to your HSMs.
This page will show you how to do the following:
-
Retrieve your cluster's certificate signing request (CSR).
-
Generate and use the private key(s) to create a self-signed root certificate or a certificate chain.
-
Sign your cluster's CSR to produce a signed HSM certificate.
-
Initialize your cluster using the signed HSM certificate and self-signed certificate or certificate chain.
When you're ready to get started, go to Step 1. Get the cluster CSR.
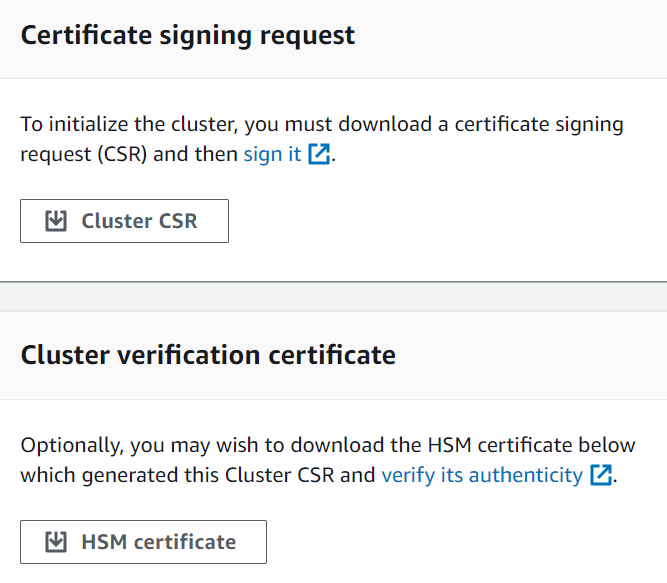
Step 1. Get the cluster CSR
Before you can initialize the cluster, you must download and sign a certificate signing request (CSR)
that is generated by the cluster's first HSM. If you followed the steps to
verify the identity of your cluster's HSM, you already
have the CSR and you can sign it. Otherwise, get the CSR now by using the
AWS CloudHSM console
Step 2. Create a private key for your Root CA
Note
For a production cluster, the key you are about to create should be created in a secure manner using a trusted source of randomness. We recommend that you use a secured offsite and offline HSM or the equivalent. Store the key safely. The key establishes the identity of the cluster and your sole control over the HSMs it contains.
For development and testing, you can use any convenient tool (such as OpenSSL) to create and sign the cluster certificate. The following example shows you how to create a key. After you have used the key to create a self-signed certificate (see below), you should store it in a safe manner. To sign into your AWS CloudHSM instance, the certificate must be present, but the private key does not.
The table below outlines the supported algorithms, key sizes, and curves for certificate generation.
| Algorithms | Size/Curves |
|---|---|
RSA PKCSv1.5 |
2048, 3072, 4096 |
RSA-PSS |
2048, 3072, 4096 |
ECDSA |
prime256v1, secp384r1, secp521r1 |
Digest |
SHA-224, SHA-256, SHA-384, and SHA-512 |
Use the following example command to create a private key for your self-signed Root CA.
$openssl genrsa -aes256 -out customerRootCA.key 2048Generating RSA private key, 2048 bit long modulus ........+++ ............+++ e is 65537 (0x10001) Enter pass phrase for customerRootCA.key: Verifying - Enter pass phrase for customerRootCA.key:
Step 3. Sign the CSR
In the previous steps, you retrieved your cluster's CSR and created a private key for your root CA. In this step, you will use your private key to generate a signing certificate in order to sign your cluster's CSR. The topics below will guide you through the process of creating a single self-signed certificate, or a certificate chain, using OpenSSL. You do not need the AWS CLI for this step, and the shell does not need to be associated with your AWS account.
Important
To initialize your cluster, your trust anchor must comply with RFC 5280
If using X509v3 extensions, the X509v3 Basic Constraints extension must be present.
The trust anchor must be a self-signed certificate.
Extension values must not conflict with each other.
Choose one of the following approaches to sign your cluster's CSR:
Choose your certificate approach
You must choose one of the following two approaches. Do not complete both approaches.
- Option A: Single self-signed certificate
-
Create a single self-signed root certificate to sign your cluster's CSR. This is the most simple, direct method of establishing trust.
Recommended for:
Environments where an external PKI is not required
Test and development environments where simplicity is preferred
- Option B: Certificate chain with intermediate CA
-
Create a certificate chain using an intermediate certificate authority. An intermediate certificate chain provides enhanced security, scalability, and flexibility by allowing root Certificate Authorities (CAs) to remain offline while delegating certificate issuance to intermediate CAs, thereby reducing the risk of compromising the root CA.
Recommended for:
Environments where an external PKI is required
Integration with AWS Private Certificate Authority (PCA)
AWS PCA Integration Example: You can use AWS Private Certificate Authority to create and manage your intermediate CA certificates. This provides automated certificate lifecycle management, including renewal and revocation, while maintaining the security benefits of keeping your root CA offline. For more information on AWS PCA, see the AWS Private Certificate Authority User Guide.
Go to: Create an intermediate certificate authority (ICA) chain
Create a single self-signed certificate
The trusted hardware that you use to create the private key for your production cluster should also provide a software tool to generate a self-signed certificate using that key. The following example uses OpenSSL and the private key that you created in the previous step to create a self-signed root CA signing certificate. The certificate is valid for 10 years (3652 days). Read the on-screen instructions and follow the prompts.
$openssl req -new -x509 -days 3652 -key customerRootCA.key -out customerRootCA.crtEnter pass phrase for customerRootCA.key: You are about to be asked to enter information that will be incorporated into your certificate request. What you are about to enter is what is called a Distinguished Name or a DN. There are quite a few fields but you can leave some blank For some fields there will be a default value, If you enter '.', the field will be left blank. ----- Country Name (2 letter code) [AU]: State or Province Name (full name) [Some-State]: Locality Name (eg, city) []: Organization Name (eg, company) [Internet Widgits Pty Ltd]: Organizational Unit Name (eg, section) []: Common Name (e.g. server FQDN or YOUR name) []: Email Address []:
This command creates a certificate file named customerRootCA.crt. Put this
certificate on every host from which you will connect to your AWS CloudHSM cluster.
If you give the file a different name or store it in a path other than the root of your
host, you should edit your client configuration file accordingly. Use the
certificate and the private key you just created to sign the cluster certificate
signing request (CSR) in the next step.
Sign the cluster CSR with your self-signed Root CA
The trusted hardware that you use to create your private key for your production cluster
should also provide a tool to sign the CSR using that key. The following example
uses OpenSSL to sign the cluster's CSR. The example command below signs the CSR with the
self-signed customerRootCA.crt
$openssl x509 -req -days 3652 -in<cluster ID>_ClusterCsr.csr \ -CA<customerRootCA>.crt \ -CAkey<customerRootCA>.key \ -CAcreateserial \ -out<cluster ID>_CustomerHsmCertificate.crtSignature ok subject=/C=US/ST=CA/O=Cavium/OU=N3FIPS/L=SanJose/CN=HSM:<HSM identifier>:PARTN:<partition number>, for FIPS mode Getting CA Private Key Enter pass phrase for<customerRootCA>.key:
This command creates a file named <cluster ID>_CustomerHsmCertificate.crt
Verify the signed certificate against the root CA (optional):
$openssl verify -purpose sslserver -CAfile customerRootCA.crt<cluster ID>_CustomerHsmCertificate.crt<cluster ID>_CustomerHsmCertificate.crt: OK
After producing the signed HSM certificate with your self-signed Root CA, go to Step 4. Initialize the cluster.
Create an intermediate certificate authority (ICA) chain
The following examples will walk you through creating a certificate chain of length 2, consisting of a root Certificate Authority (CA) and an intermediate CA. You'll first create a self-signed root CA certificate, then generate an intermediate CA that is signed by the root CA. Finally, you'll use the intermediate CA to sign your cluster's CSR, creating a complete trust chain from your HSM certificate back to the root CA. This approach provides enhanced security by keeping the root CA offline while using the intermediate CA for day-to-day certificate operations.
Important
To initialize your cluster with a certificate chain, your chain must meet the following requirements:
The chain must be ordered, starting with the Intermediate CA that signs the cluster CSR. In this order, the first ICA should have an issuer that matches the subject of the next ICA in the chain, and so forth.
Only the Root CA should be self-signed, meaning its issuer and subject should be identical.
The chain must consist of no more than 4 certificates (including the Root CA at the end), and the total size of the chain must not exceed 16 kb (kilobytes).
All Certificate Authorities (CAs) should conform to the RFC 5280
guidelines.
This section provides examples for creating an intermediate certificate authority chain using two different approaches: OpenSSL for local certificate generation, and AWS Private Certificate Authority (PCA) for managed certificate services. Choose the approach that best fits your environment and security requirements.
Note
The following examples are general use case and are both simplified, using the most basic configuration. For production environments, review additional configuration options and security requirements specific to your use case.
This command creates a file named <cluster ID>_CustomerHsmCertificate.crt
Verify the signed certificate against the certificate chain (optional):
$openssl verify -purpose sslserver -CAfile chainCA.crt<cluster ID>_CustomerHsmCertificate.crt<cluster ID>_CustomerHsmCertificate.crt: OK
After producing the signed HSM certificate with your intermediate CA, go to Step 4. Initialize the cluster.
Step 4. Initialize the cluster
Use your signed HSM certificate and your signing certificate to initialize your cluster. You can use the
AWS CloudHSM console
