Configure SAML with IAM for Amazon Connect
Amazon Connect supports identity federation by configuring Security Assertion Markup Language (SAML) 2.0 with AWS IAM to enable web-based single sign-on (SSO) from your organization to your Amazon Connect instance. This allows your users to sign in to a portal in your organization hosted by a SAML 2.0 compatible identity provider (IdP) and log in to an Amazon Connect instance with a single sign-on experience without having to provide separate credentials for Amazon Connect.
Important notes
Before you begin, note the following:
-
These instructions do not apply to Amazon Connect Global Resiliency deployments. For information that applies to Amazon Connect Global Resiliency, see Integrate your identity provider (IdP) with an Amazon Connect Global Resiliency SAML sign in endpoint.
-
Choosing SAML 2.0-based authentication as the identity management method for your Amazon Connect instance requires the configuration of AWS Identity and Access Management federation.
-
The user name in Amazon Connect must match the RoleSessionName SAML attribute specified in the SAML response returned by the identity provider.
-
Amazon Connect does not support reverse federation. That is, you can't login directly into Amazon Connect. If you tried, you'd get a Session Expired message. The authentication should be done from the Identity Provider (IdP) and not the Service Provider (SP) (Amazon Connect).
-
Most identity providers by default use the global AWS sign-in endpoint as the Application Consumer Service (ACS), which is hosted in US East (N. Virginia). We recommend overriding this value to use the regional endpoint that matches the AWS Region where your instance was created.
-
All Amazon Connect usernames are case sensitive, even when using SAML.
-
If you have old Amazon Connect instances that were set up with SAML and you need to update your Amazon Connect domain, see Personal settings.
Overview of using SAML with Amazon Connect
The following diagram shows the order in which steps take place for SAML requests to authenticate users and federate with Amazon Connect. It is not a flow diagram for a threat model.
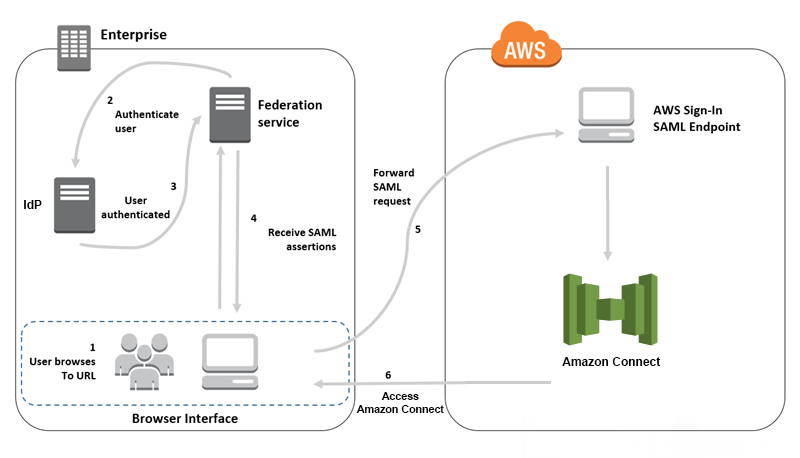
SAML requests go through the following steps:
-
The user browses to an internal portal that includes a link to log in to Amazon Connect. The link is defined in the identity provider.
-
The federation service requests authentication from the organization's identity store.
-
The identity store authenticates the user and returns the authentication response to the federation service.
-
When authentication is successful, the federation service posts the SAML assertion to the user's browser.
-
The user's browser posts the SAML assertion to the AWS sign in SAML endpoint (https://signin.aws.amazon.com/saml). AWS sign in receives the SAML request, processes the request, authenticates the user, and initiates a browser redirect to the Amazon Connect endpoint with the authentication token.
-
Using the authentication token from AWS, Amazon Connect authorizes the user and opens Amazon Connect in their browser.
Enabling SAML-based authentication for Amazon Connect
The following steps are required to enable and configure SAML authentication for use with your Amazon Connect instance:
-
Create an Amazon Connect instance and select SAML 2.0-based authentication for identity management.
-
Enable SAML federation between your identity provider and AWS.
-
Add Amazon Connect users to your Amazon Connect instance. Log in to your instance using the administrator account created when you created your instance. Go to the User Management page and add users.
Important
-
For a list of allowed characters in user names, see the documentation for the
Usernameproperty in the CreateUser action. -
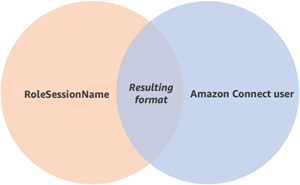
Due to the association of an Amazon Connect user and an AWS IAM Role, the user name must match exactly the RoleSessionName as configured with your AWS IAM federation integration, which typically ends up being the user name in your directory. The format of the username should match the intersection of the format conditions of the RoleSessionName and an Amazon Connect user, as shown in the following diagram:
-
-
Configure your identity provider for the SAML assertions, authentication response, and relay state. Users log in to your identity provider. When successful, they are redirected to your Amazon Connect instance. The IAM role is used to federate with AWS, which allows access to Amazon Connect.
Select SAML 2.0-based authentication during instance creation
When you are creating your Amazon Connect instance, select the SAML 2.0-based authentication option for identity management. On the second step, when you create the administrator for the instance, the user name that you specify must exactly match a user name in your existing network directory. There is no option to specify a password for the administrator because passwords are managed through your existing directory. The administrator is created in Amazon Connect and assigned the Admin security profile.
You can log in to your Amazon Connect instance, through your IdP, using the administrator account to add additional users.
Enable SAML federation between your identity provider and AWS
To enable SAML-based authentication for Amazon Connect, you must create an identity provider in the IAM console. For more information, see Enabling SAML 2.0 Federated Users to Access the AWS Management Console.
The process to create an identity provider for AWS is the same for Amazon Connect. Step 6 in the above flow diagram shows the client is sent to your Amazon Connect instance instead of the AWS Management Console.
The steps necessary to enable SAML federation with AWS include:
-
Create a SAML provider in AWS. For more information, see Creating SAML Identity Providers.
-
Create an IAM role for SAML 2.0 federation with the AWS Management Console. Create only one role for federation (only one role is needed and used for federation). The IAM role determines which permissions the users that log in through your identity provider have in AWS. In this case, the permissions are for accessing Amazon Connect. You can control the permissions to features of Amazon Connect by using security profiles in Amazon Connect. For more information, see Creating a Role for SAML 2.0 Federation (Console).
In step 5, choose Allow programmatic and AWS Management Console access. Create the trust policy described in the topic in the procedure To prepare to create a role for SAML 2.0 federation. Then create a policy to assign permissions to your Amazon Connect instance. Permissions start on step 9 of the To create a role for SAML-based federation procedure.
To create a policy for assigning permissions to the IAM role for SAML federation
-
On the Attach permissions policy page, choose Create policy.
-
On the Create policy page, choose JSON.
-
Copy one of the following example policies and paste it into the JSON policy editor, replacing any existing text. You can use either policy to enable SAML federation, or customize them for your specific requirements.
Use this policy to enable federation for all users in a specific Amazon Connect instance. For SAML-based authentication, replace the value for the
Resourceto the ARN for the instance that you created:Use this policy to enable federation to a specific Amazon Connect instances. Replace the value for the
connect:InstanceIdto the instance ID for your instance.Use this policy to enable federation for multiple instances. Note the brackets around the listed instance IDs.
-
After you create the policy, choose Next: Review. Then return to step 10 in the To create a role for SAML-based federation procedure in the Creating a Role for SAML 2.0 Federation (Console) topic.
-
-
Configure your network as a SAML provider for AWS. For more information, see Enabling SAML 2.0 Federated Users to Access the AWS Management Console.
-
Configure SAML Assertions for the Authentication Response. For more information, Configuring SAML Assertions for the Authentication Response.
-
For Amazon Connect, leave the Application Start URL blank.
-
Override the Application Consumer Service (ACS) URL in your identity provider to use the regional endpoint that coincides with the AWS Region of your Amazon Connect instance. For more information, see Configure the identity provider to use regional SAML endpoints.
-
Configure the relay state of your identity provider to point to your Amazon Connect instance. The URL to use for the relay state is comprised as follows:
https://region-id.console.aws.amazon.com/connect/federate/instance-idReplace the
region-idwith the Region name where you created your Amazon Connect instance, such as us-east-1 for US East (N. Virginia). Replace theinstance-idwith the instance ID for your instance.For a GovCloud instance, the URL is https://console.amazonaws-us-gov.com/:
-
https://console.amazonaws-us-gov.com/connect/federate/instance-id
Note
You can find the instance ID for your instance by choosing the instance alias in the Amazon Connect console. The instance ID is the set of numbers and letters after '/instance' in the Instance ARN displayed on the Overview page. For example, the instance ID in the following Instance ARN is 178c75e4-b3de-4839-a6aa-e321ab3f3770.
arn:aws:connect:us-east-1:450725743157:instance/178c75e4-b3de-4839-a6aa-e321ab3f3770
-
Configure the identity provider to use regional SAML endpoints
To provide the best availability we recommend using the regional SAML endpoint that coincides with your Amazon Connect instance instead of the default global endpoint.
The following steps are IdP agnostic; they work for any SAML IdP (for example, Okta, Ping, OneLogin, Shibboleth, ADFS, AzureAD, and more).
-
Update (or override) the Assertion Consumer Service (ACS) URL. There are two ways you can do this:
-
Option 1: Download the AWS SAML metadata and update the
Locationattribute to the Region of your choice. Load this new version of the AWS SAML metadata into your IdP.Following is an example of a revision:
<AssertionConsumerService index="1" isDefault="true" Binding="urn:oasis:names:tc:SAML:2.0:bindings:HTTP-POST" Location="https://region-id.signin.aws.amazon.com/saml"/> -
Option 2: Override the AssertionConsumerService (ACS) URL in your IdP. For IdPs like Okta that provide prebaked AWS integrations, you can override the ACS URL in the AWS admin console. Use the same format to override to a Region of your choice (for example, https://
region-id.signin.aws.amazon.com/saml).
-
-
Update the associated role trust policy:
-
This step needs to be done for every role in every account that trusts the given identity provider.
-
Edit the trust relationship, and replace the singular
SAML:audcondition with a multivalued condition. For example:-
Default: "
SAML:aud": "https://signin.aws.amazon.com/saml". -
With modifications: "
SAML:aud": [ "https://signin.aws.amazon.com/saml", "https://region-id.signin.aws.amazon.com/saml" ]
-
-
Make these changes to the trust relationships in advance. They should not be done as part of a plan during an incident.
-
-
Configure a relay state for the Region-specific console page.
-
If you don't do this final step, there's no guarantee that the Region-specific SAML sign in process will forward the user to the console sign in page within the same Region. This step is most varied per identity provider, but there are a blogs (for example, How to Use SAML to Automatically Direct Federated Users to a Specific AWS Management Console Page
) that show the use of relay state to achieve deep linking. -
Using the technique/parameters appropriate for your IdP, set the relay state to the console endpoint that matches (for example, https://
region-id.console.aws.amazon.com/connect/federate/instance-id).
-
Note
-
Ensure that STS is not disabled in your additional Regions.
-
Ensure no SCPs are preventing STS actions in your additional Regions.
Use a destination in your relay state URL
When you configure the relay state for your identity provider, you can use the
destination argument in the URL to navigate users to a specific page in your Amazon Connect
instance. For example, use a link to open the CCP directly when an agent logs in. The
user must be assigned a security profile that grants access to that page in the
instance. For example, to send agents to the CCP, use a URL similar to the following for
the relay state. You must use URL encoding
-
https://us-east-1.console.aws.amazon.com/connect/federate/instance-id?destination=%2Fccp-v2%2Fchat&new_domain=true
Another example of a valid URL is:
-
https://us-east-1.console.aws.amazon.com/connect/federate/instance-id?destination=%2Fagent-app-v2
For a GovCloud instance, the URL is https://console.amazonaws-us-gov.com/. So the address would be:
-
https://console.amazonaws-us-gov.com/connect/federate/instance-id?destination=%2Fccp-v2%2Fchat&new_domain=true
If you want to configure the destination argument to a URL outside of the Amazon Connect instance, such as your own custom website, first add that external domain to the account's approved origins. For example, perform the steps in the following order:
-
In the Amazon Connect console add https://
your-custom-website.com to your approved origins. For instructions, see Use an allowlist for integrated applications in Amazon Connect. -
In your identity provider configure your relay state to
https://your-region.console.aws.amazon.com/connect/federate/instance-id?destination=https%3A%2F%2Fyour-custom-website.com -
When your agents log in they are taken directly to https://
your-custom-website.com.
Add users to your Amazon Connect instance
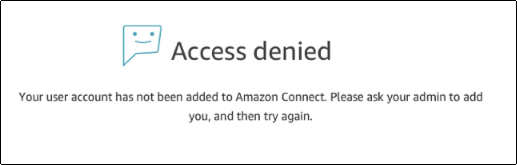
Add users to your connect instance, making sure that the user names exactly match the users names in your existing directory. If the names do not match, users can log in to the identity provider, but not to Amazon Connect because no user account with that user name exists in Amazon Connect. You can add users manually on the User management page, or you can bulk upload users with the CSV template. After you add the users to Amazon Connect, you can assign security profiles and other user settings.
When a user logs in to the identity provider, but no account with the same user name is found in Amazon Connect, the following Access denied message is displayed.
Bulk upload users with the template
You can import your users by adding them to a CSV file. You can then import the CSV file to your instance, which adds all users in the file. If you add users by uploading a CSV file, make sure that you use the template for SAML users. You can find on the User management page in Amazon Connect. A different template is used for SAML-based authentication. If you previously downloaded the template, you should download the version available on the User management page after you set up your instance with SAML-based authentication. The template should not include a column for email or password.
SAML user logging in and session duration
When you use SAML in Amazon Connect, users must log in to Amazon Connect through your identity provider (IdP). Your IdP is configured to integrate with AWS. After authentication, a token for their session is created. The user is then redirected to your Amazon Connect instance and automatically logged in to Amazon Connect using single sign-on.
As a best practice, you should also define a process for your Amazon Connect users to log out when they are finished using Amazon Connect. They should log out from both Amazon Connect and your identity provider. If they do not, the next person that logs in to the same computer can log in to Amazon Connect without a password since the token for the previous sessions is still valid for the duration of the session. It's valid for 12 hours.
About session expiration
Amazon Connect sessions expire 12 hours after a user logs in. After 12 hours, users are automatically logged out, even if they are currently on a call. If your agents stay logged in for more than 12 hours, they need to refresh the session token before it expires. To create a new session, agents need to log out of Amazon Connect and your IdP and then log in again. This resets the session timer set on the token so that agents are not logged out during an active contact with a customer. When a session expires while a user is logged in, the following message is displayed. To use Amazon Connect again, the user needs to log in to your identity provider.

Note
If you see the Session expired message while logging in, you probably just need to refresh the session token. Go to your identity provider and log in. Refresh the Amazon Connect page. If you still get this message, contact your IT team.
