Add Amazon Lex interactive messages for customers in chat
Interactive messages are rich messages that present a prompt and pre-configured display options for a customer to choose. These messages are powered by Amazon Lex and configured through Amazon Lex using an AWS Lambda function.
Tip
If you have integrated with Apple Messages for Business, see Interactive Message Types
Validation limits
The string field limits (for example, title, subtitle, etc.) are expected to be enforced by the client (that is, a custom built interface or the hosted communications widget). The SendMessage API checks only that the total size of the string is less than 20KB.
-
When you use the hosted communications widget without customizing it, if the string exceeds field limits, it is truncated on the user interface and an ellipsis (...) is appended. You can determine how to enforce field limits by customizing the widget.
-
If you are integrating with other platforms (such as Apple Messages for Business), review the limits in this topic for Amazon Connect, and review the limits in the documentation for the other platform. For example, quick replies are not supported on older versions of iOS.
All other field limits must be followed for the message to be successfully sent.
Message display templates
Amazon Connect provides the following message display templates. Use them to render information to customers in a chat:
These templates define how the information renders, and what information is surfaced in the chat interface. When interactive messages are sent through chat, flows validate that the message format follows one of these templates.
List picker template
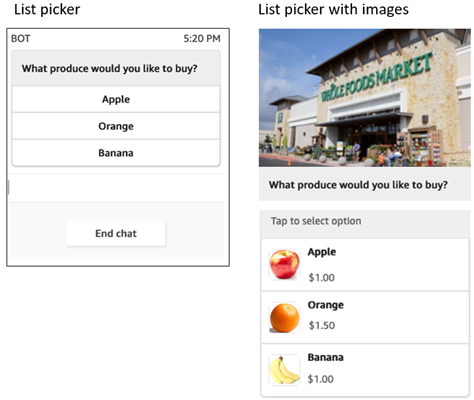
Use the list picker template to present the customer with a list of up to six choices. Each choice can have its own image.
The following images show two examples of how the list picker template renders information in a chat.
-
One image shows three buttons, each one with the name of a fruit in text: apple, orange, banana.
-
The second image shows a picture of a store and then under it, three buttons, each one with the name, image, and price of the fruit.
The following code is the list picker template that you can use in your Lambda. Note the following:
-
Bold text indicates a mandatory parameter.
-
In some cases, if the parent element isn't mandatory, but the fields in the parent element are, then the fields are mandatory. For example, see the
data.replyMessagestructure in the following template. If the structure exists,titleis mandatory. Otherwise a completereplyMessageis optional.
{
   "templateType":"ListPicker",
   "version":"1.0",
   "data":{
      "replyMessage":{
         "title":"Thanks for selecting!",
         "subtitle":"Produce selected",
         "imageType":"URL",
         "imageData":"https://interactive-msg.s3-us-west-2.amazonaws.com/fruit_34.3kb.jpg",
         "imageDescription":"Select a produce to buy"
      },
      "content":{
         "title":"What produce would you like to buy?",
         "subtitle":"Tap to select option",
         "imageType":"URL",
         "imageData":"https://interactive-msg.s3-us-west-2.amazonaws.com/fruit_34.3kb.jpg",
         "imageDescription":"Select a produce to buy",
         "elements":[
            {
               "title":"Apple",
               "subtitle":"$1.00",
               "imageType":"URL",
               "imageData":"https://interactive-message-testing.s3-us-west-2.amazonaws.com/apple_4.2kb.jpg"
            },
            {
               "title":"Orange",
               "subtitle":"$1.50",
               "imageType":"URL",
               "imageData":"https://interactive-message-testing.s3-us-west-2.amazonaws.com/orange_17.7kb.jpg",
            },
             {
               "title":"Banana",
               "subtitle":"$10.00",
               "imageType":"URL",
               "imageData":"https://interactive-message-testing.s3-us-west-2.amazonaws.com/banana_7.9kb.jpg",
               "imageDescription":"Banana"
            }
         ]
      }
List picker limits
The following table lists the limits for each of the list picker elements, should you choose to build your own Lambda from scratch. The mandatory parameters are in bold.
To send unlimited options, implement action buttons in your application. For more
information, see Implementation of action buttons in interactive message list
picker/panel
| Parent field | Field | Required | Minimum characters | Maximum characters | Other requirement |
|---|---|---|---|---|---|
|
templateType |
Yes |
Valid template type |
|||
|
data |
Yes |
||||
|
version |
Yes |
Must be "1.0" |
|||
data |
content | Yes | |||
| replyMessage | No | ||||
content |
title | Yes | 1 |
400 |
Should be a description for promptless templates |
| elements | Yes | 1 item |
10 items |
This is an array of elements. Maximum 10 elements in the array. To send unlimited elements, use the action buttons feature. |
|
| subtitle | No | 0 |
400 |
||
| multiSelect | No | Boolean - indicates whether the customer can make multiple selections. Defaults to false. This field is applicable only for Apple Messages for Business flows. |
|||
| targetForLinks | No |
Must be one of the following values:
Please see the note after this table. |
|||
| imageType | No | 0 |
50 |
Must be "URL" |
|
| imageData | No | 0 |
200 |
Must be a valid publicly accessible URL |
|
| imageDescription | No | 0 |
50 |
||
| referenceId | No |
|
String. Only required for action button feature. |
||
| listId | No |
|
String. Only required for action button feature. |
||
| preIndex | No |
|
Number. Only required for action button feature. |
||
| nextIndex | No |
|
Number. Only required for action button feature. |
||
| templateIdentifier | No |
|
Number. Should be an UUID. This field is required if List Picker/Panel is being used in a Carousel. |
||
elements |
title | Yes | 1 |
400 |
|
| subtitle | No | 0 |
400 |
||
| imageType | No | 0 |
50 |
Must be "URL" |
|
| imageData | No | 0 |
200 |
Must be a valid publicly accessible URL |
|
| imageDescription | No | 0 |
50 |
Cannot exist without an image |
|
| actionDetail | No |
|
|
Only required for action button feature. Must be "PREVIOUS_OPTIONS" or "SHOW_MORE". |
|
replyMessage |
title | Yes | 1 |
400 |
|
| subtitle | No | 0 |
400 |
||
| imageType | No | 0 |
50 |
Must be "URL" |
|
| imageData | No | 0 |
200 |
Must be a valid publicly accessible URL |
|
| imageDescription | No | 0 |
50 |
Cannot exist without an image |
Note
If you are using the targetForLinks field and Amazon Connect
communications widget, in order to open links in the same browser tab, you must
add the following attribute to the widget code snippet to allow the current
iframe to open and navigate links within the same tab:
amazon_connect('updateSandboxAttributes', 'allow-scripts allow-same-origin allow-popups allow-downloads allow-top-navigation-by-user-activation')
Time picker template
The time picker template is useful for enabling customers to schedule appointments. You can provide up to 40 timeslots to the customer in a chat.
The following images show two examples of how the time picker template renders information in a chat.
-
One image shows one date, and under it, one time slot.
-
The second image shows one date, and under it, two time slots.
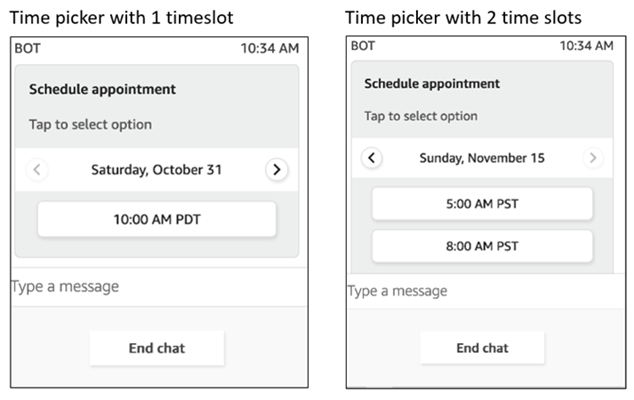
The following image shows the time picker with an image
Note
If you are using this message template with the Apple Messages for Business channel and do not add an image, Amazon Connect will add a default image in both the reply and response message.

The following code is the time picker template that you can use in your Lambda. Note the following:
-
Bold text indicates a mandatory parameter.
-
In some cases, if the parent element isn't mandatory, but the fields the parent element are, then the fields are mandatory. For example, see the
data.replyMessagestructure in the following template. If the structure exists,titleis mandatory. Otherwise a completereplyMessageis optional.
{
   "templateType":"TimePicker",
   "version":"1.0",
   "data":{
      "replyMessage":{
         "title":"Thanks for selecting",
         "subtitle":"Appointment selected",
         "imageType":"URL",
         "imageData":"https://interactive-msg.s3-us-west-2.amazonaws.com/booked.jpg",
         "imageDescription":"Appointment booked"
      },
      "content":{
         "title":"Schedule appointment",
         "subtitle":"Tap to select option",
         "imageType":"URL",
         "imageData":"https://interactive-msg.s3-us-west-2.amazonaws.com/calendar.jpg",
         "imageDescription":"Appointment booked",
         "timeZoneOffset":-450,
         "location":{
            "latitude":47.616299,
            "longitude":-122.4311,
            "title":"Oscar",
            "radius":1,
         },
         "timeslots":[
               {
                  "date" : "2020-10-31T17:00+00:00",
                  "duration": 60,
               },
               {
                  "date" : "2020-11-15T13:00+00:00",
                  "duration": 60,
               },
               {
                  "date" : "2020-11-15T16:00+00:00",
                  "duration": 60,
               }
            ],
         }
      }
   }
}
Time picker limits
The following table lists the limits for each of the time picker elements. Use this information if you choose to build your own Lambda from scratch. The mandatory parameters are in bold.
| Parent field | Field | Required | Minimum characters | Maximum characters | Other requirement |
|---|---|---|---|---|---|
|
templateType |
Yes |
Valid template type |
|||
|
data |
Yes |
||||
|
version |
Yes |
Must be "1.0" |
|||
data |
replyMessage | No | |||
| content | Yes | ||||
replyMessage |
title |
Yes | 1 |
400 |
Should be description for promptless templates |
| subtitle | No | 0 |
400 |
||
| imageType | No | 0 |
50 |
Must be "URL" | |
| imageData | No | 0 |
200 |
Must be a valid publicly accessible URL | |
| imageDescription | No | 0 |
50 |
Cannot exist without an image | |
content |
title |
Yes | 1 |
400 |
Should be description for promptless templates |
| subtitle | No | 0 |
200 |
||
| imageType | No | 0 |
50 |
Must be "URL" | |
| imageData | No | 0 |
200 |
Must be a valid publicly accessible URL | |
| imageDescription | No | 0 |
50 |
Cannot exist without an image | |
| timezone offset | No | -720 |
840 |
This is an optional field when not set. Our sample client defaults to the user's timezone. If set, this displays per the timezone entered. The field should be an integer representing the number of minutes from GMT, specifying the timezone of the event's location. |
|
| location | No | ||||
| timeslots | Yes | 1 |
40 |
This is an array of timeslots. Maximum of 40 elements in the array. |
|
location |
longitude | Yes | -180 |
180 |
Must be double |
| latitude | Yes | -90 |
90 |
Must be double |
|
| title | Yes | 1 |
400 |
||
radius |
No | 0 |
200 |
||
timeslots |
date | Yes |
|
Should be in ISO-8601 time format: YYYY-MM-DDTHH:MM+00:00 For example: "2020-08-14T21:21+00:00" |
|
| duration | Yes | 1 |
3600 |
Panel template
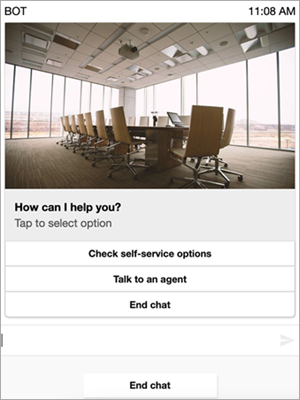
By using the panel template, you can present the customer with up to 10 choices under one question. However, you can include only one image, rather than an image with each choice.
The follow image shows an example of how the panel template renders information in a chat. It shows an image at the top of the message, and under the image it shows a prompt that asks How can I help? Tap to select option. Under the prompt three options are displayed to the customer: Check self-service options, Talk to an agent, End chat.
The following code is the panel template that you can use in your Lambda. Note the following:
-
Bold text indicates a mandatory parameter.
-
In some cases, if the parent element isn't mandatory, but the fields in the parent element are, then the fields are mandatory. For example, see the
data.replyMessagestructure in the following template. If the structure exists, atitleis mandatory. Otherwise, a completereplyMessageis optional.
{
   "templateType":"Panel",
   "version":"1.0",
   "data":{
      "replyMessage":{
         "title":"Thanks for selecting!",
         "subtitle":"Option selected",
      },
      "content":{
         "title":"How can I help you?",
         "subtitle":"Tap to select option",
         "imageType":"URL",
         "imageData":"https://interactive-msg.s3-us-west-2.amazonaws.com/company.jpg",
         "imageDescription":"Select an option",
         "elements":[
            {
               "title":"Check self-service options",
            },
            {
               "title":"Talk to an agent",
            },
            {
               "title":"End chat",
            }
         ]
      }
   }
}
Panel limits
The following table lists the limits for each of the panel elements, should you choose to build your own Lambda from scratch. The mandatory parameters are in bold.
To send unlimited options, implement action buttons in your application. For more
information, see Implementation of action buttons in interactive message list
picker/panel
| Parent field | Field | Required | Minimum characters | Maximum characters | Other requirement |
|---|---|---|---|---|---|
|
templateType |
Yes |
Valid template type |
|||
|
data |
Yes |
||||
|
version |
Yes |
Must be "1.0" |
|||
data |
replyMessage | No | |||
| content | Yes | ||||
content |
title | Yes | 1 |
400 |
Should be a description for promptless templates |
| subtitle | No | 0 |
400 |
||
| elements | Yes | 1 item |
10 items |
This is an array of elements. Maximum 10 elements in the array. |
|
| imageType | No | 0 |
50 |
Must be "URL" |
|
| imageData | No | 0 |
200 |
Must be a valid publicly accessible URL |
|
| imageDescription | No | 0 |
50 |
Cannot exist without an image |
|
| referenceId | No |
|
String. Only required for action button feature. |
||
| listId | No |
|
String. Only required for action button feature. |
||
| preIndex | No |
|
Number. Only required for action button feature. |
||
| nextIndex | No |
|
Number. Only required for action button feature. |
||
| templateIdentifier | No |
|
Number. Should be an UUID. This field is required if List Picker/Panel is being used in a Carousel. |
||
elements |
title | Yes | 1 |
400 |
|
| actionDetail | No |
|
|
Only required for action button feature. Must be "PREVIOUS_OPTIONS" or "SHOW_MORE". |
|
replyMessage |
title | Yes | 1 |
400 |
|
| subtitle | No | 0 |
400 |
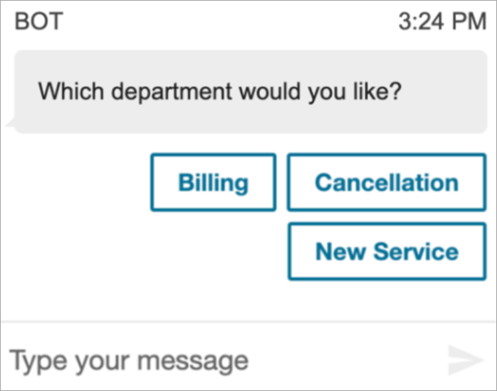
Quick reply template
Use quick reply messages to get simple responses from customers, and then to customers in an in-line list. Images are not supported for quick replies.
The following image shows an example of how the quick reply template renders information in a chat.
The following code is the quick reply template that you can use in your Lambda.
{
    "templateType": "QuickReply",
    "version": "1.0",
    "data": {
        "replyMessage": {
            "title": "Thanks for selecting!"
        },
        "content": {
            "title": "Which department would you like?",
            "elements": [{
                    "title": "Billing"
                },
                {
                    "title": "Cancellation"
                },
                {
                    "title": "New Service"
                }
            ]
        }
    }
}
Quick reply limits
The following table lists the limits for each of the quick reply elements. Use this information if you choose to build your own Lambda from scratch. The mandatory parameters are in bold.
| Field | Required | Minimum characters | Maximum characters | Other requirement |
|---|---|---|---|---|
|
templateType |
Valid template type |
|||
|
data |
Yes |
|||
|
version |
Yes |
Must be "1.0" |
||
content |
Yes | |||
| title | Yes | 1 |
400 |
Should be a description for promptless templates |
| elements | Yes | 2 item |
10 items for web chats 5 items for Apple Business Chat (this is a hard limit set by Apple) |
This is an array of elements. Minimum 2 elements and maximum 10 elements in the array. To work around Apple's limit of 5 items, consider implementing multiple quick replies with a "Show more" option. Or use ListPicker since it allows for up to 10 items. |
| title | Yes | 1 |
200 |
Carousel template
Use carousels to display up to 5 list pickers or panels to customers in a single message. Similar to the list picker and time picker, you can add more options to the carousel by using the SHOW_MORE feature.
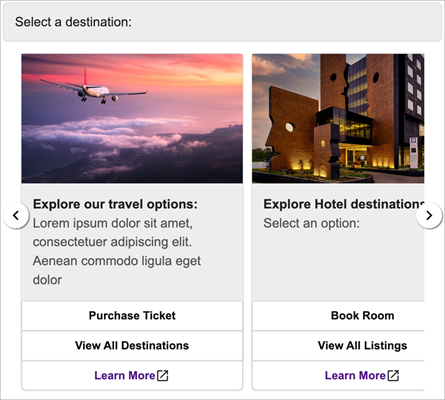
The following GIF shows an example of how the carousel template renders information in a chat. Customers scroll through the carousel of images by using the left and right arrows.

The following image shows two Learn More hyperlinks, which are examples of carousel picker hyperlink elements.
The following code is the carousel template that you can use in your Lambda.
{
  "templateType": "Carousel",
  "version": "1.0",
  "data": {
      "content": {
        "title": "View our popular destinations",
        "elements": [
        {
          "templateIdentifier": "template0",
          "templateType": "Panel",
          "version": "1.0",
          "data": {
            "content": {
              "title": "California",
              "subtitle": "Tap to select option",
              "elements": [
                {
                  "title": "Book flights"
                },
                {
                  "title": "Book hotels"
                },
                {
                  "title": "Talk to agent"
                }
              ]
            }
          }
        },
        {
          "templateIdentifier": "template1",
          "templateType": "Panel",
          "version": "1.0",
          "data": {
            "content": {
              "title": "New York",
              "subtitle": "Tap to select option",
              "elements": [
                {
                  "title": "Book flights"
                },
                {
                  "title": "Book hotels"
                },
                {
                  "title": "Talk to agent"
                }
              ]
            }
          }
        }
      ]
    }
  }
}
For hosted communications widget users:
-
The selections on the carousel template result in a JSON string response structured like the following example, to be sent back to Lambda (other interactive message types return regular string response with only
selectionTextvalue):{ templateIdentifier: "template0", listTitle: "California", selectionText: "Book hotels" } -
In carousels, you can provide hyperlinks in the list picker/panel elements. To create a hyperlink instead of a button, include the following additional fields for the element that should be a hyperlink:
{
    title: "Book flights",
    ...
    type: "hyperlink",
    url: "https://www.example.com/Flights"
}
Carousel limits
The following table lists the limits for each of the carousel elements. Use this information if you choose to build your own Lambda from scratch. The mandatory parameters are in bold.
| Parent field | Field | Required | Minimum characters | Maximum characters | Other requirement |
|---|---|---|---|---|---|
|
templateType |
Yes |
Valid template type |
|||
|
data |
Yes |
||||
|
version |
Yes |
Must be "1.0" |
|||
data |
content | Yes | |||
content |
title | Yes | 1 |
400 |
Should be a description for promptless templates |
| elements | Yes | 2 item |
5 items |
This is an array of either list pickers or panel templates. Only one interactive message type is accepted per carousel. Each element should include the top-level field templateIdentifier. Minimum 2 templates and maximum 5 templates in the array. NoteFor the best customer experience, we recommend that each template has consistent use of images/number of elements. |
|
| omitTitleFromCarouselResponse | No |
Boolean - Optionally respond
with " |
|||
| carouselIsVertical | No |
Boolean - Optionally render
|
Apple form template
Note
This template is applicable only for Apple Messages for Business contact flows.
A business can send a form interactive message to their end customers through a single message, containing multiple pages of requested inputs. When the message is received on an end-customer's Apple device, they can open the form and navigate through the pages, providing a response for each page, before submitting all responses at the end of the form.
For example, businesses can use Apple forms for various purposes, including triaging flows, customer surveys, and account creation / sign-ups.
Warning
Interactive message content and end customer responses are stored in contact record transcript and are viewable by other chat participants and contact analysts with access to transcripts. To prevent PII from appearing in your contact record transcript after the contact has ended, you will want to use the Set recording and analytics behavior block in your step-by-step guide flow, enable Contact Lens, and enable the redaction of sensitive date. For full details on how to enable PII redaction, see Enable redaction of sensitive data.
The types of pages supported are:
-
ListPicker: a list of options that the user must select from with image support.
-
WheelPicker: similar to ListPicker but selection is made through scrollable wheel of options.
-
DatePicker: a calendar view where user can pick a date.
-
Input: a text field that the user must fill in.
The following code is an example of an Apple forms template you can use in your Lambda.
Note
-
Bold text is a mandatory parameter.
-
In some cases, if the parent element exists in the request and it isn't mandatory/bold, but the fields in it are, then the fields are mandatory.
Simple survey form example:
{
  "templateType": "AppleForm",
  "version": "1.0",
  "data": {
    "content": {
      "title": "Survey",
      "pages": [
        {
          "pageType": "DatePicker",
          "title": "Date you visited",
          "subtitle": "When did you last visit?",
          "minDate": "2024-01-02"
        },
        {
          "pageType": "ListPicker",
          "title": "Rating",
          "subtitle": "How do you rate the experience?",
          "items": [
            {
              "title": "Good",
              "imageType": "URL",
              "imageData": "https://mybucket.s3.us-west-2.amazonaws.com/good.jpg"
            },
            {
              "title": "Okay",
              "imageType": "URL",
              "imageData": "https://mybucket.s3.us-west-2.amazonaws.com/okay.jpg"
            },
            {
              "title": "Poor",
              "imageType": "URL",
              "imageData": "https://mybucket.s3.us-west-2.amazonaws.com/poor.jpg"
            }
          ]
        },
        {
          "pageType": "ListPicker",
          "title": "Dine type",
          "subtitle": "Select all dine types that apply",
          "multiSelect": true,
          "items": [
            {
              "title": "Pickup"
            },
            {
              "title": "Dine-in"
            },
            {
              "title": "Delivery"
            }
          ]
        },
        {
          "pageType": "WheelPicker",
          "title": "Visits",
          "subtitle": "How often do you visit?",
          "items": [
            {
              "title": "Often"
            }
            {
              "title": "Sometimes"
            },
            {
              "title": "Rarely"
            }
          ]
        },
        {
          "pageType": "Input",
          "title": "Additional notes",
          "subtitle": "Anything else you'd like to mention about your visit?",
          "multiLine": true
        }
      ]
    }
  }
}
Apple form limits
InteractiveMessage
| Field | Type | Required | Description / Notes |
|---|---|---|---|
| version | string | Yes | Version number. Allowed value: "1.0" |
| templateType | TemplateType | Yes | Interactive message template type. Allowed values: ["ListPicker", "TimePicker", "Panel", "QuickReply", "Carousel", "ViewResource", "AppleForm"] |
| data | InteractiveMessageData | Yes | Interactive message data |
InteractiveMessageData
| Field | Type | Required | Description / Notes |
|---|---|---|---|
| content | InteractiveMessageContent | Yes | Main interactive message content |
| replyMessage | ReplyMessage | No | Message display configuration for after response to interactive message is sent |
AppleFormContent
| Field | Type | Required | Description / Notes |
|---|---|---|---|
| title | String | Yes | Top-level title of the form. Displayed in Apple receive message bubble and transcript rendering |
| subtitle | String | No | Used as subtitle in ReceivedMessage |
| imageType | String | No | Valid values: "URL" Used for image in ReceivedMessage |
| imageData | String | No | S3 image url Used for image in ReceivedMessage |
| pages | AppleFormPage[] | Yes | List of form pages |
| showSummary | Boolean | No | Whether to display a summary page of responses to review before submission Default: False (no confirmation/summary page) |
| splashPage | AppleFormSplashPage | No | Initial splash page to display before actual pages Default: No splash page |
AppleFormSplashPage
| Field | Type | Required | Description / Notes |
|---|---|---|---|
| title | String | Yes | Title of splash page |
| subtitle | String | No | Subtitle / body of splash page |
| imageType | ImageType | No | Present when displaying image within splash page Allowed value: "URL" Default: No image displayed |
| imageData | String | No | For imageType="URL", this is the URL value Default: No image displayed |
| buttonTitle | String | Yes | Text of Continue button. Required by Apple, default text with localization not supported |
AppleFormPage
-
Base model for form pages. Specific page types extend from this model
| Field | Type | Required | Description / Notes |
|---|---|---|---|
| pageType | ApplePageType | Yes | Enum for page type. Allowed values: ["Input", "DatePicker", "WheelPicker", "ListPicker"] |
| title | String | Yes | Page title |
| subtitle | String | Yes | Page subtitle. Used in confirmation page |
AppleFormDatePickerPage
AppleFormDatePickerPage extends AppleFormPage
| Field | Type | Required | Description / Notes |
|---|---|---|---|
| pageType | ApplePageType | Yes | Value: "DatePicker" |
| labelText | String | No | Text displayed next to the date input. See example screenshots in Appendix |
| helperText | String | No | Helper text displayed under the date input. See example screenshots in Appendix Default: No helper text |
| dateFormat | String | No | ISO 8601 date format. Default: MM/dd/yyyy |
| startDate | String | No | Initial / default selected date in valid date format Default: Current date for end user when message is sent |
| minDate | String | No | Min date allowed to be selected in valid date format Default: No min |
| maxDate | String | No | Max date allowed to be selected in valid date format Default: Current date for end user when message is sent |
AppleFormListPickerPage
AppleFormListPickerPage extends AppleFormPage
| Field | Type | Required | Description / Notes |
|---|---|---|---|
| pageType | ApplePageType | Yes | Value: "ListPicker" |
| multiSelect | Boolean | No | Enables selecting multiple items Default: false (single selection) |
| items | AppleFormListPickerPageItem[] | Yes | List of list page items |
AppleFormListPickerPageItem
AppleFormListPickerPageItem extends AppleFormPage
| Field | Type | Required | Description / Notes |
|---|---|---|---|
| title | String | Yes | Display text of item |
| imageType | ImageType | No | Present when displaying image within item Allowed value: "URL" Default: No image displayed |
| imageData | String | No | For imageType="URL", this is the URL value Default: No image displayed |
Note
Similar image model to existing interactive message models (ListPicker),
except imageDescription is not included, which is used for
image alt text in chat widget / web chats and ignored for Apple interactive
messages.
AppleFormWheelPickerPage
AppleFormWheelPickerPage extends AppleFormPage
| Field | Type | Required | Description / Notes |
|---|---|---|---|
| pageType | ApplePageType | Yes | Value: "WheelPicker" |
| items | AppleFormWheelPickerPageItem[] | Yes | List of wheel picker items |
| labelText | String | No | Text displayed next to the input. See example screenshots in Appendix |
AppleFormWheelPickerPageItem
AppleFormWheelPickerPageItem extends AppleFormPage
| Field | Type | Required | Description / Notes |
|---|---|---|---|
| title | String | Yes | Display text of picker item |
AppleFormInputPage
AppleFormInputPage extends AppleFormPage
| Field | Type | Required | Description / Notes |
|---|---|---|---|
| pageType | ApplePageType | Yes | Value: "Input" |
| labelText | String | No | Text displayed next to the input box. See example screenshots in Appendix |
| helperText | String | No | Additional text displayed under input box Default: No helper text |
| placeholderText | String | No | Placeholder text to display initially when there's no input Default: "(Optional)" or "(Required)" placeholder text |
| prefixText | String | No | Prefix text to display next to input. Ex: '$' when input is monetary value Default: No prefix text |
| required | Boolean | No | Whether end user is required to provide input Default: false |
| multiLine | Boolean | No | Whether multi-line input can be provided Default: false (single line) |
| maxCharCount | Number | No | Max char count of input. Enforced on Apple client Default: No limit |
| regex | String | No | Regex string to place constraints on input provided Default: No regex constraints |
| keyboardType | String | No | Determines what type of keyboard is displayed when end user
is providing input Allowed values: Same as Apple. See docs |
| textContentType | String | No | Helps with auto-fill suggestions on Apple device. Allowed
values: Same as Apple. See docs |
Apple Pay template
Note
This template is applicable only for Apple Messages for Business contact flows.
Use the Apple Pay template to provide an easy and secure way for customers to buy goods and services through Apple Messages for Business with Apple Pay.
The following code is the Apple Pay template that you can use in your Lambda:
Note
-
Bold text is a mandatory parameter.
-
In some cases, if the parent element exists in the request and it isn't mandatory/bold, but the fields in it are, then the fields are mandatory.
{
  "templateType":"ApplePay",
  "version":"1.0",
  "data":{
    "content":{
      "title":"Halibut",
      "subtitle":"$63.99 at Sam's Fish",
      "imageType":"URL",
      "imageData":"https://interactive-msg.s3-us-west-2.amazonaws.com/fish.jpg",
      "payment": {
        "endpoints": {
          "orderTrackingUrl": "https://sams.example.com/orderTrackingUrl/",
          "paymentGatewayUrl": "https://sams.example.com/paymentGateway/",
          "paymentMethodUpdateUrl": "https://sams.example.com/paymentMethodUpdate/",
          "shippingContactUpdateUrl": "https://sams.example.com/shippingContactUpdate/",
          "shippingMethodUpdateUrl": "https://sams.example.com/shippingMethodUpdate/",
          "fallbackUrl": "https://sams.example.com/paymentGateway/"
        },
        "merchantSession": {
          "epochTimestamp": 1525730094057,
          "expiresAt": 1525730094057,
          "merchantSessionIdentifier": "PSH40080EF4D6.........9NOE9FD",
          "nonce": "fe72cd0f",
          "merchantIdentifier": "merchant.com.sams.fish",
          "displayName": "Sam's Fish",
          "signature": "308006092a8.......09F0W8EGH00",
          "initiative": "messaging",
          "initiativeContext": "https://sams.example.com/paymentGateway/",
          "signedFields": [
            "merchantIdentifier",
            "merchantSessionIdentifier",
            "initiative",
            "initiativeContext",
            "displayName",
            "nonce"
          ],
        },
        "paymentRequest": {
          "applePay": {
            "merchantCapabilities": [
              "supports3DS",
              "supportsDebit",
              "supportsCredit"
            ],
            "merchantIdentifier": "merchant.com.sams.fish",
            "supportedNetworks": [
              "amex",
              "visa",
              "discover",
              "masterCard"
            ]
          },
          "countryCode": "US",
          "currencyCode": "USD",
          "lineItems": [
            {
              "amount": "59.00",
              "label": "Halibut",
              "type": "final"
            },
            {
              "amount": "4.99",
              "label": "Shipping",
              "type": "final"
            }
          ],
          "requiredBillingContactFields": [
            "postalAddress"
          ],
          "requiredShippingContactFields": [
            "postalAddress",
            "phone",
            "email",
            "name"
          ],
          "shippingMethods": [
            {
              "amount": "0.00",
              "detail": "Available within an hour",
              "identifier": "in_store_pickup",
              "label": "In-Store Pickup"
            },
            {
              "amount": "4.99",
              "detail": "5-8 Business Days",
              "identifier": "flat_rate_shipping_id_2",
              "label": "UPS Ground"
            },
            {
              "amount": "29.99",
              "detail": "1-3 Business Days",
              "identifier": "flat_rate_shipping_id_1",
              "label": "FedEx Priority Mail"
            }
          ],
          "total": {
            "amount": "63.99",
            "label": "Sam's Fish",
            "type": "final"
          },
          "supportedCountries" : [
            "US",
            "CA",
            "UK",
            "JP",
            "CN"
          ]
        }
      },
      "requestIdentifier" : "6b2ca008-1388-4261-a9df-fe04cd1c23a9"
    }
  }
}
Apple Pay limits
| Parent field | Field | Required | Minimum characters | Maximum characters | Other requirement |
|---|---|---|---|---|---|
| templateType | Yes | Valid template type | |||
| data | Yes | ||||
| version | Yes | Must be "1.0" | |||
| data | content | Yes | |||
| content | title | Yes | 1 | 512 | The title of the received message bubble |
| subtitle | No | 0 | 512 | Subtitle to be displayed under title of the received message bubble | |
| imageData | No | 0 | 200 | Must be a valid publicly accessible URL | |
| imageType | No | 0 | 50 | Must be "URL" | |
| payment | Yes | A dictionary containing fields giving the specifics of an Apple Pay request. | |||
| requestIdentifier | No | String, An identifier for the ApplePay request. If not specified, an UUID will be generated and used. | |||
| payment | endpoints | Yes | A dictionary containing the endpoints for payment processing, contact updates, and order tracking. | ||
| merchantSession | Yes | A dictionary containing the payment session provided by Apple Pay after requesting a new payment session. | |||
| paymentRequest | Yes | A dictionary with information about the payment request | |||
| endpoints | paymentGatewayUrl | Yes | String. Called by Apple Pay to process the payment through the payment provider. The URL should match the URL in the initiativeContext field of the merchant session | ||
| fallbackUrl | No | A URL that opens in a web browser so the customer can complete the purchase if their device is unable to make payments using Apple Pay. If specified, fallbackUrl need to match paymentGatewayUrl. | |||
| orderTrackingUrl | No | Called by Messages for Business after completing the order; provides you with an opportunity to update the order information in your system. | |||
| paymentMethodUpdateUrl | No | Called by Apple Pay when the customer changes the payment method. If you don’t implement this endpoint and you include this key in the dictionary, the customer sees an error message. | |||
| shippingContactUpdateUrl | No | Called by Apple Pay when the customer changes their shipping address information. If you don’t implement this endpoint and you include this key in the dictionary, the customer sees an error message | |||
| shippingMethodUpdateUrl | No | Called by Apple Pay when the customer changes the shipping method. If you don’t implement this endpoint and you include this key in the dictionary, the customer sees an error message. | |||
| merchantSession | displayName | Yes | 1 | 64 | String. The canonical name for your store, suitable for display. Do not localize the name. |
| initiative | Yes | String. Must be “messaging” | |||
| initiativeContext | Yes | String. Pass your payment gateway URL. | |||
| merchantIdentifier | Yes | String. A unique identifier that represents a merchant for Apple Pay. | |||
| merchantSessionIdentifier | Yes | String. A unique identifier that represents a merchant's session for Apple Pay. | |||
| epochTimestamp | Yes | String.The time representation in number of seconds that have elapsed since 00:00:00 UTC, Thursday, January 1, 1970. | |||
| expiresAt | Yes | String. The expiration time representation in number of seconds that have elapsed since 00:00:00 UTC, Thursday, January 1, 1970. | |||
| nonce | No | Binary. A single-use string that checks the integrity of the interaction. | |||
| signature | No | Binary. A hash of the public key used to sign the interactions. | |||
| signedFields | No | List of strings contains the signed properties. | |||
| paymentRequest | applePay | Yes | A dictionary that describes the Apple Pay configuration. | ||
| countryCode | Yes | String. The merchant’s two-letter ISO 3166 country code. | |||
| currencyCode | Yes | String. The three-letter ISO 4217 currency code for the payment. | |||
| lineItems | No | An array of line items explaining payments and additional charges. Line items are not required. However, the array cannot be empty if the lineItems key is present. | |||
| total | Yes | A dictionary containing the total. The total amount must be greater than zero to pass validation. | |||
| requiredBillingContactFields | No | The list of the customer's required billing information needed to
process the transaction. For the list of possible strings, see
requiredBillingContactFields |
|||
| requiredShippingContactFields | No | The list of shipping or contact information required from the
customer to fulfill the order. For example, if you need the
customer's email or phone number, then include this key. For the
list of possible strings, see requiredShippingContactFields |
|||
| shippingMethods | No | An array that lists the available shipping methods. The Apple Pay payment sheet displays the first shipping method from the array as the default shipping method. | |||
| supportedCountries | No | An array of countries to support. List each country with their ISO 3166 country code. | |||
| applePay | merchantIdentifier | Yes | A unique identifier that represents a merchant for Apple Pay. | ||
| merchantCapabilities | Yes | An array of payment capabilities supported by the merchant. The array must include supports3DS, and may optionally include supportsCredit, supportsDebit, and supportsEMV. | |||
| supportedNetworks | Yes | An array of payment networks supported by the merchant. The array must include one or more of the following values: amex, discover, jcb, masterCard, privateLabel, or visa | |||
| lineItem | amount | Yes | The monetary amount of the line item. | ||
| label | Yes | A short, localized description of the line item. | |||
| type | No | A value that indicates whether the line item is final or pending. | |||
| total | amount | Yes | The total amount of the payment. | ||
| label | Yes | A short, localized description of the payment. | |||
| type | No | A value that indicates whether the payment is final or pending. | |||
| shippingMethods | amount | Yes | String. The non-negative cost associated with this shipping method. | ||
| detail | Yes | String. Additional description of the shipping method. | |||
| label | Yes | String. A short description of the shipping method. | |||
| identifier | Yes | String. A client-defined value used to identify this shipping method. |
iMessage App template
Note
This template is applicable only for Apple Messages for Business contact flows.
Use the iMessage Apps template to present the customer with your custom built iMessage App.
The following code is an example iMessage App template that you can use in your Lambda function.
{
   templateType: AppleCustomInteractiveMessage,
   version: "1.0",
   data: {
       content: {
           appIconUrl: "https://interactive-message-testing.s3-us-west-2.amazonaws.com/apple_4.2kb.jpg",
           appId: "123456789",
           appName: "Package Delivery",
           title: "Bubble Title CIM",
           bid: "com.apple.messages.MSMessageExtensionBalloonPlugin:{team-id}:{ext-bundle-id}",
           dataUrl: "?deliveryDate=26-01-2024&destinationName=Home&street=1infiniteloop&state=CA&city=Cupertino&country=USA&postalCode=12345&latitude=37.331686&longitude=-122.030656&isMyLocation=false&isFinalDestination=true",
           subtitle: "Bubble package",
       },
       replyMessage: {
           title: "Custom reply message title",
           subtitle: "Custom reply message subtitle",
           imageType: "URL",
           imageData: "https://interactive-msg.s3-us-west-2.amazonaws.com/fruit_34.3kb.jpg",
       }
   }
}
iMessage App limits
| Parent Field | Field | Required | Type | Other Notes |
|---|---|---|---|---|
| templateType | Yes | TemplateType | Valid template type, "AppleCustomInteractiveMessage" | |
| data | Yes | InteractiveMessageData | Contains content and receivedMessage dictionaries | |
| version | Yes | string | Must be "1.0" | |
| data | content | Yes | InteractiveMessageContent | Interactive Content of the iMessage App |
| replyMessage | Yes | ReplyMessage | Message display configuration for after response to interactive message is sent | |
| content | appIconUrl | Yes | string | AWS S3 URL |
| appId | Yes | string | Business IMessage App Id | |
| appName | Yes | string | Business IMessage App name | |
| bid | Yes | string | Business IMessage App Bid. Pattern: com.apple.messages.MSMessageExtensionBalloonPlugin:{team-id}:{ext-bundle-id} | |
| dataUrl | Yes | string | Data that is passed into the iMessage App | |
| useLiveLayout | No | boolean | Default True | |
| title | Yes | string | title of the Imessage App bubble | |
| subtitle | No | string | subtitle of the Imessage App bubble | |
| replyMessage | title | No | string | |
| subtitle | No | string | ||
| imageType | No | string | Must be a valid publicly accessible URL | |
| imageData | No | string | Cannot exist without an image |
WhatsApp list
Note
You only use this template for WhatsApp messaging flows. For more information about integrating WhatsApp with Amazon Connect, see Set up WhatsApp Business messaging, earlier in this guide.
You use the WhatsApp list template in WhatsApp chats to provide customers with a list of options.
The following example shows a list of options for a banking service.
{
  "templateType": "WhatsAppInteractiveList",
  "version": "1.0",
  "data": {
    "content": {
      "title": "Which account do you need help with?",
      "body": {
        "text": "Which account do you need help with?"
      },
      "action": {
        "button": "Options",
        "sections": [
          {
            "title": "Your accounts",
            "rows": [
              {
                "id": "11111111",
                "title": "11111111",
                "description": "PERSONAL CHECKING"
              },
              {
                "id": "22223333",
                "title": "22223333",
                "description": "PERSONAL SAVINGS"
              }
            ]
          },
          {
            "title": "Other",
            "rows": [
              {
                "id": "other",
                "title": "I can't find my account"
              }
            ]
          }
        ]
      }
    }
  }
}
The following image shows a typical screen before and after a customer opens a list.

WhatsApp options limits
| Parent field | Field | Required | Minimum length | Maximum length | Other Requirement |
|---|---|---|---|---|---|
| templateType | Yes | Must be "WhatsAppInteractiveList" | |||
| data | Yes | ||||
| version | Yes | Must be "1.0" | |||
| data | content | Yes | |||
| content | title | Yes | |||
| header | No | ||||
| body | Yes | ||||
| footer | No | ||||
| action | Yes | ||||
| header | type | Yes | Must be "text" | ||
| text | Yes | 1 | 60 | ||
| body | text | Yes | 1 | 4096 | |
| footer | text | Yes | 1 | 60 | |
| action | sections | Yes | 1 | 10 | |
| button | Yes | 1 | 20 | ||
| section | title | Yes | 1 | 24 | |
| rows | Yes | 1 | 10 | Maximum 10 rows across all sections | |
| row | id | Yes | 1 | 200 | Must be unique across rows |
| title | Yes | 1 | 24 | ||
| description | No | 1 | 72 |
WhatsApp reply button
Note
You only use this template for WhatsApp messaging flows.
You can use the WhatsApp reply button template to present an in-line list of options for customers.
{
  "templateType": "WhatsAppInteractiveReplyButton",
  "version": "1.0",
  "data": {
    "content": {
      "title": "What would you like to do?",
      "body": {
        "text": "What would you like to do?"
      },
      "action": {
        "buttons": [
          {
            "type": "reply",
            "reply": {
              "id": "agent",
              "title": "Continue to agent"
            }
          },
          {
            "type": "reply",
            "reply": {
              "id": "end_chat",
              "title": "End chat"
            }
          }
        ]
      }
    }
  }
}
The following image shows a typical user experience.

WhatsApp reply button limits
The WhatsApp reply template has the following limits.
| Parent Field | Field | Required | Minimum length | Maximum length | Other Requirement |
|---|---|---|---|---|---|
| templateType | Yes | Must be "WhatsAppInteractiveReplyButton" | |||
| data | Yes | ||||
| version | Yes | Must be "1.0" | |||
| data | content | Yes | |||
| content | title | Yes | |||
| header | No | ||||
| body | Yes | ||||
| footer | No | ||||
| action | Yes | ||||
| header | type | Yes | Valid values: "text", "document", "image", "video" | ||
| text | No | 1 | 60 | ||
| image | No | ||||
| video | No | ||||
| document | No | ||||
| image | link | Yes | Must be publicly accessible media URL starting with https/http | ||
| video | link | Yes | Must be publicly accessible media URL starting with https/http | ||
| document | link | Yes | Must be publicly accessible media URL starting with https/http | ||
| body | text | Yes | 1 | 1024 | |
| footer | text | Yes | 1 | 60 | |
| action | buttons | Yes | 1 | 3 | |
| button | type | Yes | Must be "reply" | ||
| reply.id | Yes | 1 | 256 | Must be unique across buttons | |
| reply.title | Yes | 1 | 20 |
Rich formatting in titles and subtitles
You can add rich formatting to the titles and subtitles of your chat messages. For
example, you can add links, italics, bold, numbered lists, and bulleted lists. You use
markdown
The following image of a chat box shows an example list picker with rich formatting in the title and subtitle.
-
The title How can we help? aws.amazon.com is bold and contains a link.
-
The subtitle contains italics and bold text, a bulleted list, and a numbered list. It also shows a plain link, text link, and sample code.
-
The bottom of the chat box shows three list picker elements.

How to format text with markdown
You can write title and subtitle strings in a multi-line format, or in a single
line with `\r\n` line break characters.
-
Multi-line format: The following code sample shows how to author lists in markdown in a multi-line format.
const MultiLinePickerSubtitle = `This is some *emphasized text* and some **strongly emphasized text** This is a bulleted list (multiline): * item 1 * item 2 * item 3 This is a numbered list: 1. item 1 2. item 2 3. item 3 Questions? Visit https://plainlink.com/faq [This is a link](https://aws.amazon.com) This is \`\` ` const PickerTemplate = { templateType: "ListPicker|Panel", version: "1.0", data: { content: { title: "How can we help?", subtitle: MultiLinePickerSubtitle, elements: [ /* ... */ ] } } } -
Single line format: The following example shows how to author a subtitle in a single line by using
`\r\n`line break characters.const SingleLinePickerSubtitle = "This is some *emphasized text* and some **strongly emphasized text**\r\nThis is a bulleted list:\n* item 1\n* item 2\n* item 3\n\nThis is a numbered list:\n1. item 1\n2. item 2\n3. item 3\n\nQuestions? Visit https://plainlink.com/faq\r\n[This is a link](https://aws.amazon.com)\r\nThis is `<code/>`"; const PickerTemplate = { templateType: "ListPicker|Panel", version: "1.0", data: { content: { title: "How can we help?", subtitle: SingleLinePickerSubtitle, elements: [ /* ... */ ] } } }
The following example shows how format italics and bold text with markdown:
This is some *emphasized text* and some **strongly emphasized
                text**
The following example shows how to format text as code with markdown:
This is `<code />`
How to format links with markdown
To create a link, use the following syntax:
[aws](https://aws.amazon.com)
The following examples show two ways you can add links with markdown:
Questions? Visit https://plainlink.com/faq
[This is a link](https://aws.amazon.com)
Note
For list pickers, the targetForLinks field can be added as a
child field to content if you want to have granular control over
where links are opened. The communications widget will open links in a new
browser tab by default. For more information, see List picker template.
