Enable conversational analytics in Amazon Connect Contact Lens
You can enable Contact Lens conversational analytics in a few steps:
-
Enable Contact Lens on your Amazon Connect instance.
-
Add a Set recording and analytics behavior block to a flow, and configure it to enable conversational analytics for voice, chat, or both.
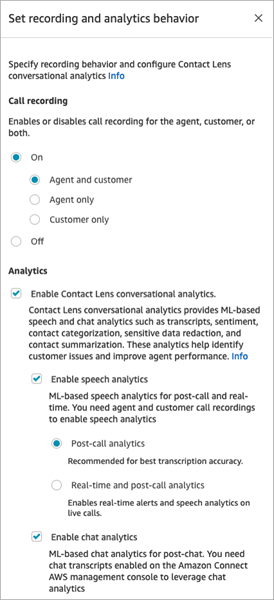
The following image shows a block that's configured for call recording and speech analytics. The Call recording option is set to Agent and customer. In the Analytics section, the options are selected for automated interactions and agent interactions.
The procedures in this topic describe the steps to enable conversational analytics for calls or chats.
Contents
Important things to know
-
Collect data after transferring a contact: If you want to continue using conversational analytics to collect data after transferring a contact to another agent or queue, you need to add another Set recording and analytics behavior block with Enable analytics enabled for the flow. This is because a transfer generates a second contact ID and contact record. Conversational analytics needs to run on that contact record as well.
Note
For queue-to-queue transfers the configuration information for conversational analytics is copied to the transferred contact.
-
When you choose a language that is supported by sentiment analysis, AND select Enable Contact Lens speech analytics or Enable chat analytics in the Set recording and analytics behavior block, sentiment analysis is enabled by default. You can choose to disable sentiment analysis.
-
Where you place the Set recording and analytics behavior block in a flow affects the agent's experience with key highlights. For more information, see Design a flow for key highlights.
Enable Contact Lens for your Amazon Connect instance
Before you can enable conversational analytics, you first need to enable Contact Lens for your instance.
-
Open the Amazon Connect console at https://console.aws.amazon.com/connect/
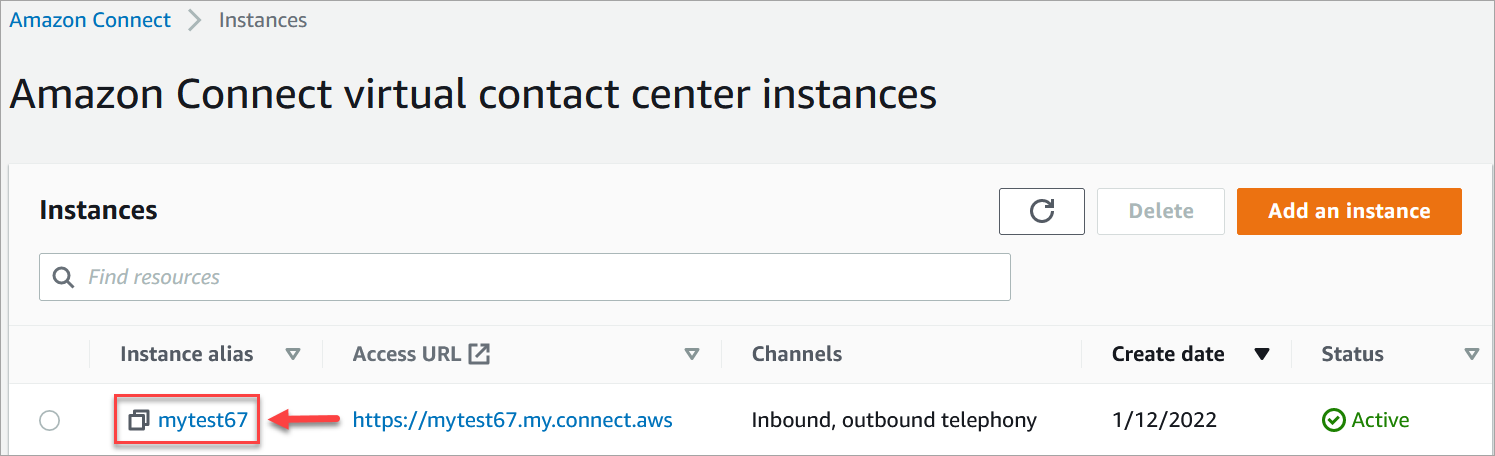
. On the instances page, choose the instance alias. The instance alias is also your instance name, which appears in your Amazon Connect URL. The following image shows the Amazon Connect virtual contact center instances page, with a box around the instance alias.
-
In the Amazon Connect console, in the navigation pane, choose Analytics tools, and then choose Enable Contact Lens.
-
Choose Save.
Enable call recording and speech analytics
After Contact Lens is enabled for your instance, you can add Set recording and analytics behavior blocks to your flows. You then enable conversational analytics when you configure the Set recording and analytics behavior block.
-
In the flow designer add a Set recording and analytics behavior block to your flow.
For information about which flow types you can use with this block and other tips, see Set recording and analytics behavior.
-
Open the Set recording and analytics behavior properties page. Under Call recording, choose On, Agent and Customer.
Both agent and customer call recordings are required to use conversational analytics for voice contacts.
-
Under Analytics, choose Enable Contact Lens conversational analytics, Enable speech analytics.
If you don't see this option, Amazon Connect Contact Lens hasn't been enabled for your instance. For instructions to enable it, see Enable Contact Lens for your Amazon Connect instance.
-
Choose one of the following:
-
Post-call analytics: Contact Lens analyzes the call recording after the conversation and After Contact Work (ACW) is complete. This option provides the best transcription accuracy.
-
Real-time analytics: Contact Lens provides both real-time insights during the call, and post-call analytics after the conversation has ended and After Contact Work (ACW) is complete.
If you choose this option, we recommend setting up alerts based on keywords and phrases that the customer may utter during the call. Contact Lens analyzes the conversation real-time to detect the specified keywords or phrases, and alerts supervisors. From there, supervisors can listen in on the live call and provide guidance to the agent to help them resolve the issue faster.
For information about setting up alerts, see Alert supervisors in real-time for calls.
If your instance was created before October 2018, additional configuration is needed to access real-time call analytics. For more information, see Service-linked role permissions.
-
-
Choose from the list of available languages.
For instructions about specifying the language dynamically, see Dynamically enable redaction based on the customer's language.
-
Optionally, enable redaction of sensitive data. For more information, see the next section, Enable redaction.
-
Choose Save.
-
If the contact is going to be transferred to another agent or queue, repeat these steps to add another Set recording and analytics behavior block with Enable Contact Lens for conversational analytics enabled.
Enable chat analytics
-
In the Set recording and analytics behavior block, under Analytics, choose Enable Contact Lens conversational analytics, and Enable chat analytics.
Note
By choosing this option you will receive both real-time and post-chat analytics.
If you don't see this option, Amazon Connect Contact Lens hasn't been enabled for your instance. For instructions to enable it, see Enable Contact Lens for your Amazon Connect instance.
-
Choose from the list of available languages.
For instructions on choosing the language and redaction dynamically, see Dynamically enable redaction based on the customer's language.
-
Optionally, enable redaction of sensitive data. For more information, see the next section, Enable redaction.
-
Choose Save.
-
If the contact is going to be transferred to another agent or queue, repeat these steps to add another Set recording and analytics behavior block with Enable Contact Lens for conversational analytics enabled.
Enable redaction of sensitive data
When you configure the Set recording and analytics behavior block for conversational analytics, you also have the option to enable redaction of sensitive data in a flow. When redaction is enabled you can choose from the following options:
-
Redact all personally identifiable information (PII) data (all PII entities supported).
-
Choose which PII entities to redact from the list of supported entities.
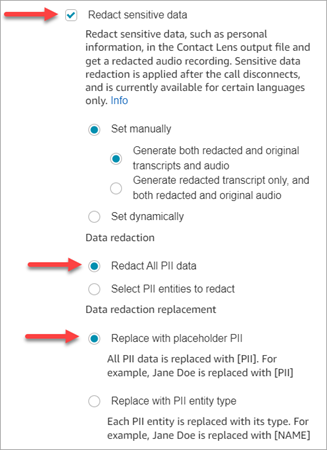
If you accept the default settings, Contact Lens conversational analytics redacts all personally identifiable information (PII) it identifies, and replaces it with [PII] in the transcript. The default settings are shown in the following image because the following options are selected: Redact sensitive data, Redact All PII data, and Replace with placeholder PII.
Select PII entities to redact
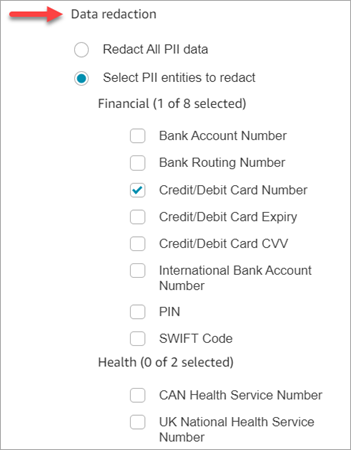
Under the Data redaction section, you can select specific PII entities to redact. The following image shows that Credit/Debit Card Number is going to be redacted.
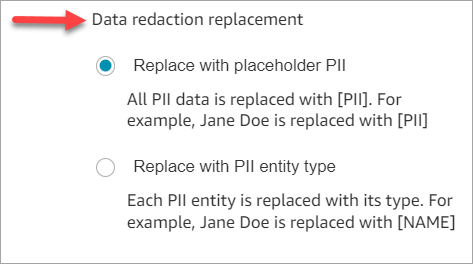
Choose data redaction replacement
Under the Data redaction replacement section, you can choose the mask to be used as data redaction replacement. For example, in the following image, the Replace with placeholder PII option indicates that PII will replace the data.
For more information about using redaction, see Use sensitive data redaction.
Review sensitive data redaction for accuracy
The redaction feature is designed to identify and remove sensitive data. However, due to the predictive nature of machine learning, it may not identify and remove all instances of sensitive data in a transcript generated by Contact Lens. We recommend you review any redacted output to ensure it meets your needs.
Important
The redaction feature does not meet the requirements for de-identification under medical privacy laws like the U.S. Health Insurance Portability and Accountability Act of 1996 (HIPAA), so we recommend you continue to treat it as protected health information after redaction.
For the location of redacted files and examples, see Output file locations.
Disable sentiment analysis
When you choose a language that is supported by sentiment analysis, AND choose Enable speech analytics or Enable chat analytics, sentiment analysis is enabled by default for all agents and customers. For a list of languages supported by sentiment analysis, see AI features.
The following image shows the sentiment analysis option is enabled on the Set recording and analytics behavior block.

The following image shows a language that is not supported by sentiment analysis. We recommend opening the Sentiment section to verify whether it is enabled or disabled.

To disable sentiment analysis for all agents and customers, deselect the Enable Sentiment Analysis option, as shown in the following image.

Dynamically enable redaction based on the customer's language
You can dynamically enable the redaction of the output files based on the language of the customer. For example, for customers using en-US, you may want only a redacted file whereas for those using en-GB, you may want both the original and redacted output files.
-
Redaction: choose one of the following (they are case sensitive)
-
None
-
RedactedOnly
-
RedactedAndOriginal
-
-
Language: Choose from the list of available languages.
You can set these attributes in the following ways:
-
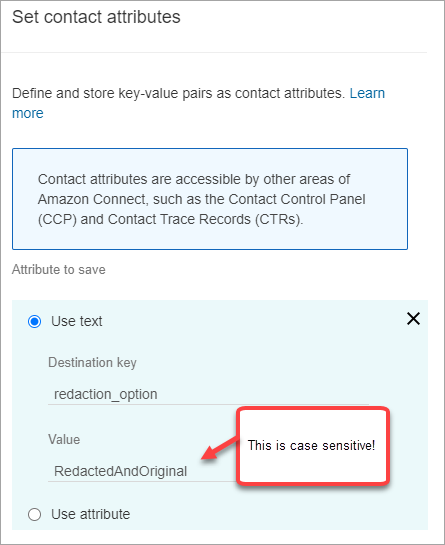
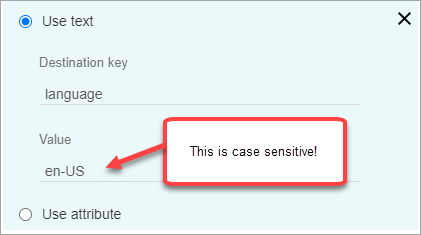
User defined: use a Set contact attributes block. For general instructions about using this block, see How to reference contact attributes. Define the Destination key and Value for redaction and language as needed.
The following image shows an example of how you can configure the Set contact attributes block to use contact attributes for redaction. Choose the Use text option, set Destination key to redaction_option, and set Value to RedactedAndOriginal.
Note
Value is case sensitive.
The following image show how to use contact attributes for language. Choose the Use text option, set Destination key to language, set Value to en-US.
-
Use a Lambda function. This is similar to how you set up user-defined contact attributes. An AWS Lambda function can return the result as a key-value pair, depending on the language of the Lambda response. The following example shows a Lambda response in JSON:
{
   'redaction_option': 'RedactedOnly',
   'language': 'en-US'
}
Design a flow for key highlights
Transcripts are visible to agents using the Contact Control Panel (CCP) depending on whether conversational analytics is enabled in the Set recording and analytics behavior in the inbound flow, and/or a transfer flow.
This section provides three use cases for enabling conversational analytics in the Set recording and analytics behavior block, and describes how they affect the agent's experience with key highlights.
Use case 1: Conversational analytics is enabled in an inbound flow only
-
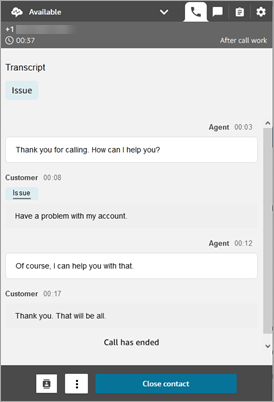
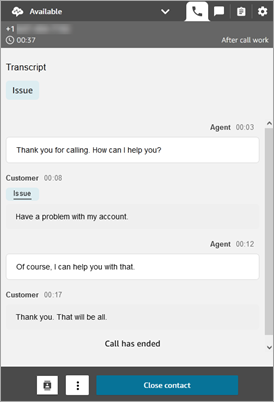
A contact enters the inbound flow, and there are no call transfers. Following is the agent experience:
The agent receives the full transcript during After Contact Work (ACW). The transcript includes everything said by the agent and the customer, from the moment the agent accepts the initial call, until the call has ended, as shown in the following image.
-
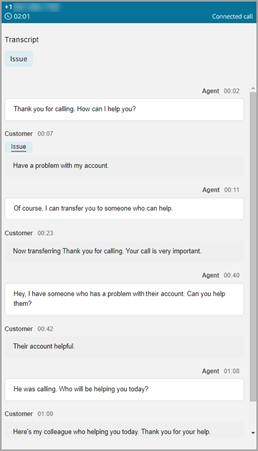
A contact enters the inbound flow, and there is a call transfer. Following is the agent experience:
-
Agent 1 receives a call transcript after they leave the conference/warm transfer, during ACW.
The transcript includes everything said by agent 1 and the customer, from the moment the agent accepts the initial call, until the agent 1 leaves the conference/warm transfer portion of the call. The transcript includes the flow (transfer/queue flow) prompt messages, as shown in the following image.

-
Agent 2 receives a call transcript at the time of accepting the conference/warm transfer call from agent 1.
The transcript includes everything said by agent 1 and the customer, from the moment agent 1 accepts the initial call until the agent 1 leaves the conference/warm transfer portion of the call. The transcript includes the flow (transfer/queue flow) prompt messages, and the warm transfer conversation, as shown in the following image.
Because conversational analytics is not enabled in the transfer flow, agent 2 doesn't see the remainder of the transcript when the call has ended and they enter ACW. The following image of ACW for agent 2 shows the transcript is empty.

-
Use case 2: Conversational analytics is enabled in an inbound flow and a transfer flow (quick connect)
-
A contact enters the inbound flow, and there are no call transfers. Following is the agent experience:
-
Agent 1 receives a full call transcript (unredacted) during ACW.
The transcript includes everything said by agent 1 and the customer from the moment the agent accepts the call, until the call has ended. This is shown in the following image of the CCP for agent 1.
-
-
A contact enters the inbound flow, and there is a call transfer. Following is the agent experience:
-
Agent 1 receives a call transcript after they leave the conference/warm transfer, during ACW.
The transcript includes everything said by agent 1 and the customer from the moment agent 1 accepts the call, until agent 1 leaves the conference/warm transfer portion of the call. The transcript includes flow (transfer/queue flow) prompt messages.
The full call transcript until warm transfer is shown in the following image.
-
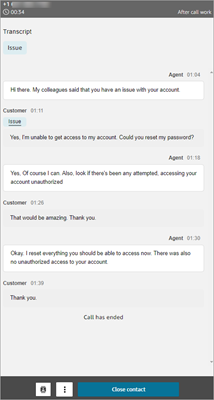
Agent 2 receives a call transcript at the time of accepting the conference/warm transfer call from agent 1.
The transcript includes everything said by agent 1 and the customer, from the moment agent 1 accepts the call, until agent 1 leaves the conference/warm transfer portion of the call. The transcript includes the flow (transfer/queue flow) prompt messages.
-
Because conversational analytics is enabled in the transfer flow, agent 2 receives a call transcript after the call is completed, during ACW.
The transcript includes only the remaining portion of the call between agent 2 and customer, after agent 1 has left the call. The transcript includes everything said by agent 2 and the customer, from the moment they are conferenced/warm transferred in, until the call has ended. An example transcript is shown in the following image.
-
What if the flow block fails to enable conversational analytics?
It's possible that the Set recording and analytics behavior block can fail to enable conversational analytics on a contact. If conversational analytics isn't enabled for a contact, check the flow logs for the error.
Multi-party calls and conversational analytics
Contact Lens conversational analytics supports calls with up to 2 participants. For example, if there are more than two parties (agent and customer) on a call, or a call is getting transferred to a third party, the quality of the transcription and analytics, such as sentiment, redaction, categories among others, can get degraded. We recommend you disable conversational analytics for multi-party or third-party calls if there are more than two parties (agent and customer). To do this, add another Set recording and analytics behavior block to the flow and disable conversational analytics. For more information about the behavior of the flow block, see Configuration tips.
