Login/Logout reports for agents in Amazon Connect
The Login/Logout report displays the login and logout information for the users in your contact center (for example, agents, managers, and administrators). For each user session, the login and logout times are displayed as a row in the report. You can use the report to determine the time users were logged in to Amazon Connect. The report also displays the amount of time for each session that user was logged in to Amazon Connect.
Contents
Why your Login/Logout report may appear incorrect
You may observe that the data in your Login/Logout report appears incorrect. For example:
-
The report doesn't show any data, or is missing data, even though everyone on your team is logged in.
-
The report shows users are logged in although you know they are Offline and their CCP window is closed.
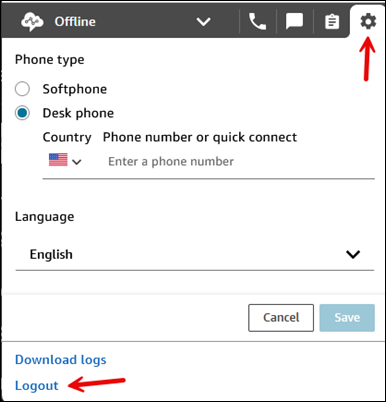
These issues are usually because users are not actually logged out. They aren't clicking the Logout button. For example, they may be changing their status to Offline and then closing their CCP window.
To log out, in the CCP or the agent workspace, they need to choose Settings, scroll down the page, and choose Logout. These buttons are shown in the following image.
A few other reasons a report may appear incorrect:
-
The report includes login and logout events that occur within the specified time range. If a user logs in and out outside of that time range, those events will not be captured in the report.
-
In an SSO scenario, if agents are automatically logged out due to session timeout, or if they simply close the browser without choosing the Logout button, those logout events will not be registered in the report. The report only captures explicit logout actions performed by the user.
Login/Logout report limit: 10,000 rows
-
If you try to generate a Login/Logout report that has more than 10,000 rows, it won't complete.
-
The Login/Logout report page displays only 10,000.
-
If you schedule a Login/Logout report that contains more than 10,000 rows, the report will fail. In addition, no report output will be saved to your S3 bucket, and you cannot view the report.
-
If you have a contact center with a lot of users, and your reports fail to complete, you can specify a shorter time range to reduce the size of the report generated, or apply filters to the report, such as routing profile and agent hierarchy. You can then use other filters to capture all of the login/logout data for your instance.
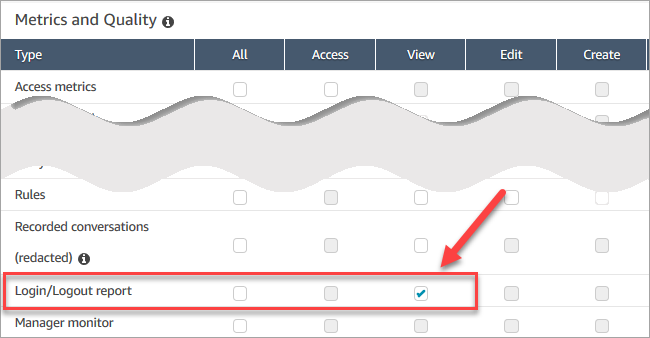
Required permissions to access the Login/Logout report
Before you can generate a Login/Logout report, you need the following permissions assigned to your security profile: Login/Logout report - View.
By default, the Amazon Connect Admin security profile has these permissions.
For information about how to add more permissions to an existing security profile, see Update security profiles in Amazon Connect.
Generate a Login/Logout report
A Login/Logout report includes only login or logout actions by your users that occurred during the specified time range.
-
If user logged in during the time range and did not log out, the report shows a login time but not a logout time.
-
If the user logged in before the start of the time range, and then logged out during the time range, the report shows both the login and logout times even though the login occurred before the start of the time range. This is so you can view the duration of the user session associated with the most recent logout.
To generate a Login/Logout report
-
Log in to the Amazon Connect admin website at https://
instance name.my.connect.aws/. -
Choose Analytics and optimization, Login/Logout report.
-
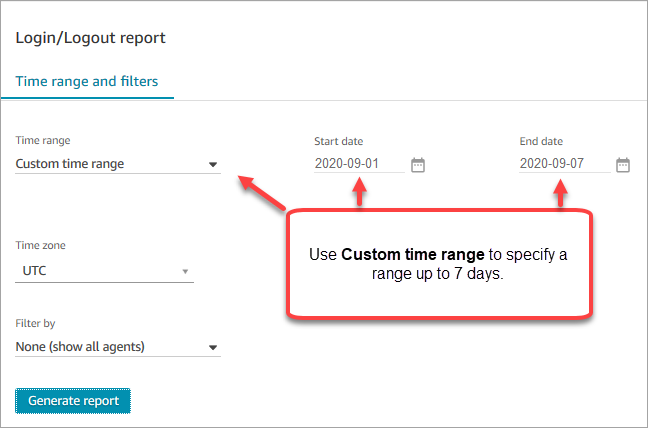
On the Login/Logout report page, choose the Time range for the records to include in the report. Choose Custom time range to specify a range up to 7 days. This configuration is shown in the following image.
-
Choose the Time zone to use for your report.
-
To filter data included in the report, for Filter by, choose a value.
-
Choose Generate report, Save.
-
Provide a name for the report, and choose Save.
Edit a Saved Login/Logout Report
After you save your report, you can edit it at any time. When you open a saved report, the time frame and date range displayed show the date and time defined when you saved the report.
To edit a saved Login/Logout report
-
Log in to the Amazon Connect admin website at https://
instance name.my.connect.aws/. -
Choose Analytics and optimization, Saved reports.
-
Choose Login/Logout report and select the report to edit.
-
Update the Time range, Time zone, and Filter by settings.
-
To overwrite your existing report, choose Save.
-
To save the changes as a new report, choose Save, Save as. Provide a name for the report and choose Save as.
Download a Login/Logout report as a CSV file
When you have generated a report, you can download it as a comma-separated value (CSV) file so that you can use it other applications to work with the data, such as a spreadsheet or database.
Important
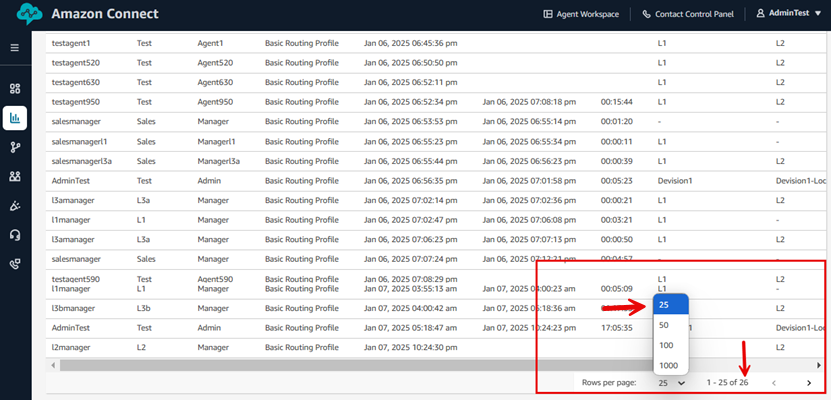
Only the data that is displayed on the page is downloaded into the CSV file.
For example, if you're displaying a page with 25 rows and there are 26 results, the downloaded CSV file will include only rows 1-25. You need to increase the Rows per page to include all results.
The following image shows that row 26 won't be included in a download of 25 rows.
To download a report as a CSV file
-
Open the report to download.
-
On the Login/Logout report page, at the top right corner, choose the Share report menu (arrow) next to Save.
-
Choose Download CSV. The file
Login_Logout
                        report.csv
is downloaded to your computer.
Share a Login/Logout report
To make the report available to other people in your organization, you can share a report. People can access the report only if they have appropriate permissions in Amazon Connect.
To share a Login/Logout report
-
On the Login/Logout report page, at the top right corner, choose the Share report menu (arrow) next to Save.
-
Choose Share report.
-
To copy the URL to the report, choose Copy link address. You can send the URL to others in your organization by pasting the link into an email or other document.
-
To publish the report to your organization, for Publish report to organization, move the toggle to On.
-
Choose Save.
Schedule a Login/Logout report
To generate a report with the same settings on a regular basis, you can schedule the report to run daily or on specific days of the week. Note that scheduled Login/Logout reports work differently than Login/Logout reports you generate from the user interface for a specified time range.
Important things to know
-
When you schedule a report, it is automatically published to your organization. Anyone with appropriate permissions can view the report. Users with all permissions for Login/Logout reports can also edit, schedule, or delete the report.
-
For scheduled Login/Logout reports, the trailing window value is always the last 24 hours.
-
A scheduled report always runs at 12AM on the day you select, in the time zone that you choose.
For example, if you select Wednesday, the report runs at midnight Wednesday and does not include any data for Wednesday.
-
Scheduled reports are saved as CSV files in your Amazon S3 bucket. The default time zone is UTC. To have your report run at 12AM in your local time, choose your time zone instead.
-
To email a scheduled report to a list of co-workers, you need to generate the email manually using your messaging system. Amazon Connect doesn’t provide an option to email the scheduled report automatically.
How to schedule a Login/Logout report
-
If you already have a saved report to schedule open, skip to step 4. Otherwise, in the dashboard, choose Analytics and optimization, Dashboards and reports.
-
Choose Login/Logout report.
-
Hover the mouse pointer over the row containing the name of the report to schedule, and choose the Schedule report icon.
-
On the Schedule report page, under Recurrence, for Generate this report, choose whether to generate the report Daily or Weekly.
-
If you choose Weekly, select the day or days of the week on which to run the report.
-
Choose the Time zone.
-
To add a prefix to the S3 path to the saved report, choose Delivery Options and enter a value in the Prefix field.
The prefix is added to the path between /Reports and the report name. For example: .../Reports/
my-prefix/report-name-YYYY-MM-DD… -
Choose Create.
After you schedule a report, you can change or delete the schedule for it at any time.
To edit or delete the schedule for a report
-
Follow the steps in the preceding section to open the Schedule report page.
-
To edit the schedule, choose Edit, update the Recurrence and Delivery Options as desired, and then choose Save.
-
To delete the schedule for the report, choose Delete, and then choose Delete again on the confirmation dialog.
Delete a Saved Login/Logout report
Too many reports in your report library? If you no longer want to use a saved report, you can delete it. When you delete a report, you are only deleting the settings for the report, not any reports that have already been generated using those settings. No CSV files created from a scheduled report are removed from your S3 bucket.
To delete a saved Login/Logout report
-
Open your Amazon Connect dashboard.
-
Choose Analytics and optimization, Saved reports.
-
Hover over the row for the report to delete, and choose the Delete icon.
-
Choose Delete again.
Not supported: Tag-based access control
Amazon Connect does not support tag-based access controls for login/logout reports.
