Create quick connects in Amazon Connect
Quick connects are a way for you to create a list of destinations for common transfers. For example, you might create a quick connect for Tier 2 support. If agents in Tier 1 support can't solve the issue, they will transfer the contact to Tier 2.
How many quick connects can I create? To view your
quota of Quick connects per instance, open the Service Quotas console at
https://console.aws.amazon.com/servicequotas/
Types of quick connects
The type of a quick connect specifies the destination. You can specify one of the following destinations.
Phone number quick connect
Contacts are transferred to a phone number (such as an on-call pager).
User quick connect
Contacts are transferred to a specific user, such as an agent, as part of a flow.
Important
User and Queue quick connects only appear in the CCP when an agent goes to transfer a contact.
Queue quick connect
Contacts are transferred to a queue as part of a flow.
Important
User and Queue quick connects only appear in the CCP when an agent goes to transfer a contact.
Step 1: Create quick connects
Following are the instructions to add quick connects manually using the Amazon Connect console. To add quick connects programmatically, use the CreateQuickConnect API.
To add quick connects
-
Log in to the Amazon Connect admin website at https://
instance name.my.connect.aws/. To find the name of your instance, see Find your Amazon Connect instance ID or ARN. -
On the navigation menu, choose Routing, Quick connects.
-
For each quick connect, do the following:
-
Choose Add new.
-
Enter a unique name. If desired, also enter a description.
-
Choose a type.
-
Enter the destination (for example, a phone number, the name of an agent, or the name of a queue).
-
Enter a flow, if applicable.
-
Enter a description.
-
-
When you're finished adding quick connects, choose Save.
Step 2: Enable agents to see quick connects
To enable your agents to see the quick connects in the CCP when they transfer a contact
-
After you create the quick connect, go to Routing, Queues and then choose the appropriate queue for the contact to be routed to.
-
On the Edit queue page, in the Quick connect box, search for the quick connect you created.
-
Select the quick connect and then choose Save.
Tip
Agents see the quick connects of the queues in their routing profile, including the Default outbound queue.
Example: Create a phone number quick connect to a mobile phone
In this example, you create a phone number quick connect to a person's mobile phone. This might be for a supervisor, for example, so agents can call them if needed.
Create a quick connect for a person's mobile phone number
-
On the navigation menu, choose Routing, Quick connects, Add quick connect.
-
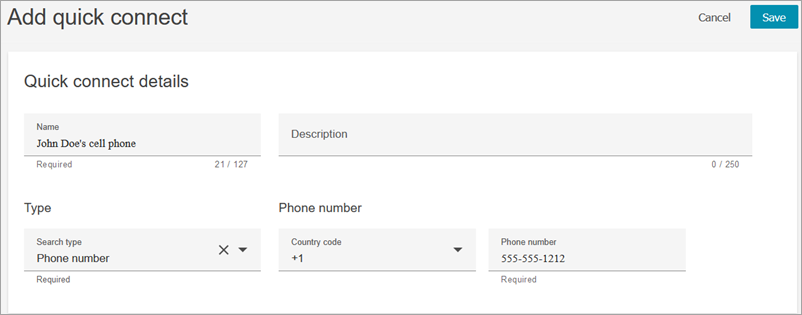
On the Add quick connect page, enter a name for the quick connect, for example, John Doe's cell phone.
-
For Type, select Phone number.
-
For Phone number, enter the mobile phone number, starting with the country code. In the US, the country code is 1, as shown in the following image.
-
Choose Save.
Add the quick connect to a queue. Agents working this queue will see the quick connect in their CCP.
-
Go to Routing, Queues, and choose the queue you want to edit.
-
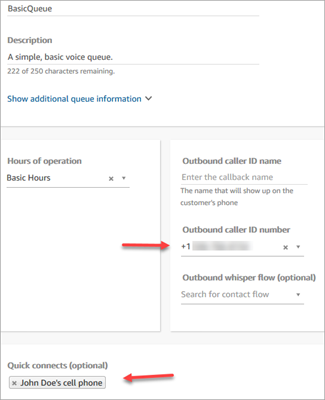
On the Edit queue page, in Outbound caller ID number, choose a number claimed for your contact center. This is required to make outbound calls.
-
At the bottom of the page, in the Quick connect box, search for the quick connect you created, for example, John Doe's cell phone.
-
Select the quick connect. In the following image of the Edit queue page, a phone number has been selected for the Outbound caller ID number, and John Doe's cell phone has been selected as the quick connect.
-
Choose Save.
Test the quick connect
-
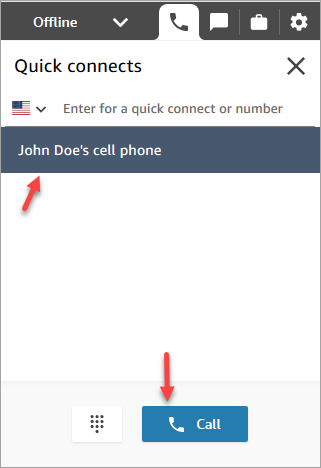
Open the Contact Control Panel.
-
Choose Quick connects.
-
Select the quick connect you created, and then choose Call.