Using multiple staging accounts with AWS DRS
AWS Elastic Disaster Recovery (AWS DRS) currently limits customers to 300 replicating source servers per account per AWS Region, due to various storage and API limitations. Customers who want to replicate and protect more than 300 source servers can use multiple staging accounts for replication, and recover their source servers into these accounts or into a single target AWS account. Customers who want to recover into a target account can manage the recovery for all the source servers in the staging accounts from that target account.
Use cases for this feature:
-
You have more than 300 replicating servers and want to manage them from a single account.
-
You have multiple AWS accounts with any number of servers and want to manage these servers from a single account.
-
You want to manage your source servers in different AWS accounts for various business or security reasons and want to manage them from a single account.
-
You have replicating servers that you would like to be able to recover to multiple different AWS accounts.
Overview
The multiple staging account feature is configured similarly to the standard AWS DRS configuration, but includes several extra steps required to configure the target AWS account.
For each staging account, you must first:
-
Initialize AWS DRS.
-
Define your replication configuration template.
-
Install the AWS Replication Agent on each source server.
-
Configure the individual source server replication settings.
-
Share the EBS encryption key with the target account.
-
Create a role to allow access into the staging account from the target account
For each target account, you must first:
-
Initialize the target account.
Once all of your source servers have been added to your staging accounts and are replicating successfully (are in the Healthy data replication state), you can use the target AWS account to launch Drill and Recovery instances for each server.
Note
You can only update the default replication template for the source servers from the staging account and not from the target account. Also, disconnection and deletion of the staging account’s source servers are done from the staging account (to stop replication and save on resource usage). Source servers can be extended into many target accounts, or deleted from them.
Note
Source servers that reside in the staging account but are managed in the target account are called "extended source servers". An extended source server for which the staging source server has been deleted, or the role revoked, will remain in the target account, but will be marked with an extension error. An extended source server can be deleted at any time from the target account.
Note
Source servers that are EC2 instances, and have one or more marketplace licenses associated, cannot be extended into the target AWS account, unless the source AWS account (the AWS account that owns the EC2 instance) creates a failback and in-AWS account role for the staging account. This is required to provide permissions to get the marketplace license data from the source account when the server is extended. Create a Failback and in-AWS right-sizing role for trusted account for any staging account on the source account (the AWS account that owns the EC2 instance).
On a target account, the source servers list view shows all the source servers that were extended into the account, or those that are replicating in it.
Extending source servers from a staging account into a target AWS account
You can extend source servers from both new and existing AWS DRS accounts into a target AWS account.
Onboarding a new staging account
To use an account as a staging account in any AWS Region, you must first initialize AWS DRS in the AWS Region of the staging account, and add roles for the target account or accounts you plan to use.
During initialization, you will need to define the default replication settings, as described in the quick start guide.
Note
If your volumes are encrypted, you must use a custom encryption using a customer managed key when defining the EBS encryption. This key must be shared with the target account (see instructions below), to facilitate recovery in the target account.
After the initialization of the staging account, add IAM roles for the target accounts on the Settings: trusted accounts page of AWS DRS in the staging account. The roles are used to allow the target account to extend source servers from the staging account and to recover them in the target account.
Note
Commercial AWS accounts can only be extended to other Commercial AWS accounts and Gov Cloud AWS accounts can only be extended to other Gov Cloud AWS accounts.

Under trusted accounts settings, you will find the Existing trusted accounts pane. Here, you can manage existing staging account IAM roles. These IAM roles are used to associate the staging account with the target account.

Use Add trusted accounts and create roles to add roles for any trusted account you plan to use.

On the Add trusted accounts and create roles page, choose Add new trusted account.

Enter the AWS account IDs of the trusted account and select staging role. This will automatically generate a service IAM role that will allow the use of Amazon EC2, Amazon EBS and AWS DRS resources in the staging account on behalf of a trusted account’s user.
Choose Add new trusted account to add more than one trusted account at once. You can add up to 10 trusted accounts at once.
Once you have added your accounts, choose Add trusted accounts and create roles.

Using an existing account as a staging account
To use an account as a staging account, the default replication settings and replication settings of each source server that is to be extended into a target account should be reviewed, and EBS encryption must be set to use custom encryption using a customer managed key.
Note
This may trigger a full resync of the replicated data for a source server that had the default key, if that source server’s encryption key was modified.
Share the customer managed key (or keys) with the target account (as described below).
IAM roles are automatically created for the target accounts on the Settings: trusted account page of AWS DRS in the staging account. These roles are used to allow the target account to extend source servers from the staging account and to recover them in the target account.
Under trusted accounts settings, you will find the Existing trusted accounts category. Here, you can manage existing staging accounts with links to IAM roles associated for each account. These IAM roles are used to associate the staging account with the trusted account.
Use Add trusted accounts and create roles to add roles for any trusted account you plan to use.
On the Add trusted accounts and create roles page, choose Add new trusted account.
Enter the AWS account IDs of the target account. This will automatically generate a service IAM role that will allow the use of Amazon EC2, Amazon EBS and AWS DRS resources in the staging account on behalf of a target account’s user.
Choose Add new trusted account to add more than one trusted account at once. You can add up to 10 trusted accounts at once.
Once you have added your accounts, choose Add trusted accounts and create roles.
Share the EBS encryption key with the target account
Sharing the EBS encryption key is mandatory only if your volumes are encrypted.
In order for the target account to be able to successfully read the EBS snapshots of the replication servers in the staging account, you must share the EBS encryption key configured in the staging account with the target account. This can be done by following the instructions in the Allowing users in other accounts to use a KMS key documentation.
You must set the following statement policies on your staging account's KMS key in order
to be able to recover extended source servers on a specific target account. Ensure that you
properly assign the $STAGING_ACCOUNT_ID and $TARGET_ACCOUNT_ID and
$REGION
variables.
Note that if this is a key you already have been using, you will need to attach this policy in addition to the existing one.
[
	{
		"Sid": "Allow access to share snapshots with a target account",
		"Effect": "Allow",
		"Principal": {
			"AWS": [
				"arn:aws:iam::$STAGING_ACCOUNT_ID:role/service-role/DRSStagingAccountRole_$TARGET_ACCOUNT_ID"
			]
		},
		"Action": "kms:ReEncrypt*",
		"Resource": "*",
		"Condition": {
			"StringEquals": {
				"kms:CallerAccount": "$STAGING_ACCOUNT_ID",
				"kms:ViaService": "ec2.$REGION.amazonaws.com"
			}
		}
	},
	{
		"Sid": "Allow a target account to use this KMS key via EC2",
		"Effect": "Allow",
		"Principal": {
			"AWS": "arn:aws:iam::$TARGET_ACCOUNT_ID:root"
		},
		"Action": "kms:ReEncrypt*",
		"Resource": "*",
		"Condition": {
			"StringEquals": {
				"kms:CallerAccount": "$TARGET_ACCOUNT_ID",
				"kms:ViaService": "ec2.$REGION.amazonaws.com"
			}
		}
	}
]
Managing extended source servers within the target AWS account
In order to manage extended source servers within the target accounts, you should extend source servers you wish to recover in the target account into that account from any staging account.
Initializing the target account
If you plan on using an AWS account and AWS Region in which AWS DRS has not been initialized, the service can be initialized either from the AWS DRS console or from the API. If you choose to initialize the service from the API, using the InitializeService API, you can skip creating the default replication settings if you plan to use the service only from the API and do not plan to have source servers replicating on this account. If you initialize the service through the AWS DRS console, the initialization wizard still creates the default replication settings, and the wizard will also run if you use the console after initializing a service without creating the default replication settings.
Create extended source servers
In order to add your source servers from your staging accounts into your target account, you must extend the source servers from the staging account to the target account.
Important
You must repeat the steps below for every staging account you want to associate with the target account.
Navigate to the Source servers view within the target account, open the Actions menu, and choose Create extended source servers. This will extend the source servers from the staging accounts into the target account, allowing you to manage all of the source servers in your staging accounts through a single target account.

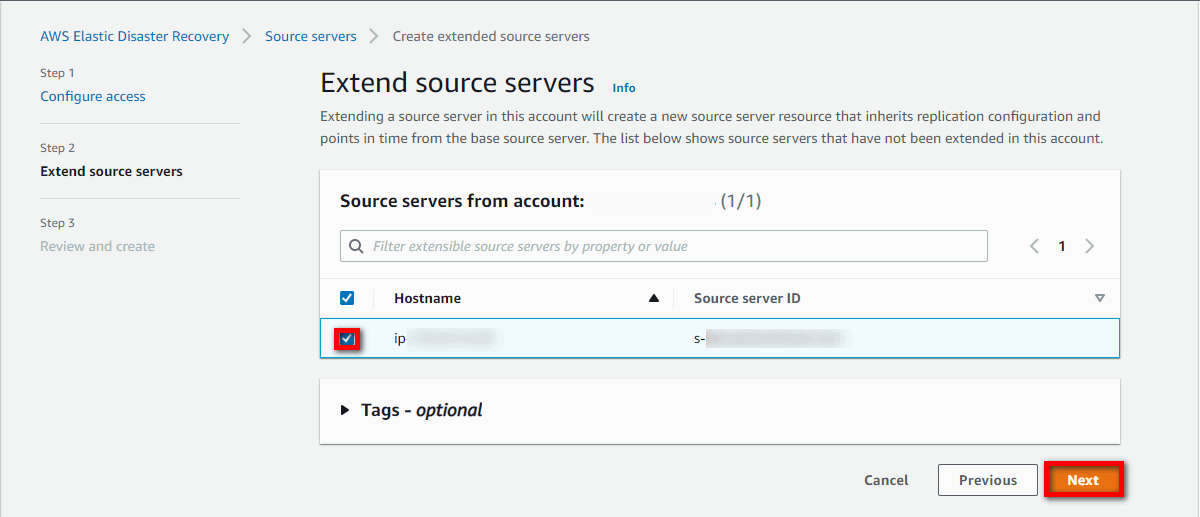
The Create extended source servers wizard will appear. The wizard is composed of three steps:
-
Configure access
-
Extend source servers
-
Review and create
First you must configure access. Under Configure access > Staging account configuration, enter the ID of the staging account in which you created the IAM roles in the previous step. Choose Next.

Select the source servers you want to extend from the staging account into the target account by checking the box to the left of the source server Hostname. This will create a new source server resource that will inherit the replication configuration and points in time from the base source server in the staging account. Only source servers that have not already been extended will be shown. Once you have selected your source servers, choose Next.
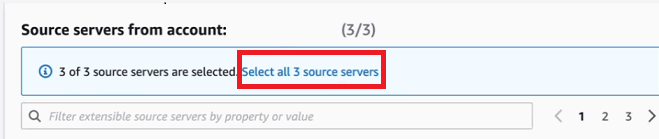
Note
The Extend source servers page will only show 30 source servers per page. If you have many source servers in your staging account and want to extend them all to your target account, then choose the Select all X source servers option.
Note
You can filter the source servers shown by Hostname or Source Server ID through the Filter.… box.

You can add Tags if you wish to or you can skip this step. Add tags if you wish to, and then choose Next. Learn more about adding tags in AWS DRS.

Finally, Review and create the extended source servers. Review the information on the page and then choose Create extended source servers.


The AWS DRS console show the Successfully created X extended source servers message and you will see your extended source servers in your target account.

Note
Extended source servers will show Extended under Extension status in the Source server details > Overview section.

Manage source servers
Once you have extended your source servers from every staging account into the target account, you can manage the source servers from the target account.
Source servers are grouped by staging account. You can choose the staging account under the Source servers header.

Note
If you want to see the Source Server ID and Staging Account ID of each source server in the source servers view, you can add those columns by choosing the Preferences wheel.

From Preferences, toggle the Source server ID and Staging account ID options and choose Confirm.

You will now see these columns added to the main source servers view.

You can now perform normal AWS DRS operations for the source servers, including:
-
Performing a failover and failback
Note
You will not be able to edit the replication settings and disks for individual extended source servers from the target account. You must edit these from the staging account.
Note
The AWS Replication Agent will stop replicating automatically after failing back from a recovery instance of an extended source server to the original server.
Removing an extended source server
If you need to delete an extended source server, do this from the account it was extended to (and where it is no longer needed). Deleting an extended source server has no effect on the replication of the source server into the staging account.
You can always recreate an extended source server after it was deleted, using 'Create extended source server' on the same staging source server.
Note
To delete the staging account source server (the source server that is used to replicate data into the staging account), it must first be disconnected, and then it can be deleted from the staging account.
Note
You cannot change the staging account (the account where replication takes place) for a server that has been extended. For example, if a source server is replicating into account A, and has been extended into account B, you cannot reinstall the agent on the source server to replicate into an account that is different than A while it is still extended into account B.
Troubleshooting
If your source server shows Extension error under the Ready for recovery category in the target account, then the source server was most likely deleted from the staging account.

Navigate to the source server details page by choosing the server's hostname in order to see the extension error details.

