Mit dem IVS Android Broadcast SDK veröffentlichen und abonnieren
Dieser Abschnitt führt Sie durch die Schritte zur Veröffentlichung und zum Abonnieren einer Stufe mithilfe Ihrer Android-App.
Ansichten erstellen
Wir beginnen mit der Erstellung eines einfachen Layouts für unsere Anwendung mithilfe der automatisch erstellten activity_main.xml-Datei. Das Layout enthält einen EditText, um ein Token hinzuzufügen, einen Beitreten-Button, eine TextView, um den Status der Stage anzuzeigen, und eine CheckBox, um die Veröffentlichung umzuschalten.
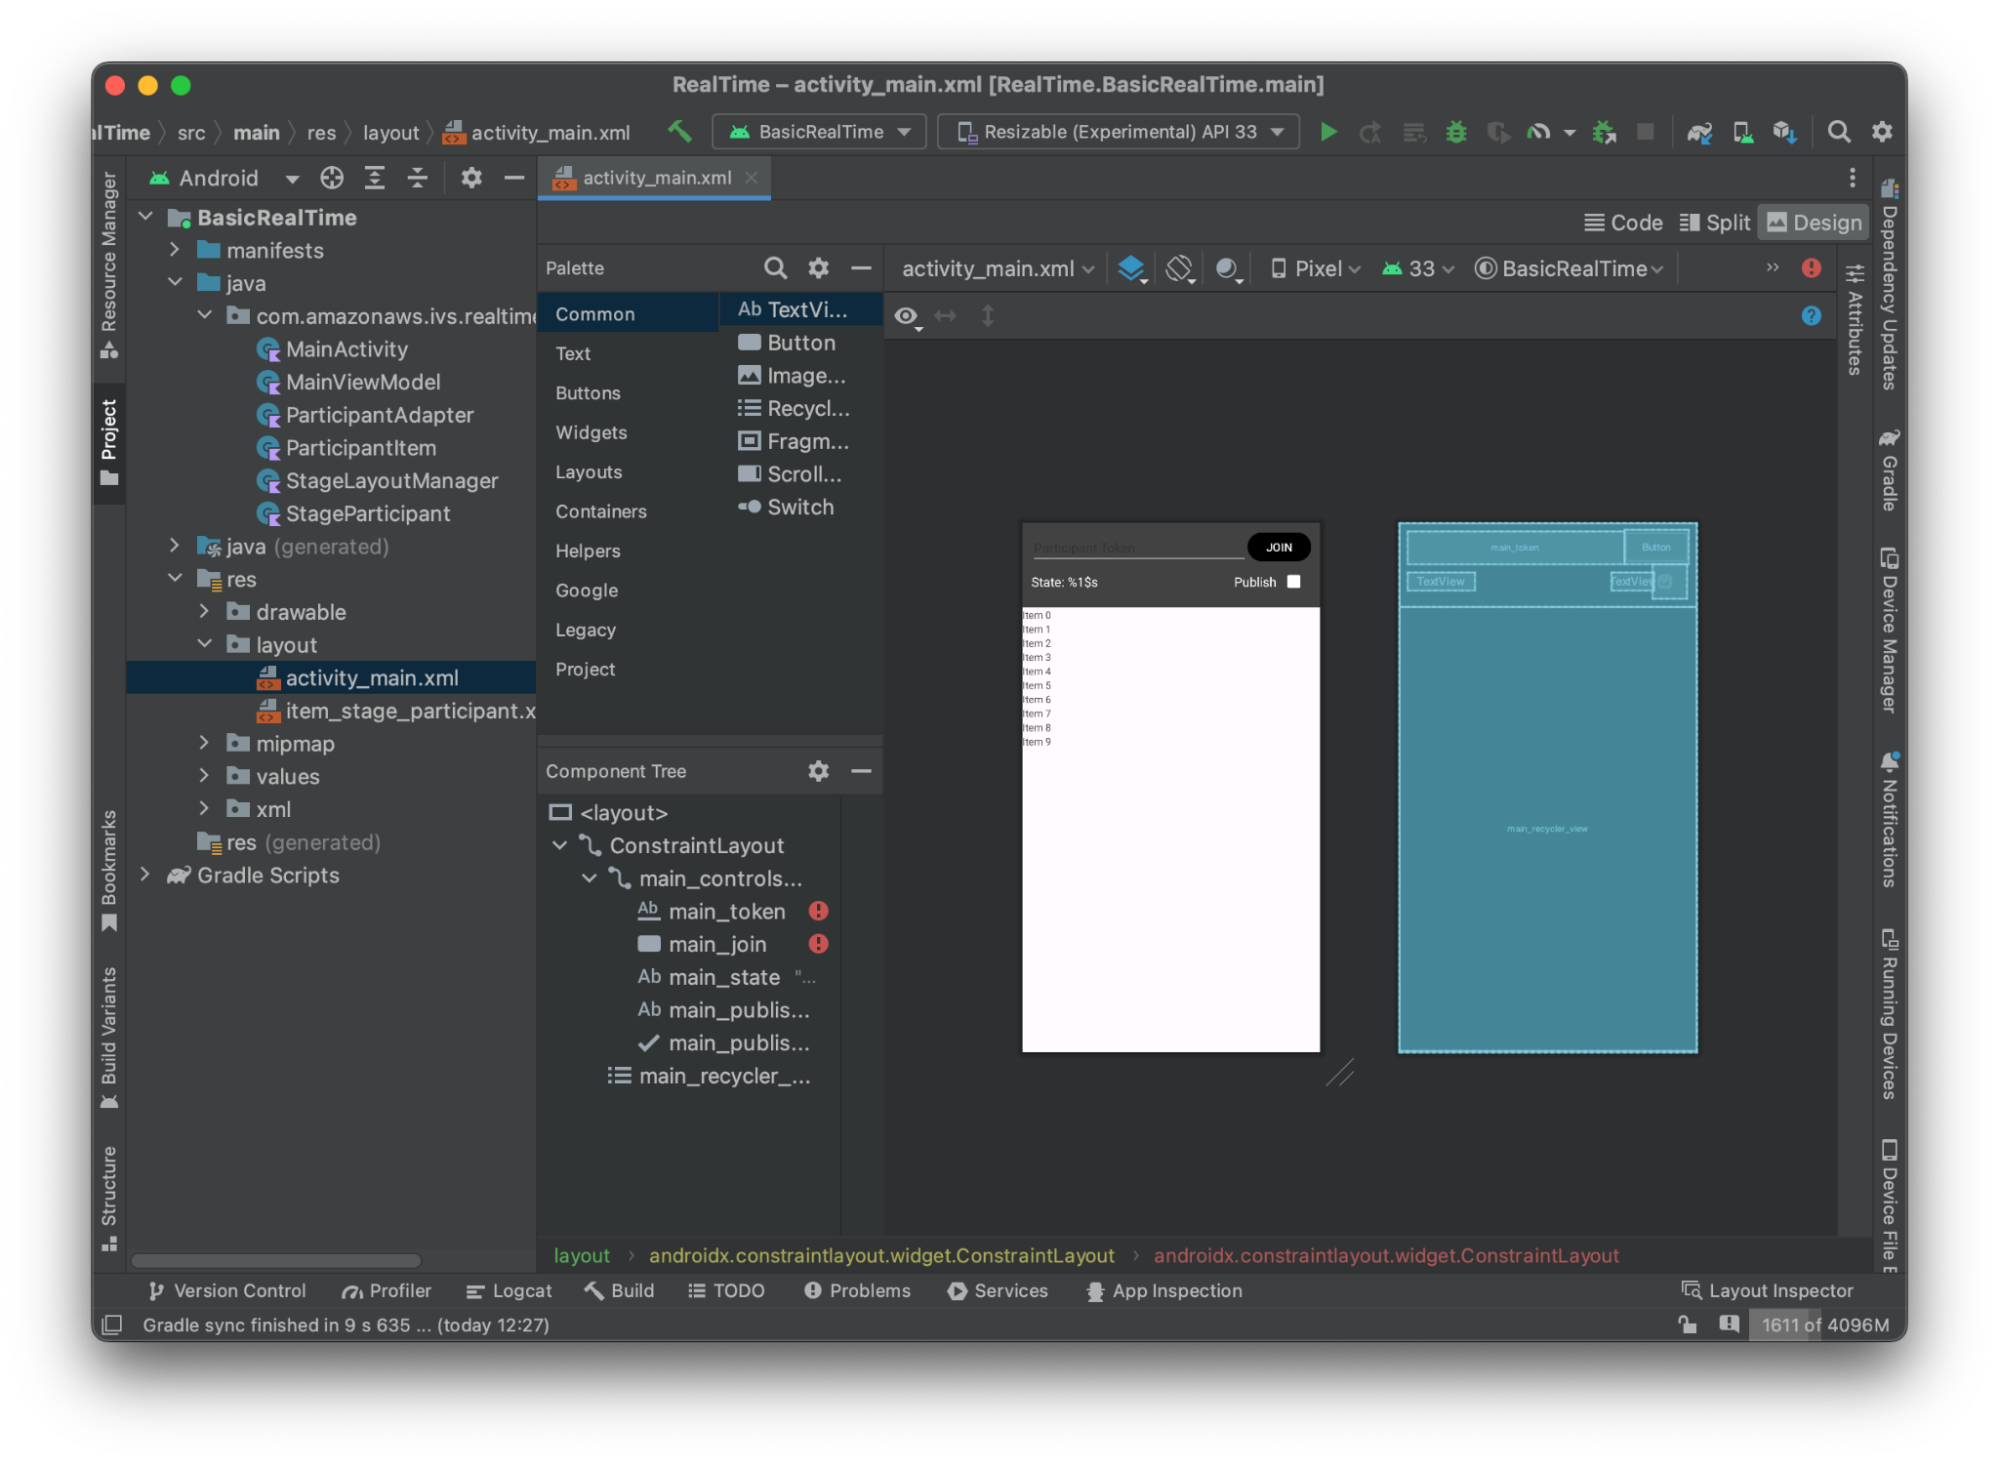
Hier ist das XML hinter der Ansicht:
<?xml version="1.0" encoding="utf-8"?>
<layout xmlns:android="http://schemas.android.com/apk/res/android"
    xmlns:app="http://schemas.android.com/apk/res-auto"
    xmlns:tools="http://schemas.android.com/tools">

    <androidx.constraintlayout.widget.ConstraintLayout
        android:keepScreenOn="true"
        android:layout_width="match_parent"
        android:layout_height="match_parent"
        tools:context=".BasicActivity">

        <androidx.constraintlayout.widget.ConstraintLayout
            android:id="@+id/main_controls_container"
            android:layout_width="match_parent"
            android:layout_height="wrap_content"
            android:background="@color/cardview_dark_background"
            android:padding="12dp"
            app:layout_constraintTop_toTopOf="parent">

            <EditText
                android:id="@+id/main_token"
                android:layout_width="0dp"
                android:layout_height="wrap_content"
                android:autofillHints="@null"
                android:backgroundTint="@color/white"
                android:hint="@string/token"
                android:imeOptions="actionDone"
                android:inputType="text"
                android:textColor="@color/white"
                app:layout_constraintEnd_toStartOf="@id/main_join"
                app:layout_constraintStart_toStartOf="parent"
                app:layout_constraintTop_toTopOf="parent" />

            <Button
                android:id="@+id/main_join"
                android:layout_width="wrap_content"
                android:layout_height="wrap_content"
                android:backgroundTint="@color/black"
                android:text="@string/join"
                android:textAllCaps="true"
                android:textColor="@color/white"
                android:textSize="16sp"
                app:layout_constraintBottom_toBottomOf="@+id/main_token"
                app:layout_constraintEnd_toEndOf="parent"
                app:layout_constraintStart_toEndOf="@id/main_token" />

            <TextView
                android:id="@+id/main_state"
                android:layout_width="wrap_content"
                android:layout_height="wrap_content"
                android:text="@string/state"
                android:textColor="@color/white"
                android:textSize="18sp"
                app:layout_constraintBottom_toBottomOf="parent"
                app:layout_constraintStart_toStartOf="parent"
                app:layout_constraintTop_toBottomOf="@id/main_token" />

            <TextView
                android:id="@+id/main_publish_text"
                android:layout_width="wrap_content"
                android:layout_height="wrap_content"
                android:text="@string/publish"
                android:textColor="@color/white"
                android:textSize="18sp"
                app:layout_constraintBottom_toBottomOf="parent"
                app:layout_constraintEnd_toStartOf="@id/main_publish_checkbox"
                app:layout_constraintTop_toBottomOf="@id/main_token" />

            <CheckBox
                android:id="@+id/main_publish_checkbox"
                android:layout_width="wrap_content"
                android:layout_height="wrap_content"
                android:buttonTint="@color/white"
                android:checked="true"
                app:layout_constraintBottom_toBottomOf="@id/main_publish_text"
                app:layout_constraintEnd_toEndOf="parent"
                app:layout_constraintTop_toTopOf="@id/main_publish_text" />

        </androidx.constraintlayout.widget.ConstraintLayout>

        <androidx.recyclerview.widget.RecyclerView
            android:id="@+id/main_recycler_view"
            android:layout_width="match_parent"
            android:layout_height="0dp"
            app:layout_constraintTop_toBottomOf="@+id/main_controls_container"
            app:layout_constraintBottom_toBottomOf="parent" />

    </androidx.constraintlayout.widget.ConstraintLayout>
<layout>
Wir haben hier auf ein paar String-IDs verwiesen, also erstellen wir unsere gesamte strings.xml-Datei jetzt:
<resources>
    <string name="app_name">BasicRealTime</string>
    <string name="join">Join</string>
    <string name="leave">Leave</string>
    <string name="token">Participant Token</string>
    <string name="publish">Publish</string>
    <string name="state">State: %1$s</string>
</resources>
Lassen Sie uns diese Ansichten im XML mit unseren MainActivity.kt verknüpfen:
import android.widget.Button
import android.widget.CheckBox
import android.widget.EditText
import android.widget.TextView
import androidx.recyclerview.widget.RecyclerView

private lateinit var checkboxPublish: CheckBox
private lateinit var recyclerView: RecyclerView
private lateinit var buttonJoin: Button
private lateinit var textViewState: TextView
private lateinit var editTextToken: EditText

override fun onCreate(savedInstanceState: Bundle?) {
    super.onCreate(savedInstanceState)
    setContentView(R.layout.activity_main)

    checkboxPublish = findViewById(R.id.main_publish_checkbox)
    recyclerView = findViewById(R.id.main_recycler_view)
    buttonJoin = findViewById(R.id.main_join)
    textViewState = findViewById(R.id.main_state)
    editTextToken = findViewById(R.id.main_token)
}
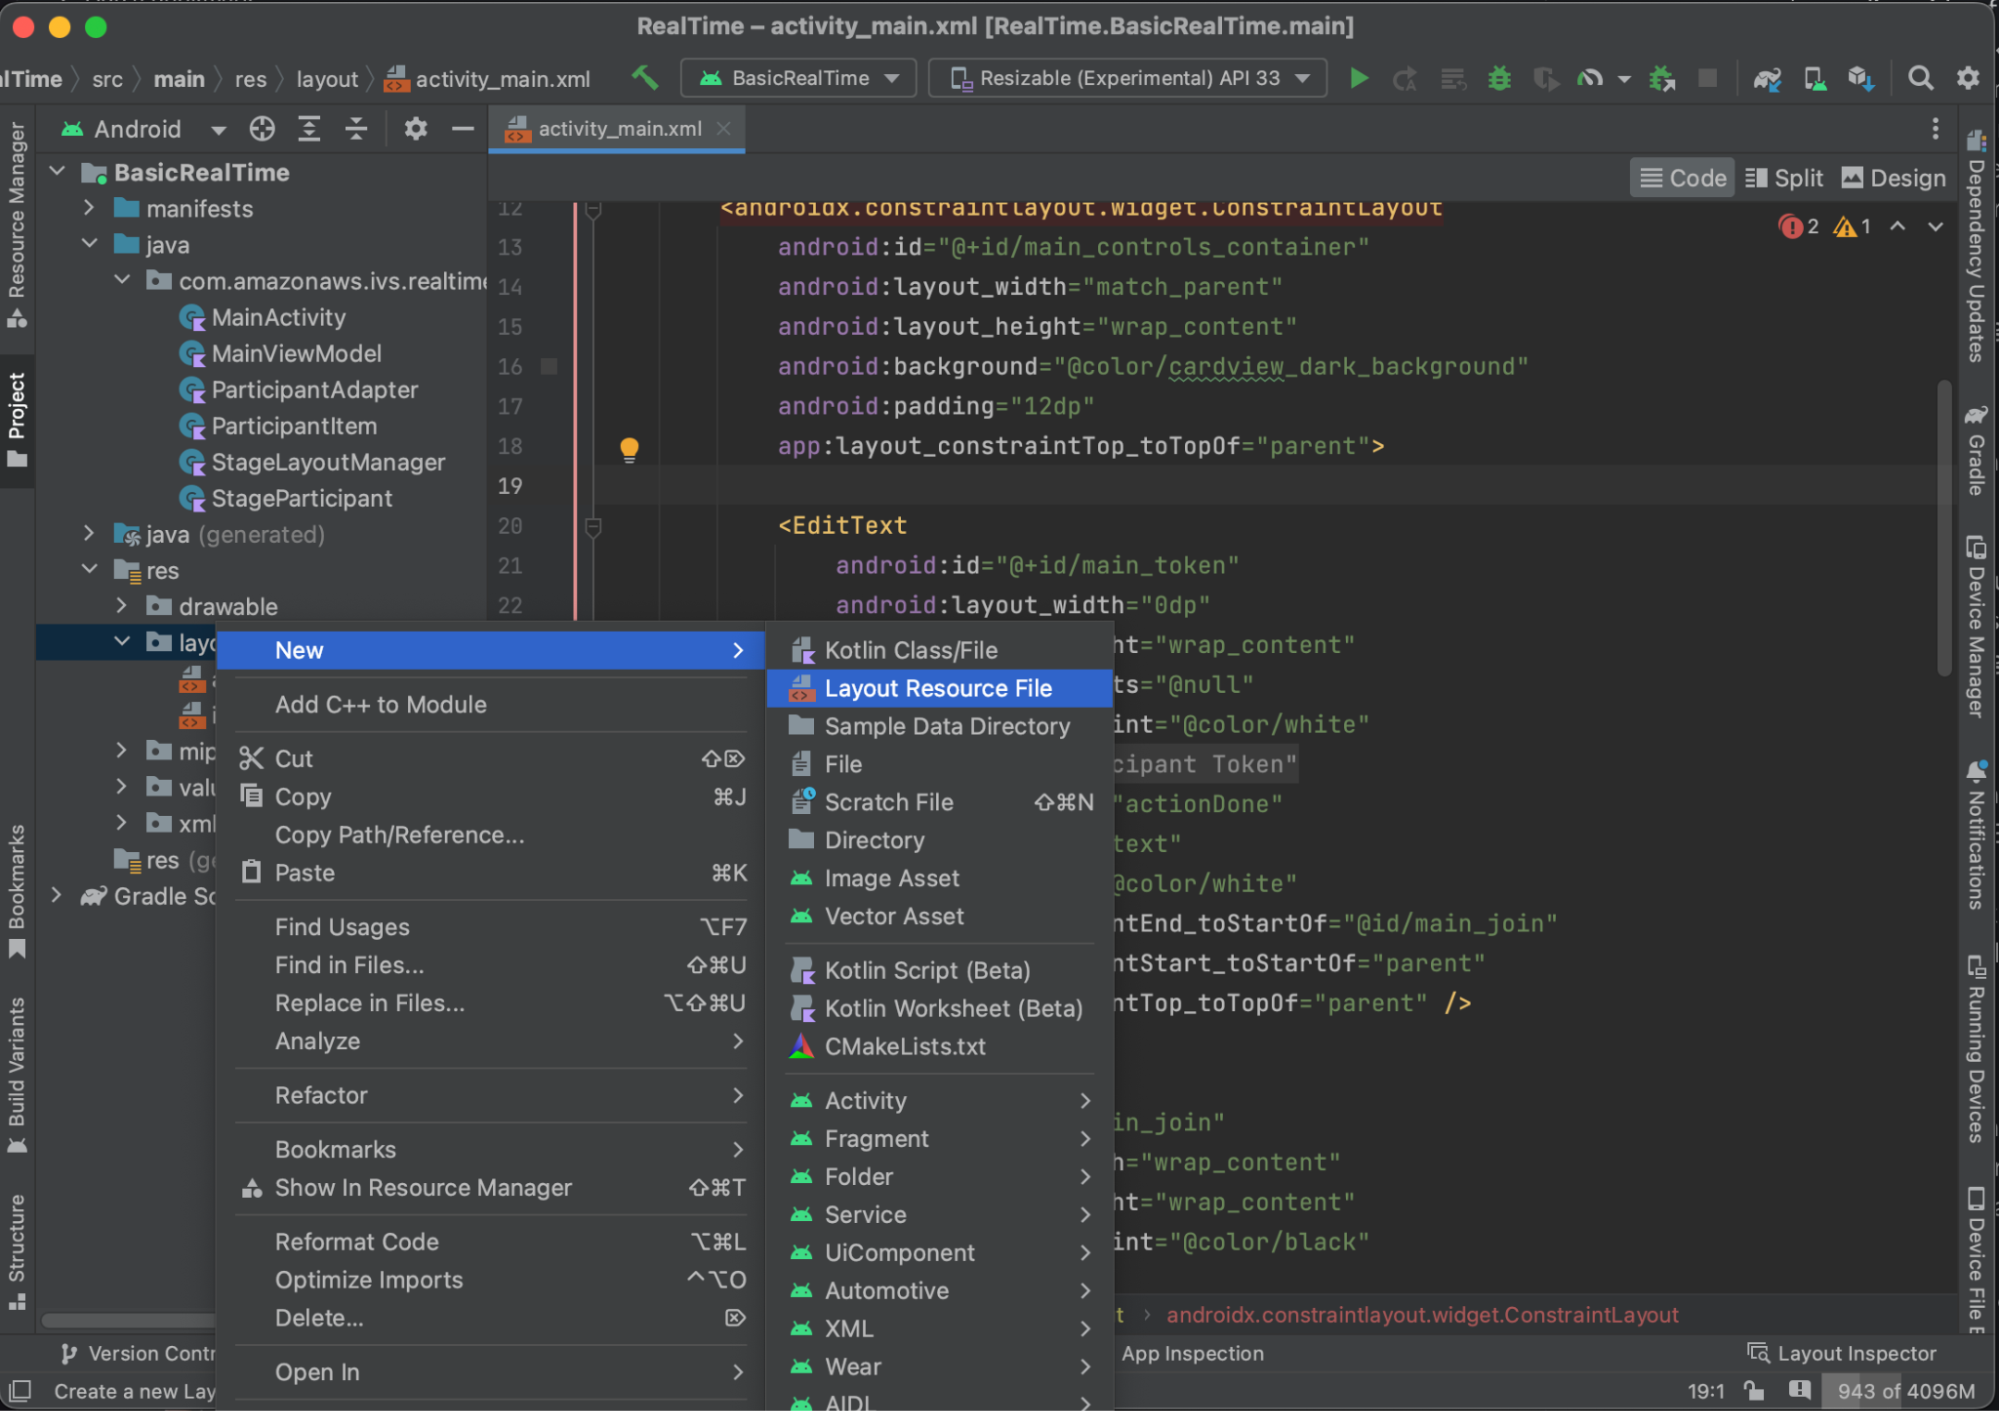
Jetzt erstellen wir eine Elementansicht für unsere RecyclerView. Klicken Sie dazu mit der rechten Maustaste auf res/layout-Verzeichnis und wählen Sie Neu > Layout-Ressourcendatei. Benennen Sie diese Datei item_stage_participant.xml.
Das Layout für dieses Element ist einfach: Es enthält eine Ansicht zum Rendern des Videostreams eines Teilnehmers und eine Liste von Labels zur Anzeige von Informationen über den Teilnehmer:
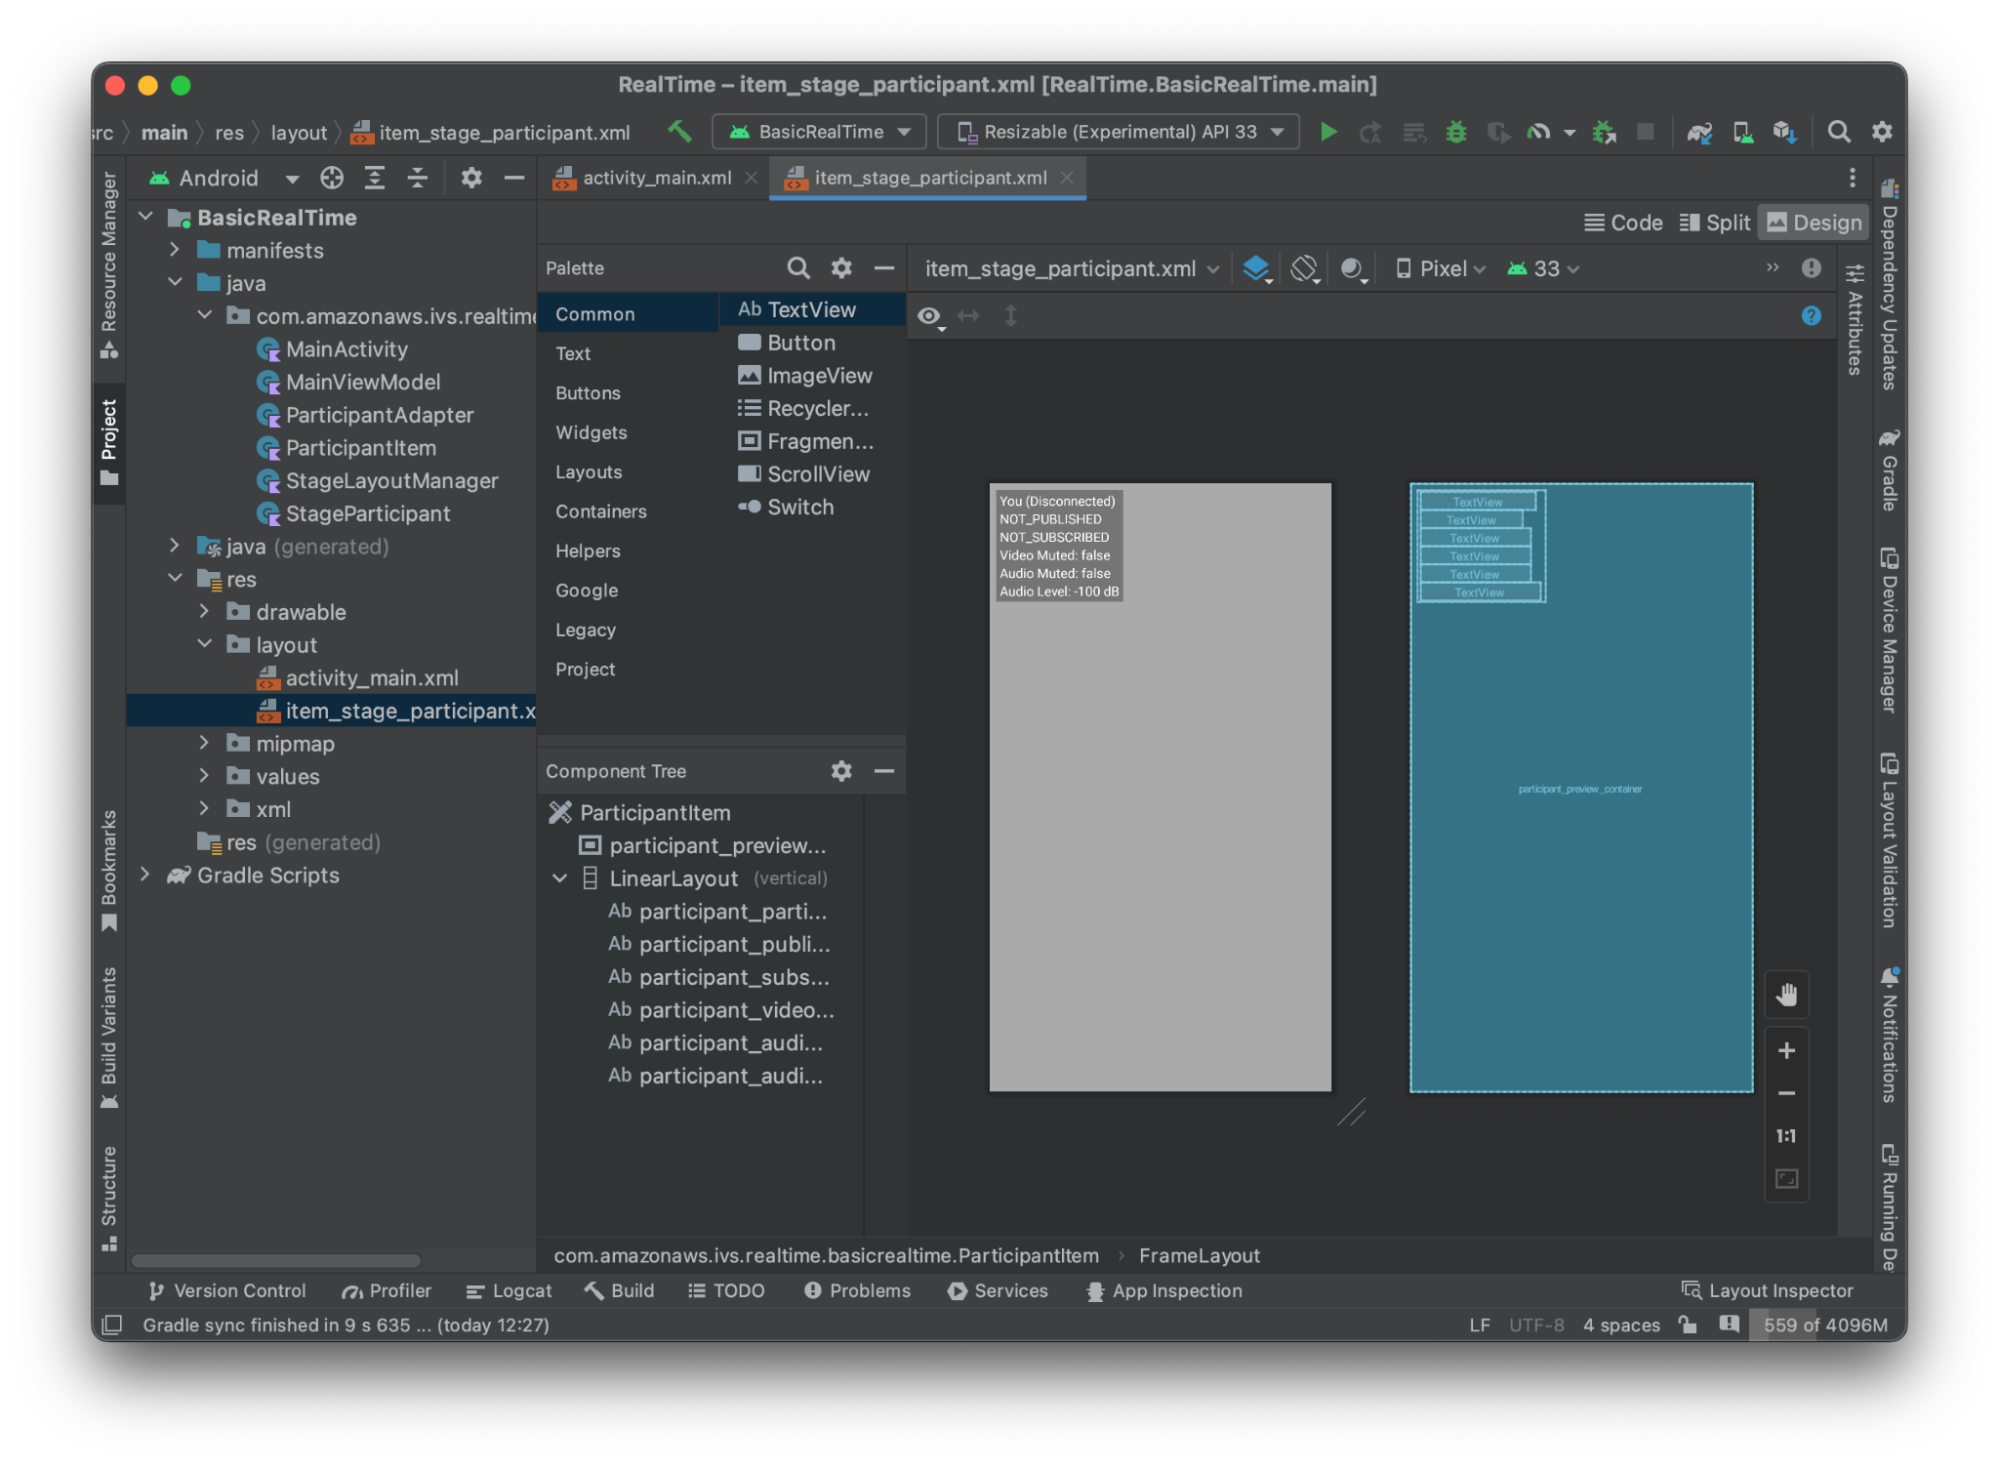
Hier ist das XML:
<?xml version="1.0" encoding="utf-8"?>
<com.amazonaws.ivs.realtime.basicrealtime.ParticipantItem xmlns:android="http://schemas.android.com/apk/res/android"
    xmlns:app="http://schemas.android.com/apk/res-auto"
    xmlns:tools="http://schemas.android.com/tools"
    android:layout_width="match_parent"
    android:layout_height="match_parent">

    <FrameLayout
        android:id="@+id/participant_preview_container"
        android:layout_width="match_parent"
        android:layout_height="match_parent"
        tools:background="@android:color/darker_gray" />

    <LinearLayout
        android:layout_width="wrap_content"
        android:layout_height="wrap_content"
        android:layout_marginStart="8dp"
        android:layout_marginTop="8dp"
        android:background="#50000000"
        android:orientation="vertical"
        android:paddingLeft="4dp"
        android:paddingTop="2dp"
        android:paddingRight="4dp"
        android:paddingBottom="2dp"
        app:layout_constraintStart_toStartOf="parent"
        app:layout_constraintTop_toTopOf="parent">

        <TextView
            android:id="@+id/participant_participant_id"
            android:layout_width="wrap_content"
            android:layout_height="wrap_content"
            android:textColor="@android:color/white"
            android:textSize="16sp"
            tools:text="You (Disconnected)" />

        <TextView
            android:id="@+id/participant_publishing"
            android:layout_width="wrap_content"
            android:layout_height="wrap_content"
            android:textColor="@android:color/white"
            android:textSize="16sp"
            tools:text="NOT_PUBLISHED" />

        <TextView
            android:id="@+id/participant_subscribed"
            android:layout_width="wrap_content"
            android:layout_height="wrap_content"
            android:textColor="@android:color/white"
            android:textSize="16sp"
            tools:text="NOT_SUBSCRIBED" />

        <TextView
            android:id="@+id/participant_video_muted"
            android:layout_width="wrap_content"
            android:layout_height="wrap_content"
            android:textColor="@android:color/white"
            android:textSize="16sp"
            tools:text="Video Muted: false" />

        <TextView
            android:id="@+id/participant_audio_muted"
            android:layout_width="wrap_content"
            android:layout_height="wrap_content"
            android:textColor="@android:color/white"
            android:textSize="16sp"
            tools:text="Audio Muted: false" />

        <TextView
            android:id="@+id/participant_audio_level"
            android:layout_width="wrap_content"
            android:layout_height="wrap_content"
            android:textColor="@android:color/white"
            android:textSize="16sp"
            tools:text="Audio Level: -100 dB" />

    </LinearLayout>

</com.amazonaws.ivs.realtime.basicrealtime.ParticipantItem>
Diese XML-Datei generiert eine Klasse, die wir noch nicht erstellt haben, ParticipantItem. Da das XML den vollständigen Namespace enthält, sollten Sie diese XML-Datei unbedingt in Ihren Namespace aktualisieren. Lassen Sie uns diese Klasse erstellen und die Ansichten einrichten, aber ansonsten lassen wir das Feld vorerst leer.
Erstellen Sie eine neue Kotlin-Klasse, ParticipantItem:
package com.amazonaws.ivs.realtime.basicrealtime

import android.content.Context
import android.util.AttributeSet
import android.widget.FrameLayout
import android.widget.TextView
import kotlin.math.roundToInt

class ParticipantItem @JvmOverloads constructor(
    context: Context,
    attrs: AttributeSet? = null,
    defStyleAttr: Int = 0,
    defStyleRes: Int = 0,
) : FrameLayout(context, attrs, defStyleAttr, defStyleRes) {

    private lateinit var previewContainer: FrameLayout
    private lateinit var textViewParticipantId: TextView
    private lateinit var textViewPublish: TextView
    private lateinit var textViewSubscribe: TextView
    private lateinit var textViewVideoMuted: TextView
    private lateinit var textViewAudioMuted: TextView
    private lateinit var textViewAudioLevel: TextView

    override fun onFinishInflate() {
        super.onFinishInflate()
        previewContainer = findViewById(R.id.participant_preview_container)
        textViewParticipantId = findViewById(R.id.participant_participant_id)
        textViewPublish = findViewById(R.id.participant_publishing)
        textViewSubscribe = findViewById(R.id.participant_subscribed)
        textViewVideoMuted = findViewById(R.id.participant_video_muted)
        textViewAudioMuted = findViewById(R.id.participant_audio_muted)
        textViewAudioLevel = findViewById(R.id.participant_audio_level)
    }
}
Berechtigungen
Um die Kamera und das Mikrofon verwenden zu können, müssen Sie vom Benutzer Berechtigungen anfordern. Dafür folgen wir einem standardmäßigen Berechtigungsablauf:
override fun onStart() {
    super.onStart()
    requestPermission()
}

private val requestPermissionLauncher =
    registerForActivityResult(ActivityResultContracts.RequestMultiplePermissions()) { permissions ->
        if (permissions[Manifest.permission.CAMERA] == true && permissions[Manifest.permission.RECORD_AUDIO] == true) {
            viewModel.permissionGranted() // we will add this later
        }
    }

private val permissions = listOf(
    Manifest.permission.CAMERA,
    Manifest.permission.RECORD_AUDIO,
)

private fun requestPermission() {
    when {
        this.hasPermissions(permissions) -> viewModel.permissionGranted() // we will add this later
        else -> requestPermissionLauncher.launch(permissions.toTypedArray())
    }
}

private fun Context.hasPermissions(permissions: List<String>): Boolean {
    return permissions.all {
        ContextCompat.checkSelfPermission(this, it) == PackageManager.PERMISSION_GRANTED
    }
}
Anwendungsstatus
Unsere Anwendung verfolgt die Teilnehmer vor Ort in einer MainViewModel.kt und der Status wird an die MainActivity zurückgemeldet mit Kotlins StateFlow
Erstellen Sie eine neue Kotlin-Klasse MainViewModel:
package com.amazonaws.ivs.realtime.basicrealtime

import android.app.Application
import androidx.lifecycle.AndroidViewModel

class MainViewModel(application: Application) : AndroidViewModel(application), Stage.Strategy, StageRenderer {

}
In MainActivity.kt verwalten wir unser Ansicht-Modell:
import androidx.activity.viewModels

private val viewModel: MainViewModel by viewModels()
Um AndroidViewModel und diese Kotlin-ViewModel-Erweiterungen zu verwenden, müssen Sie Folgendes zur build.gradle-Datei Ihres Moduls hinzufügen:
implementation 'androidx.core:core-ktx:1.10.1'
implementation "androidx.activity:activity-ktx:1.7.2"
implementation 'androidx.appcompat:appcompat:1.6.1'
implementation 'com.google.android.material:material:1.10.0'
implementation "androidx.lifecycle:lifecycle-extensions:2.2.0"

def lifecycle_version = "2.6.1"
implementation "androidx.lifecycle:lifecycle-livedata-ktx:$lifecycle_version"
implementation "androidx.lifecycle:lifecycle-viewmodel-ktx:$lifecycle_version"
implementation 'androidx.constraintlayout:constraintlayout:2.1.4'
RecyclerView-Adapter
Wir werden eine einfache RecyclerView.Adapter-Unterklasse erstellen, um unsere Teilnehmer zu verfolgen und unsere RecyclerView auf Stageereignisse zu aktualisieren. Aber zuerst brauchen wir eine Klasse, die einen Teilnehmer repräsentiert. Erstellen Sie eine neue Kotlin-Klasse StageParticipant:
package com.amazonaws.ivs.realtime.basicrealtime

import com.amazonaws.ivs.broadcast.Stage
import com.amazonaws.ivs.broadcast.StageStream

class StageParticipant(val isLocal: Boolean, var participantId: String?) {
    var publishState = Stage.PublishState.NOT_PUBLISHED
    var subscribeState = Stage.SubscribeState.NOT_SUBSCRIBED
    var streams = mutableListOf<StageStream>()

    val stableID: String
        get() {
            return if (isLocal) {
                "LocalUser"
            } else {
                requireNotNull(participantId)
            }
        }
}
Wir verwenden diese Klasse in der ParticipantAdapter-Klasse, die wir als Nächstes erstellen werden. Wir beginnen damit, die Klasse zu definieren und eine Variable zu erstellen, um die Teilnehmer zu verfolgen:
package com.amazonaws.ivs.realtime.basicrealtime

import android.view.LayoutInflater
import android.view.ViewGroup
import androidx.recyclerview.widget.RecyclerView

class ParticipantAdapter : RecyclerView.Adapter<ParticipantAdapter.ViewHolder>() {

    private val participants = mutableListOf<StageParticipant>()
Wir müssen auch unsere RecyclerView.ViewHolder definieren bevor Sie die restlichen Überschreibungen implementieren:
class ViewHolder(val participantItem: ParticipantItem) : RecyclerView.ViewHolder(participantItem)
Damit können wir die Standard-RecyclerView.Adapter-Überschreibung implementieren:
override fun onCreateViewHolder(parent: ViewGroup, viewType: Int): ViewHolder {
    val item = LayoutInflater.from(parent.context)
        .inflate(R.layout.item_stage_participant, parent, false) as ParticipantItem
    return ViewHolder(item)
}

override fun getItemCount(): Int {
    return participants.size
}

override fun getItemId(position: Int): Long =
    participants[position]
        .stableID
        .hashCode()
        .toLong()

override fun onBindViewHolder(holder: ViewHolder, position: Int) {
    return holder.participantItem.bind(participants[position])
}

override fun onBindViewHolder(holder: ViewHolder, position: Int, payloads: MutableList<Any>) {
    val updates = payloads.filterIsInstance<StageParticipant>()
    if (updates.isNotEmpty()) {
        updates.forEach { holder.participantItem.bind(it) // implemented later }
    } else {
        super.onBindViewHolder(holder, position, payloads)
    }
}
Schließlich fügen wir neue Methoden hinzu, die wir von unserem MainViewModel abrufen, wenn Änderungen an den Teilnehmern vorgenommen werden. Bei diesen Methoden handelt es sich um Standard-CRUD-Operationen auf dem Adapter.
fun participantJoined(participant: StageParticipant) {
    participants.add(participant)
    notifyItemInserted(participants.size - 1)
}

fun participantLeft(participantId: String) {
    val index = participants.indexOfFirst { it.participantId == participantId }
    if (index != -1) {
        participants.removeAt(index)
        notifyItemRemoved(index)
    }
}

fun participantUpdated(participantId: String?, update: (participant: StageParticipant) -> Unit) {
    val index = participants.indexOfFirst { it.participantId == participantId }
    if (index != -1) {
        update(participants[index])
        notifyItemChanged(index, participants[index])
    }
}
Wieder in MainViewModel müssen wir einen Verweis auf diesen Adapter erstellen und speichern:
internal val participantAdapter = ParticipantAdapter()
Stufenstatus
Wir müssen auch einige Stagestatus innerhalb MainViewModel verfolgen. Definieren wir jetzt diese Eigenschaften:
private val _connectionState = MutableStateFlow(Stage.ConnectionState.DISCONNECTED)
val connectionState = _connectionState.asStateFlow()

private var publishEnabled: Boolean = false
    set(value) {
        field = value
        // Because the strategy returns the value of `checkboxPublish.isChecked`, just call `refreshStrategy`.
        stage?.refreshStrategy()
    }

private var deviceDiscovery: DeviceDiscovery? = null
private var stage: Stage? = null
private var streams = mutableListOf<LocalStageStream>()
Um Ihre eigene Vorschau zu sehen, bevor Sie eine Stage betreten, erstellen wir sofort einen lokalen Teilnehmer:
init {
    deviceDiscovery = DeviceDiscovery(application)

    // Create a local participant immediately to render our camera preview and microphone stats
    val localParticipant = StageParticipant(true, null)
    participantAdapter.participantJoined(localParticipant)
}
Wir wollen sicherstellen, dass wir diese Ressourcen bereinigen, wenn unsere ViewModel bereinigt ist. Wir überschreiben onCleared() sofort, damit wir nicht vergessen, diese Ressourcen zu reinigen.
override fun onCleared() {
    stage?.release()
    deviceDiscovery?.release()
    deviceDiscovery = null
    super.onCleared()
}
Jetzt füllen wir unsere lokale streams-Eigenschaft auf, sobald die Berechtigungen erteilt sind, und implementieren die permissionsGranted-Methode, die wir zuvor aufgerufen haben:
internal fun permissionGranted() {
    val deviceDiscovery = deviceDiscovery ?: return
    streams.clear()
    val devices = deviceDiscovery.listLocalDevices()
    // Camera
    devices
        .filter { it.descriptor.type == Device.Descriptor.DeviceType.CAMERA }
        .maxByOrNull { it.descriptor.position == Device.Descriptor.Position.FRONT }
        ?.let { streams.add(ImageLocalStageStream(it)) }
    // Microphone
    devices
        .filter { it.descriptor.type == Device.Descriptor.DeviceType.MICROPHONE }
        .maxByOrNull { it.descriptor.isDefault }
        ?.let { streams.add(AudioLocalStageStream(it)) }

    stage?.refreshStrategy()

    // Update our local participant with these new streams
    participantAdapter.participantUpdated(null) {
        it.streams.clear()
        it.streams.addAll(streams)
    }
}
Implementierung des Stage-SDK
Drei Kernkonzepte liegen der Echtzeit-Funktionalität zugrunde: Stage, Strategie und Renderer. Das Designziel besteht in der Minimierung der Menge an clientseitiger Logik, die für die Entwicklung eines funktionierenden Produkts erforderlich ist.
Stage.Strategy
Die Stage.Strategy-Implementierung ist einfach:
override fun stageStreamsToPublishForParticipant(
    stage: Stage,
    participantInfo: ParticipantInfo
): MutableList<LocalStageStream> {
    // Return the camera and microphone to be published.
    // This is only called if `shouldPublishFromParticipant` returns true.
    return streams
}

override fun shouldPublishFromParticipant(stage: Stage, participantInfo: ParticipantInfo): Boolean {
    return publishEnabled
}

override fun shouldSubscribeToParticipant(stage: Stage, participantInfo: ParticipantInfo): Stage.SubscribeType {
    // Subscribe to both audio and video for all publishing participants.
    return Stage.SubscribeType.AUDIO_VIDEO
}
Zusammenfassend lässt sich sagen, dass wir auf der Grundlage unseres internen Status publishEnabled veröffentlichen, und wenn wir veröffentlichen, veröffentlichen wir die zuvor gesammelten Streams. Schließlich abonnieren wir für dieses Beispiel immer andere Teilnehmer und erhalten sowohl ihr Audio als auch ihr Video.
StageRenderer
Die StageRenderer-Implementierung ist ebenfalls ziemlich einfach, obwohl sie angesichts der Anzahl der Funktionen reichlich mehr Code enthält. Der allgemeine Ansatz in diesem Renderer besteht darin, unseren ParticipantAdapter zu aktualisieren, wenn das SDK uns über eine Änderung an einem Teilnehmer informiert. Es gibt bestimmte Szenarien, in denen wir mit lokalen Teilnehmern anders umgehen, weil wir beschlossen haben, sie selbst zu verwalten, sodass sie ihre Kameravorschau sehen können, bevor sie beitreten.
override fun onError(exception: BroadcastException) {
    Toast.makeText(getApplication(), "onError ${exception.localizedMessage}", Toast.LENGTH_LONG).show()
    Log.e("BasicRealTime", "onError $exception")
}

override fun onConnectionStateChanged(
    stage: Stage,
    connectionState: Stage.ConnectionState,
    exception: BroadcastException?
) {
    _connectionState.value = connectionState
}

override fun onParticipantJoined(stage: Stage, participantInfo: ParticipantInfo) {
    if (participantInfo.isLocal) {
        // If this is the local participant joining the stage, update the participant with a null ID because we
        // manually added that participant when setting up our preview
        participantAdapter.participantUpdated(null) {
            it.participantId = participantInfo.participantId
        }
    } else {
        // If they are not local, add them normally
        participantAdapter.participantJoined(
            StageParticipant(
                participantInfo.isLocal,
                participantInfo.participantId
            )
        )
    }
}

override fun onParticipantLeft(stage: Stage, participantInfo: ParticipantInfo) {
    if (participantInfo.isLocal) {
        // If this is the local participant leaving the stage, update the ID but keep it around because
        // we want to keep the camera preview active
        participantAdapter.participantUpdated(participantInfo.participantId) {
            it.participantId = null
        }
    } else {
        // If they are not local, have them leave normally
        participantAdapter.participantLeft(participantInfo.participantId)
    }
}

override fun onParticipantPublishStateChanged(
    stage: Stage,
    participantInfo: ParticipantInfo,
    publishState: Stage.PublishState
) {
    // Update the publishing state of this participant
    participantAdapter.participantUpdated(participantInfo.participantId) {
        it.publishState = publishState
    }
}

override fun onParticipantSubscribeStateChanged(
    stage: Stage,
    participantInfo: ParticipantInfo,
    subscribeState: Stage.SubscribeState
) {
    // Update the subscribe state of this participant
    participantAdapter.participantUpdated(participantInfo.participantId) {
        it.subscribeState = subscribeState
    }
}

override fun onStreamsAdded(stage: Stage, participantInfo: ParticipantInfo, streams: MutableList<StageStream>) {
    // We don't want to take any action for the local participant because we track those streams locally
    if (participantInfo.isLocal) {
        return
    }
    // For remote participants, add these new streams to that participant's streams array.
    participantAdapter.participantUpdated(participantInfo.participantId) {
        it.streams.addAll(streams)
    }
}

override fun onStreamsRemoved(stage: Stage, participantInfo: ParticipantInfo, streams: MutableList<StageStream>) {
    // We don't want to take any action for the local participant because we track those streams locally
    if (participantInfo.isLocal) {
        return
    }
    // For remote participants, remove these streams from that participant's streams array.
    participantAdapter.participantUpdated(participantInfo.participantId) {
        it.streams.removeAll(streams)
    }
}

override fun onStreamsMutedChanged(
    stage: Stage,
    participantInfo: ParticipantInfo,
    streams: MutableList<StageStream>
) {
    // We don't want to take any action for the local participant because we track those streams locally
    if (participantInfo.isLocal) {
        return
    }
    // For remote participants, notify the adapter that the participant has been updated. There is no need to modify
    // the `streams` property on the `StageParticipant` because it is the same `StageStream` instance. Just
    // query the `isMuted` property again.
    participantAdapter.participantUpdated(participantInfo.participantId) {}
}
Implementierung eines benutzerdefinierten RecyclerView-LayoutManagers
Die Festlegung verschiedener Teilnehmerzahlen kann komplex sein. Sie möchten, dass sie den gesamten Frame der übergeordneten Ansicht einnehmen, aber Sie möchten nicht jede Teilnehmerkonfiguration unabhängig voneinander handhaben. Um dies zu vereinfachen, führen wir die Implementierung eines RecyclerView.LayoutManager durch.
Erstelle eine weitere neue Klasse StageLayoutManager, welche GridLayoutManager erweitern soll. In diesem Kurs wird das Layout für jeden Teilnehmer anhand der Anzahl der Teilnehmer in einem flussbasierten Zeilen-/Spaltenlayout berechnet. Jede Zeile hat dieselbe Höhe wie die anderen, aber Spalten können pro Zeile unterschiedlich breit sein. Sehen Sie den Code-Kommentar über der layouts-Variable für eine Beschreibung, wie dieses Verhalten angepasst werden kann.
package com.amazonaws.ivs.realtime.basicrealtime

import android.content.Context
import androidx.recyclerview.widget.GridLayoutManager
import androidx.recyclerview.widget.RecyclerView

class StageLayoutManager(context: Context?) : GridLayoutManager(context, 6) {

    companion object {
        /**
         * This 2D array contains the description of how the grid of participants should be rendered
         * The index of the 1st dimension is the number of participants needed to active that configuration
         * Meaning if there is 1 participant, index 0 will be used. If there are 5 participants, index 4 will be used.
         *
         * The 2nd dimension is a description of the layout. The length of the array is the number of rows that
         * will exist, and then each number within that array is the number of columns in each row.
         *
         * See the code comments next to each index for concrete examples.
         *
         * This can be customized to fit any layout configuration needed.
         */
        val layouts: List<List<Int>> = listOf(
            // 1 participant
            listOf(1), // 1 row, full width
            // 2 participants
            listOf(1, 1), // 2 rows, all columns are full width
            // 3 participants
            listOf(1, 2), // 2 rows, first row's column is full width then 2nd row's columns are 1/2 width
            // 4 participants
            listOf(2, 2), // 2 rows, all columns are 1/2 width
            // 5 participants
            listOf(1, 2, 2), // 3 rows, first row's column is full width, 2nd and 3rd row's columns are 1/2 width
            // 6 participants
            listOf(2, 2, 2), // 3 rows, all column are 1/2 width
            // 7 participants
            listOf(2, 2, 3), // 3 rows, 1st and 2nd row's columns are 1/2 width, 3rd row's columns are 1/3rd width
            // 8 participants
            listOf(2, 3, 3),
            // 9 participants
            listOf(3, 3, 3),
            // 10 participants
            listOf(2, 3, 2, 3),
            // 11 participants
            listOf(2, 3, 3, 3),
            // 12 participants
            listOf(3, 3, 3, 3),
        )
    }

    init {
        spanSizeLookup = object : SpanSizeLookup() {
            override fun getSpanSize(position: Int): Int {
                if (itemCount <= 0) {
                    return 1
                }
                // Calculate the row we're in
                val config = layouts[itemCount - 1]
                var row = 0
                var curPosition = position
                while (curPosition - config[row] >= 0) {
                    curPosition -= config[row]
                    row++
                }
                // spanCount == max spans, config[row] = number of columns we want
                // So spanCount / config[row] would be something like 6 / 3 if we want 3 columns.
                // So this will take up 2 spans, with a max of 6 is 1/3rd of the view.
                return spanCount / config[row]
            }
        }
    }

    override fun onLayoutChildren(recycler: RecyclerView.Recycler?, state: RecyclerView.State?) {
        if (itemCount <= 0 || state?.isPreLayout == true) return

        val parentHeight = height
        val itemHeight = parentHeight / layouts[itemCount - 1].size // height divided by number of rows.

        // Set the height of each view based on how many rows exist for the current participant count.
        for (i in 0 until childCount) {
            val child = getChildAt(i) ?: continue
            val layoutParams = child.layoutParams as RecyclerView.LayoutParams
            if (layoutParams.height != itemHeight) {
                layoutParams.height = itemHeight
                child.layoutParams = layoutParams
            }
        }
        // After we set the height for all our views, call super.
        // This works because our RecyclerView can not scroll and all views are always visible with stable IDs.
        super.onLayoutChildren(recycler, state)
    }

    override fun canScrollVertically(): Boolean = false
    override fun canScrollHorizontally(): Boolean = false
}
Wieder zurück in MainActivity.kt müssen wir den Adapter und den Layoutmanager für unsere RecyclerView einrichten:
// In onCreate after setting recyclerView.
recyclerView.layoutManager = StageLayoutManager(this)
recyclerView.adapter = viewModel.participantAdapter
UI-Aktionen verbinden
Wir sind nah dran; es gibt nur ein paar UI-Aktionen, die wir verbinden müssen.
Zuerst haben wir unsere MainActivity, die die StateFlow-Änderungen vonMainViewModel beobachtet:
// At the end of your onCreate method
lifecycleScope.launch {
    repeatOnLifecycle(Lifecycle.State.CREATED) {
        viewModel.connectionState.collect { state ->
            buttonJoin.setText(if (state == ConnectionState.DISCONNECTED) R.string.join else R.string.leave)
            textViewState.text = getString(R.string.state, state.name)
        }
    }
}
Als Nächstes fügen wir Listener zu unseren Schaltflächen „Beitreten“ und „Veröffentlichen“ hinzu:
buttonJoin.setOnClickListener {
    viewModel.joinStage(editTextToken.text.toString())
}
checkboxPublish.setOnCheckedChangeListener { _, isChecked ->
    viewModel.setPublishEnabled(isChecked)
}
Beide der oben genannten Anruffunktionen in unserer MainViewModel, die wir jetzt implementieren:
internal fun joinStage(token: String) {
    if (_connectionState.value != Stage.ConnectionState.DISCONNECTED) {
        // If we're already connected to a stage, leave it.
        stage?.leave()
    } else {
        if (token.isEmpty()) {
            Toast.makeText(getApplication(), "Empty Token", Toast.LENGTH_SHORT).show()
            return
        }
        try {
            // Destroy the old stage first before creating a new one.
            stage?.release()
            val stage = Stage(getApplication(), token, this)
            stage.addRenderer(this)
            stage.join()
            this.stage = stage
        } catch (e: BroadcastException) {
            Toast.makeText(getApplication(), "Failed to join stage ${e.localizedMessage}", Toast.LENGTH_LONG).show()
            e.printStackTrace()
        }
    }
}

internal fun setPublishEnabled(enabled: Boolean) {
    publishEnabled = enabled
}
Rendern der Teilnehmer
Schließlich müssen wir die Daten, die wir vom SDK erhalten, auf das zuvor erstellte Teilnehmerelement übertragen. Wir haben die Logik von RecyclerView bereits fertig, also müssen wir nur noch die API von bind in ParticipantItem implementieren.
Wir beginnen mit dem Hinzufügen der leeren Funktion und gehen sie dann Schritt für Schritt durch:
fun bind(participant: StageParticipant) {

}
Zuerst kümmern wir uns um den Status „Einfach“, die Teilnehmer-ID, den Veröffentlichungsstatus und den Abonnementstatus. Für diese aktualisieren wir einfach unsere TextViews direkt:
val participantId = if (participant.isLocal) {
    "You (${participant.participantId ?: "Disconnected"})"
} else {
    participant.participantId
}
textViewParticipantId.text = participantId
textViewPublish.text = participant.publishState.name
textViewSubscribe.text = participant.subscribeState.name
Als Nächstes aktualisieren wir die stummgeschalteten Audio- und Videozustände. Um den Stummschaltzustand zu erhalten, müssen wir den ImageDevice und AudioDevice aus dem Streams-Array finden. Um die Leistung zu optimieren, erinnern wir uns an die zuletzt angehängten Geräte-IDs.
// This belongs outside the `bind` API.
private var imageDeviceUrn: String? = null
private var audioDeviceUrn: String? = null

// This belongs inside the `bind` API.
val newImageStream = participant
    .streams
    .firstOrNull { it.device is ImageDevice }
textViewVideoMuted.text = if (newImageStream != null) {
    if (newImageStream.muted) "Video muted" else "Video not muted"
} else {
    "No video stream"
}

val newAudioStream = participant
    .streams
    .firstOrNull { it.device is AudioDevice }
textViewAudioMuted.text = if (newAudioStream != null) {
    if (newAudioStream.muted) "Audio muted" else "Audio not muted"
} else {
    "No audio stream"
}
Abschließend wollen wir eine Vorschau für das imageDevice rendern:
if (newImageStream?.device?.descriptor?.urn != imageDeviceUrn) {
    // If the device has changed, remove all subviews from the preview container
    previewContainer.removeAllViews()
    (newImageStream?.device as? ImageDevice)?.let {
        val preview = it.getPreviewView(BroadcastConfiguration.AspectMode.FIT)
        previewContainer.addView(preview)
        preview.layoutParams = FrameLayout.LayoutParams(
            FrameLayout.LayoutParams.MATCH_PARENT,
            FrameLayout.LayoutParams.MATCH_PARENT
        )
    }
}
imageDeviceUrn = newImageStream?.device?.descriptor?.urn
Und wir zeigen Audiostatistiken von der audioDevice:
if (newAudioStream?.device?.descriptor?.urn != audioDeviceUrn) {
    (newAudioStream?.device as? AudioDevice)?.let {
        it.setStatsCallback { _, rms ->
            textViewAudioLevel.text = "Audio Level: ${rms.roundToInt()} dB"
        }
    }
}
audioDeviceUrn = newAudioStream?.device?.descriptor?.urn
