Upgrading your Amazon DocumentDB cluster using AWS Database Migration Service
Important
Amazon DocumentDB does not follow the same support lifecycles as MongoDB and MongoDB's end-of-life schedule does not apply to Amazon DocumentDB.
You can upgrade your Amazon DocumentDB cluster to a higher version with minimal downtime using AWS DMS. AWS DMS is a fully managed service that makes it easy to migrate from older Amazon DocumentDB versions, relational databases and non-relational databases to your target Amazon DocumentDB cluster.
Step 1: Enable change streams
To perform a minimal downtime migration, AWS DMS requires access to the cluster’s change streams. Amazon DocumentDB change streams provide a time-ordered sequence of update events that occur within your cluster’s collections and databases. Reading from the change stream enables AWS DMS to perform change data capture (CDC) and apply incremental updates to the target Amazon DocumentDB cluster.
To enable change streams for all collections on a specific database, authenticate to your Amazon DocumentDB cluster using the mongo shell and execute the following commands:
db.adminCommand({modifyChangeStreams: 1,
    database: "db_name",
    collection: "",
    enable: true});
Step 2: Modify the change streams retention duration
Next, modify the change stream retention period based on how long you would like to retain change events in the change stream. For example, if you expect your Amazon DocumentDB cluster migration using AWS DMS to take 12 hours, you should set the change stream retention to a value greater than 12 hours. The default retention period for your Amazon DocumentDB cluster is three hours. You can modify the change stream log retention duration for your Amazon DocumentDB cluster to be between one hour and seven days using the AWS Management Console or the AWS CLI. For more details, refer to Modifying the Change Stream Log Retention Duration.
Step 3: Migrate your indexes
Create the same indexes on your target Amazon DocumentDB cluster that you have on your source Amazon DocumentDB cluster.
Although AWS DMS handles the migration of data, it does not migrate indexes.
To migrate the indexes, use the Amazon DocumentDB Index Tool to export indexes from the source Amazon DocumentDB cluster.
You can get the tool by creating a clone of the Amazon DocumentDB tools GitHub repo and following the instructions in README.md
In the following example, replace each user input placeholder with your own information.
The following code dumps indexes from your source Amazon DocumentDB cluster:
python migrationtools/documentdb_index_tool.py --dump-indexes --urimongodb://sample-user:user-password@sample-source-cluster.node.us-east 1.docdb.amazonaws.com:27017/?tls=true&tlsCAFile=global-bundle.pem&replicaSet=rs0&readPreference=secondaryPreferred&retryWrites=false'--dir ~/index.js/ 2020-02-11 21:51:23,245: Successfully authenticated to database: admin2020-02-11 21:46:50,432: Successfully connected to instance docdb-40-xx.cluster-xxxxxxxx.us-east-1.docdb.amazonaws.com:27017 2020-02-11 21:46:50,432: Retrieving indexes from server...2020-02-11 21:46:50,440: Completed writing index metadata to local folder: /home/ec2-user/index.js/
Once your indexes are successfully exported, restore those indexes in your target Amazon DocumentDB cluster. To restore the indexes that you exported in the preceding step, use the Amazon DocumentDB Index Tool. The following command restores the indexes in your target Amazon DocumentDB cluster from the specified directory.
python migrationtools/documentdb_index_tool.py --restore-indexes --urimongodb://sample-user:user-password@sample-destination-cluster.node.us-east 1.docdb.amazonaws.com:27017/?tls=true&tlsCAFile=global-bundle.pem&replicaSet=rs0&readPreference=secondaryPreferred&retryWrites=false'--dir ~/index.js/ 2020-02-11 21:51:23,245: Successfully authenticated to database: admin2020-02-11 21:51:23,245: Successfully connected to instance docdb-50-xx.cluster-xxxxxxxx.us-east-1.docdb.amazonaws.com:27017 2020-02-11 21:51:23,264: testdb.coll: added index: _id
To confirm that you restored the indexes correctly, connect to your target Amazon DocumentDB cluster with the mongo shell and list the indexes for a given collection. See the following code:
mongo --ssl
--host docdb-xx-xx.cluster-xxxxxxxx.us-east-1.docdb.amazonaws.com:27017
--sslCAFile rds-ca-2019-root.pem --username documentdb --password documentdb

db.coll.getIndexes()
Step 4: Create an AWS DMS replication instance
An AWS DMS replication instance connects and reads data from your source Amazon DocumentDB cluster and writes it your target Amazon DocumentDB cluster. The AWS DMS replication instance can perform both bulk load and CDC operations. Most of this processing happen in memory. However, large operations might require some buffering on disk. Cached transactions and log files are also written to disk. Once the data is migrated, the replication instance also streams any change events to make sure the source and target are in sync.
To create an AWS DMS replication instance:
-
Open the AWS DMS console
. -
In the navigation pane, choose Replication instances.
-
Choose Create replication instance and enter the following information:
For Name, enter a name of your choice. For example,
docdb36todocdb40.-
For Description, enter a description of your choice. For listitem, Amazon DocumentDB 3.6 to Amazon DocumentDB 4.0 replication instance.
-
For Instance class, choose the size based on your needs.
-
For Engine version, choose
3.4.1. -
For Amazon VPC, choose the Amazon VPC that houses your source and target Amazon DocumentDB clusters.
-
For Allocated storage (GiB), use the default of 50 GiB. If you have a high write throughput workload, increase this value to match your workload.
-
For Multi-AZ, choose Yes if you need high availability and failover support.
For Publicly accessible, enable this option.
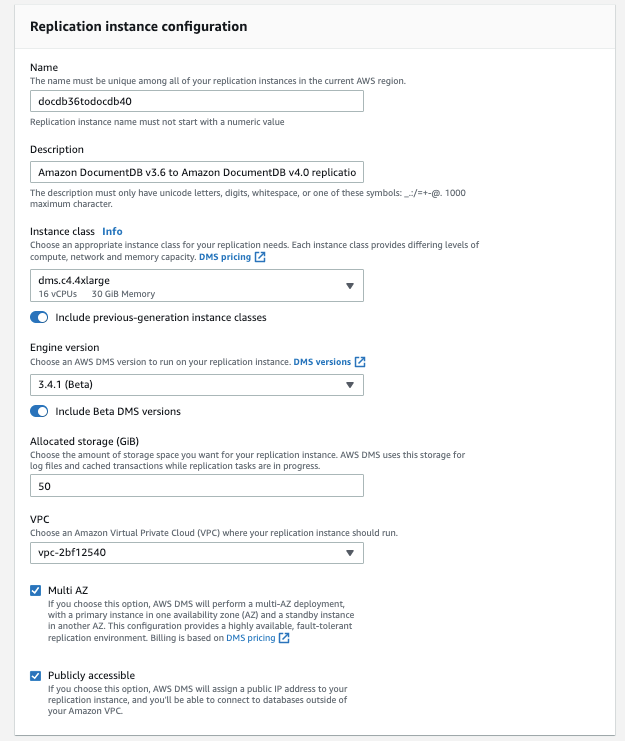
Choose Create replication instance.
Step 5: Create an AWS DMS source endpoint
The source endpoint is used for the source Amazon DocumentDB cluster.
To create a source endpoint
-
Open the AWS DMS console
. -
In the navigation pane, choose Endpoints.
-
Choose
Create endpointand enter the following information:For Endpoint type, choose Source.
>For Endpoint identifier, enter a name that's easy to remember, for example
docdb-source.For Source engine, choose
docdb.For Server name, enter the DNS name of your source Amazon DocumentDB cluster.
For Port, enter the port number of your source Amazon DocumentDB cluster.
For SSL mode, choose
verify-full.For CA certificate, choose Add new CA certificate. Download the new CA certificate
to create TLS connections bundle. For Certificate identifier, enter rds-combined-ca-bundle. For Import certificate file, choose Choose file and navigate to the.pemfile that you previously downloaded. Select and open the file. Choose Import certificate, then chooserds-combined-ca-bundlefrom the Choose a certificate drop down-
For User name, enter the primary username of your source Amazon DocumentDB cluster.
-
For Password, enter the primary password of your source Amazon DocumentDB cluster.
-
For Database name, enter the database name you are looking to upgrade.
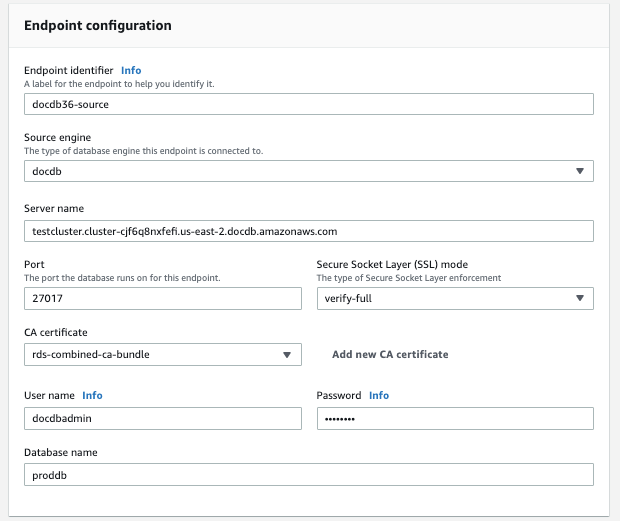
Test your connection to verify it was successfully setup.
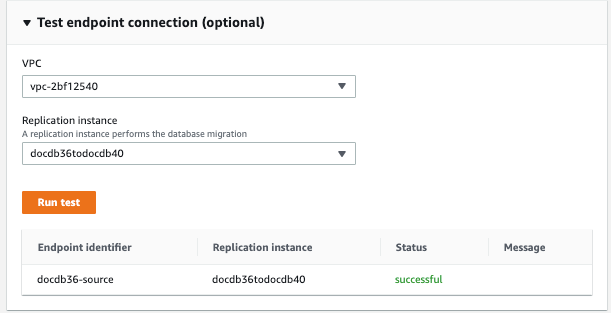
Choose Create Endpoint.
Note
AWS DMS can only migrate one database at a time.
Step 6: Create an AWS DMS target endpoint
The target endpoint is for your target Amazon DocumentDB cluster.
To create a target endpoint:
-
Open the AWS DMS console
. -
In the navigation pane, choose Endpoints.
-
Choose Create endpoint and enter the following information:
For Endpoint type, choose Target.
For Endpoint identifier, enter a name that's easy to remember, for example
docdb-target.For Source engine, choose
docdb.For Server name, enter the DNS name of your target Amazon DocumentDB cluster.
For Port, enter the port number of your target Amazon DocumentDB cluster.
For SSL mode, choose
verify-full.-
For CA certificate, choose the existing
rds-combined-ca-bundlecertificate from the Choose a certificate drop down. -
For User name, enter the primary username of your target Amazon DocumentDB cluster.
For Password, enter the primary password of your target Amazon DocumentDB cluster.
-
For Database name, enter the same database name you used to setup your source endpoint.
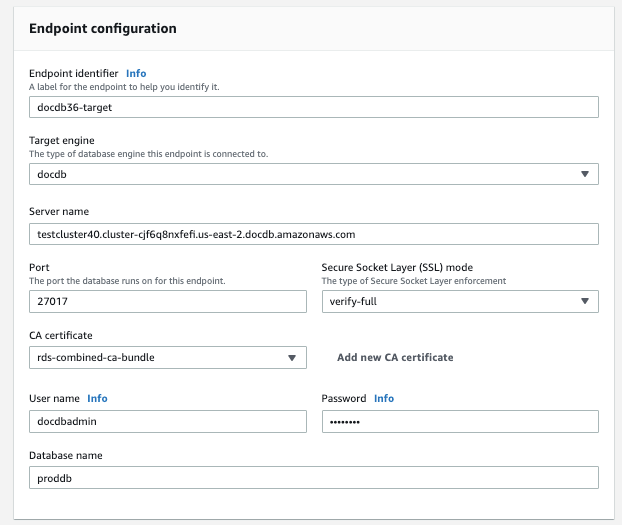
-
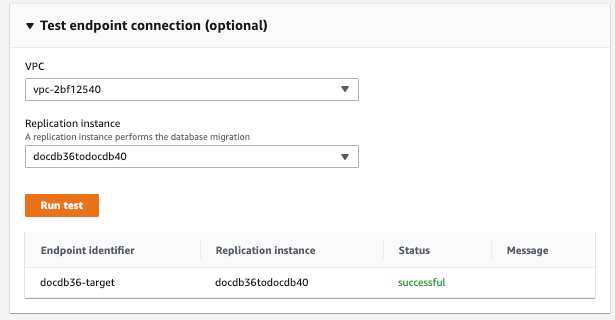
Test your connection to verify it was successfully set up.
-
Choose Create Endpoint.
Step 7: Create and run a migration task
An AWS DMS task binds the replication instance with your source and target instance. When you create a migration task, you specify the source endpoint, target endpoint, replication instance, and any desired migration settings. An AWS DMS task can be created with three different migration types - migrate existing data, migrate existing data, and replicate ongoing changes or replicate data changes only. Since the purpose of this walk-through is to upgrade an Amazon DocumentDB cluster with minimal downtime, the steps utilize the option to migrate existing data and replicate ongoing changes. With this option, AWS DMS captures changes while migrating your existing data. AWS DMS continues to capture and apply changes even after the bulk data has been loaded. Eventually the source and target databases will be in sync, allowing for a minimal downtime migration.
Below are the steps to create a migration task for a minimal downtime migration:
-
Open the AWS DMS console
. -
In the navigation pane, choose Database migration tasks.
-
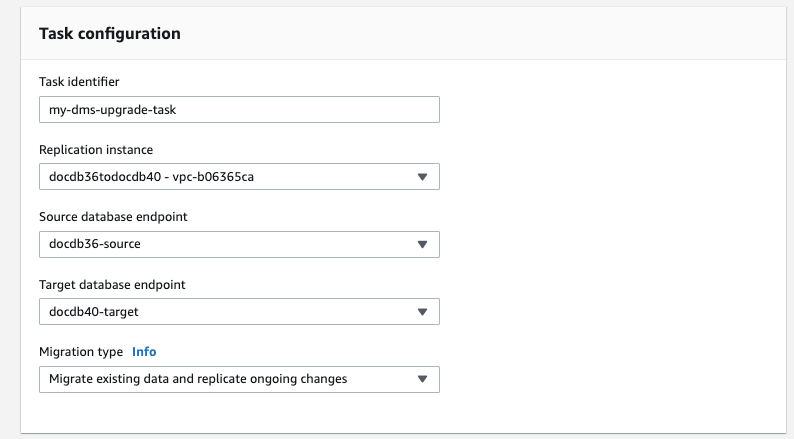
Choose Create database migration task and enter the following information in the Task configuration section:
For Task identifier, enter a name that's easy to remember, for example
my-dms-upgrade-task.For Descriptive Amazon Resource Name (ARN), enter a user-friendly name to override the default DMS ARN.
For Replication instance, choose the replication instance that you created in Step 4: Create an AWS DMS replication instance.
For Source database endpoint, choose the source endpoint that you created in Step 5: Create an AWS DMS source endpoint.
For Target database endpoint, choose the target endpoint that you created in Step 6: Create an AWS DMS target endpoint.
-
For Migration type, choose Migrate and replicate.
-
Enter the following information in the Task settings section:
-
For Target table preparation mode section, choose Do nothing. This will ensure that the indexes created in step 3 will not be dropped.
-
For Task logs sub-section, select Turn on CloudWatch logs.
-
For Migration task startup configuration, choose Automatically on create. This will start the migration task automatically once you create it.
-
Choose Create database migration task.
-
AWS DMS now begins migrating data from your source Amazon DocumentDB cluster to your target Amazon DocumentDB cluster. The task status should change from Starting to Running. You can monitor the progress by choosing Tasks in the AWS DMS console. After several minutes/hours (depending on the size of your migration), the status should change from to Load complete, replication ongoing. This means that AWS DMS has completed a full load migration of your source Amazon DocumentDB cluster to a target Amazon DocumentDB cluster and is now replicating change events.

Eventually your source and target will be in sync. You can verify whether they are in sync by running a count() operation on your collections to verify all change events have migrated.
Step 8: Changing the application endpoint to the target Amazon DocumentDB cluster
After the full load is complete and the CDC process is replicating continuously, you are ready to change your application’s database connection endpoint from your source Amazon DocumentDB cluster to your target Amazon DocumentDB cluster.