Tutorial: Run CPU stress on an instance using AWS FIS
You can use AWS Fault Injection Service (AWS FIS) to test how your applications handle CPU stress. Use this tutorial to create an experiment template that uses AWS FIS to run a pre-configured SSM document that runs CPU stress on an instance. The tutorial uses a stop condition to halt the experiment when the CPU utilization of the instance exceeds a configured threshold.
For more information, see Pre-configured AWS FIS SSM documents.
Prerequisites
Before you can use AWS FIS to run CPU stress, complete the following prerequisites.
Create an IAM role
Create a role and attach a policy that enables AWS FIS to use the
aws:ssm:send-command action on your behalf. For more information,
see IAM roles for AWS FIS experiments.
Verify access to AWS FIS
Ensure that you have access to AWS FIS. For more information, see AWS FIS policy examples.
Prepare a test EC2 instance
-
Launch an EC2 instance using Amazon Linux 2 or Ubuntu, as required by the pre-configured SSM documents.
-
The instance must be managed by SSM. To verify that the instance is managed by SSM, open the Fleet Manager console
. If the instance is not managed by SSM, verify that the SSM Agent is installed and that the instance has an attached IAM role with the AmazonSSMManagedInstanceCore policy. To verify the installed SSM Agent, connect to your instance and run the following command. Amazon Linux 2
yum info amazon-ssm-agentUbuntu
apt list amazon-ssm-agent -
Enable detailed monitoring for the instance. This provides data in 1-minute periods, for an additional charge. Select the instance and choose Actions, Monitor and troubleshoot, Manage detailed monitoring.
Step 1: Create a CloudWatch alarm for a stop condition
Configure a CloudWatch alarm so that you can stop the experiment if CPU utilization exceeds the threshold that you specify. The following procedure sets the threshold to 50% CPU utilization for the target instance. For more information, see Stop conditions.
To create an alarm that indicates when CPU utilization exceeds a threshold
Open the Amazon EC2 console at https://console.aws.amazon.com/ec2/
. -
In the navigation pane, choose Instances.
-
Select the target instance and choose Actions, Monitor and troubleshoot, Manage CloudWatch alarms.
-
For Alarm notification, use the toggle to turn off Amazon SNS notifications.
-
For Alarm thresholds, use the following settings:
-
Group samples by: Maximum
-
Type of data to sample: CPU utilization
-
Percent:
50 -
Period:
1 Minute
-
-
When you're done configuring the alarm, choose Create.
Step 2: Create an experiment template
Create the experiment template using the AWS FIS console. In the template, you specify the following action to run: aws:ssm:send-command/AWSFIS-Run-CPU-Stress.
To create an experiment template
Open the AWS FIS console at https://console.aws.amazon.com/fis/
. -
In the navigation pane, choose Experiment templates.
-
Choose Create experiment template.
-
For Step 1, Specify template details, do the following:
-
For Description and name, enter a description for the template.
-
Choose Next, and move to Step 2, Specify actions and targets.
-
-
For Actions, do the following:
-
Choose Add action.
-
Enter a name for the action. For example, enter
runCpuStress. -
For Action type, choose aws:ssm:send-command/AWSFIS-Run-CPU-Stress. This automatically adds the ARN of the SSM document to Document ARN.
-
For Target keep the target that AWS FIS creates for you.
-
For Action parameters, Document parameters, enter the following:
{"DurationSeconds":"120"} -
For Action parameters, Duration, specify 5 minutes (PT5M).
-
Choose Save.
-
-
For Targets, do the following:
-
Choose Edit for the target that AWS FIS automatically created for you in the previous step.
-
Replace the default name with a more descriptive name. For example, enter
testInstance. -
Verify that Resource type is aws:ec2:instance.
-
For Target method, choose Resource IDs, and then choose the ID of the test instance.
-
For Selection mode, choose All.
-
Choose Save.
-
-
Choose Next to move to Step 3, Configure service access.
-
For Service Access, choose Use an existing IAM role, and then choose the IAM role that you created as described in the prerequisites for this tutorial. If your role is not displayed, verify that it has the required trust relationship. For more information, see IAM roles for AWS FIS experiments.
-
Choose Next to move to Step 4, Configure optional settings.
-
For Stop conditions, select the CloudWatch alarm that you created in Step 1.
-
(Optional) For Tags, choose Add new tag and specify a tag key and tag value. The tags that you add are applied to your experiment template, not the experiments that are run using the template.
-
Choose Next to move to Step 5, Review and create.
-
Review the template and choose Create experiment template. When prompted for confirmation, enter
create, Then choose Create experiment template.
(Optional) To view the experiment template JSON
Choose the Export tab. The following is an example of the JSON created by the preceding console procedure.
{
    "description": "Test CPU stress predefined SSM document",
    "targets": {
        "testInstance": {
            "resourceType": "aws:ec2:instance",
            "resourceArns": [
                "arn:aws:ec2:region:123456789012:instance/instance_id"
            ],
            "selectionMode": "ALL"
        }
    },
    "actions": {
        "runCpuStress": {
            "actionId": "aws:ssm:send-command",
            "parameters": {
                "documentArn": "arn:aws:ssm:region::document/AWSFIS-Run-CPU-Stress",
                "documentParameters": "{\"DurationSeconds\":\"120\"}",
                "duration": "PT5M"
            },
            "targets": {
                "Instances": "testInstance"
            }
        }
    },
    "stopConditions": [
        {
            "source": "aws:cloudwatch:alarm",
            "value": "arn:aws:cloudwatch:region:123456789012:alarm:awsec2-instance_id-GreaterThanOrEqualToThreshold-CPUUtilization"
        }
    ],
    "roleArn": "arn:aws:iam::123456789012:role/AllowFISSSMActions",
    "tags": {}
}
Step 3: Start the experiment
When you have finished creating your experiment template, you can use it to start an experiment.
To start an experiment
-
You should be on the details page for the experiment template that you just created. Otherwise, choose Experiment templates and then select the ID of the experiment template to open the details page.
-
Choose Start experiment.
-
(Optional) To add a tag to your experiment, choose Add new tag and enter a tag key and a tag value.
-
Choose Start experiment. When prompted for confirmation, enter
start. Choose Start experiment.
Step 4: Track the experiment progress
You can track the progress of a running experiment until the experiment completes, stops, or fails.
To track the progress of an experiment
-
You should be on the details page for the experiment that you just started. Otherwise, choose Experiments and then select the ID of the experiment to open the details page for the experiment.
-
To view the state of the experiment, check State in the Details pane. For more information, see experiment states.
-
When the experiment state is Running, go to the next step.
Step 5: Verify the experiment results
You can monitor the CPU utilization of your instance while the experiment is running. When the CPU utilization reaches the threshold, the alarm is triggered and the experiment is halted by the stop condition.
To verify the results of the experiment
-
Choose the Stop conditions tab. The green border and green checkmark icon indicate that the initial state of the alarm is
OK. The red line indicates the alarm threshold. If you prefer a more detailed graph, choose Enlarge from the widget menu.
-
When CPU utilization exceeds the threshold, the red border and red exclamation point icon in the Stop conditions tab indicate that the alarm state changed to
ALARM. In the Details pane, the state of the experiment is Stopped. If you select the state, the message displayed is "Experiment halted by stop condition".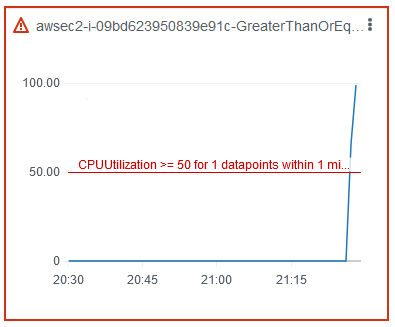
-
When CPU utilization decreases below the threshold, the green border and green checkmark icon indicate that the alarm state changed to
OK. -
(Optional) Choose View in alarms from the widget menu. This opens the alarm details page in the CloudWatch console, where you can get more detail about the alarm or edit the alarm settings.
Step 6: Clean up
If you no longer need the test EC2 instance that you created for this experiment, you can terminate it.
To terminate the instance
-
Open the Amazon EC2 console at https://console.aws.amazon.com/ec2/
. -
In the navigation pane, choose Instances.
-
Select the test instances and choose Instance state, Terminate instance.
-
When prompted for confirmation, choose Terminate.
If you no longer need the experiment template, you can delete it.
To delete an experiment template using the AWS FIS console
Open the AWS FIS console at https://console.aws.amazon.com/fis/
. -
In the navigation pane, choose Experiment templates.
-
Select the experiment template, and choose Actions, Delete experiment template.
-
When prompted for confirmation, enter
deleteand then choose Delete experiment template.
