Getting started with the MediaTek MT7697Hx development kit
Important
This reference integration is hosted on the Amazon-FreeRTOS repository which is deprecated. We recommend that you start here when you create a new project. If you already have an existing FreeRTOS project based on the now deprecated Amazon-FreeRTOS repository, see the Amazon-FreeRTOS Github Repository Migration Guide.
This tutorial provides instructions for getting started with the MediaTek MT7697Hx Development Kit.
If you do not have the MediaTek MT7697Hx Development Kit, visit the AWS Partner Device Catalog to purchase
one from our
partner
Before you begin, you must configure AWS IoT and your FreeRTOS download to connect your device to the AWS
Cloud. See First steps for instructions. In this
tutorial, the path to the FreeRTOS download directory is referred to as
freertos
Overview
This tutorial contains instructions for the following getting started steps:
-
Installing software on the host machine for developing and debugging embedded applications for your microcontroller board.
-
Cross compiling a FreeRTOS demo application to a binary image.
-
Loading the application binary image to your board, and then running the application.
-
Interacting with the application running on your board across a serial connection, for monitoring and debugging purposes.
Set up your development environment
Before you set up your environment, connect your computer to the USB port on the MediaTek MT7697Hx Development Kit.
Download and install Keil MDK
You can use the GUI-based Keil Microcontroller Development Kit (MDK) to configure, build, and run FreeRTOS projects on your board. Keil MDK includes the μVision IDE and the μVision Debugger.
Note
Keil MDK is supported on Windows 7, Windows 8, and Windows 10 64-bit machines only.
To download and install Keil MDK
-
Go to the Keil MDK Getting Started
page, and choose Download MDK-Core. -
Enter and submit your information to register with Keil.
-
Right-click the MDK executable and save the Keil MDK installer to your computer.
-
Open the Keil MDK installer and follow the steps to completion. Make sure that you install the MediaTek device pack (MT76x7 Series).
Establish a serial connection
Connect the board to your host computer with a USB cable. A COM port appears in the Windows Device Manager. For debugging, you can open a session to the port with a terminal utility tool such as HyperTerminal or TeraTerm.
Monitoring MQTT messages on the cloud
Before you run the FreeRTOS demo project, you can set up the MQTT client in the AWS IoT console to monitor the messages that your device sends to the AWS Cloud.
To subscribe to the MQTT topic with the AWS IoT MQTT client
-
Sign in to the AWS IoT console
. -
In the navigation pane, choose Test, then choose MQTT test client to open the MQTT client.
-
In Subscription topic, enter
your-thing-nameexample/topic
When the demo project successfully runs on your device you see "Hello World!" sent multiple times to the topic that you subscribed to.
Build and run the FreeRTOS demo project with Keil MDK
To build the FreeRTOS demo project in Keil μVision
-
From the Start menu, open Keil μVision 5.
-
Open the
projects/mediatek/mt7697hx-dev-kit/uvision/aws_demos/aws_demos.uvprojxproject file. -
From the menu, choose Project, and then choose Build target.
After the code is built, you see the demo executable file at
projects/mediatek/mt7697hx-dev-kit/uvision/aws_demos/out/Objects/aws_demo.axf.
To run the FreeRTOS demo project
-
Set the MediaTek MT7697Hx Development Kit to PROGRAM mode.
To set the kit to PROGRAM mode, press and hold the PROG button. With the PROG button still pressed, press and release the RESET button, and then release the PROG button.
-
From the menu, choose Flash, and then choose Configure Flash Tools.
-
In Options for Target '
aws_demo', choose the Debug tab. Select Use, set the debugger to CMSIS-DAP Debugger, and then choose OK. -
From the menu, choose Flash, and then choose Download.
μVision notifies you when the download is complete.
-
Use a terminal utility to open the serial console window. Set the serial port to 115200 bps, none-parity, 8-bits, and 1 stop-bit.
-
Choose the RESET button on your MediaTek MT7697Hx Development Kit.
Troubleshooting
Debugging FreeRTOS projects in Keil μVision
Currently, you must edit the MediaTek package that is included with Keil μVision before you can debug the FreeRTOS demo project for MediaTek with Keil μVision.
To edit the MediaTek package for debugging FreeRTOS projects
-
Find and open the
Keil_v5\ARM\PACK\.Web\MediaTek.MTx.pdscfile in your Keil MDK installation folder. -
Replace all instances of
flag = Read32(0x20000000);withflag = Read32(0x0010FBFC);. -
Replace all instances of
Write32(0x20000000, 0x76877697);withWrite32(0x0010FBFC, 0x76877697);.
To start debugging the project
-
From the menu, choose Flash, and then choose Configure Flash Tools.
-
Choose the Target tab, and then choose Read/Write Memory Areas. Confirm that IRAM1 and IRAM2 are both selected.
-
Choose the Debug tab, and then choose CMSIS-DAP Debugger.
-
Open
vendors/mediatek/boards/mt7697hx-dev-kit/aws_demos/application_code/main.c, and set the macroMTK_DEBUGGERto1. -
Rebuild the demo project in μVision.
-
Set the MediaTek MT7697Hx Development Kit to PROGRAM mode.
To set the kit to PROGRAM mode, press and hold the PROG button. With the PROG button still pressed, press and release the RESET button, and then release the PROG button.
-
From the menu, choose Flash, and then choose Download.
μVision notifies you when the download is complete.
-
Press the RESET button on your MediaTek MT7697Hx Development Kit.
-
From the μVision menu, choose Debug, and then choose Start/Stop Debug Session. The Call Stack + Locals window opens when you start the debug session.
-
From the menu, choose Debug, and then choose Stop to pause the code execution. The program counter stops at the following line:
{ volatile int wait_ice = 1 ; while ( wait_ice ) ; } -
In the Call Stack + Locals window, change the value for
wait_iceto0. -
Set breakpoints in your project's source code, and run the code.
Troubleshooting the IDE debugger settings
If you are having trouble debugging an application, your debugger settings might be incorrect.
To verify that your debugger settings are correct
-
Open Keil μVision.
-
Right-click the
aws_demosproject, choose Options, and under the Utilities tab, choose Settings, next to “-- Use Debug Driver --”. -
Verify that the settings under the Debug tab appear as follows:
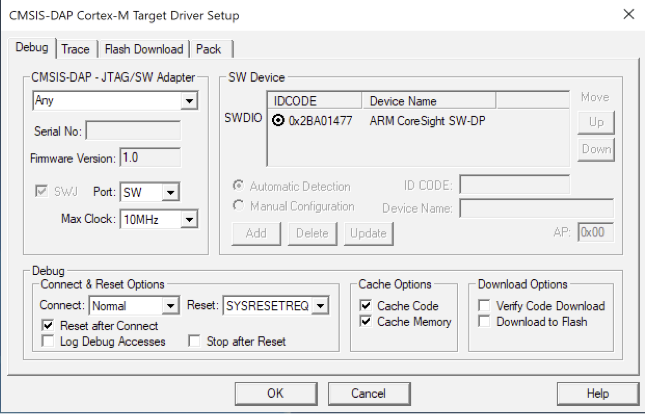
-
Verify that the settings under the Flash Download tab appear as follows:

For general troubleshooting information about Getting Started with FreeRTOS, see Troubleshooting getting started.
