Demo bootloader for the Microchip Curiosity PIC32MZEF
Important
This demo is hosted on the Amazon-FreeRTOS repository which is deprecated. We recommend that you start here when you create a new project. If you already have an existing FreeRTOS project based on the now deprecated Amazon-FreeRTOS repository, see the Amazon-FreeRTOS Github Repository Migration Guide.
Note
In agreement with Microchip, we are removing the Curiosity PIC32MZEF (DM320104) from the FreeRTOS Reference
Integration repository main branch and will no longer carry it in new releases. Microchip has issued an official notice
This demo bootloader implements firmware version checking, cryptographic signature verification, and application self-testing. These capabilities support over-the-air (OTA) firmware updates for FreeRTOS.
The firmware verification includes verifying the authenticity and integrity of the new firmware received over the air. The bootloader verifies the cryptographic signature of the application before booting. The demo uses elliptic-curve digital signature algorithm (ECDSA) over SHA-256. The utilities provided can be used to generate a signed application that can be flashed on the device.
The bootloader supports the following features required for OTA:
-
Maintains application images on the device and switches between them.
-
Allows self-test execution of a received OTA image and rollback on failure.
-
Checks signature and version of the OTA update image.
Note
To set up and run the FreeRTOS demos, follow the steps in Get Started with FreeRTOS.
Bootloader states
The bootloader process is shown in the following state machine.

The following table describes the bootloader states.
| Bootloader State | Description |
|---|---|
|
Initialization |
Bootloader is in the initialization state. |
|
Verification |
Bootloader is verifying the images present on the device. |
|
Execute Image |
Bootloader is launching the selected image. |
|
Execute Default |
Bootloader is launching the default image. |
|
Error |
Bootloader is in the error state. |
In the preceding diagram, both Execute Image and Execute
Default are shown as the Execution state.
- Bootloader Execution State
-
The bootloader is in the
Executionstate and is ready to launch the selected verified image. If the image to be launched is in the upper bank, the banks are swapped before executing the image, because the application is always built for the lower bank. - Bootloader Default Execution State
-
If the configuration option to launch the default image is enabled, the bootloader launches the application from a default execution address. This option must be disabled except while debugging.
- Bootloader Error State
-
The bootloader is in an error state and no valid images are present on the device. The bootloader must notify the user. The default implementation sends a log message to the console and fast-blinks the LED on the board indefinitely.
Flash device
The Microchip Curiosity PIC32MZEF platform contains an internal program flash of two megabytes (MB) divided into two banks. It supports memory map swapping between these two banks and live updates. The demo bootloader is programmed in a separate lower boot flash region.

Application image structure
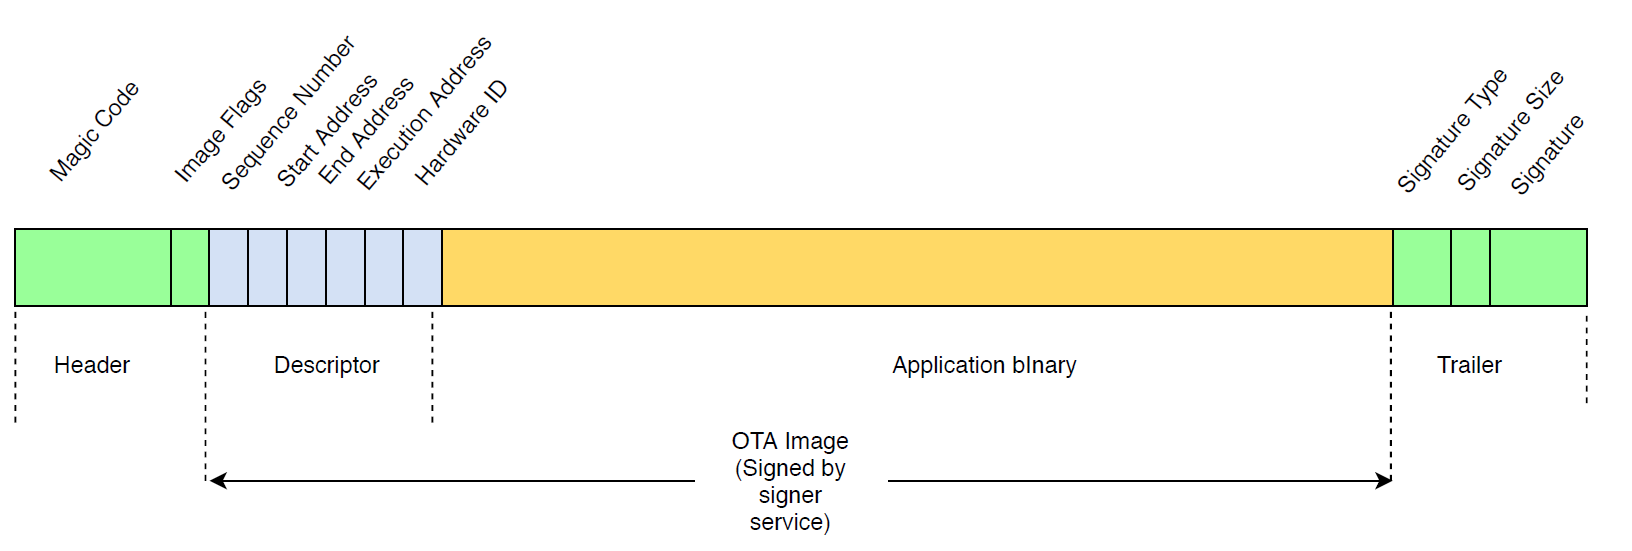
The diagram shows the primary components of the application image stored on each bank of the device.
| Component | Size (in bytes) |
|---|---|
|
Image header |
8 bytes |
|
Image descriptor |
24 bytes |
|
Application binary |
< 1 MB - (324) |
|
Trailer |
292 bytes |
Image header
The application images on the device must start with a header that consists of a magic code and image flags.
| Header Field | Size (in bytes) |
|---|---|
|
Magic code |
7 bytes |
|
Image flags |
1 byte |
Magic code
The image on the flash device must start with a magic code. The default magic
code is @AFRTOS. The bootloader checks if a valid magic code is
present before booting the image. This is the first step of verification.
Image flags
The image flags are used to store the status of the application images. The flags are used in the OTA process. The image flags of both banks determine the state of the device. If the executing image is marked as commit pending, it means the device is in the OTA self-test phase. Even if images on the devices are marked valid, they go through the same verification steps on every boot. If an image is marked as new, the bootloader marks it as commit pending and launches it for self-test after verification. The bootloader also initializes and starts the watchdog timer so that if the new OTA image fails self-test, the device reboots and bootloader rejects the image by erasing it and executes the previous valid image.
The device can have only one valid image. The other image can be a new OTA image or a commit pending (self-test). After a successful OTA update, the old image is erased from the device.
| Status | Value | Description |
|---|---|---|
|
New image |
0xFF |
Application image is new and never executed. |
|
Commit pending |
0xFE |
Application image is marked for test execution. |
|
Valid |
0xFC |
Application image is marked valid and committed. |
|
Invalid |
0xF8 |
Application image is marked invalid. |
Image descriptor
The application image on the flash device must contain the image descriptor
following the image header. The image descriptor is generated by a post-build
utility that uses configuration files (ota-descriptor.config) to
generate the appropriate descriptor and prepends it to the application binary. The
output of this post-build step is the binary image that can be used for OTA.
| Descriptor Field | Size (in bytes) |
|---|---|
|
Sequence Number |
4 bytes |
|
Start Address |
4 bytes |
|
End Address |
4 bytes |
|
Execution Address |
4 bytes |
|
Hardware ID |
4 bytes |
|
Reserved |
4 bytes |
- Sequence Number
-
The sequence number must be incremented before building a new OTA image. See the
ota-descriptor.configfile. The bootloader uses this number to determine the image to boot. Valid values are from 1 to 4294967295. - Start Address
-
The starting address of the application image on the device. As the image descriptor is prepended to the application binary, this address is the start of the image descriptor.
- End Address
-
The ending address of the application image on the device, excluding the image trailer.
- Execution Address
-
The execution address of the image.
- Hardware ID
-
A unique hardware ID used by the bootloader to verity the OTA image is built for the correct platform.
- Reserved
-
This is reserved for future use.
Image trailer
The image trailer is appended to the application binary. It contains the signature type string, signature size, and signature of the image.
| Trailer Field | Size (in bytes) |
|---|---|
|
Signature Type |
32 bytes |
|
Signature Size |
4 bytes |
|
Signature |
256 bytes |
- Signature Type
-
The signature type is a string that represents the cryptographic algorithm being used and serves as a marker for the trailer. The bootloader supports the elliptic-curve digital signature algorithm (ECDSA). The default is sig-sha256-ecdsa.
- Signature Size
-
The size of the cryptographic signature, in bytes.
- Signature
-
The cryptographic signature of the application binary prepended with the image descriptor.
Bootloader configuration
The basic bootloader configuration options are provided in
freertos/vendors/microchip/boards/curiosity_pic32mzef/bootloader/config_files/aws_boot_config.h
- Enable Default Start
-
Enables the execution of the application from the default address and must be enabled for debugging only. The image is executed from the default address without any verification.
- Enable Crypto Signature Verification
-
Enables cryptographic signature verification on boot. Failed images are erased from the device. This option is provided for debugging purposes only and must remain enabled in production.
- Erase Invalid Image
-
Enables a full bank erase if image verification on that bank fails. The option is provided for debugging and must remain enabled in production.
- Enable Hardware ID Verification
-
Enables verification of the hardware ID in the descriptor of the OTA image and the hardware ID programmed in the bootloader. This is optional and can be disabled if hardware ID verification is not required.
- Enable Address Verification
-
Enables verification of the start, end, and execution addresses in the descriptor of OTA image. We recommend that you keep this option enabled.
Building the bootloader
The demo bootloader is included as a loadable project in the aws_demos project located in
freertos/vendors/microchip/boards/curiosity_pic32mzef/aws_demos/mplab/aws_demos project is built, it builds the
bootloader first, followed by the application. The final output is a unified hex image including the
bootloader and the application. The factory_image_generator.py utility is provided to generate a
unified hex image with cryptographic signature. The bootloader utility scripts are located in
freertos/demos/ota/bootloader/utility/
Bootloader pre-build step
This pre-build step executes a utility script called
codesigner_cert_utility.py that extracts the public key from the
code-signing certificate and generates a C header file that contains the public key
in Abstract Syntax Notation One (ASN.1) encoded format. This header is compiled into
the bootloader project. The generated header contains two constants: an array of the
public key and the length of the key. The bootloader project can also be built
without aws_demos and can be debugged as a normal application.
