Migrating to FSx for ONTAP using NetApp SnapMirror
You can migrate your NetApp ONTAP file systems to Amazon FSx for NetApp ONTAP using NetApp SnapMirror.
NetApp SnapMirror employs block-level replication between two ONTAP file systems, replicating data from a specified source volume to a destination volume. We recommend using SnapMirror to migrate on-premise NetApp ONTAP file systems to FSx for ONTAP. NetApp SnapMirror's block-level replication is quick and efficient even for file systems with:
Complex directory structures
Over 50 million files
Very small file sizes (on the order of kilobytes)
When you use SnapMirror to migrate to FSx for ONTAP, deduplicated and compressed data remains in those states, which reduces transfer times and reduces the amount of bandwidth required for migration. Snapshots that exist on the source ONTAP volumes are preserved when migrated to the destination volumes. Migrating your on-premises NetApp ONTAP file systems to FSx for ONTAP involves the following high level tasks:
Create the destination volume in Amazon FSx.
Gather source and destination logical interfaces (LIFs).
Establish cluster peering between the source and destination file systems.
Create an SVM peering relationship.
Create the SnapMirror relationship.
Maintain an updated destination cluster.
Cut over to your FSx for ONTAP file system.
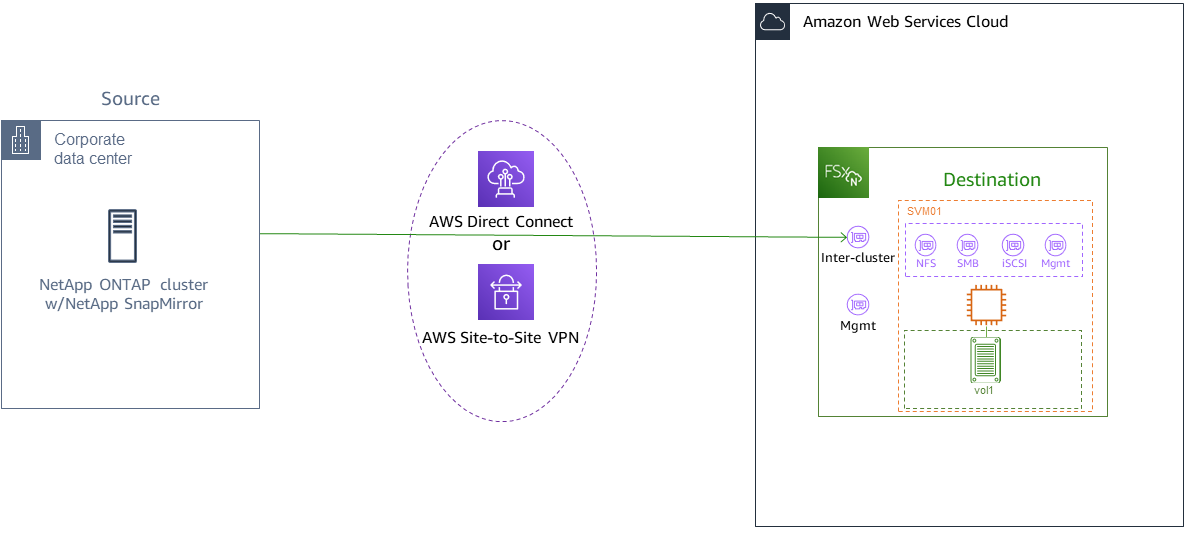
The following diagram illustrates the migration scenario described in this section.
Topics
Before you begin
Before you begin using the procedures described in the following sections, be sure that you have met the following prerequisites:
FSx for ONTAP prioritizes client traffic over background tasks including data tiering, storage efficiency, and backups. When migrating data, and as a general best practice, we recommend that you monitor your SSD tier's capacity to ensure it is not exceeding 80% utilization. You can monitor your SSD tier's utilization using CloudWatch File system metrics. For more information, see Volume metrics.
If you set the destination volume's data tiering policy to
Allwhen migrating your data, all file metadata is stored on the primary SSD storage tier. File metadata is always stored on the SSD-based primary tier, regardless of the volume's data tiering policy. We recommend that you assume a ratio of 1 : 10 for primary tier : capacity pool tier storage capacity.The source and destination file systems are connected in the same VPC, or are in networks that are peered using Amazon VPC Peering, Transit Gateway, AWS Direct Connect or AWS VPN. For more information, see Accessing data from within the AWS Cloud and What is VPC peering? in the Amazon VPC Peering Guide.
The VPC security group for the FSx for ONTAP file system has inbound and outbound rules allowing ICMP as well as TCP on ports 443, 10000, 11104, and 11105 for your inter-cluster endpoints (LIFs).
Verify that the source and destination volumes are running compatible NetApp ONTAP versions before creating a SnapMirror data protection relationship. For more information, see Compatible ONTAP versions for SnapMirror relationships
in NetApp's ONTAP user documentation. The procedures presented here use an on-premise NetApp ONTAP file system for the source. Your on-premises (source) NetApp ONTAP file system includes a SnapMirror license.
You have created a destination FSx for ONTAP file system with an SVM, but you have not created a destination volume. For more information, see Creating file systems.
The commands in these procedures use the following cluster, SVM, and volume aliases:
FSx-DestOnPrem-SourceDestSVMSourceSVMBoth the source and destination volume names are
vol1.
Note
An FSx for ONTAP file system is referred to as a cluster in all of the ONTAP CLI commands.
The procedures in this section use the following NetApp ONTAP CLI commands.
volume create
command cluster
commands vserver peer
commands snapmirror
commands
You will use the NetApp ONTAP CLI to create and manage a SnapMirror configuration on your FSx for ONTAP file system. For more information, see Using the NetApp ONTAP CLI.
Create the destination volume
You can create a data protection (DP) destination volume using the Amazon FSx console, the AWS CLI, and the Amazon FSx API, in addition to the NetApp ONTAP CLI and REST API. For information about creating a destination volume using the Amazon FSx console and AWS CLI, see Creating volumes.
Note
ONTAP does not preserve post-process compression savings achieved at the source in the destination
DP volume when the destination volume's tiering policy is All. To preserve post-process compression savings, you
should set the destination volume tiering policy to Auto and enable inactive-data-compression on the destination
file system to re-apply post-process compression savings at the destination.
In the following procedure, you will use the NetApp ONTAP CLI to create a destination volume on your FSx for ONTAP file system.
You will need the fsxadmin password and the IP address or DNS name of the file system's management port.
Establish an SSH session with the destination file system using user
fsxadminand the password that you set when you created the file system.ssh fsxadmin@file-system-management-endpoint-ip-addressCreate a volume on the destination cluster that has a storage capacity that is at least equal to the storage capacity of the source volume. Use
-type DPto designate it as a destination for a SnapMirror relationship.If you plan to use data tiering, we recommended that you set
-tiering-policytoall. This ensures that your data is immediately transferred to capacity pool storage and prevents you from running out of capacity on your SSD tier. After migration, you can switch-tiering-policytoauto.Note
File metadata is always stored on the SSD-based primary tier, regardless of the volume's data tiering policy.
FSx-Dest::> vol create -vserverDestSVM-volume vol1 -aggregate aggr1 -size 1g -type DP -tiering-policy all
Record the source and destination inter-cluster LIFs
SnapMirror uses inter-cluster logical interfaces (LIFs), each with a unique IP address, to facilitate data transfer between source and destination clusters.
-
For the destination FSx for ONTAP file systems, you can retrieve the Inter-cluster endpoint - IP addresses from the Amazon FSx console by navigating to the Administration tab on your file system's details page.
For the source NetApp ONTAP cluster, retrieve the inter-cluster LIF IP addresses using the ONTAP CLI. Run the following command:
OnPrem-Source::>network interface show -role interclusterLogical Network Vserver Interface Status Address/Mask ----------- ---------- ------- ------------ FSx-Dest inter_1 up/up 10.0.0.36/24 inter_2 up/up 10.0.1.69/24Note
For second-generation Single-AZ file systems, there are two inter-cluster IP addresses for each high-availability (HA) pair. Save these values for later.
Save the
inter_1andinter_2IP addresses. They are referenced in theFSx-Destasdest_inter_1anddest_inter_2and forOnPrem-Sourceassource_inter_1andsource_inter_2.
Establish cluster peering between source and destination
Establish a cluster peer relationship on the destination cluster by providing the inter-cluster IP addresses. You will also need to create a passphrase which you will need to enter in when you establish cluster peering on the source cluster.
Set up peering on the destination cluster using the following command. For second-generation Single-AZ file systems, you'll need to provide each inter-cluster IP address.
FSx-Dest::>cluster peer create -address-family ipv4 -peer-addrssource_inter_1,source_inter_2Enter the passphrase: Confirm the passphrase: Notice: Now use the same passphrase in the "cluster peer create" command in the other cluster.Next, establish the cluster peer relationship on the source cluster. You’ll need to enter the passphrase you created above to authenticate. For second-generation Single-AZ file systems, you'll need to provide each inter-cluster IP address.
OnPrem-Source::>cluster peer create -address-family ipv4 -peer-addrsdest_inter_1,dest_inter_2Enter the passphrase: Confirm the passphrase:Verify the peering was successful using the following command on the source cluster. In the output,
Availabilityshould be set toAvailable.OnPrem-Source::>cluster peer showPeer Cluster Name Availability Authentication ----------------- -------------- -------------- FSx-Dest Available ok
Create an SVM peering relationship
With cluster peering established, the next step is peering the SVMs. Create an SVM peering relationship on the destination cluster
(FSx-Dest) using the vserver peer command. Additional aliases used in the following commands are as follows:
DestLocalName– this is name used to identify the destination SVM when configuring SVM peering on the source SVM.SourceLocalName– this is the name used to identify the source SVM when configuring SVM peering on the destination SVM.
-
Use the following command to create an SVM peering relationship between the source and destination SVMs.
FSx-Dest::>vserver peer create -vserverDestSVM-peer-vserverSourceSVM-peer-clusterOnPrem-Source-applications snapmirror -local-nameSourceLocalNameInfo: [Job 207] 'vserver peer create' job queued -
Accept the peering relationship on the source cluster:
OnPrem-Source::>vserver peer accept -vserverSourceSVM-peer-vserverDestSVM-local-nameDestLocalNameInfo: [Job 211] 'vserver peer accept' job queued -
Verify the SVM peering status using the following command;
Peer Stateshould be set topeeredin the response.OnPrem-Source::>vserver peer showPeer Peer Peer Peering Remote Vserver Vserver State Cluster Applications Vserver ------- -------- ------ -------- ------------- --------- svm01 destsvm1 peered FSx-Dest snapmirror svm01
Create the SnapMirror relationship
Now that you have peered the source and destination SVMs, the next steps are to create and initialize the SnapMirror relationship on the destination cluster.
Note
Once you create and initialize a SnapMirror relationship, the destination volumes are read-only until the relationship is broken.
Use the
snapmirror createcommand to create the SnapMirror relationship on the destination cluster. Thesnapmirror createcommand must be used from the destination SVM.You can optionally use
-throttleto set the maximum bandwidth (in kB/sec) for the SnapMirror relationship.FSx-Dest::>snapmirror create -source-pathSourceLocalName:vol1 -destination-pathDestSVM:vol1 -vserverDestSVM-throttle unlimitedOperation succeeded: snapmirror create for the relationship with destination "DestSVM:vol1".
Transfer data to your FSx for ONTAP file system
Now that the you've created the SnapMirror relationship, you can transfer data to the destination file system.
You can transfer data to the destination file system by running the following command on the destination file system.
Note
Once you run this command, SnapMirror begins transferring snapshots of data from the source volume to the destination volume.
FSx-Dest::>snapmirror initialize -destination-pathDestSVM:vol1 -source-pathSourceLocalName:vol1If you are migrating data that is being actively used, you’ll need to update your destination cluster so that it remains synced with your source cluster. To perform a one-time update to the destination cluster, run the following command.
FSx-Dest::>snapmirror update -destination-pathDestSVM:vol1You can also schedule hourly or daily updates prior to completing the migration and moving your clients to FSx for ONTAP. You can establish a SnapMirror update schedule using the
snapmirror modifycommand. FSx-Dest::>snapmirror modify -destination-pathDestSVM:vol1 -schedule hourly
Cutting over to Amazon FSx
To prepare for the cut over to your FSx for ONTAP file system, do the following:
Disconnect all clients that write to the source cluster.
Perform a final SnapMirror transfer to ensure there is no data loss when cutting over.
Break the SnapMirror relationship.
Connect all clients to your FSx for ONTAP file system.
To ensure that all data from the source cluster is transferred to FSx for ONTAP file system, perform a final Snapmirror transfer.
FSx-Dest::>snapmirror update -destination-pathDestSVM:vol1Ensure that the data migration is complete by verifying that
Mirror Stateis set toSnapmirrored, andRelationship Statusis set toIdle. You also should ensure that theLast Transfer End Timestampdate is as expected, as it shows when the last transfer to the destination volume occurred.Run the following command to show the SnapMirror status.
FSx-Dest::>snapmirror show -fields state,status,last-transfer-end-timestampSource Destination Mirror Relationship Last Transfer End Path Path State Status Timestamp ---------- ----------- ---------- ------- --------------- Svm01:vol1 svm02:DestVol Snapmirrored Idle 09/02 09:02:21Disable any future SnapMirror transfers by using the
snapmirror quiescecommand.FSx-Dest::>snapmirror quiesce -destination-pathDestSVM:vol1Verify that the
Relationship Statushas changed toQuiescedusingsnapmirror show.FSx-Dest::>snapmirror showSource Destination Mirror Relationship Path Path State Status ----------- ------------ ------------- -------- sourcesvm1:vol1 svm01:DestVol Snapmirrored QuiescedDuring migration, the destination volume is read-only. To enable read/write, you need to break the SnapMirror relationship and cut over to your FSx for ONTAP file system. Break the SnapMirror relationship using the following command.
FSx-Dest::>snapmirror break -destination-pathDestSVM:vol1Operation succeeded: snapmirror break for destination "DestSVM:vol1".Once the SnapMirror replication has completed and you have broken the SnapMirror relationship, you can mount the volume to make the data available.
FSx-Dest::> vol mount -vserver fsx -volume vol1 -junction-path /vol1
The volume is now available with the data from the source volume fully migrated to the
destination volume The volume is also available for clients to read and write to it. If you
previously set the tiering-policy of this volume to all, you can
change it to auto or snapshot-only and your data will automatically
transition between storage tiers according to access patterns. To make this data accessible to
clients and applications, see Accessing your FSx for ONTAP data.
