Developing AWS IoT TwinMaker time-series data connectors
This section explains how to develop a time-series data connector in a step-by-step
process. Additionally, we present an example time-series data connector based of the
entire cookie factory sample, which includes 3D models, entities, components, alarms,
and connectors. The cookie factory sample source is available on the AWS IoT TwinMaker samples GitHub repository
AWS IoT TwinMaker time-series data connector prerequisites
Before developing your time-series data connector, we recommend that you complete the following tasks:
Create an AWS IoT TwinMaker workspace.
-
Create AWS IoT TwinMaker entities.
(Optional) Read Using and creating component types.
(Optional) Read AWS IoT TwinMaker data connector interface to get a general understanding of AWS IoT TwinMaker data connectors.
Note
For an example of a fully implemented connector, see our cookie factory example implementation.
Time-series data connector background
Imagine you are working with a factory that has a set of cookie mixers and a water tank. You would like to build AWS IoT TwinMaker digital twins of these physical entities so that you can monitor their operational states by checking various time-series metrics.
You have on-site sensors set up and you are already streaming measurement data into a Timestream database. You want to be able to view and organize the measurement data in AWS IoT TwinMaker with minimal overhead. You can accomplish this task by using a time-series data connector. The following image shows an example telemetry table, which is populated through the use of a time-series connector.
.png)
The datasets and the Timestream table used in this screenshot are available in the AWS IoT TwinMaker samples GitHub repository
Time-series data connector data flow
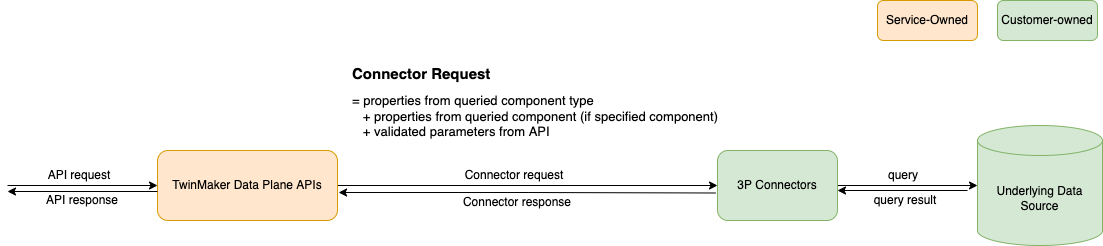
For data plane queries, AWS IoT TwinMaker fetches the corresponding properties of both components and component types from components and component types definitions. AWS IoT TwinMaker forwards properties to AWS Lambda functions along with any API query parameters in the query.
AWS IoT TwinMaker uses Lambda functions to access and resolve queries from data sources and return the results of those queries. The Lambda functions use the component and component type properties from the data plane to resolve the initial request.
The results of the Lambda query are mapped to an API response and returned to you.
AWS IoT TwinMaker defines the data connector interface and uses that to interact with Lambda functions. Using data connectors, you can query your data source from AWS IoT TwinMaker API without any data migration efforts. The following image outlines the basic data flow described in the previous paragraphs.
Developing a time-series data connector
The following procedure outlines a development model that incrementally builds up to a functional time-series data connector. The basic steps are as follows:
-
Create a valid basic component type
In a component type, you define common properties that are shared across your components. To learn more about defining component types, see Using and creating component types.
AWS IoT TwinMaker uses an entity-component modeling pattern
so each component is attached to an entity. We recommend that you model each physical item as an entity and model different data sources with their own component types. The following example shows a Timestream template component type with one property:
{"componentTypeId": "com.example.timestream-telemetry",
    "workspaceId": "MyWorkspace",
    "functions": {
        "dataReader": {
            "implementedBy": {
                "lambda": {
                    "arn": "lambdaArn"
                }
            }
        }
    },
    "propertyDefinitions": {
        "telemetryType": {
            "dataType": { "type": "STRING" },
            "isExternalId": false,
            "isStoredExternally": false,
            "isTimeSeries": false,
            "isRequiredInEntity": true
        },
        "telemetryId": {
            "dataType": { "type": "STRING" },
            "isExternalId": true,
            "isStoredExternally": false,
            "isTimeSeries": false,
            "isRequiredInEntity": true
        },
        "Temperature": {
            "dataType": { "type": "DOUBLE" },
            "isExternalId": false,
            "isTimeSeries": true,
            "isStoredExternally": true,
            "isRequiredInEntity": false
        }
    }
}
The key elements of the component type are the following:
-
The
telemetryIdproperty identifies the unique key of the physical item in the corresponding data source. The data connector uses this property as a filter condition to only query values associated with the given item. Additionally, if you include thetelemetryIdproperty value in the data plane API response, then the client side takes the ID and can perform a reverse lookup if necessary. -
The
lambdaArnfield identifies the Lambda function with which the component type engages. -
The
isRequiredInEntityflag enforces the ID creation. This flag is required so that when the component is created, the item's ID is also instantiated. -
The
TelemetryIdis added to the component type as an external id so that the item can be identified in the Timestream table.
-
Create a component with the component type
To use the component type you created, you must create a component and attach it to the entity from which you wish to retrieve data. The following steps detail the process of creating that component:
Navigate to the AWS IoT TwinMaker console
. Select and open the same workspace in which you created the component types.
Navigate to the entity page.
Create a new entity or select an existing entity from the table.
Once you have selected the entity you wish to use, choose Add component to open the Add component page.
Give the component a name and for the Type, choose the component type you created with the template in 1. Create a valid basic component type.
-
Make your component type call a Lambda connector
The Lambda connector needs to access the data source and generate the query statement based on the input and forward it to the data source. The following example shows a JSON request template that does this.
{
  "workspaceId": "MyWorkspace",
  "entityId": "MyEntity",
  "componentName": "TelemetryData",
  "selectedProperties": ["Temperature"],
  "startTime": "2022-08-25T00:00:00Z",
  "endTime": "2022-08-25T00:00:05Z",
  "maxResults": 3,
  "orderByTime": "ASCENDING",
  "properties": {
      "telemetryType": {
          "definition": {
              "dataType": { "type": "STRING" },
              "isExternalId": false,
              "isFinal": false,
              "isImported": false,
              "isInherited": false,
              "isRequiredInEntity": false,
              "isStoredExternally": false,
              "isTimeSeries": false
          },
          "value": {
              "stringValue": "Mixer"
          }
      },
      "telemetryId": {
          "definition": {
              "dataType": { "type": "STRING" },
              "isExternalId": true,
              "isFinal": true,
              "isImported": false,
              "isInherited": false,
              "isRequiredInEntity": true,
              "isStoredExternally": false,
              "isTimeSeries": false
          },
          "value": {
              "stringValue": "item_A001"
          }
      },
      "Temperature": {
          "definition": {
              "dataType": { "type": "DOUBLE", },
              "isExternalId": false,
              "isFinal": false,
              "isImported": true,
              "isInherited": false,
              "isRequiredInEntity": false,
              "isStoredExternally": false,
              "isTimeSeries": true
          }
      }
  }
}
The key elements of the request:
-
The
selectedPropertiesis a list you populate with the properties for which you want Timestream measurements. -
The
startDateTime,startTime,EndDateTime, andendTimefields specify a time range for the request. This determines the sample range for the measurements returned. -
The
entityIdis the name of the entity from which you are querying data. -
The
componentNameis the name of the component from which you are querying data. -
Use the
orderByTimefield to organize the order in which the results are displayed.
In the preceding example request, we would expect to get a series of samples for the selected properties during the given time window for the given item, with the selected time order. The response statement can be summarized as the following:
{ "propertyValues": [ { "entityPropertyReference": { "entityId": "MyEntity", "componentName": "TelemetryData", "propertyName": "Temperature" }, "values": [ { "time": "2022-08-25T00:00:00Z", "value": { "doubleValue": 588.168 } }, { "time": "2022-08-25T00:00:01Z", "value": { "doubleValue": 592.4224 } }, { "time": "2022-08-25T00:00:02Z", "value": { "doubleValue": 594.9383 } } ] } ], "nextToken": "..." } -
Update your component type to have two properties
The following JSON template shows a valid component type with two properties:
{
    "componentTypeId": "com.example.timestream-telemetry",
    "workspaceId": "MyWorkspace",
    "functions": {
        "dataReader": {
            "implementedBy": {
                "lambda": {
                    "arn": "lambdaArn"
                }
            }
        }
    },
    "propertyDefinitions": {
        "telemetryType": {
            "dataType": { "type": "STRING" },
            "isExternalId": false,
            "isStoredExternally": false,
            "isTimeSeries": false,
            "isRequiredInEntity": true
        },
        "telemetryId": {
            "dataType": { "type": "STRING" },
            "isExternalId": true,
            "isStoredExternally": false,
            "isTimeSeries": false,
            "isRequiredInEntity": true
        },
        "Temperature": {
            "dataType": { "type": "DOUBLE" },
            "isExternalId": false,
            "isTimeSeries": true,
            "isStoredExternally": true,
            "isRequiredInEntity": false
        },
        "RPM": {
            "dataType": { "type": "DOUBLE" },
            "isExternalId": false,
            "isTimeSeries": true,
            "isStoredExternally": true,
            "isRequiredInEntity": false
        }
    }
}
Update the Lambda connector to handle the second property
The AWS IoT TwinMaker data plane API supports querying multiple properties in a single request, and AWS IoT TwinMaker follows a single request to a connector by providing a list of
selectedProperties.The following JSON request shows a modified template that now supports a request for two properties.
{
  "workspaceId": "MyWorkspace",
  "entityId": "MyEntity",
  "componentName": "TelemetryData",
  "selectedProperties": ["Temperature", "RPM"],
  "startTime": "2022-08-25T00:00:00Z",
  "endTime": "2022-08-25T00:00:05Z",
  "maxResults": 3,
  "orderByTime": "ASCENDING",
  "properties": {
      "telemetryType": {
          "definition": {
              "dataType": { "type": "STRING" },
              "isExternalId": false,
              "isFinal": false,
              "isImported": false,
              "isInherited": false,
              "isRequiredInEntity": false,
              "isStoredExternally": false,
              "isTimeSeries": false
          },
          "value": {
              "stringValue": "Mixer"
          }
      },
      "telemetryId": {
          "definition": {
              "dataType": { "type": "STRING" },
              "isExternalId": true,
              "isFinal": true,
              "isImported": false,
              "isInherited": false,
              "isRequiredInEntity": true,
              "isStoredExternally": false,
              "isTimeSeries": false
          },
          "value": {
              "stringValue": "item_A001"
          }
      },
      "Temperature": {
          "definition": {
              "dataType": { "type": "DOUBLE" },
              "isExternalId": false,
              "isFinal": false,
              "isImported": true,
              "isInherited": false,
              "isRequiredInEntity": false,
              "isStoredExternally": false,
              "isTimeSeries": true
          }
      },
      "RPM": {
          "definition": {
              "dataType": { "type": "DOUBLE" },
              "isExternalId": false,
              "isFinal": false,
              "isImported": true,
              "isInherited": false,
              "isRequiredInEntity": false,
              "isStoredExternally": false,
              "isTimeSeries": true
          }
      }
  }
}
Similarly, the corresponding response is also updated, as shown in the following example:
{
  "propertyValues": [
    {
      "entityPropertyReference": {
        "entityId": "MyEntity",
        "componentName": "TelemetryData",
        "propertyName": "Temperature"
      },
      "values": [
        {
          "time": "2022-08-25T00:00:00Z",
          "value": {
            "doubleValue": 588.168
          }
        },
        {
          "time": "2022-08-25T00:00:01Z",
          "value": {
            "doubleValue": 592.4224
          }
        },
        {
          "time": "2022-08-25T00:00:02Z",
          "value": {
            "doubleValue": 594.9383
          }
        }
      ]
    },
    {
      "entityPropertyReference": {
        "entityId": "MyEntity",
        "componentName": "TelemetryData",
        "propertyName": "RPM"
      },
      "values": [
        {
          "time": "2022-08-25T00:00:00Z",
          "value": {
            "doubleValue": 59
          }
        },
        {
          "time": "2022-08-25T00:00:01Z",
          "value": {
            "doubleValue": 60
          }
        },
        {
          "time": "2022-08-25T00:00:02Z",
          "value": {
            "doubleValue": 60
          }
        }
      ]
    }
  ],
  "nextToken": "..."
}
Note
In terms of the pagination for this case, the page size in the request applies to all properties. This means that with five properties in the query and a page size of 100, if there are enough data points in the source, you should expect to see 100 data points per property, with 500 data points in total.
For an example implementation, see Snowflake connector sample
on GitHub.
Improving your data connector
Handling exceptions
It is safe for the Lambda connector to throw exceptions. In the data plane API
call, the AWS IoT TwinMaker service waits for the Lambda function to return a response. If
the connector implementation throws an exception, AWS IoT TwinMaker translates the
exception type to be ConnectorFailure, making the API client aware
that an issue happened inside the connector.
Handling pagination
In the example, Timestream provides a utility function
When the new token is returned to AWS IoT TwinMaker through the connector response interface, the token is encrypted before being returned to the API client. When the token is included in another request, AWS IoT TwinMaker decrypts it before forwarding it to the Lambda connector. We recommend that you avoid adding sensitive information to the token.
Testing your connector
Though you can still update the implementation after you link the connector to the component type, we strongly recommend you verify the Lambda connector before integrating with AWS IoT TwinMaker.
There are multiple ways to test your Lambda connector: you can test the Lambda connector in the Lambda console or locally in the AWS CDK.
For more information on testing your Lambda functions, see Testing Lambda functions and Locally testing AWS CDK applications.
Security
For documentation on security best practices with Timestream, see Security in Timestream.
For an example of SQL injection prevention, see the following Python script
Creating AWS IoT TwinMaker resources
Once you have implemented the Lambda function, you can create AWS IoT TwinMaker resources such as
component types, entities, and components through the AWS IoT TwinMaker console
Note
If you follow the setup instructions in the GitHub sample, all AWS IoT TwinMaker resources are available
automatically. You can check the component type definitions in the AWS IoT TwinMaker GitHub sample
Integration testing
We recommend having an integrated test with AWS IoT TwinMaker to verify the data plane query
works end-to-end. You can perform that through GetPropertyValueHistory
API or easily in AWS IoT TwinMaker console
.png)
In the AWS IoT TwinMaker console, go to component details and then under the Test, you’ll see all the properties in the component are listed there. The Test area of the console allows you to test time-series properties as well as non-time-series properties. For time-series properties you can also use the GetPropertyValueHistory API and for non-time-series properties use GetPropertyValue API. If your Lambda connector supports multiple property query, you can choose more than one property.
.png)
What's next
You can now set up an AWS IoT TwinMaker Grafana
dashboard to visualize metrics. You can also explore other data
connector samples in the AWS IoT TwinMaker samples GitHub repository
