Create AWS IoT resources
In this tutorial, you'll create the AWS IoT resources that a device requires to connect to AWS IoT Core and exchange messages.

-
Create an AWS IoT policy document, which will authorize your device to interact with AWS IoT services.
-
Create a thing object in AWS IoT and its X.509 device certificate, and then attach the policy document. The thing object is the virtual representation of your device in the AWS IoT registry. The certificate authenticates your device to AWS IoT Core, and the policy document authorizes your device to interact with AWS IoT.
Note
If you are planning to Create a virtual device with Amazon EC2, you can skip this page and continue to Configure your device. You will create these resources when you create your virtual thing.
This tutorial uses the AWS IoT console to create the AWS IoT resources. If your device supports a web browser, it might be easier to run this procedure on the device's web browser because you will be able to download the certificate files directly to your device. If you run this procedure on another computer, you will need to copy the certificate files to your device before they can be used by the sample app.
Create an AWS IoT policy
Devices use an X.509 certificate to authenticate with AWS IoT Core. The certificate has AWS IoT policies attached to it. These policies determine which AWS IoT operations, such as subscribing or publishing to MQTT topics, the device is permitted to perform. Your device presents its certificate when it connects and sends messages to AWS IoT Core.
Follow the steps to create a policy that allows your device to perform the AWS IoT operations necessary to run the example program. You must create the AWS IoT policy before you can attach it to the device certificate, which you'll create later.
To create an AWS IoT policy
-
In the AWS IoT console
, in the left menu, choose Security and then choose Policies. -
On the You don't have a policy yet page, choose Create policy.
If your account has existing policies, choose Create policy.
-
On the Create policy page:
-
In the Policy properties section, in the Policy name field, enter a name for the policy (for example,
My_Iot_Policy). Don't use personally identifiable information in your policy names. -
In the Policy document section, create the policy statements that grant or deny resources access to AWS IoT Core operations. To create a policy statement that grants all clients to perform
iot:Connect, follow these steps:-
In the Policy effect field, choose Allow. This allows all clients that have this policy attached to their certificate to perform the action listed in the Policy action field.
-
In the Policy action field, choose a policy action such as
iot:Connect. Policy actions are the actions that your device needs permission to perform when it runs the example program from the Device SDK.
-
In the Policy resource field, enter a resource Amazon Resource Name (ARN) or
*. A*to select any client (device).
To create the policy statements for
iot:Receive,iot:Publish, andiot:Subscribe, choose Add new statement and repeat the steps.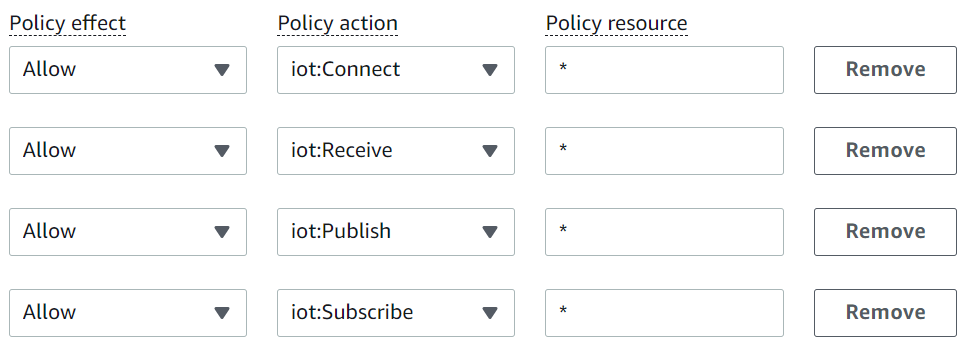
Note
In this quick start, the wildcard (*) character is used for simplicity. For higher security, you should restrict which clients (devices) can connect and publish messages by specifying a client ARN instead of the wildcard character as the resource. Client ARNs follow this format:
arn:aws:iot:.your-region:your-aws-account:client/my-client-idHowever, you must first create the resource (such as a client device or thing shadow) before you can assign its ARN to a policy. For more information, see AWS IoT Core action resources.
-
-
-
After you've entered the information for your policy, choose Create.
For more information, see How AWS IoT works with IAM.
Create a thing object
Devices connected to AWS IoT Core are represented by thing objects in the AWS IoT registry. A thing object represents a specific device or logical entity. It can be a physical device or sensor (for example, a light bulb or a light switch on the wall). It can also be a logical entity, like an instance of an application or physical entity that doesn't connect to AWS IoT, but is related to other devices that do (for example, a car that has engine sensors or a control panel).
To create a thing in the AWS IoT console
-
In the AWS IoT console
, in the left menu, choose All devices and then choose Things. -
On the Things page, choose Create things.
-
On the Create things page, choose Create a single thing, then choose Next.
-
On the Specify thing properties page, for Thing name, enter a name for your thing, such as
MyIotThing.Choose thing names carefully, because you can't change a thing name later.
To change a thing's name, you must create a new thing, give it the new name, and then delete the old thing.
Note
Do not use personally identifiable information in your thing name. The thing name can appear in unencrypted communications and reports.
-
Keep the rest of the fields on this page empty. Choose Next.
-
On the Configure device certificate - optional page, choose Auto-generate a new certificate (recommended). Choose Next.
-
On the Attach policies to certificate - optional page, select the policy you created in the previous section. In that section, the policy was named,
My_Iot_Policy. Choose Create thing. -
On the Download certificates and keys page:
-
Download each of the certificate and key files and save them for later. You'll need to install these files on your device.
When you save your certificate files, give them the names in the following table. These are the file names used in later examples.
Certificate file names File
File path
Private key
private.pem.keyPublic key (not used in these examples) Device certificate
device.pem.crtRoot CA certificate
Amazon-root-CA-1.pem -
To download the root CA file for these files, choose the Download link of the root CA certificate file that corresponds to the type of data endpoint and cipher suite you're using. In this tutorial, choose Download to the right of RSA 2048 bit key: Amazon Root CA 1 and download the RSA 2048 bit key: Amazon Root CA 1 certificate file.
Important
You must save the certificate files before you leave this page. After you leave this page in the console, you will no longer have access to the certificate files.
If you forgot to download the certificate files that you created in this step, you must exit this console screen, go to the list of things in the console, delete the thing object you created, and then restart this procedure from the beginning.
-
Choose Done.
-
After you complete this procedure, you should see the new thing object in your list of things.
