Multiplexing multiple data streams in a secure tunnel
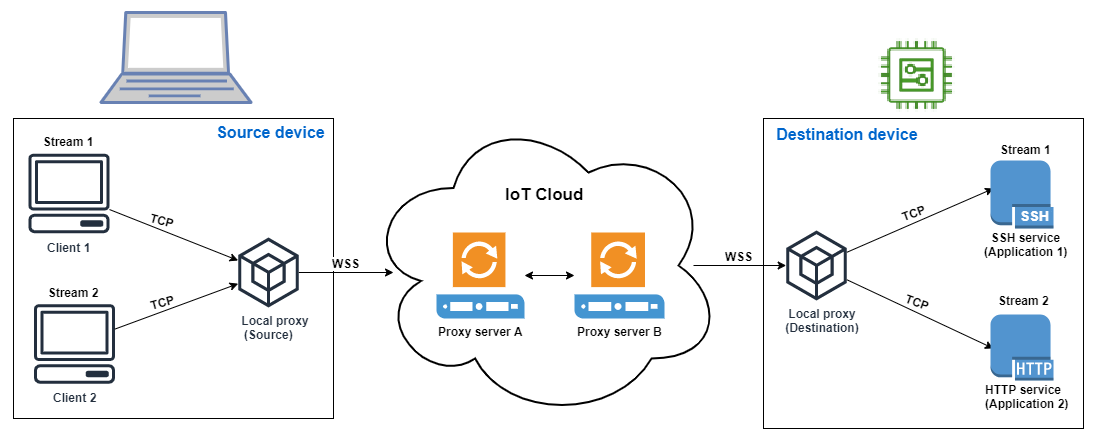
You can use the multiplexing feature for devices that use multiple connections or ports. Multiplexing can also be used when you require multiple connections to a remote device to troubleshoot any issues. For example, it can be used in case of a web browser that requires sending multiple HTTP and SSH data streams. The application data from both streams are sent to the device concurrently over the multiplexed tunnel.
Example use case
Say you need to connect to an on-device web application to change some networking parameters, while simultaneously issuing shell commands through the terminal to verify that the device is working properly with the new networking parameters. In this scenario, you may need to connect to the device through both HTTP and SSH and transfer two parallel data streams to concurrently access the web application and terminal. With the multiplexing feature, these two independent streams can be transferred over the same tunnel at the same time.
How to set up a multiplexed tunnel
The following procedure walks you through how to set up a multiplexed tunnel for troubleshooting devices using applications that require connections to multiple ports. You will set up one tunnel with two multiplexed streams: one HTTP stream and one SSH stream.
-
(Optional) Create configuration files
You can optionally configure the source and destination device with configuration files. Use configuration files if your port mappings are likely to change frequently. You can skip this step if you prefer to specify the port mapping explicitly using the CLI, or if you don't need to start the local proxy on designated listening ports. For more information about how to use configuration files, see Options set via --config
in GitHub. -
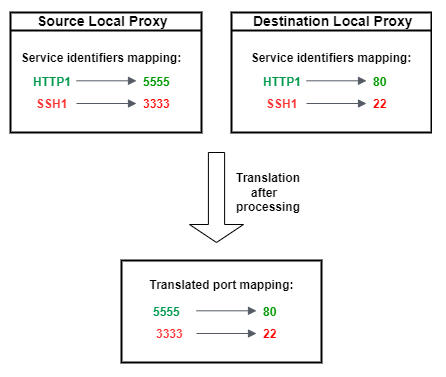
On your source device, in the folder where your local proxy will run, create a configuration folder called
Config. Inside this folder, create a file calledSSHSource.iniwith the following content:HTTP1 =5555SSH1 =3333 -
On your destination device, in the folder where your local proxy will run, create a configuration folder called
Config. Inside this folder, create a file calledSSHDestination.iniwith the following content:HTTP1 =80SSH1 =22
-
-
Open a tunnel
Open a tunnel using the
OpenTunnelAPI operation or theopen-tunnelCLI command. Configure the destination by specifyingSSH1andHTTP1as the services and the name of the AWS IoT thing that corresponds to your remote device. Your SSH and HTTP applications are running on this remote device. You must have already created the IoT thing in the AWS IoT registry. For more information, see Managing things with the registry.aws iotsecuretunneling open-tunnel \ --destination-config thingName=RemoteDevice1,services=HTTP1,SSH1Running this command generates the source and destination access tokens which you'll use to run the local proxy.
{ "tunnelId": "b2de92a3-b8ff-46c0-b0f2-afa28b00cecd", "tunnelArn": "arn:aws:iot:us-west-2:431600097591:tunnel/b2de92a3-b8ff-46c0-b0f2-afa28b00cecd", "sourceAccessToken":source_client_access_token, "destinationAccessToken":destination_client_access_token} -
Configure and start the local proxy
Before you can run the local proxy, either set up the AWS IoT Device Client, or download the local proxy source code from GitHub
and build it for the platform of your choice. You can then start the destination and the source local proxy to connect to the secure tunnel. For more information about configuring and using the local proxy, see How to use the local proxy. Note
On your source device, if you don't use any configuration files or specify the port mapping using the CLI, you can still use the same command to run the local proxy. The local proxy in source mode will automatically pick up available ports to use and the mappings for you.
The application data from SSH and HTTP connection can now be transferred
concurrently over the multiplexed tunnel. As seen in the map below, the service
identifier acts as a readable format to translate the port mapping between the
source and destination device. With this configuration, secure tunneling
forwards any incoming HTTP traffic from port 5555 on
the source device to port 80 on the destination
device, and any incoming SSH traffic from port 3333
to port 22 on the destination device.