Step 7: Create an AWS DMS Replication Instance
After we validate the schema structure between source and target databases, as described preceding, we proceed to the core part of this walkthrough, which is the data migration. The following illustration shows a high-level view of the migration process.
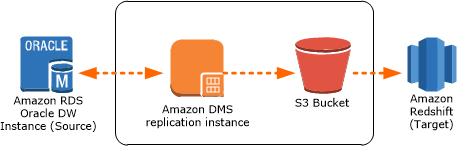
A DMS replication instance performs the actual data migration between source and target. The replication instance also caches the transaction logs during the migration. How much CPU and memory capacity a replication instance has influences the overall time required for the migration.
To create an AWS DMS replication instance, do the following:
-
Sign in to the AWS Management Console, open the AWS DMS console at https://console.aws.amazon.com/dms/v2/, and choose Create Migration. If you are signed in as an AWS Identity and Access Management (IAM) user, you must have the appropriate permissions to access AWS DMS. For more information about the permissions required, see IAM Permissions.
-
Choose Create migration to start a database migration.
-
On the Welcome page, choose Next.
-
On the Create replication instance page, specify your replication instance information as shown following.
Parameter Action Name
Enter
DMSdemo-repserver.Description
Enter a brief description, such as
DMS demo replication server.Instance class
Choose dms.t2.medium. This instance class is large enough to migrate a small set of tables.
VPC
Choose
OracletoRedshiftusingDMS, which is the VPC that was created by the AWS CloudFormation stack.Multi-AZ
Choose
No.Publicly accessible
Leave this item selected.
-
For the Advanced section, leave the default settings as they are, and choose Next.
