Performing a failback with the DRS Mass Failback Automation Client
DRS allows you to perform a scalable failback for vCenter with the DRS Mass Failback Automation Client (DRSFA Client). This allows you to perform a one-click or custom failback for multiple vCenter machines at once.
Note
The DRSFA client only works with vCenters source servers.
Note
The DRSFA client was only tested on vCenter versions 6.7 and 7.0.
DRSFA prerequisites
These are the prerequisites for performing failback automation with the DRSFA client:
-
Ensure that you meet all of the network requirements.
-
Ensure that you have initialized DRS.
-
Each server that is being failed back must have at least 3 GB of RAM.
-
Each server that is being failed back must have the hardware clock set to UTC rather than Local Time.
-
The recovery instance used as a source for failback must have permissions to access AWS Elastic Disaster Recovery via API calls. This is done using instance profile for the underlying EC2 instance. The instance profile must include the AWSElasticDisasterRecoveryRecoveryInstancePolicy in addition to any other policy you require the EC2 instance to have. By default, the launch settings that DRS creates for source servers already have an instance profile defined that includes that policy and that instance profile will be used when launching a Recovery Instance.
-
Inbound port TCP 1500 must be open on the Recovery instance in AWS.
-
The server on which the DRSFA client is run needs to be able to communicate with your vCenter environment.
-
The server on which the DRSFA client is run must have at least 4 GB of RAM.
-
The server on which the DRSFA client is run must run Python 3.9.4 with pip installed (other versions of Python will not work).
Note
The installation procedure shown below uses Ubuntu 20.04 running Python 3.9.4.
-
The server on which the DRSFA client is run requires these tools for DRSFA Client installation. The installer will attempt to install them if they are not already present::
build-essential curl genisoimage git libbz2-dev libffi-dev liblzma-dev libncurses5-dev libncursesw5-dev libreadline-dev libsqlite3-dev libssl-dev llvm make tk-dev unzip wget xz-utils zlib1g-dev
-
To see the list of python libraries required for the DRSFA Client to run, see the requirements.txt file (https://drsfa-us-west-2.s3.us-west-2.amazonaws.com/requirements.txt). These libraries will be installed automatically by DRSFA Client.
-
-
The vCenter source servers must have two CD ROM devices with IDE controllers attached to run the DRSFA client - one for the DRS Failback Client and one for the drs_failback_automation_seed.iso
Note
If no attached CD ROM devices are found, the DRSFA client will attempt to add the CD ROM devices.
-
The DRS Failback Client must be uploaded to your vCenter Datastore.
-
We recommend using the latest version of the DRS Failback Client. Download the latest version of the DRS Failback Clientand upload it to your vCenter datastore.
-
We recommend running SHA512 checksum verification on the DRS Failback Client prior to using it with the DRSFA client. You can verify the checksum at this address:
https://aws-elastic-disaster-recovery-hashes-{REGION}.s3.amazonaws.com/latest/failback_livecd/aws-failback-livecd-64bit.iso.sha512 -
We recommend running SHA512 checksum verification on the drs_failback_automation_seed.iso file prior to using it with the DRSFA client.
-
The DRSFA client does not require root privileges. We recommend low privileges for running the client.
-
You need to have these vCenter API credentials and permissions: ‘Virtual machine’ : [ ‘Change Settings’, ‘Guest operation queries’, ‘Guest operation program execution’, ‘Connect devices’, ‘Power off’, ‘Power on’. ‘Add or remove device’, ‘Configure CD media] ‘Datastore’: [‘Browse datastore’]
-
vCenter credentials should only be constrained to the VMs you plan to failback.
-
You should be able to fail back all of the Recovery instances in a single AWS Region simultaneously with the aid of the DRSFA Client as long as your vCenter hardware supports the failback load.
Security best practices
These are security best practices for using the DRSFA Client:
-
Follow the least privilege principle and set the appropriate permissions on the folder where the JSON generated by the client will be stored.
-
Ensure that you are always using the latest version of the DRSFA Client. The client will automatically check and verify that you are using the latest version upon startup.
-
You should not provide any additional permissions to the DRSFA Client other than the ones listed in the prerequisites.
-
Ensure that you follow the AWS recommended password policy when setting the password for the VM that hosts the DRS Failback Client when generating the drs_failback_automation_seed.iso file.
-
Ensure that you manually verify the DRSFA client hashes when automatic hash verification is not performed. The hash verification hint is shown when the DRSFA client is installed.
-
Ensure that only trusted administrators have access to the vCenter environment. The DRSFA Client will consider the customer executing scripts and every person with access to the datastore as a single trust entity
-
We suggest performing a hash verification on the DRS Failback Client and the drs_failback_automation_seed.iso file before proceeding. The hash is exported to the
drs_failback_automation_seed.iso.sha512file once the seed iso is created. -
We suggest using low level privilege when running the DRSFA client.
-
We suggest following the least privilege principle and setting the appropriate permissions on the folder where the Failback Client and seed.iso files will be stored.
-
The vCenter credentials used should only have permissions to the VMs involved in the failback attempt.
Installing the DRSFA Client
Prior to running the DRSFA Client, you must first install it. Installing the client is a one-time operation.
The DRSFA client was fully tested on Ubuntu 20.04 and an installation script for this version is provided. Use this vanilla AMI or public ISO to run the client locally in your vCenter environment.
Follow the Create your EC2 resources and launch your EC2 instance guidelines as per the EC2 documentation. When asked to select an AMI, select the option below instead of the Amazon Linux 2 AMI and then proceed according to the documentation. Use this AMI from EC2: Ubuntu Server 20.04 LTS (HVM), SSD Volume Type:

Download the Ubuntu Server 20.04 LTS server install image ISO from the
Ubuntu download site
Once your VM instance is set up and ready, connect to the Ubuntu instance and run command prompt and download the DRSFA client using this command:
wget
                            https://drsfa-us-west-2.s3.us-west-2.amazonaws.com/drs_failback_automation_installer.sh

Note
You should verify the hash of the installer after running the
installation command:
https://drsfa-hashes-us-west-2.s3.us-west-2.amazonaws.com/drs_failback_automation_installer.sh.sha512
Use this command to execute the installation script:
bash drs_failback_automation_installer.sh


Note
This command may ask for a sudo password if you use the Ubuntu ISO. Enter the password but do not run this command as sudo.
source ~/.profile

The DRSFA client has a one-time installation. The DRSFA client will be
installed in the drs_failback_automation_client directory. Once
you've successfully ran the command above and installed the client, you can
delete the DRSFA client installer from your server by running this
command:
rm drs_failback_automation_installer.sh

Once installation is complete, you will need to set up a password for the VM on which the DRSFA client is run. This is done by generating a seed.iso file that you must upload to your Datastore. Run these commands to generate the seed.iso file:
bash drs_failback_automation_seed_creator.sh
You will be prompted to enter a password. Ensure that you enter a unique password that following the AWS recommended password policy.
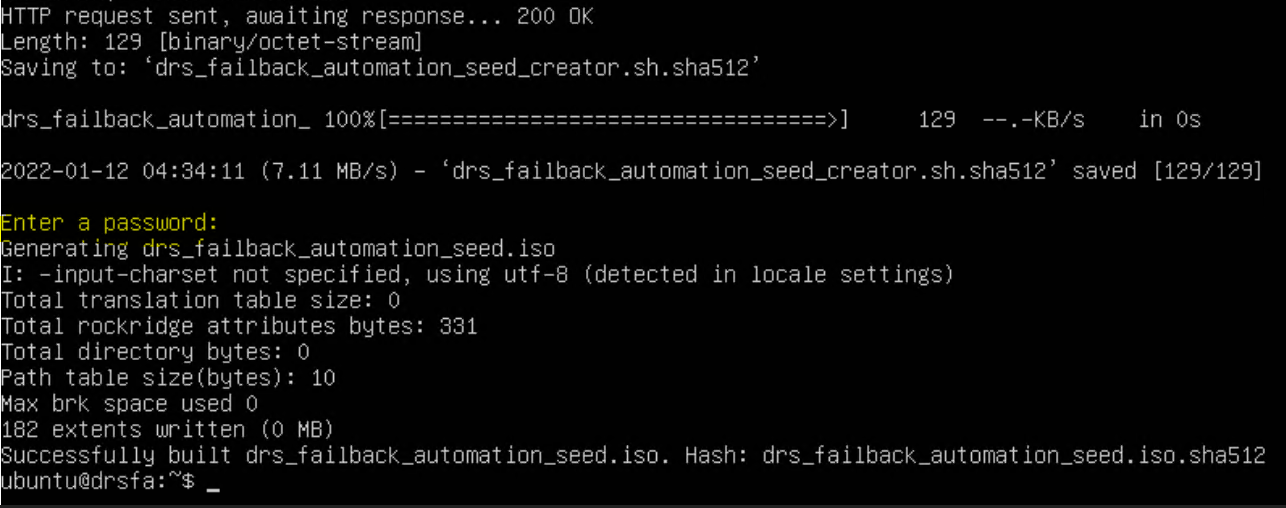
Two files will be generated, the
drs_failback_automation_seed.iso file and the
drs_failback_automation_seed.iso.sha512 hash. Upload the
seed.iso file to the same Datastore where the DRS Failback Client ISO file
is stored.

Once the drs_failback_automation_seed.iso file is generated,
you can run this command to delete the seed creator:
rm drs_failback_automation_seed_creator.sh

Once you have completed the initial installation, you can generate the required credentials and run the DRSFA client.
Generating IAM credentials and configuring Cloudwatch logging
In order to run the DRSFA Client, you must first generate the required AWS credentials.
Important
Temporary credentials have many advantages. You don't need to rotate them or revoke them when they're no longer needed, and they cannot be reused after they expire. You can specify for how long the credentials are valid, up to a maximum limit. Because they provide enhanced security, using temporary credentials is considered best practice and the recommended option.
Temporary credentials
To create temporary credentials:
-
Create a new IAM Role with the AWSElasticDisasterRecoveryFailbackInstallationPolicy policy.
-
Request temporary security credentials via AWS STS using the AssumeRole API.
Once your credentials are generated, you should create a logGroup for CloudWatch logging named DRS_Mass_Failback_Automation. If this log group is not created or if it's created with the wrong name, the DRSFA client will still work, but logs will not be sent to CloudWatch. Learn more about working with log groups in the Amazon CloudWatch Logs documentation.
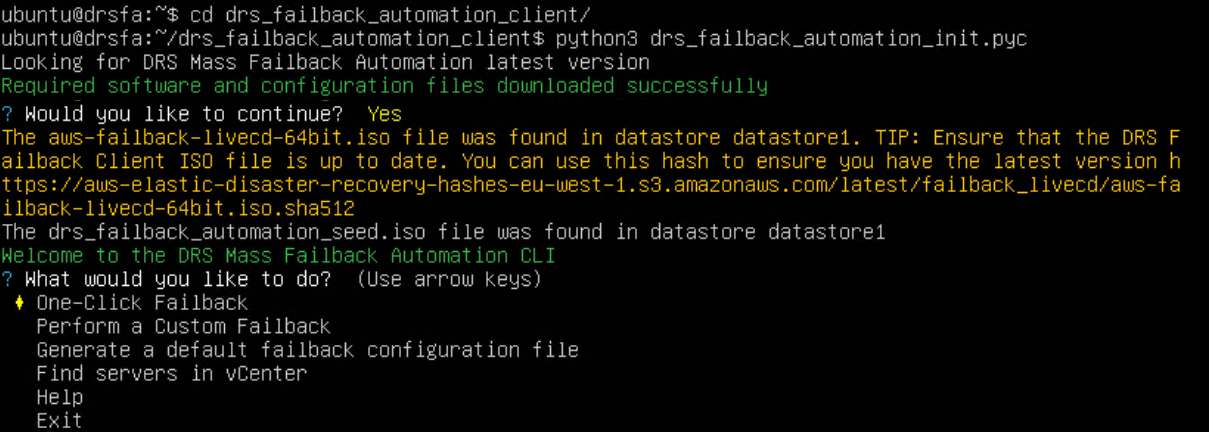
Running the DRSFA client
Once you have installed the DRSFA client, you can run it by following these instructions:
cd into the drs_failback_automation_client
directory and enter these parameters in a single line or settings the
environment variables one by one, replace the defaults with your specific
parameters and paths followed by the python
drs_failback_automation_init.pyc command and press enter.

-
AWS_REGION=XXXXX – The AWS Region in which your Recovery instances are located.
-
AWS_ACCESS_KEY=XXXXX – The AWS Access Key you generated for the DRSFA client.
-
AWS_SECRET_ACCESS_KEY=XXXXXX – The AWS Secret Access Key you generated for the DRSFA client.
-
AWS_SESSION_TOKEN=XXXXXX – (Optional) The AWS Session Token you generated for the DRSFA client.
-
DRS_FAILBACK_CLIENT_PASSWORD = XXXXXX – The custom password you set for the Failback Client in the drs_failback_automation_seed.iso file.
-
VCENTER_HOST=XX.XX.XXX.XXX – The IP address of the vCenter Host.
-
VCENTER_PORT=XXX – The vCenter Port (usually 443)
-
VCENTER_USER=sample@vsphere.local – The vCenter username
-
VCENTER_PASSWORD=samplepassword – The vCenter password
-
VCENTER_DATASTORE=DatastoreX – The Datastore within vCenter where the Failback Client ISO file (aws-failback-livecd-64bit.iso) and seed.iso file (drs_failback_automation_seed.iso) are stored.
-
VCENTER_FAILBACK_CLIENT_PATH='samplepath/aws-failback-livecd-64bit.iso' – Failback Client ISO path in the Datastore.
-
VCENTER_SEED_ISO_PATH='samplepath/drs_failback_automation_seed.iso' – The seed.iso file path in the Datastore.
Enter all of the parameters in a single line or enter the environmental
variables individually one by one. Once you have entered your parameters,
enter the python drs_failback_automation_init.pyc command and
press enter. The full parameters and command should look like this example:
AWS_REGION=XXXX AWS_ACCESS_KEY=XXXX AWS_SECRET_ACCESS_KEY=XXXX
                            DRS_FAILBACK_CLIENT_PASSWORD=XXXX VCENTER_HOST=XXXX VCENTER_PORT=XXXX VCENTER_USER=XXXX
                            VCENTER_PASSWORD=XXXX VCENTER_DATASTORE=XXXX VCENTER_FAILBACK_CLIENT_PATH=XXXX
                            VCENTER_SEED_ISO_PATH=XXXX python drs_failback_automation_init.pyc

Note
-
SSL verification is active by default. If you want to deactivate SSL verification, then add this parameter: DISABLE_SSL_VERIFICATION=true
By default, the DRSFA client initiates a failback for 10 servers at once (if failing back more than 10 servers). To change the default value, use the THREAD_POOL_SIZE parameter.
One-click failback
Once the client has connected successfully and finished verification, select the One-Click Failback option under What would you like to do?
Enter a custom prefix for the results output for this failback operation.
This file is saved in the
/drs_failback_automation_client/results/Failback directory.

If failback replication has already been started for some of the Recovery instances, the console prompts you to decide if you want to skip the instances that are already in failback or restart replication for those instances.

The DRSFA client will list the Recovery instances that are currently present in your AWS Account. The client will then prompt you Would you like to continue? . Enter Y to continue.

The client will initiate failback. You can see the failback progress on the Recovery instances page in the DRS Console.

Once the failback has been complete, the DRSFA client displays the results of the failback, including the number of servers for which replication has successfully been initiated and the number of servers for which the failback operation failed.
The full results of the failback will be exported as a JSON file to the failback client
folder path under the /drs_failback_automation_client/results/Failback folder with
the custom prefix you set, the AWS account ID, the AWS Region, and a timestamp.
The JSON file displays:
-
The AWS ID of the Recovery instance
-
The status of the failback (succeeded, skipped, or failed)
-
A message (which provides the cause for failure in the case of failure)
-
The vCenter VM UUID

If failback failed for any of your machines, you can troubleshoot the failure by looking at
the machine configuration failback_hosts_settings.json file in the same folder.

Here, you can see the exact configurations of the failed machines. You can then fix any problems and use the custom failback flow explained below to fail back these specific machines.
Custom failback
The custom failback option gives you more control and flexibility over the failback process. When utilizing the custom failback option, you will first create a failback configuration file, in which you can edit specific settings for each individual machine, and you will then use this file to perform a failback in a flow that is similar to that of the one-step failback.
Generating the configuration file
To use the custom failback option, you can either create a custom configuration JSON file or generate a default failback configuration file through the client.
To generate a default failback configuration file, once the client has connected successfully and finished verification, select the Generate a default failback configuration file option under What would you like to do?

Enter a custom prefix for the configuration file name. The
configuration file will be created as a JSON file in the
/drs_failback_automation_client/
Configurations /folder with the name:
"{prefix}_{account_id}_{region}.json"

You can edit any of the fields in the file in order to correctly configure it. The file displays these fields for each machine. You can edit every field to have absolute control over your failback configuration for each machine. Ensure to save your changes.
-
NETMASK
-
VCENTER_MACHINE_UUID
-
PROXY
-
DNS
-
CONFIG_NETWORK
-
IPADDR
-
GATEWAY
-
SOURCE_SERVER_ID
-
DEVICE_MAPPING
Note
-
The
CONFIG_NETWORKvalue should be set to "DHCP" if you are using DHCP. The value should be set to "STATIC" if you want to manually configure the network settings. If CONFIG_NETWORK is set to "DHCP", then theDNS, IPADDR, GATEWAY, NETMASK, andPROXYparameters are ignored but should not be deleted. -
If you are using a proxy server, leave the
PROXYfield as an empty string, do not remove it. -
If a source server does not have an attached recovery instance, the file will still be generated, but the SOURCE SERVER ID field will be empty.
You can edit any of the fields in the file in order to correctly configure it. The file displays these fields for each machine. You can edit every field to have absolute control over your failback configuration for each machine. Ensure to save your changes.
Custom device mapping parameter
Custom "DEVICE_MAPPING" field is passed to the LiveCD failback process as --device-mapping argument. Learn more about using --device-mapping program argument
There are three formats supported:
-
Classic CE format of key-value CSV string as one line.
You may use either ":" or "=" as CSV fields separator which is more sutable for Windows drive letters. Examples are:
"DEVICE_MAPPING": "recovery_device1=local_device1,recovery_device2=local_device2,recovery_device3=EXCLUDE""DEVICE_MAPPING": "recovery_device1:local_device1,recovery_device2:local_device2" -
JSON format:
"DEVICE_MAPPING": { "/dev/xvdb":"/dev/sdb", "/dev/xvdc":"/dev/sdc", "recovery_device3":"local_device3" } -
JSON list DRS API format:
[
    {
    "recoveryInstanceDeviceName": "recovery_device1",
    "failbackClientDeviceName": "local_device1"
    },
    {
    "recoveryInstanceDeviceName": "recovery_device2",
    "failbackClientDeviceName": "local_device2"
    }
]
No matter which format you choose, you need to provide either valid Failback Client device name or EXCLUDE for each Recovery Instance device.
Performing the custom failback
Once you are done editing your configuration file, rerun the DRSFA client and select the Perform a Custom Failback option.

Select your configuration file. You can either define a custom path or select the default path that's automatically displayed by the client.


Enter a custom prefix for the results output for this failback
operation. This file is saved in the
/drs_failback_automation_client/Results/Failback
directory.
If failback replication has already been started for some of the recovery instances, the console prompts you to decide if you want to skip the instances that are already in failback or restart replication for those instances.
The Client will identify the recovery instances that will be failed back to their original VMs and list them. The client will then prompt you whether you would like to continue. Choose Y to continue.
The Client will initiate failback. You can see the failback progress on the Recovery instances page in the AWS DRS Console.
Once the failback has been complete, the DRSFA client displays the results of the failback, including the number of servers for which replication has successfully been initiated and the number of servers for which the failback operation failed.
The full results of the failback will be exported as a JSON file to the failback client
folder path under the /drs_failback_automation_client/Results/Failback folder
with
the custom prefix you set, the AWS account ID, the AWS Region, and a timestamp.
The JSON file displays:
-
The AWS ID of the Recovery instance
-
The status of the failback (succeeded, skipped, or failed)
-
A message (which provides the cause for failure in the case of failure)
-
The vCenter VM UUID
-
The vCenter UUID of the original source server
If failback failed for any of your machines, you can troubleshoot the failure by looking
at
the machine configuration failback_hosts_settings.json file in the same folder.
Here, you can see the exact configurations of the failed machines. You can then fix any problems and use the custom failback flow explained below to fail back these specific machines.
Find servers in vCenter
Select the Find servers in vCenter option to find machines in vCenter. This makes it easier to discover the disks/volumes of your machines for custom failback.

Enter a name to filter or press Enter to see all results. Choose Yes to print your results.

The results will be exported to the Results/VMFinder folder in the DRSFA client
folder. The
results will be named after the vCenter IP and the time stamp.
{vcenter_host}_{ts}.txt
These are displayed for each server:
-
Name
-
UUID
-
Disk and volume info

Upgrading the DRSFA Client
Most of DRSFA components are upgraded automatically upon execution. However, in certain scenarios, you will see a message informing you that you need to upgrade the DRSFA Client manually.
To complete the upgrade, take these steps:
-
Change directory (cd) into the directory where the installation originally took place.
-
Download the DRSFA installer:
wget
                                    https://drsfa-us-west-2.s3.us-west-2.amazonaws.com/drs_failback_automation_installer.sh
Note
You should verify the hash of the installer after running the installation command:
https://drsfa-hashes-us-west-2.s3.us-west-2.amazonaws.com/drs_failback_automation_installer.sh.sha512 -
Run the installer.
bash drs_failback_automation_installer.sh -
Remove the installer.
rm drs_failback_automation_installer.sh
Troubleshooting
-
To troubleshoot the DRSFA Client, review the
drs_failback_automation.logfile that is generated in the/drs_failback_automation_client/folder on the server from which the client is run. -
To find the log for a specific server, open the VM, and find the
drs_failback_automation.logandfailback.logfile, which can be used for troubleshooting.
