翻訳は機械翻訳により提供されています。提供された翻訳内容と英語版の間で齟齬、不一致または矛盾がある場合、英語版が優先します。
チュートリアル: OpenSearch Service と OpenSearch Dashboards によるカスタマーサポートへの問い合わせを可視化する
この章は、次のような状況の完全なチュートリアルです。ビジネスである程度の数のカスタマーサポートコールを受けており、それらを分析したいと考えています。各問い合わせの件名は何でしょうか? 肯定的なやり取りの数はいくつでしょうか? 否定的なやり取りの数はいくつでしょうか? マネージャーはこれらの問い合わせのトランスクリプトをどのように検索または確認することができますか?
手動ワークフローでは、従業員が通話記録を聴き、各問い合わせの件名をメモし、顧客とのやり取りが肯定的であったかどうかを判断することが考えられます。
このようなプロセスには非常に大きな労力がかかります。1 回の問い合わせの平均時間が 10 分とすると、各従業員が 1 日あたり聴くことができる問い合わせの数は 48 件にすぎません。人間の先入観や偏見を除外することで、生成されるデータは非常に正確なものとなる一方で、データの量は最小限になります。つまり、問い合わせの件名と、顧客が満足したかどうかのブール値のみとなります。完全なトランスクリプトなど、それ以上の内容を伴う場合、非常に長い時間がかかる可能性があります。
Amazon S3
このチュートリアルはそのとおりに使用できますが、その意図は、OpenSearch Service でインデックス化する前に、JSON ドキュメントを強化する方法に関するアイデアを生み出すことです。
推定コスト
一般的に、このチュートリアルのステップを実行するコストは 2 USD 未満です。このチュートリアルでは、以下のリソースを使用します。
-
転送および保存されるデータが 100 MB 未満である S3 バケット
詳細については、「Amazon S3 料金表
」を参照してください。 -
1 つの
t2.mediumインスタンスを持つ OpenSearch Service ドメインと、数時間に対応する 10 GiB の EBS ストレージ詳細については、「Amazon OpenSearch Service 料金表
」を参照してください。 -
Amazon Transcribe への数回の呼び出し
詳細については、「Amazon Transcribe 料金表
」を参照してください。 -
Amazon Comprehend への数回の自然言語処理の呼び出し
詳細については、「Amazon Comprehend 料金表
」を参照してください。
トピック
ステップ 1: 前提条件を設定する
続行する前に、以下のリソースが必要です。
| 前提条件 | 説明 |
|---|---|
| Amazon S3 バケット | 詳細については、Amazon Simple Storage Service コンソールユーザーガイドの「バケットの作成」を参照してください。 |
| OpenSearch Service ドメイン | データのコピー先。詳細については、「OpenSearch Service ドメインの作成」を参照してください。 |
これらのリソースがない場合は、次の AWS CLI コマンドを使用して作成できます。
aws s3 mb s3://my-transcribe-test --region us-west-2
aws opensearch create-domain --domain-name my-transcribe-test --engine-version OpenSearch_1.0 --cluster-config InstanceType=t2.medium.search,InstanceCount=1 --ebs-options EBSEnabled=true,VolumeType=standard,VolumeSize=10 --access-policies '{"Version":"2012-10-17","Statement":[{"Effect":"Allow","Principal":{"AWS":"arn:aws:iam::123456789012:root"},"Action":"es:*","Resource":"arn:aws:es:us-west-2:123456789012:domain/my-transcribe-test/*"}]}' --region us-west-2
注記
これらのコマンドでは us-west-2 リージョンを使用しますが、Amazon Comprehend がサポートしている任意のリージョンを使用することもできます。詳細については、AWS 全般のリファレンス を参照してください。
ステップ 2: サンプルコードをコピーする
-
次の Python 3 サンプルコードをコピーし、
call-center.pyという新しいファイルに貼り付けます。import boto3 import datetime import json import requests from requests_aws4auth import AWS4Auth import time import urllib.request # Variables to update audio_file_name = '' # For example, 000001.mp3 bucket_name = '' # For example, my-transcribe-test domain = '' # For example, https://search-my-transcribe-test-12345.us-west-2.es.amazonaws.com index = 'support-calls' type = '_doc' region = 'us-west-2' # Upload audio file to S3. s3_client = boto3.client('s3') audio_file = open(audio_file_name, 'rb') print('Uploading ' + audio_file_name + '...') response = s3_client.put_object( Body=audio_file, Bucket=bucket_name, Key=audio_file_name ) # # Build the URL to the audio file on S3. # # Only for the us-east-1 region. # mp3_uri = 'https://' + bucket_name + '.s3.amazonaws.com/' + audio_file_name # Get the necessary details and build the URL to the audio file on S3. # For all other regions. response = s3_client.get_bucket_location( Bucket=bucket_name ) bucket_region = response['LocationConstraint'] mp3_uri = 'https://' + bucket_name + '.s3-' + bucket_region + '.amazonaws.com/' + audio_file_name # Start transcription job. transcribe_client = boto3.client('transcribe') print('Starting transcription job...') response = transcribe_client.start_transcription_job( TranscriptionJobName=audio_file_name, LanguageCode='en-US', MediaFormat='mp3', Media={ 'MediaFileUri': mp3_uri }, Settings={ 'ShowSpeakerLabels': True, 'MaxSpeakerLabels': 2 # assumes two people on a phone call } ) # Wait for the transcription job to finish. print('Waiting for job to complete...') while True: response = transcribe_client.get_transcription_job(TranscriptionJobName=audio_file_name) if response['TranscriptionJob']['TranscriptionJobStatus'] in ['COMPLETED', 'FAILED']: break else: print('Still waiting...') time.sleep(10) transcript_uri = response['TranscriptionJob']['Transcript']['TranscriptFileUri'] # Open the JSON file, read it, and get the transcript. response = urllib.request.urlopen(transcript_uri) raw_json = response.read() loaded_json = json.loads(raw_json) transcript = loaded_json['results']['transcripts'][0]['transcript'] # Send transcript to Comprehend for key phrases and sentiment. comprehend_client = boto3.client('comprehend') # If necessary, trim the transcript. # If the transcript is more than 5 KB, the Comprehend calls fail. if len(transcript) > 5000: trimmed_transcript = transcript[:5000] else: trimmed_transcript = transcript print('Detecting key phrases...') response = comprehend_client.detect_key_phrases( Text=trimmed_transcript, LanguageCode='en' ) keywords = [] for keyword in response['KeyPhrases']: keywords.append(keyword['Text']) print('Detecting sentiment...') response = comprehend_client.detect_sentiment( Text=trimmed_transcript, LanguageCode='en' ) sentiment = response['Sentiment'] # Build the Amazon OpenSearch Service URL. id = audio_file_name.strip('.mp3') url = domain + '/' + index + '/' + type + '/' + id # Create the JSON document. json_document = {'transcript': transcript, 'keywords': keywords, 'sentiment': sentiment, 'timestamp': datetime.datetime.now().isoformat()} # Provide all details necessary to sign the indexing request. credentials = boto3.Session().get_credentials() awsauth = AWS4Auth(credentials.access_key, credentials.secret_key, region, 'opensearchservice', session_token=credentials.token) # Index the document. print('Indexing document...') response = requests.put(url, auth=awsauth, json=json_document, headers=headers) print(response) print(response.json()) -
最初の 6 つの変数を更新します。
-
次のコマンドを使用して必要なパッケージをインストールします。
pip install boto3 pip install requests pip install requests_aws4auth -
call-center.pyと同じディレクトリに MP3 を配置し、スクリプトを実行します。サンプル出力を次に示します。$ python call-center.py Uploading 000001.mp3... Starting transcription job... Waiting for job to complete... Still waiting... Still waiting... Still waiting... Still waiting... Still waiting... Still waiting... Still waiting... Detecting key phrases... Detecting sentiment... Indexing document... <Response [201]> {u'_type': u'call', u'_seq_no': 0, u'_shards': {u'successful': 1, u'failed': 0, u'total': 2}, u'_index': u'support-calls4', u'_version': 1, u'_primary_term': 1, u'result': u'created', u'_id': u'000001'}
call-center.py は多数のオペレーションを実行します。
-
このスクリプトは、音声ファイル (この例では MP3 ですが、Amazon Transcribe は複数の形式をサポートします) を S3 バケットにアップロードします。
-
オーディオファイルの URL を Amazon Transcribe に送信し、書き起こしジョブの完了を待機します。
書き起こしジョブが完了するまでの時間は、オーディオファイルの長さによって異なります。数秒ではなく、数分であると想定してください。
ヒント
書き起こしの品質を向上させるため、Amazon Transcribe 用のカスタム語彙を設定できます。
-
書き起こしジョブが完了すると、スクリプトはトランスクリプトを抽出し、それを 5,000 文字に切り捨て、キーワードとセンチメントの分析のため Amazon Comprehend に送信します。
-
最後に、スクリプトは完全なトランスクリプト、キーワード、センチメント、および現在のタイムスタンプを JSON ドキュメントに追加し、そのインデックスを OpenSearch Service に作成します。
ヒント
LibriVox
(オプション) ステップ 3: サンプルデータのインデックスを作成する
多くの通話記録が手元にない場合 (これは一般的です)、sample-calls.zip にサンプルドキュメントのインデックスを作成できます。これは call-center.py で生成されるものと同等です。
-
bulk-helper.pyという名前のファイルを作成します:import boto3 from opensearchpy import OpenSearch, RequestsHttpConnection import json from requests_aws4auth import AWS4Auth host = '' # For example, my-test-domain.us-west-2.es.amazonaws.com region = '' # For example, us-west-2 service = 'es' bulk_file = open('sample-calls.bulk', 'r').read() credentials = boto3.Session().get_credentials() awsauth = AWS4Auth(credentials.access_key, credentials.secret_key, region, service, session_token=credentials.token) search = OpenSearch( hosts = [{'host': host, 'port': 443}], http_auth = awsauth, use_ssl = True, verify_certs = True, connection_class = RequestsHttpConnection ) response = search.bulk(bulk_file) print(json.dumps(response, indent=2, sort_keys=True)) -
hostおよびregionの最初の 2 つの変数を更新します。 -
次のコマンドを使用して必要なパッケージをインストールします。
pip install opensearch-py -
sample-calls.zip をダウンロードして解凍します。
-
sample-calls.bulkと同じディレクトリにbulk-helper.pyを配置し、ヘルパーを実行します。サンプル出力を次に示します。$ python bulk-helper.py { "errors": false, "items": [ { "index": { "_id": "1", "_index": "support-calls", "_primary_term": 1, "_seq_no": 42, "_shards": { "failed": 0, "successful": 1, "total": 2 }, "_type": "_doc", "_version": 9, "result": "updated", "status": 200 } },...], "took": 27 }
ステップ 4: データを分析し、可視化する
OpenSearch Service にデータを配置したので、OpenSearch Dashboards を使用してそのデータを可視化することができます。
-
https://search-に移動します。domain.region.es.amazonaws.com/_dashboards -
OpenSearch Dashboards を使用するには、インデックスパターンが必要です。Dashboards はインデックスパターンを使用して、分析を 1 つまたは複数のインデックスに絞り込みます。
call-center.pyが作成したsupport-callsインデックスと一致させるには、[スタックの管理]、[インデックスパターン] に移動し、support*のインデックスパターンを定義してから、[次のステップ] を選択します。 -
[タイムフィルターフィールド名] で、[タイムスタンプ] を選択します。
-
これで、可視化の作成を開始できます。[可視化] を選択し、新しい視覚化を追加します。
-
円グラフと
support*インデックスパターンを選択します。 -
デフォルトの可視化は基本的です。そこで、より魅力的な視覚化を作成するため、[分割スライス] を選択します。
[集約] で、[用語] を選択します。[フィールド] で、[sentiment.keyword] を選択します。次に、[変更の適用] を選択し、[保存] を選択します。

-
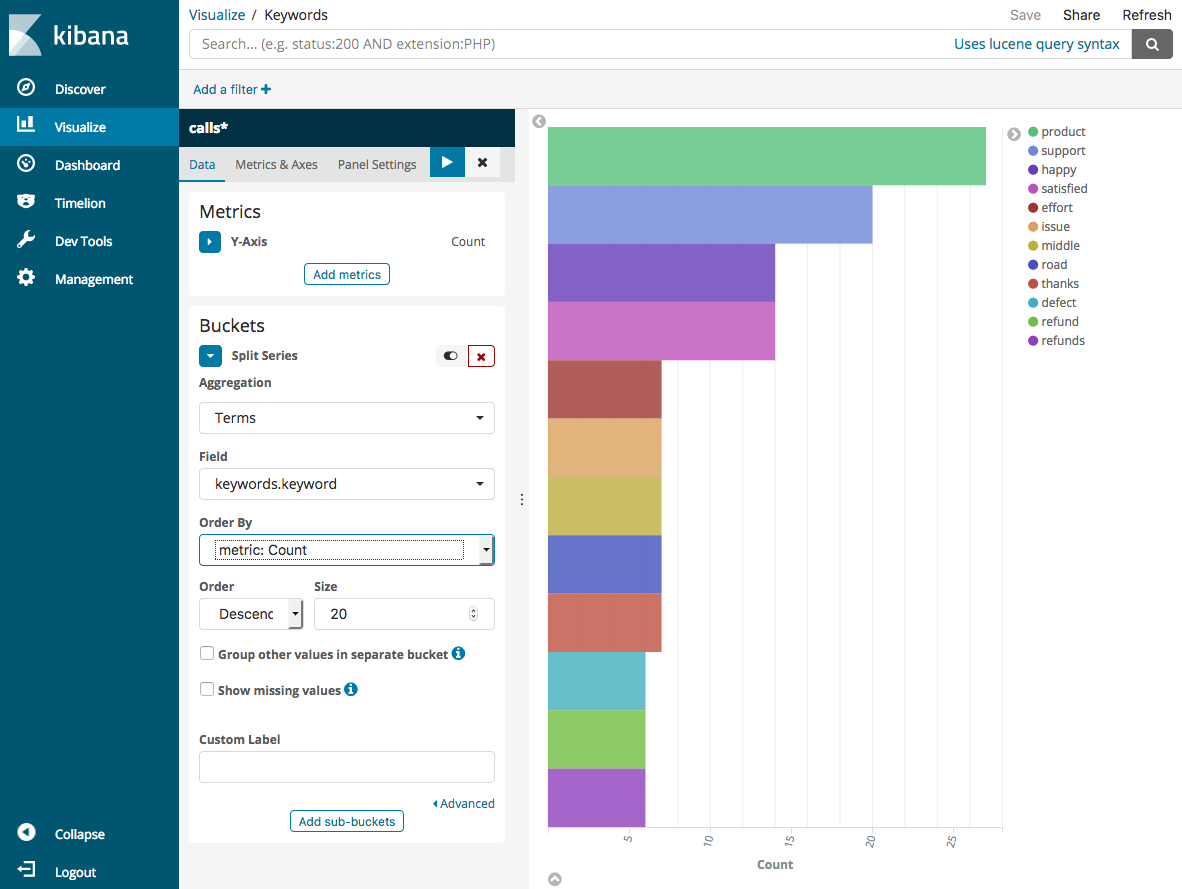
[可視化] ページに戻り、別の可視化を追加します。今回は、水平棒グラフを選択します。
-
[シリーズの分割] を選択します。
[集約] で、[用語] を選択します。[フィールド] で、[keywords.keyword] を選択し、[サイズ] を 20 に変更します。次に、[変更の適用] を選択し、[保存] を選択します。
-
[可視化] ページに戻り、最終的な 1 つの視覚化である垂直棒グラフを追加します。
-
[シリーズの分割] を選択します。[集約] で、[日付ヒストグラム] を選択します。[フィールド] の [タイムスタンプ] を選択し、[間隔] を [日別] に設定します。
-
[メトリクス & 軸] を選択し、[モード] を [法線] に変更します。
-
[変更の適用] を選択し、[保存] を選択します。

-
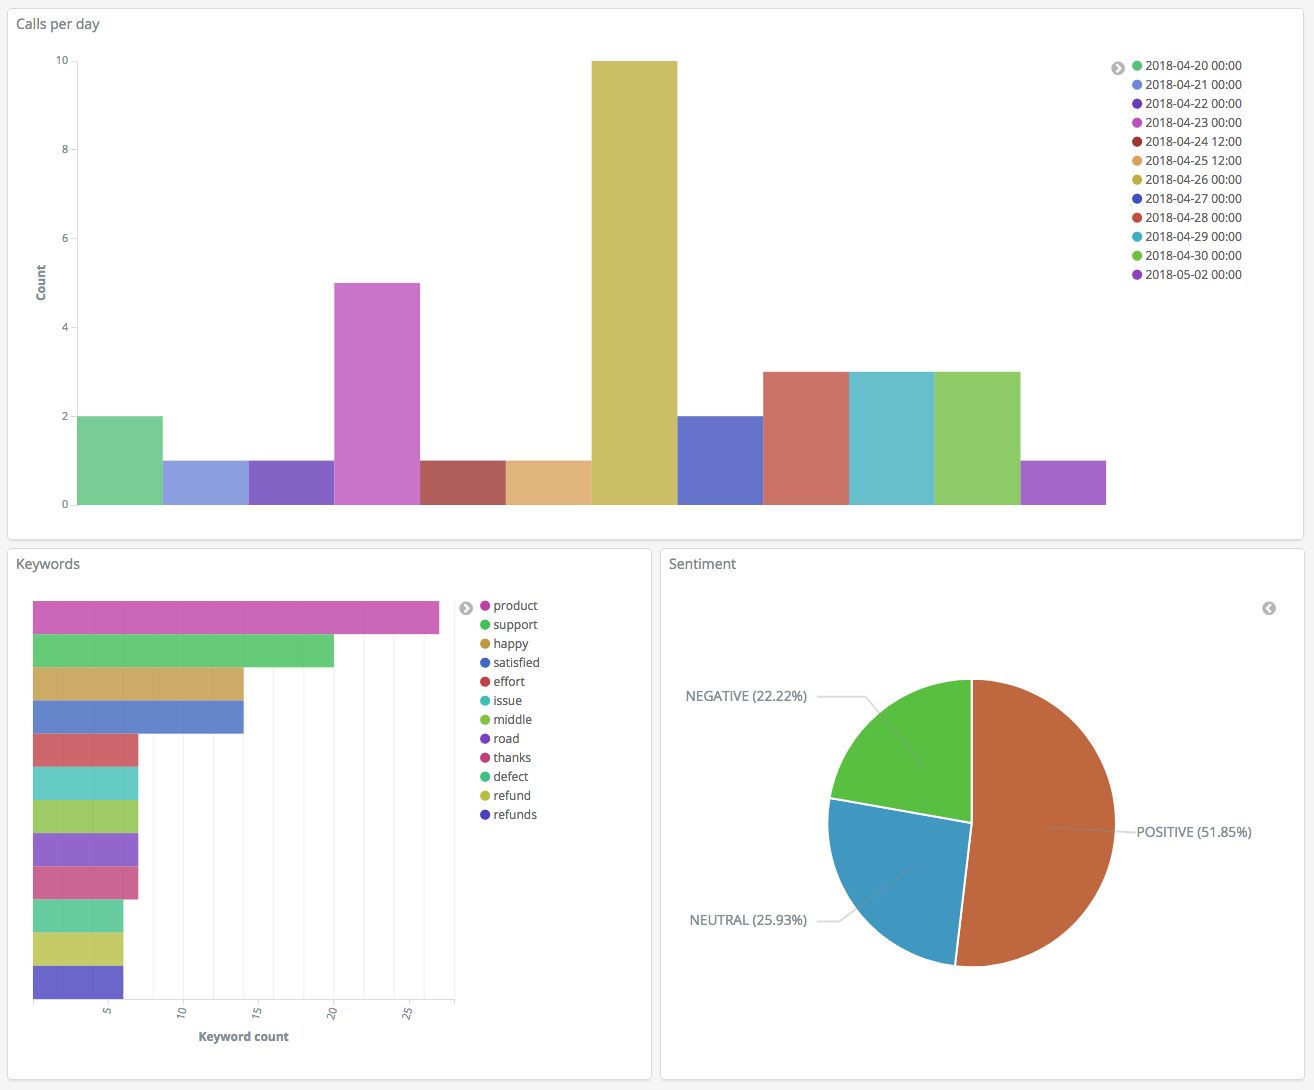
これで 3 つの可視化を作成したので、Dashboards ダッシュボードに追加することができます。[ダッシュボード] を選択し、ダッシュボードを作成して、可視化を追加します。
ステップ 5: リソースのクリーンアップと次のステップ
不要な料金が発生しないようにするため、S3 バケットおよび OpenSearch Service ドメインを削除します。詳細については、Amazon Simple Storage Service ユーザーガイドの「バケットの削除」およびこのガイドの「OpenSearch Service ドメインを削除する」を参照してください。
トランスクリプトは、MP3 ファイルよりもはるかに少ないディスク容量で済みます。MP3 の保持期間を短くする (例えば、通話記録の保持期間を 3 か月から 1 か月にする) ことも、数年間のトランスクリプトを保持することもでき、いずれの場合もストレージコストを低減できます。
また、 AWS Step Functions と Lambda を使用して文字起こしプロセスを自動化したり、インデックス作成前にメタデータを追加したり、正確なユースケースに合わせてより複雑な視覚化を作成したりできます。
