AWS CLI を使用してプライベートサブネットおよび NAT ゲートウェイを持つ VPC を作成する
このチュートリアルでは、AWS CLI を使用して本番環境のサーバーに使用できる VPC を作成する方法を説明します。回復性を高めるには、Auto Scaling グループと Application Load Balancer を使用して、2 つのアベイラビリティーゾーンにサーバーをデプロイします。セキュリティを強化するために、サーバーをプライベートサブネットにデプロイします。サーバーはロードバランサーを介してリクエストを受信し、NAT ゲートウェイを使用してインターネットに接続できます。回復性を高めるには、NAT ゲートウェイを各アベイラビリティーゾーンにデプロイします。
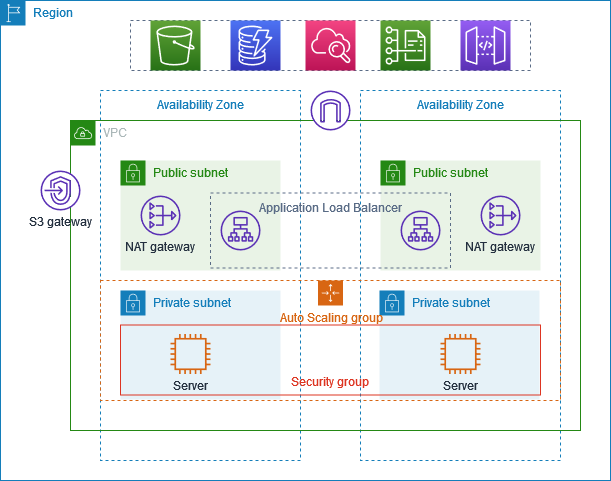
次の図は、このチュートリアルに含まれるリソースの概要を示しています。VPC には、2 つのアベイラビリティーゾーンにパブリックサブネットとプライベートサブネットがあります。各パブリックサブネットには、NAT ゲートウェイとロードバランサーノードが含まれています。サーバーはプライベートサブネットで実行され、Auto Scaling グループを使用して起動および終了し、ロードバランサーからトラフィックを受信します。サーバーは、NAT ゲートウェイを使用してインターネットに接続できます。サーバーは、ゲートウェイ VPC エンドポイントを使用して Amazon S3 に接続できます。
前提条件
このチュートリアルを開始する前に、以下が必要です。
-
VPC リソース、EC2 インスタンス、ロードバランサー、Auto Scaling グループを作成するアクセス許可を持ってインストールおよび設定されている AWS CLI。AWS CLI のインストールについては、「AWS CLI の最新バージョンを使用してインストールまたは更新を行う」を参照してください。
-
サブネット、ルートテーブル、インターネットゲートウェイなど、VPC の概念に関する基本的な知識。
-
jqコマンドライン JSON プロセッサがインストールされている。これは、AWS CLI コマンドの出力を解析するために使用されます。jq のインストールの詳細については、「Download jq」を参照してください。 -
作成するリソースに十分なサービスクォータ。これには以下が含まれます。
-
少なくとも 2 つの使用可能な Elastic IP アドレス
-
少なくとも 2 つの NAT ゲートウェイ
-
少なくとも 1 つの VPC
-
少なくとも 4 つのサブネット
-
少なくとも 1 つの Application Load Balancer
推定コスト: このチュートリアルで作成されたリソースには、AWS アカウントで料金が発生します。NAT ゲートウェイ: 1 時間あたり約 $0.045、およびデータ処理料金 Elastic IP アドレス: 実行中のインスタンスに関連付けられている場合は無料、関連付けられていない場合は 1 時間あたり約 $0.005 EC2 インスタンス: インスタンスタイプ (このチュートリアルでは t3.micro を使用) によって異なる Application Load Balancer: 1 時間あたり約 $0.0225、およびデータ処理料金
VPC およびサブネットを作成する
まず、CIDR ブロックが 10.0.0.0/16 の VPC を作成します。これにより、最大 65,536 個のプライベート IP アドレスが提供されます。
# Create a VPC with CIDR block 10.0.0.0/16
aws ec2 create-vpc --cidr-block 10.0.0.0/16 --tag-specifications 'ResourceType=vpc,Tags=[{Key=Name,Value=ProductionVPC}]'
このコマンドにより、以下のような出力が返されます。
{
    "Vpc": {
        "CidrBlock": "10.0.0.0/16",
        "DhcpOptionsId": "dopt-abcd1234",
        "State": "pending",
        "VpcId": "vpc-abcd1234",
        "OwnerId": "123456789012",
        "InstanceTenancy": "default",
        "Ipv6CidrBlockAssociationSet": [],
        "CidrBlockAssociationSet": [
            {
                "AssociationId": "vpc-cidr-assoc-abcd1234",
                "CidrBlock": "10.0.0.0/16",
                "CidrBlockState": {
                    "State": "associated"
                }
            }
        ],
        "IsDefault": false,
        "Tags": [
            {
                "Key": "Name",
                "Value": "ProductionVPC"
            }
        ]
    }
}
出力の VPC ID を書き留めます (例: vpc-abcd1234)。この ID は後続のコマンドで使用します。
次に、リージョン内の 2 つのアベイラビリティーゾーンを特定して、回復力のあるアーキテクチャを作成します。
# Get available Availability Zones
aws ec2 describe-availability-zones --query 'AvailabilityZones[0:2].ZoneName' --output text
このコマンドにより、以下のような出力が返されます。
us-east-1a us-east-1b
次に、ロードバランサーと NAT ゲートウェイ用の 2 つのパブリックサブネットと、アプリケーションサーバー用の 2 つのプライベートサブネットの 4 つのサブネットを作成します。vpc-abcd1234 を実際の VPC ID に置き換え、us-east-1a および us-east-1b を実際のアベイラビリティーゾーンに置き換えます。
# Create public subnet in first AZ
aws ec2 create-subnet \
  --vpc-id vpc-abcd1234 \
  --cidr-block 10.0.0.0/24 \
  --availability-zone us-east-1a \
  --tag-specifications 'ResourceType=subnet,Tags=[{Key=Name,Value=PublicSubnet1}]'

# Create private subnet in first AZ
aws ec2 create-subnet \
  --vpc-id vpc-abcd1234 \
  --cidr-block 10.0.1.0/24 \
  --availability-zone us-east-1a \
  --tag-specifications 'ResourceType=subnet,Tags=[{Key=Name,Value=PrivateSubnet1}]'

# Create public subnet in second AZ
aws ec2 create-subnet \
  --vpc-id vpc-abcd1234 \
  --cidr-block 10.0.2.0/24 \
  --availability-zone us-east-1b \
  --tag-specifications 'ResourceType=subnet,Tags=[{Key=Name,Value=PublicSubnet2}]'

# Create private subnet in second AZ
aws ec2 create-subnet \
  --vpc-id vpc-abcd1234 \
  --cidr-block 10.0.3.0/24 \
  --availability-zone us-east-1b \
  --tag-specifications 'ResourceType=subnet,Tags=[{Key=Name,Value=PrivateSubnet2}]'
各コマンドは、サブネット ID を含む出力を返します。後続のコマンドで使用するために、これらの ID を書き留めます。
-
パブリックサブネット 1:
subnet-abcd1234 -
プライベートサブネット 1:
subnet-abcd5678 -
パブリックサブネット 2:
subnet-efgh1234 -
プライベートサブネット 2:
subnet-efgh5678
インターネット接続を作成および設定する
このセクションでは、VPC とインターネット間の通信を許可するインターネットゲートウェイを作成し、VPC にアタッチします。
# Create an Internet Gateway
aws ec2 create-internet-gateway --tag-specifications 'ResourceType=internet-gateway,Tags=[{Key=Name,Value=ProductionIGW}]'
コマンドは、インターネットゲートウェイ ID を含む出力を返します。この ID (例: igw-abcd1234) を書き留めます。
VPC にインターネットゲートウェイをアタッチします。igw-abcd1234 を実際のインターネットゲートウェイ ID に置き換え、vpc-abcd1234 を実際の VPC ID に置き換えます。
# Attach the Internet Gateway to the VPC
aws ec2 attach-internet-gateway --internet-gateway-id igw-abcd1234 --vpc-id vpc-abcd1234
次に、パブリックサブネットとプライベートサブネットのルートテーブルを作成します。vpc-abcd1234 を実際の VPC ID に置き換えます。
# Create a route table for public subnets
aws ec2 create-route-table --vpc-id vpc-abcd1234 --tag-specifications 'ResourceType=route-table,Tags=[{Key=Name,Value=PublicRouteTable}]'

# Create route table for private subnet in first AZ
aws ec2 create-route-table --vpc-id vpc-abcd1234 --tag-specifications 'ResourceType=route-table,Tags=[{Key=Name,Value=PrivateRouteTable1}]'

# Create route table for private subnet in second AZ
aws ec2 create-route-table --vpc-id vpc-abcd1234 --tag-specifications 'ResourceType=route-table,Tags=[{Key=Name,Value=PrivateRouteTable2}]'
各コマンドは、ルートテーブル ID を含む出力を返します。以下の ID を書き留めます。
-
パブリックルートテーブル:
rtb-abcd1234 -
プライベートルートテーブル 1:
rtb-efgh1234 -
プライベートルートテーブル 2:
rtb-ijkl1234
インターネットアクセスを有効にするために、パブリックルートテーブルでインターネットゲートウェイにルートを追加します。rtb-abcd1234 を実際のパブリックルートテーブル ID に置き換え、igw-abcd1234 を実際のインターネットゲートウェイ ID に置き換えます。
# Add a route to the Internet Gateway
aws ec2 create-route --route-table-id rtb-abcd1234 --destination-cidr-block 0.0.0.0/0 --gateway-id igw-abcd1234
サブネットをそれぞれのルートテーブルに関連付けます。ルートテーブル ID とサブネット ID を実際の ID に置き換えます。
# Associate public subnets with the public route table
aws ec2 associate-route-table --route-table-id rtb-abcd1234 --subnet-id subnet-abcd1234
aws ec2 associate-route-table --route-table-id rtb-abcd1234 --subnet-id subnet-efgh1234

# Associate private subnets with their respective route tables
aws ec2 associate-route-table --route-table-id rtb-efgh1234 --subnet-id subnet-abcd5678
aws ec2 associate-route-table --route-table-id rtb-ijkl1234 --subnet-id subnet-efgh5678
NAT ゲートウェイを作成する
NAT ゲートウェイは、プライベートサブネットのインスタンスがインターネットや他の AWS サービスに接続できるようにしますが、インターネットからはこれらのインスタンスとの接続を開始できないようにします。まず、NAT ゲートウェイに Elastic IP アドレスを割り当てます。
# Allocate Elastic IP for NAT Gateway in first AZ
aws ec2 allocate-address --domain vpc --tag-specifications 'ResourceType=elastic-ip,Tags=[{Key=Name,Value=NAT1-EIP}]'

# Allocate Elastic IP for NAT Gateway in second AZ
aws ec2 allocate-address --domain vpc --tag-specifications 'ResourceType=elastic-ip,Tags=[{Key=Name,Value=NAT2-EIP}]'
各コマンドは、割り当て ID を含む出力を返します。以下の ID を書き留めます。
-
EIP 1 割り当て ID:
eipalloc-abcd1234 -
EIP 2 割り当て ID:
eipalloc-efgh1234
各パブリックサブネットに NAT ゲートウェイを作成します。サブネット ID と割り当て ID を実際の ID に置き換えます。
# Create NAT Gateway in public subnet of first AZ
aws ec2 create-nat-gateway \
  --subnet-id subnet-abcd1234 \
  --allocation-id eipalloc-abcd1234 \
  --tag-specifications 'ResourceType=natgateway,Tags=[{Key=Name,Value=NAT-Gateway1}]'

# Create NAT Gateway in public subnet of second AZ
aws ec2 create-nat-gateway \
  --subnet-id subnet-efgh1234 \
  --allocation-id eipalloc-efgh1234 \
  --tag-specifications 'ResourceType=natgateway,Tags=[{Key=Name,Value=NAT-Gateway2}]'
各コマンドは、NAT ゲートウェイ ID を含む出力を返します。以下の ID を書き留めます。
-
NAT ゲートウェイ 1:
nat-abcd1234 -
NAT ゲートウェイ 2:
nat-efgh1234
NAT ゲートウェイのプロビジョニングには数分かかります。使用可能になるまで待ってから次に進みます。NAT ゲートウェイ ID を実際の ID に置き換えます。
# Wait for NAT Gateways to be available
aws ec2 wait nat-gateway-available --nat-gateway-ids nat-abcd1234
aws ec2 wait nat-gateway-available --nat-gateway-ids nat-efgh1234
プライベートルートテーブルの NAT ゲートウェイにルートを追加して、プライベートサブネットのインスタンスのインターネットアクセスを有効にします。ルートテーブル ID と NAT ゲートウェイ ID を実際の ID に置き換えます。
# Add route to NAT Gateway 1 in private route table 1
aws ec2 create-route \
  --route-table-id rtb-efgh1234 \
  --destination-cidr-block 0.0.0.0/0 \
  --nat-gateway-id nat-abcd1234

# Add route to NAT Gateway 2 in private route table 2
aws ec2 create-route \
  --route-table-id rtb-ijkl1234 \
  --destination-cidr-block 0.0.0.0/0 \
  --nat-gateway-id nat-efgh1234
Amazon S3 の VPC エンドポイントを作成する
Amazon S3 の VPC エンドポイントを使用すると、プライベートサブネットのインスタンスは NAT ゲートウェイを経由せずに S3 にアクセスできるため、データ転送コストを削減し、ネットワークパフォーマンスが向上します。vpc-abcd1234 を実際の VPC ID に置き換え、ルートテーブル ID を実際の ID に置き換えます。
# Get the prefix list ID for S3 in your region
S3_PREFIX_LIST_ID=$(aws ec2 describe-prefix-lists --filters "Name=prefix-list-name,Values=com.amazonaws.$(aws configure get region).s3" --query 'PrefixLists[0].PrefixListId' --output text)

# Create the VPC endpoint for S3
aws ec2 create-vpc-endpoint \
  --vpc-id vpc-abcd1234 \
  --service-name com.amazonaws.$(aws configure get region).s3 \
  --route-table-ids rtb-efgh1234 rtb-ijkl1234 \
  --tag-specifications 'ResourceType=vpc-endpoint,Tags=[{Key=Name,Value=S3-Endpoint}]'
コマンドは、VPC エンドポイント ID を含む出力を返します。この ID (例: vpce-abcd1234) を書き留めます。
セキュリティグループの設定
セキュリティグループは、インスタンスの仮想ファイアウォールとして機能し、インバウンドトラフィックとアウトバウンドトラフィックを制御します。任意の場所からのインバウンド HTTP トラフィックを許可するロードバランサーのセキュリティグループを作成します。vpc-abcd1234 を実際の VPC ID に置き換えます。
# Create security group for the load balancer
aws ec2 create-security-group \
  --group-name LoadBalancerSG \
  --description "Security group for the load balancer" \
  --vpc-id vpc-abcd1234 \
  --tag-specifications 'ResourceType=security-group,Tags=[{Key=Name,Value=LoadBalancerSG}]'
コマンドは、セキュリティグループ ID を含む出力を返します。この ID (例: sg-abcd1234) を書き留めます。
ロードバランサーへのインバウンド HTTP トラフィックを許可します。sg-abcd1234 を実際のロードバランサーセキュリティグループ ID に置き換えます。
# Allow inbound HTTP traffic from anywhere
aws ec2 authorize-security-group-ingress \
  --group-id sg-abcd1234 \
  --protocol tcp \
  --port 80 \
  --cidr 0.0.0.0/0
ロードバランサーからのインバウンドトラフィックのみを許可するアプリケーションサーバーのセキュリティグループを作成します。vpc-abcd1234 を実際の VPC ID に置き換えます。
# Create security group for the application servers
aws ec2 create-security-group \
  --group-name AppServerSG \
  --description "Security group for the application servers" \
  --vpc-id vpc-abcd1234 \
  --tag-specifications 'ResourceType=security-group,Tags=[{Key=Name,Value=AppServerSG}]'
コマンドは、セキュリティグループ ID を含む出力を返します。この ID (例: sg-efgh1234) を書き留めます。
ロードバランサーセキュリティグループからアプリケーションサーバーへのインバウンド HTTP トラフィックを許可します。sg-efgh1234 を実際のアプリケーションサーバーセキュリティグループ ID に置き換え、sg-abcd1234 を実際のロードバランサーセキュリティグループ ID に置き換えます。
# Allow inbound HTTP traffic from the load balancer security group
aws ec2 authorize-security-group-ingress \
  --group-id sg-efgh1234 \
  --protocol tcp \
  --port 80 \
  --source-group sg-abcd1234
EC2 インスタンスの起動テンプレートを作成する
起動テンプレートには、インスタンスを起動するための設定情報 (AMI ID、インスタンスタイプ、セキュリティグループなど) が含まれています。まず、インスタンスの起動時に実行されるユーザーデータスクリプトを作成します。
cat > user-data.sh << 'EOF'
#!/bin/bash
yum update -y
yum install -y httpd
systemctl start httpd
systemctl enable httpd
echo "<h1>Hello from $(hostname -f) in $(curl -s http://169.254.169.254/latest/meta-data/placement/availability-zone)</h1>" > /var/www/html/index.html
EOF
ユーザーデータスクリプトを base64 でエンコードします。
USER_DATA=$(base64 -w 0 user-data.sh)
最新の Amazon Linux 2 AMI ID を取得します。
# Get the latest Amazon Linux 2 AMI ID
aws ec2 describe-images --owners amazon --filters "Name=name,Values=amzn2-ami-hvm-*-x86_64-gp2" "Name=state,Values=available" --query 'sort_by(Images, &CreationDate)[-1].ImageId' --output text
AMI ID、インスタンスタイプ、セキュリティグループ、ユーザーデータを使用して起動テンプレートを作成します。sg-efgh1234 を実際のアプリケーションサーバーのセキュリティグループ ID に置き換え、$AMI_ID と $USER_DATA を前のコマンドで取得した値に置き換えます。
# Create a launch template
aws ec2 create-launch-template \
  --launch-template-name AppServerTemplate \
  --version-description "Initial version" \
  --tag-specifications 'ResourceType=launch-template,Tags=[{Key=Name,Value=AppServerTemplate}]' \
  --launch-template-data '{
    "NetworkInterfaces": [{
      "DeviceIndex": 0,
      "Groups": ["sg-efgh1234"],
      "DeleteOnTermination": true
    }],
    "ImageId": "ami-abcd1234",
    "InstanceType": "t3.micro",
    "UserData": "IyEvYmluL2Jhc2gKeXVtIHVwZGF0ZSAteQp5dW0gaW5zdGFsbCAteSBodHRwZApzeXN0ZW1jdGwgc3RhcnQgaHR0cGQKc3lzdGVtY3RsIGVuYWJsZSBodHRwZAplY2hvICI8aDE+SGVsbG8gZnJvbSAkKGhvc3RuYW1lIC1mKSBpbiAkKGN1cmwgLXMgaHR0cDovLzE2OS4yNTQuMTY5LjI1NC9sYXRlc3QvbWV0YS1kYXRhL3BsYWNlbWVudC9hdmFpbGFiaWxpdHktem9uZSk8L2gxPiIgPiAvdmFyL3d3dy9odG1sL2luZGV4Lmh0bWw=",
    "TagSpecifications": [{
      "ResourceType": "instance",
      "Tags": [{
        "Key": "Name",
        "Value": "AppServer"
      }]
    }]
  }'
ロードバランサーおよびターゲットグループを作成する
ターゲットグループは、指定したプロトコルとポートを使用して、EC2 インスタンスなどの登録済みターゲットにリクエストをルーティングします。アプリケーションサーバーのターゲットグループを作成します。vpc-abcd1234 を実際の VPC ID に置き換えます。
# Create a target group
aws elbv2 create-target-group \
  --name AppTargetGroup \
  --protocol HTTP \
  --port 80 \
  --vpc-id vpc-abcd1234 \
  --target-type instance \
  --health-check-protocol HTTP \
  --health-check-path / \
  --health-check-port traffic-port
コマンドは、ターゲットグループ ARN を含む出力を返します。この ARN (例: arn:aws:elasticloadbalancing:us-east-1:123456789012:targetgroup/AppTargetGroup/abcd1234) を書き留めます。
パブリックサブネットに Application Load Balancer を作成します。サブネット ID とセキュリティグループ ID を実際の ID に置き換えます。
# Create a load balancer
aws elbv2 create-load-balancer \
  --name AppLoadBalancer \
  --subnets subnet-abcd1234 subnet-efgh1234 \
  --security-groups sg-abcd1234 \
  --tags Key=Name,Value=AppLoadBalancer
コマンドは、ロードバランサー ARN を含む出力を返します。この ARN (例: arn:aws:elasticloadbalancing:us-east-1:123456789012:loadbalancer/app/AppLoadBalancer/abcd1234) を書き留めます。
ロードバランサーがアクティブになるまで待ってから次に進みます。arn:aws:elasticloadbalancing:us-east-1:123456789012:loadbalancer/app/AppLoadBalancer/abcd1234 を実際のロードバランサー ARN に置き換えます。
# Wait for load balancer to be active
aws elbv2 wait load-balancer-available \
  --load-balancer-arns arn:aws:elasticloadbalancing:us-east-1:123456789012:loadbalancer/app/AppLoadBalancer/abcd1234
HTTP トラフィックをターゲットグループに転送するロードバランサーのリスナーを作成します。ロードバランサー ARN とターゲットグループ ARN を実際の ARN に置き換えます。
# Create a listener
aws elbv2 create-listener \
  --load-balancer-arn arn:aws:elasticloadbalancing:us-east-1:123456789012:loadbalancer/app/AppLoadBalancer/abcd1234 \
  --protocol HTTP \
  --port 80 \
  --default-actions Type=forward,TargetGroupArn=arn:aws:elasticloadbalancing:us-east-1:123456789012:targetgroup/AppTargetGroup/abcd1234
Auto Scaling グループを作成する
Auto Scaling グループには、自動スケーリングと管理の目的で論理グループとして扱われる EC2 インスタンスの集合が含まれます。起動テンプレートを使用し、プライベートサブネットにインスタンスを配置する Auto Scaling グループを作成します。サブネット ID とターゲットグループ ARN を実際の ID と ARN に置き換えます。
# Create an Auto Scaling group
aws autoscaling create-auto-scaling-group \
  --auto-scaling-group-name AppAutoScalingGroup \
  --launch-template LaunchTemplateName=AppServerTemplate,Version='$Latest' \
  --min-size 2 \
  --max-size 4 \
  --desired-capacity 2 \
  --vpc-zone-identifier "subnet-abcd5678,subnet-efgh5678" \
  --target-group-arns arn:aws:elasticloadbalancing:us-east-1:123456789012:targetgroup/AppTargetGroup/abcd1234 \
  --health-check-type ELB \
  --health-check-grace-period 300 \
  --tags Key=Name,Value=AppServer,PropagateAtLaunch=true
設定をテストする
Auto Scaling グループがインスタンスを起動し、ヘルスチェックに合格したら、ロードバランサーをテストできます。ロードバランサーの DNS 名を取得します。ロードバランサー ARN を実際の ARN に置き換えます。
# Get the DNS name of the load balancer
aws elbv2 describe-load-balancers \
  --load-balancer-arns arn:aws:elasticloadbalancing:us-east-1:123456789012:loadbalancer/app/AppLoadBalancer/abcd1234 \
  --query 'LoadBalancers[0].DNSName' \
  --output text)
curl を使用して、ロードバランサー名でアプリケーションをテストします。
curl http://LoadBalancerName
ページを複数回更新すると、異なるアベイラビリティーゾーンの異なるインスタンスからのレスポンスが表示されます。
リソースをクリーンアップする
このチュートリアルを終了したら、料金が発生しないようにすべてのリソースを削除する必要があります。すべての ID を実際のリソース ID に置き換えます。
# Delete the Auto Scaling group
aws autoscaling delete-auto-scaling-group \
  --auto-scaling-group-name AppAutoScalingGroup \
  --force-delete

# Wait for the Auto Scaling group to be deleted
sleep 60

# Delete the load balancer
aws elbv2 delete-load-balancer \
  --load-balancer-arn arn:aws:elasticloadbalancing:us-east-1:123456789012:loadbalancer/app/AppLoadBalancer/abcd1234

# Wait for the load balancer to be deleted
sleep 30

# Delete the target group
aws elbv2 delete-target-group \
  --target-group-arn arn:aws:elasticloadbalancing:us-east-1:123456789012:targetgroup/AppTargetGroup/abcd1234

# Delete the launch template
aws ec2 delete-launch-template \
  --launch-template-name AppServerTemplate

# Delete the NAT Gateways
aws ec2 delete-nat-gateway --nat-gateway-id nat-abcd1234
aws ec2 delete-nat-gateway --nat-gateway-id nat-efgh1234

# Wait for the NAT Gateways to be deleted
sleep 90

# Release the Elastic IPs
aws ec2 release-address --allocation-id eipalloc-abcd1234
aws ec2 release-address --allocation-id eipalloc-efgh1234

# Delete the VPC endpoint
aws ec2 delete-vpc-endpoints --vpc-endpoint-ids vpce-abcd1234

# Wait for security group dependencies to clear
sleep 30

# Delete the security groups
aws ec2 delete-security-group --group-id sg-efgh1234
aws ec2 delete-security-group --group-id sg-abcd1234

# Detach the Internet Gateway
aws ec2 detach-internet-gateway --internet-gateway-id igw-abcd1234 --vpc-id vpc-abcd1234

# Delete the Internet Gateway
aws ec2 delete-internet-gateway --internet-gateway-id igw-abcd1234

# Delete the route tables
aws ec2 delete-route-table --route-table-id rtb-efgh1234
aws ec2 delete-route-table --route-table-id rtb-ijkl1234
aws ec2 delete-route-table --route-table-id rtb-abcd1234

# Delete the subnets
aws ec2 delete-subnet --subnet-id subnet-abcd1234
aws ec2 delete-subnet --subnet-id subnet-efgh1234
aws ec2 delete-subnet --subnet-id subnet-abcd5678
aws ec2 delete-subnet --subnet-id subnet-efgh5678

# Delete the VPC
aws ec2 delete-vpc --vpc-id vpc-abcd1234
次のステップ
プライベートサブネットと NAT ゲートウェイを持つ VPC を作成したので、次の関連トピックを確認しましょう。
