OAuth 2.0 authentication
You can connect Amazon Q to Confluence (Cloud) using OAuth 2.0 authentication credentials. The following procedures give you an overview of how to configure Confluence (Cloud) to connect to Amazon Q using OAuth 2.0 authentication.
Steps to configure Confluence (Cloud) OAuth 2.0 authentication
Step 1: Retrieving username and Confluence (Cloud) URL
To connect Confluence (Cloud) to Amazon Q, you need your Confluence (Cloud) username and your Confluence (Cloud) URL. The following procedure shows you how to retrieve these.
Retrieving username and Confluence (Cloud) URL
-
Log in to your account from the Confluence (Cloud)
. Note the username you logged in with. You will need this later to connect to Amazon Q. -
From your Confluence (Cloud) home page, note your Confluence (Cloud) URL from your Confluence browser URL. For example:
https://example.atlassian.net. You will need this later to both configure your OAuth 2.0 token and connect to Amazon Q.
Step 2: Configuring an OAuth 2.0 app integration
To connect Confluence (Cloud) to Amazon Q using OAuth 2.0 authentication, you need to create a Confluence (Cloud) OAuth 2.0 app with the necessary permissions. The following procedure shows you how to create this.
Configuring an OAuth 2.0 app integration
-
Log in to your account from the Atlassian Developer page
. -
Select the profile icon from the top-right corner. Then, from the dropdown menu that opens, select Developer Console.

-
From the Welcome page, select Create and then select OAuth 2.0 integration.

-
On the Create a new OAuth 2.0 (3LO) integration page, for Name, enter a name for the OAuth 2.0 application you are creating. Then, select the I agree to be bound by Atlassian's developer terms checkbox, and select Create.
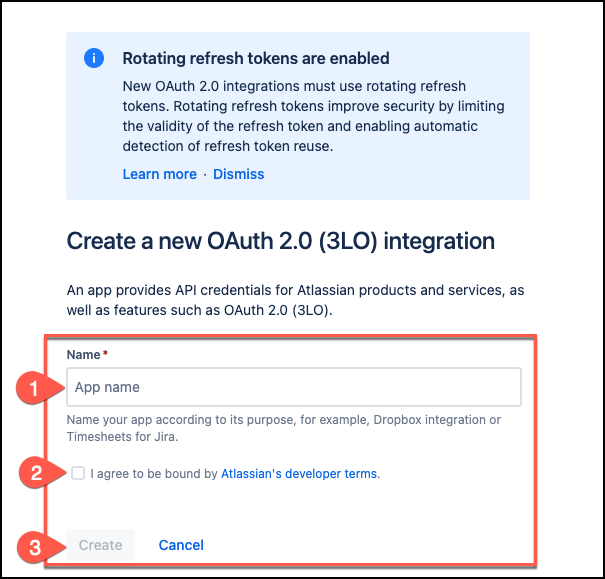
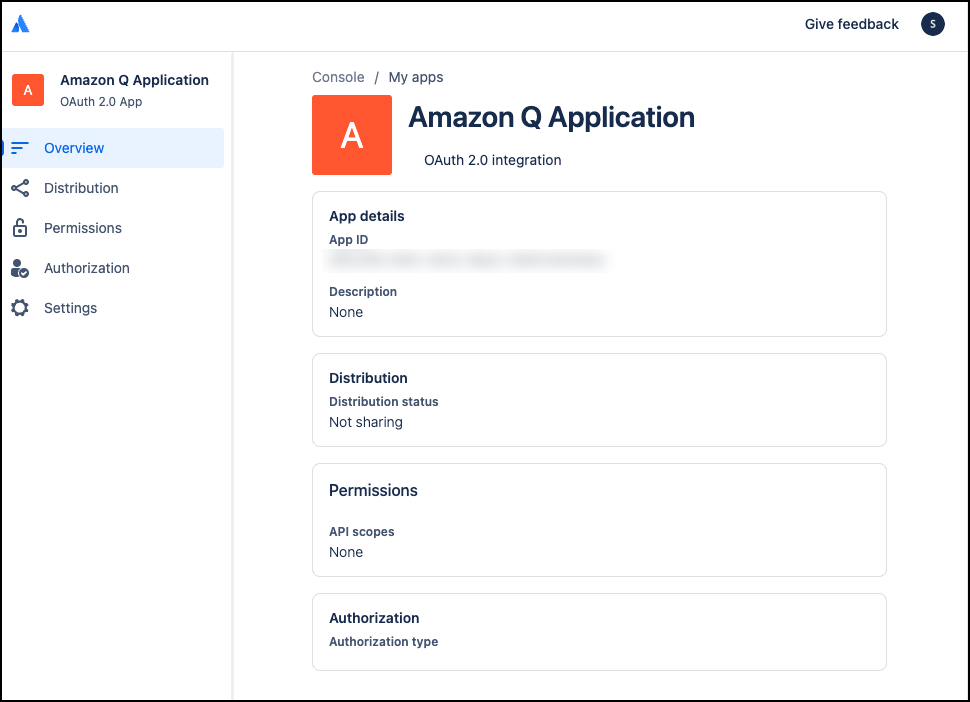
The console will display a summary page outlining the details of the OAuth 2.0 app created.
-
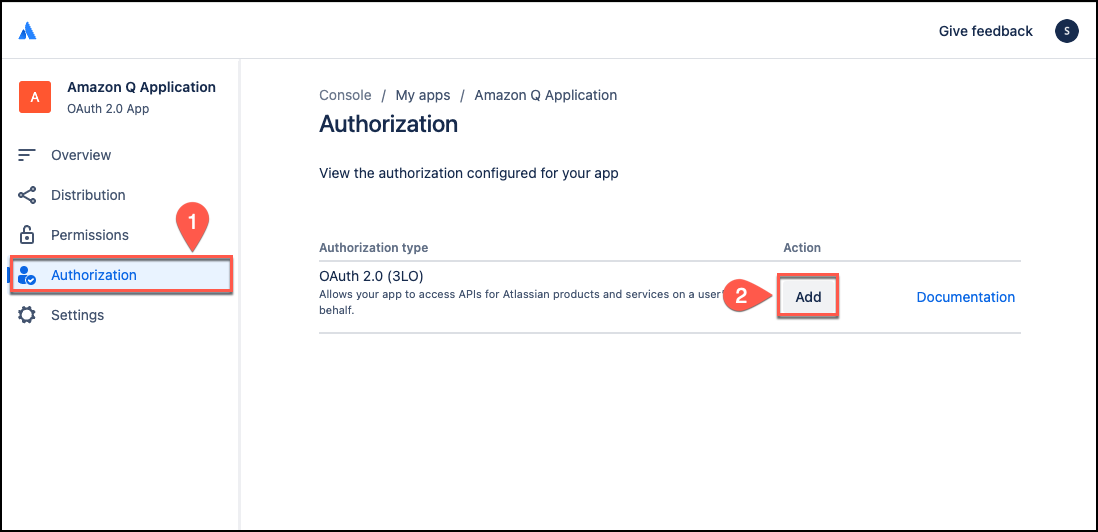
From the left navigation menu, choose Authorization.
-
From the Authorization page, choose Add to add OAuth 2.0 (3LO) to your app.
-
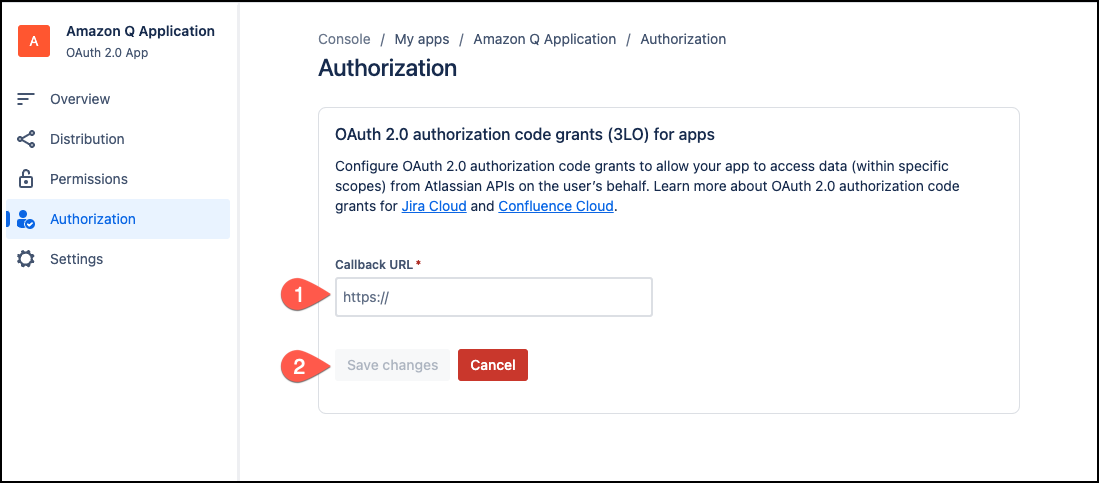
On the OAuth 2.0 authorization code grants (3LO) for apps, enter the Confluence (Cloud) URL you copied as the Callback URL and then choose Save changes.
-
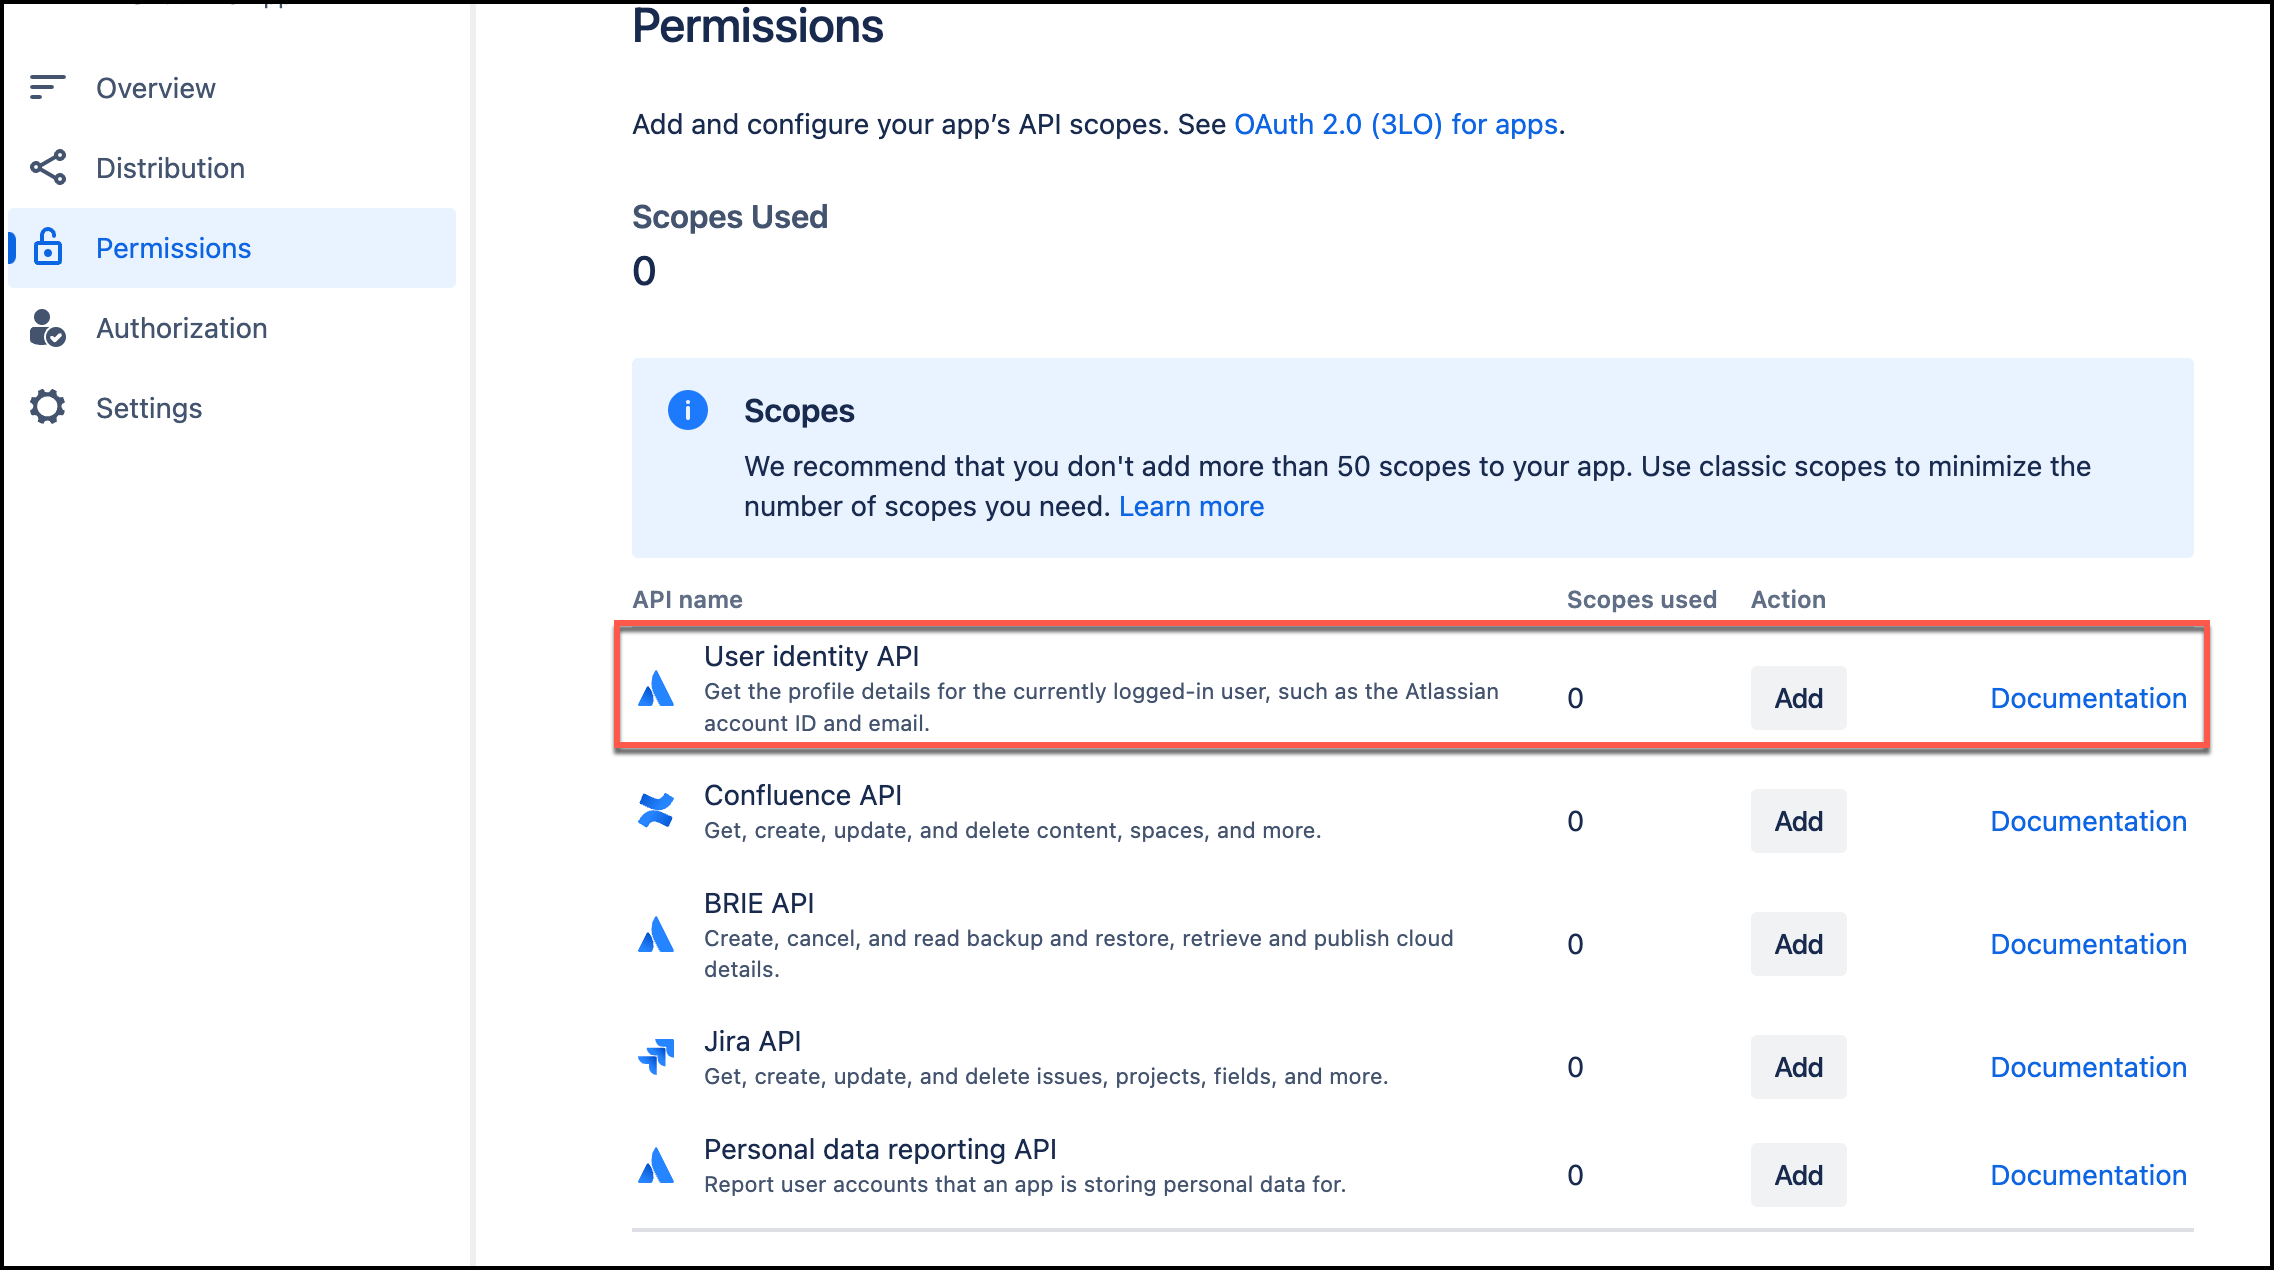
From the Authorization URL generator section that appears, choose Add APIs to add APIs to your app. This will redirect you to the Permissions page.
-
On the Permissions page, for Scopes, navigate to User Identity API. Select Add, and then select Configure.
-
On the User Identity API page, choose Edit Scopes, and the add the following
readscopes:-
read:me– View active user profile -
read:account– View user profiles
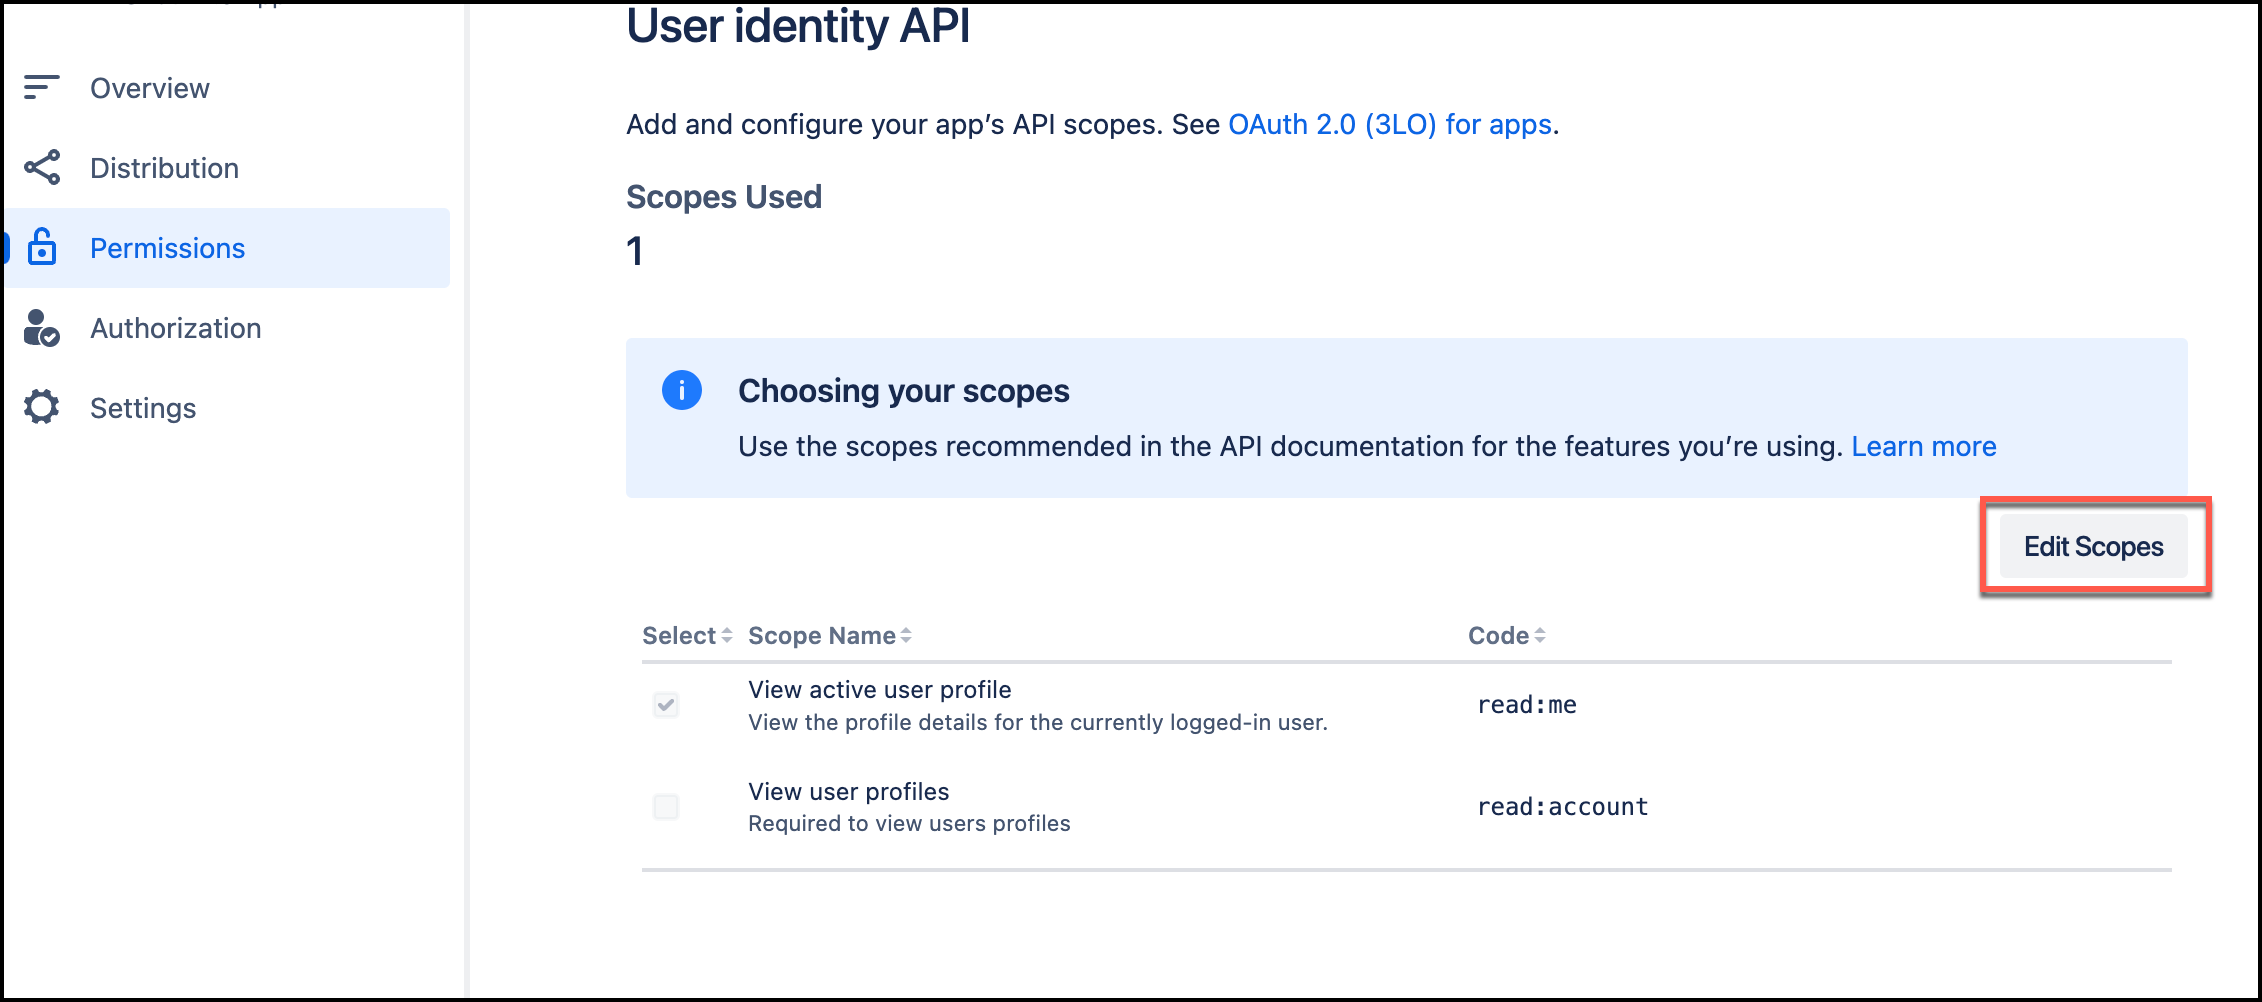
Then, select Save.
-
-
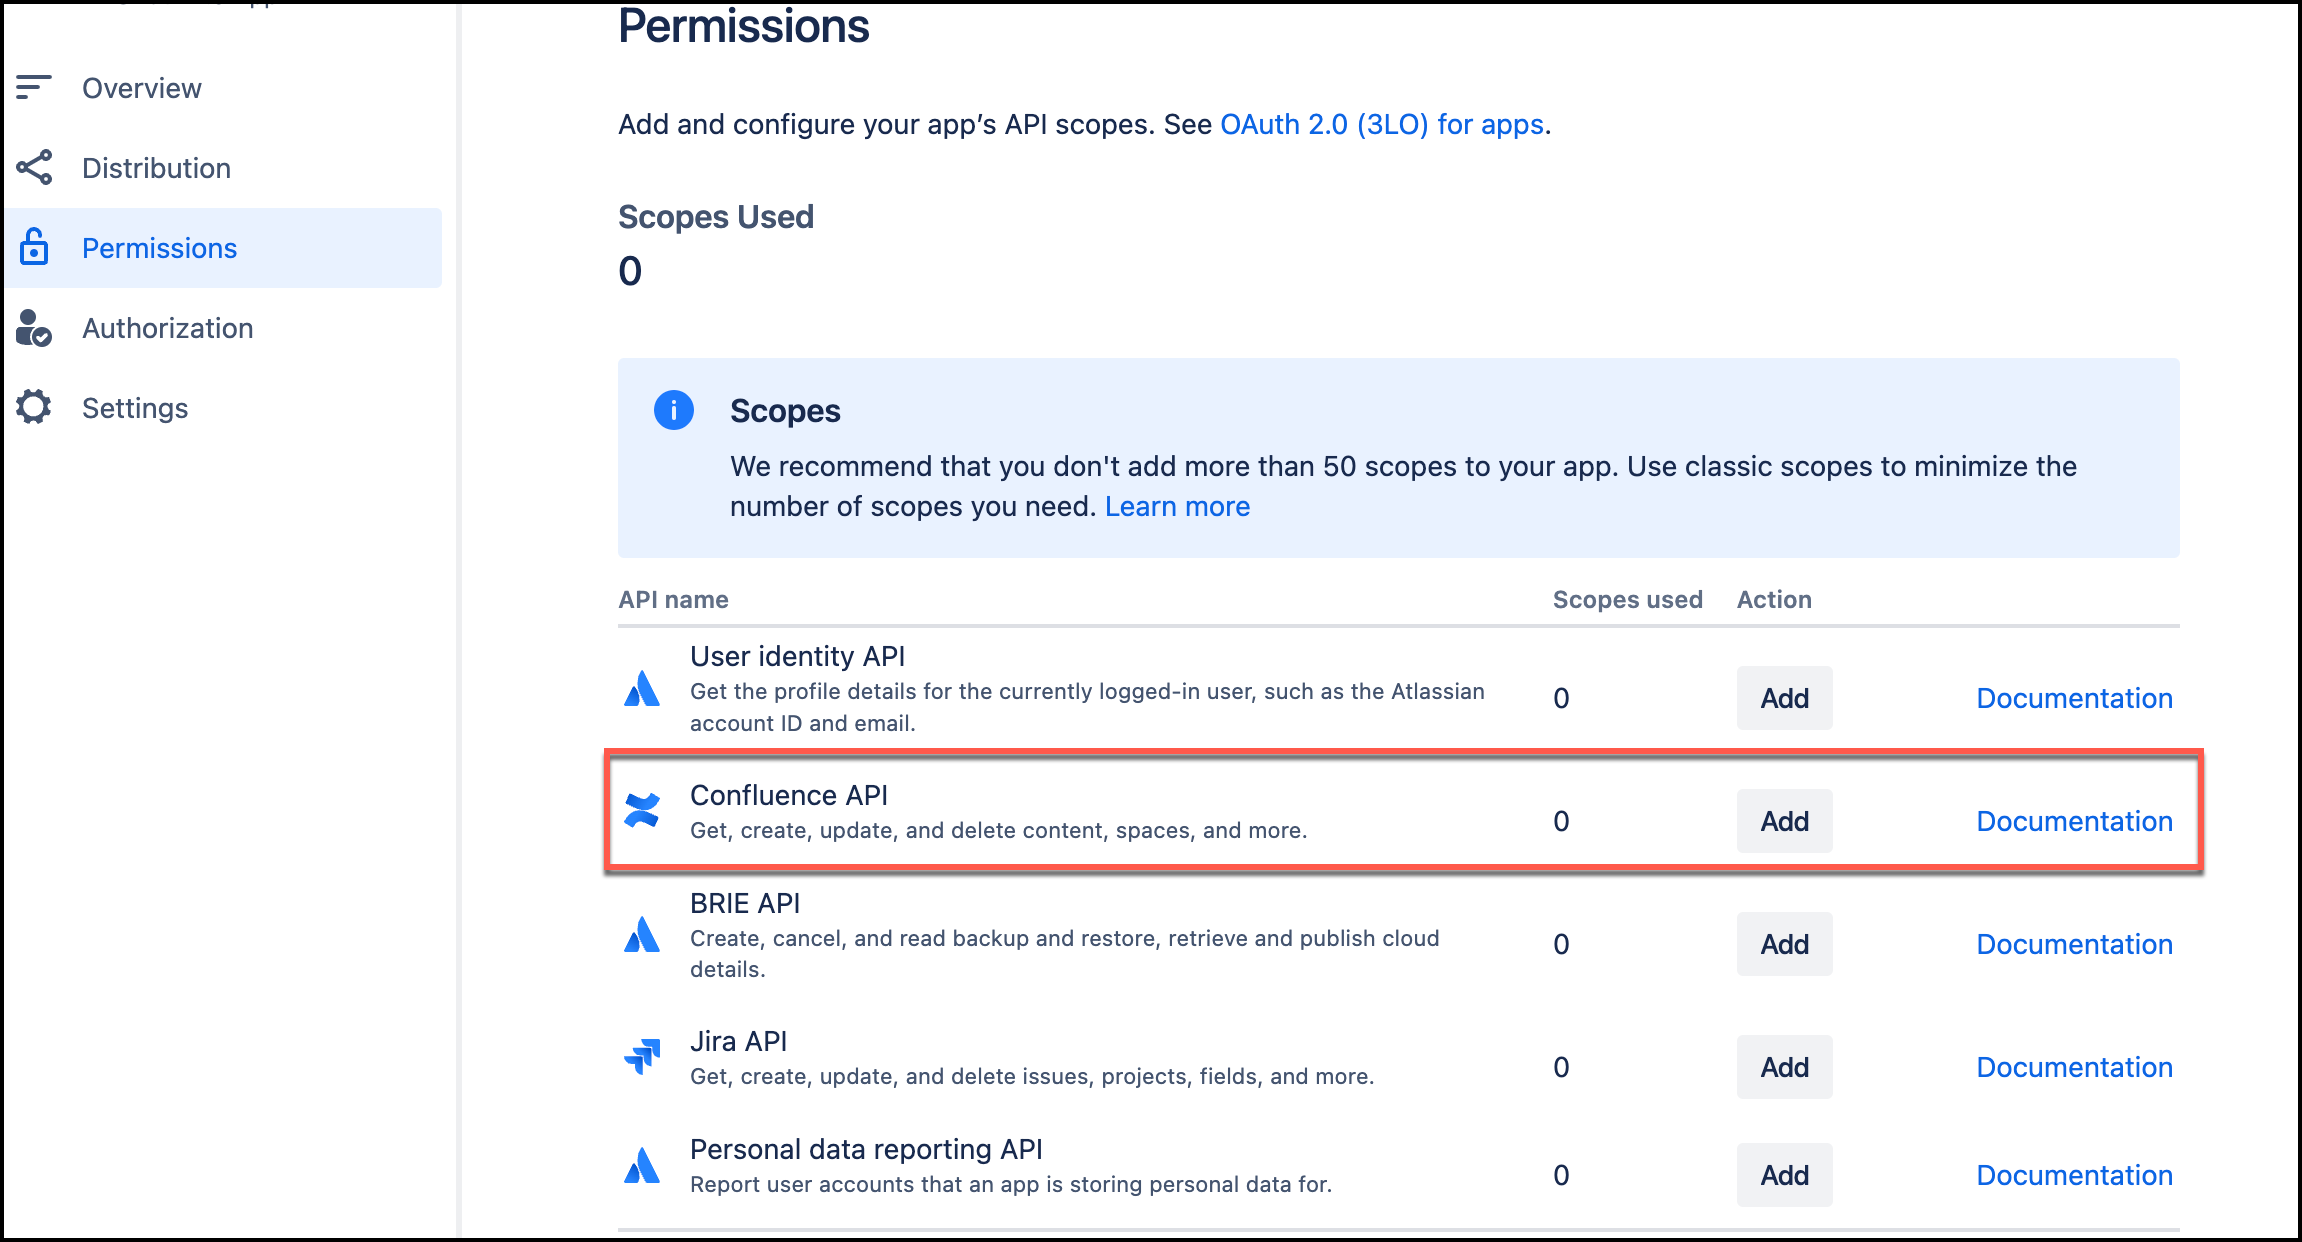
Return to the Permissions page. From Scopes, navigate to Confluence API. Select Add, and the select Configure.
-
Navigate to the Granular scopes page.
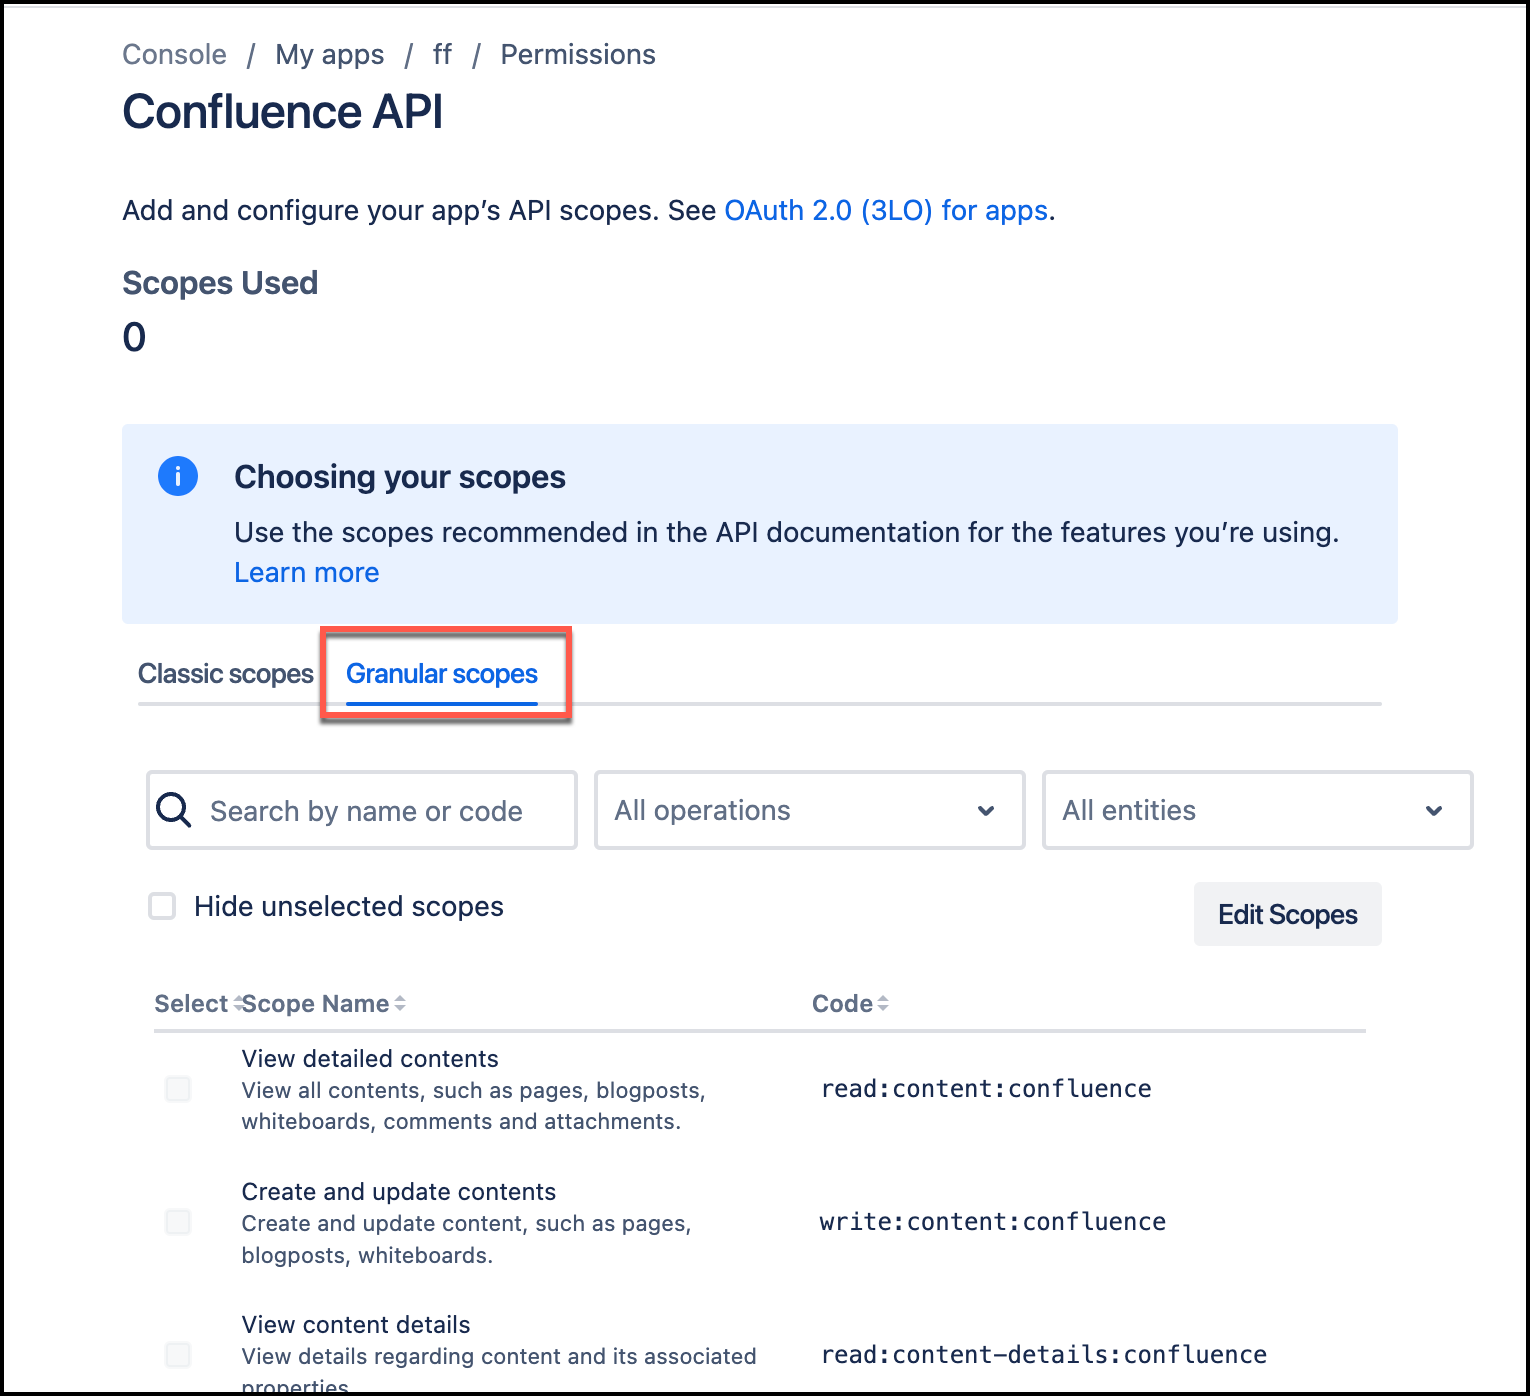
Then, choose Edit Scopes, and the add the following
readscopes:-
read:content:confluence– View detailed contents -
read:content-details:confluence– View content details -
read:space-details:confluence– View space details -
read:audit-log:confluence– View audit records -
read:page:confluence– View pages -
read:attachment:confluence– View and download content attachments -
read:blogpost:confluence– View blogposts -
read:custom-content:confluence– View custom content -
read:comment:confluence– View comments -
read:template:confluence– View content templates -
read:label:confluence– View labels -
read:watcher:confluence– View content watchers -
read:group:confluence– View groups -
read:relation:confluence– View entity relationships -
read:user:confluence– View user details -
read:configuration:confluence– View Confluence settings -
read:space:confluence– View space details -
read:space.permission:confluence– View space permissions -
read:space.property:confluence– View space properties -
read:user.property:confluence– View user properties -
read:space.setting:confluence– View space settings -
read:analytics.content:confluence– View analytics for content -
read:content.permission:confluence– Check content permissions -
read:content.property:confluence– View content properties -
read:content.restriction:confluence– View content restrictions -
read:content.metadata:confluence– View content summaries -
read:inlinetask:confluence– View tasks -
read:task:confluence– View tasks -
read:permission:confluence– View content restrictions and space permissions -
read:whiteboard:confluence– View whiteboards -
read:app-data:confluence– Read app data -
(Optional)
read:database:confluence– Read database -
(Optional)
read:embed:confluence– Read embeddings -
(Optional)
read:folder:confluence– Read folders -
(Optional)
read:email-address:confluence– Read email addresses
Then, select Save.
-
For more information, see Implementing OAuth 2.0 (3LO)
Atlassian Admin Authentication
To ensure Amazon Q can access all user and group information from your Confluence (Cloud) instance, you must provide Atlassian admin credentials. These credentials allow Amazon Q to sync user information regardless of individual email visibility settings.
Get your Atlassian admin credentials
-
Sign in to the Atlassian admin portal
with administrator permissions. -
Open the Administration app for your organization. The URL should look like:
https://admin.atlassian.com/o/{ORGANIZATION-UUID}/overview -
Choose Settings, then choose API Keys.
-
Choose Create API key\
-
Select all available scopes for the API key.
Note that the Confluence APIs that fetch user and group information require full scope access.
-
Copy and save both the Organization ID and API Key. Note that API keys expire. Monitor the expiration date and update your data source credentials before the key expires.
Get your Directory ID
-
Use the Atlassian Admin Workspace API to get your Directory ID. Run the following command:
curl --request POST \ --url 'https://api.atlassian.com/admin/v2/orgs/{ORGANIZATION-ID}/workspaces' \ --header 'Authorization: Bearer {API-KEY}' \ --header 'Accept: application/json' \ --header 'Content-Type: application/json' -
In the API response, find the workspace entry that matches your Confluence Cloud instance. Look for
"type":
                                        "Confluence"
. Verify the workspace name matches your instance and then copy the directory value from the attributes section. If your instance isn't listed, use the pagination cursor in thelinks.nextfield to view additional pages.curl --request POST \ --url 'https://api.atlassian.com/admin/v2/orgs/{ORGANIZATION-ID}/workspaces' \ --header 'Authorization: Bearer {API-KEY}' \ --header 'Accept: application/json' \ --header 'Content-Type: application/json' \ --data '{"cursor": "{NEXT-PAGE-TOKEN}"}'
Creating your Confluence data source
When creating your Confluence Cloud data source, provide these three values in your AWS Secrets Manager secret:
-
Admin API Key
-
Organization ID
-
Directory ID
For more information about Atlassian admin API scopes, see Atlassian API
scopes documentation
For API details, see Atlassian Admin Workspace API reference
Updating your Confluence data source
To update an existing Confluence Cloud data source with new admin credentials, add the following key pairs to your AWS Secrets Manager secret:
-
adminApiKey, {Admin API Key}
-
organizationId, {Organization ID}
-
directoryId, {Directory ID}
For more information about Atlassian admin API scopes, see Atlassian API
scopes documentation
For API details, see Atlassian Admin Workspace API reference
Step 3: Retrieving Confluence (Cloud) client ID and client Secret
To connect Confluence (Cloud) to Amazon Q using OAuth 2.0 authentication, you need to provide a Confluence (Cloud) client ID and client secret. The following procedure shows you how to retrieve these.
Note
You must create an OAuth 2.0 app before you can retrieve the client ID and client secret. See Configuring an OAuth 2.0 app integration for more details.
Retrieving Confluence (Cloud) client ID and client secret
-
From the left navigation menu, choose Settings. Then, scroll down to Authentication details section and copy and save the following in a text editor of your choice:
-
Client ID – You will enter this as App key in the Amazon Q console.
-
Client Secret – You will enter this as App secret in the Amazon Q console.

You will need these to generate your Confluence (Cloud) OAuth 2.0 token and also to connect Amazon Q to Confluence (Cloud).
-
For more information, see Implementing OAuth 2.0 (3LO)
Step 4: Generating an Confluence (Cloud) access token
To connect Confluence (Cloud) to Amazon Q, you need to generate an access token. The following procedure outlines how to generate an access token in Confluence (Cloud).
Generating your Confluence (Cloud) access token
-
Log in to your account from the Atlassian Developer page
. -
Open the OAuth 2.0 app you want to generate a refresh token for.
-
From the left navigation menu, choose Authorization again. Then, for OAuth 2.0 (3LO), choose Configure.
-
From the Authorization page, from Authorization URL generator, from Granular Confluence API authorization URL, copy the URL and save it in a text editor of your choice.

The URL is of the following format:
https://auth.atlassian.com/authorize? audience=api.atlassian.com &client_id=YOUR_CLIENT_ID&scope=REQUESTED_SCOPE%20REQUESTED_SCOPE_TWO&redirect_uri=https://YOUR_APP_CALLBACK_URL&state=YOUR_USER_BOUND_VALUE&response_type=code &prompt=consent -
In the saved authorization URL, update the
state=${YOUR_USER_BOUND_VALUE}parameter value to any text of your choice. For example,state=sample_text.For more information, see What is the state parameter used for?
in Atlassian Support. -
Open a web browser of your choice. Then, paste the authorization URL you copied into the browser URL. On the page that opens up, make sure everything is correct and then select Accept.
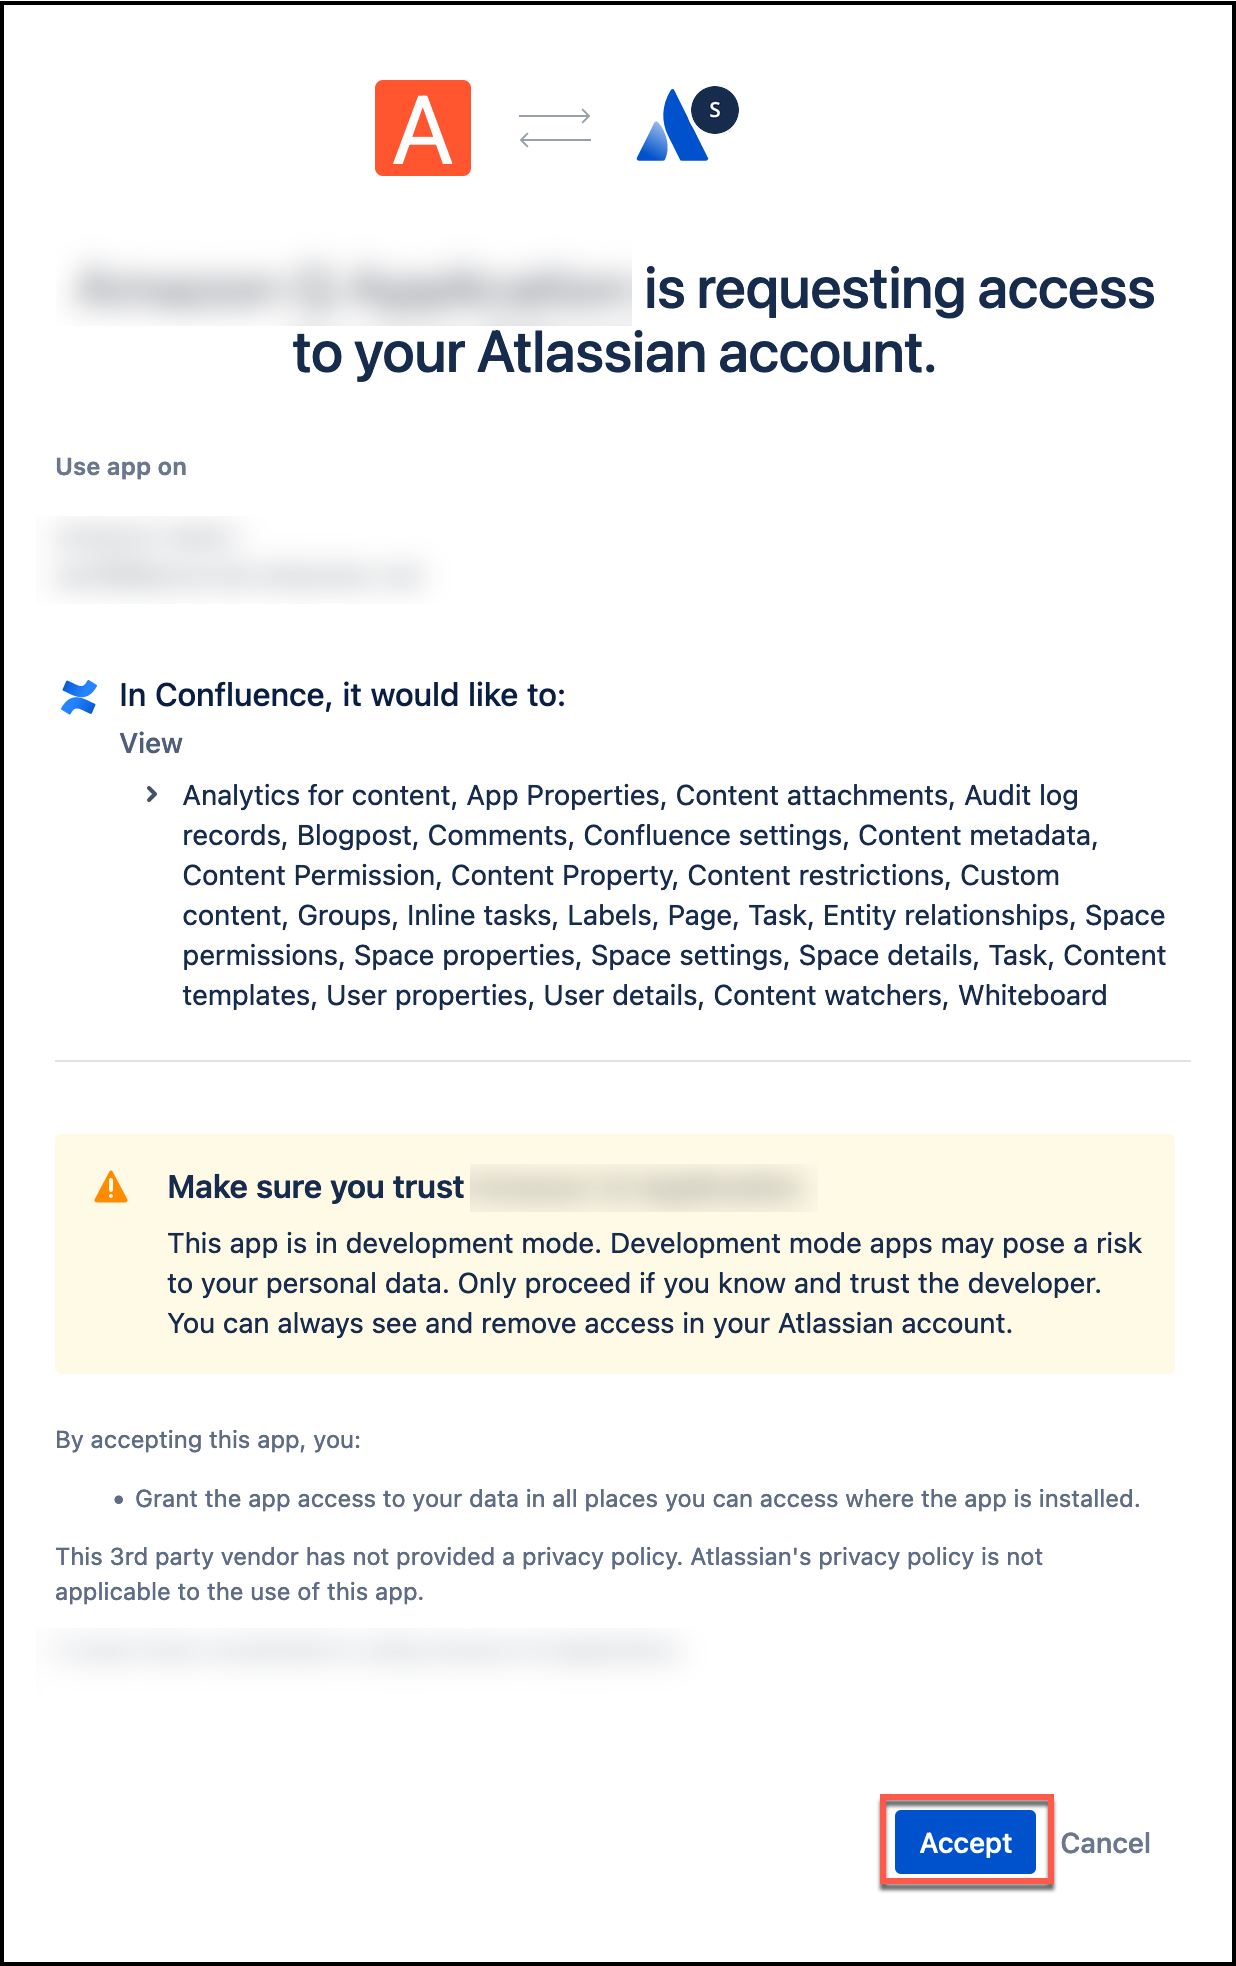
You will be returned to your Confluence (Cloud) home page.
-
Copy the URL of the Confluence (Cloud) home page and save it in a text editor of your choice. The URL contains the authorization code for your application. You will need this code to generate your Confluence (Cloud) access token. The whole section after
code=is the authorization code. -
Navigate to Postman.
If you don't have Postman, you can also choose to use cURL to generate a Confluence (Cloud) access token. Use the following cURL command to do so:
curl --location 'https://auth.atlassian.com/oauth/token' \ --header 'Content-Type: application/json' \ --data '{"grant_type": "authorization_code", "client_id": "YOUR_CLIENT_ID", "client_secret": "YOUR_CLIENT_SECRET", "code": "AUTHORIZATION_CODE", "redirect_uri": "YOUR_CALLBACK_URL"}' -
On the Postman home page, select
POSTas the method, and then enter the following URL in the Enter URL or paste text box:https://auth.atlassian.com/oauth/token. -
Then, select Body from the menu, and select raw JSON.
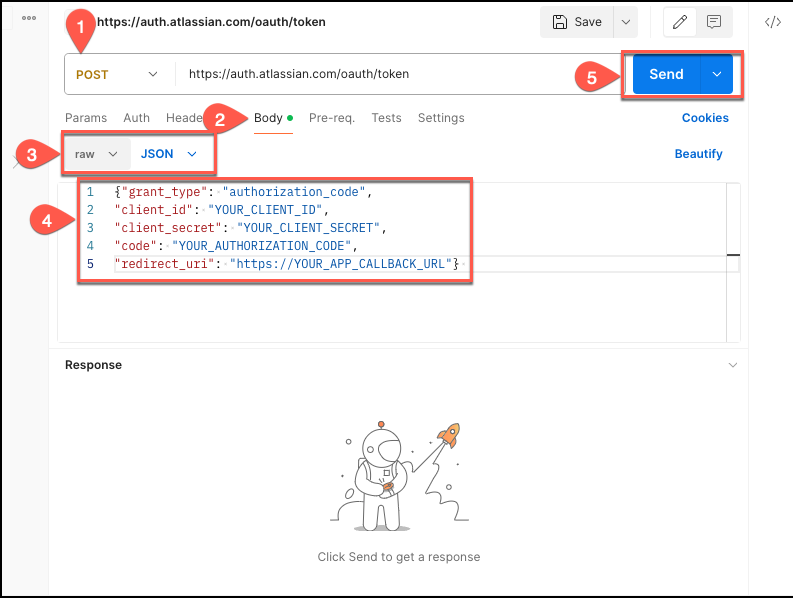
-
In the text box, enter the following code extract, replacing the fields with your credential values:
{"grant_type": "authorization_code", "client_id": "YOUR_CLIENT_ID", "client_secret": "YOUR_CLIENT_SECRET", "code": "YOUR_AUTHORIZATION_CODE", "redirect_uri": "https://YOUR_APP_CALLBACK_URL"} -
Then, select Send. If everything is configured correctly, Postman will return an
access-token. Copy the access token and save it using a text editor of your choice. You will need it to connect Confluence (Cloud) to Amazon Q.
For more information, see Implementing OAuth 2.0 (3LO)
Step 5: Generating a Confluence (Cloud) refresh token
The access token you use to connect Confluence (Cloud) to Amazon Q using OAuth 2.0 authentication expires after 1 hour. When it does, you can either repeat the whole authorization process and generate a new access token. Or, you can choose to generate a refresh token. You can use the refresh token to regenerate a new access token when an existing access token expires.
To do this, you add a %20offline_access parameter to the end of
the scope value in the authorization URL you used to generate your
access token. The following procedure shows you how to generate a refresh
token.
Generating an Confluence (Cloud) refresh token
-
Log in to your account from the Atlassian Developer page
. -
Open the OAuth 2.0 app you want to generate a refresh token for.
-
From the left navigation menu, choose Authorization again. Then, for OAuth 2.0 (3LO), choose Configure.
-
From the Authorization page, from Authorization URL generator, from Granular Confluence API authorization URL, copy the URL and save it in a text editor of your choice.
-
In the saved authorization URL, update the
state=${YOUR_USER_BOUND_VALUE}parameter value to any text of your choice. For example,state=sample_text.For more information, see What is the state parameter used for?
in Atlassian Support. -
Then, add the following text at the end of the
scopevalue in your authorization URL:%20offline_accessand copy it. For example:https://auth.atlassian.com/authorize? audience=api.atlassian.com &client_id=YOUR_CLIENT_ID&scope=REQUESTED_SCOPE%20REQUESTED_SCOPE_TWO%20offline_access&redirect_uri=https://YOUR_APP_CALLBACK_URL&state=YOUR_USER_BOUND_VALUE&response_type=code &prompt=consent -
Open a web browser of your choice and paste the modified authorization URL you copied into the browser URL. On the page that opens up, make sure everything is correct and then select Accept.
You will be returned to the Confluence (Cloud) console.
-
Copy the URL of the Confluence (Cloud) home page and save it in a text editor of your choice. The URL contains the authorization code for your application. You will need this code to generate your Confluence (Cloud) refresh token. The whole section after
code=is the authorization code. -
Navigate to Postman.
If you don't have Postman, you can also choose to use cURL to generate a Confluence (Cloud) access token. Use the following cURL command to do so:
curl --location 'https://auth.atlassian.com/oauth/token' \ --header 'Content-Type: application/json' \ --data '{"grant_type": "authorization_code", "client_id": "YOUR CLIENT ID", "client_secret": "YOUR CLIENT SECRET", "code": "AUTHORIZATION CODE", "redirect_uri": "YOUR CALLBACK URL"}' -
On the Postman home page, select
POSTas the method, and then enter the following URL in the Enter URL or paste text box:https://auth.atlassian.com/oauth/token. -
Then, select Body from the menu, and select raw JSON.
-
In the text box, enter the following code extract, replacing the fields with your credential values:
{"grant_type": "authorization_code", "client_id": "YOUR_CLIENT_ID", "client_secret": "YOUR_CLIENT_SECRET", "code": "YOUR_AUTHORIZATION_CODE", "redirect_uri": "https://YOUR_APP_CALLBACK_URL"} -
Then, select Send. If everything is configured correctly, Postman will return an
refresh-token.Copy the refresh token and save it using a text editor of your choice. You will need it to connect Confluence (Cloud) to Amazon Q.
For more information, see Implementing a Refresh Token Flow
Step 6: Generating a new Confluence (Cloud) access token using a refresh token
You can use the refresh token you generated to create a new access token-refresh token pair when an existing access token expires. The following procedure shows you how to generate a refresh token.
Generating an Confluence (Cloud) access token-refresh token pair
-
Copy the refresh token you generated following the steps in Step 5: Generating a Confluence (Cloud) refresh token.
-
Navigate to Postman.
If you don't have Postman, you can also choose to use cURL to generate a new Confluence (Cloud) access token. Use the following cURL command to do so:
curl --location 'https://auth.atlassian.com/oauth/token' \ --header 'Content-Type: application/json' \ --data '{"grant_type": "refresh_token", "client_id": "YOUR_CLIENT_ID", "client_secret": "YOUR_CLIENT_SECRET", "refresh_token": "YOUR_REFRESH_TOKEN"}' -
On the Postman home page, select
POSTas the method, and then enter the following URL in the Enter URL or paste text box:https://auth.atlassian.com/oauth/token. -
Then, select Body from the menu, and select raw JSON.
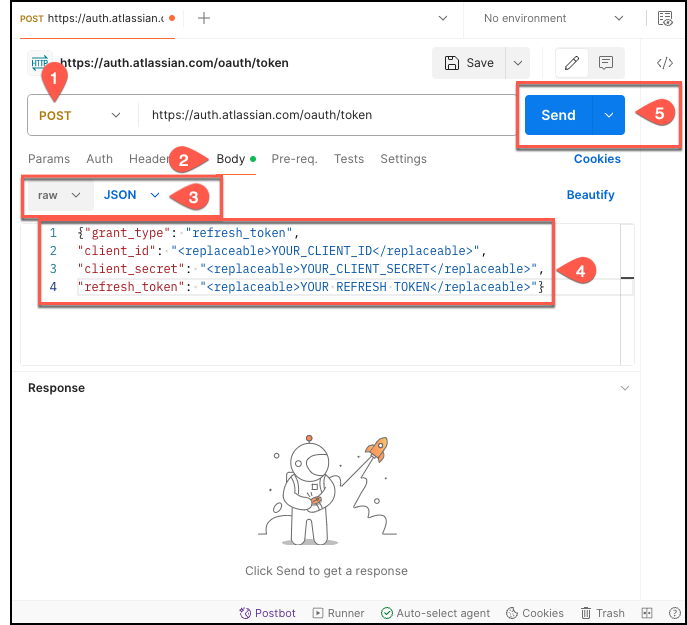
-
In the text box, enter the following code extract, replacing the fields with your credential values:
{"grant_type": "refresh_token", "client_id": "YOUR_CLIENT_ID", "client_secret": "YOUR_CLIENT_SECRET", "refresh_token": "YOUR REFRESH TOKEN"} -
Then, select Send. If everything is configured correctly, Postman will return a new access token-refresh token pair in the following format:
{
"access_token": "string,
"expires_in": "expiry time of access_token in second",
"scope": "string",
"refresh_token": "string"
}
For more information, see Implementing a Refresh Token Flow
