기계 번역으로 제공되는 번역입니다. 제공된 번역과 원본 영어의 내용이 상충하는 경우에는 영어 버전이 우선합니다.
모델 버전 등록
Amazon SageMaker 모델이 속한 모델 그룹을 지정하는 모델 버전을 생성하여 Amazon 모델을 등록할 수 있습니다. 모델 버전에는 모델 아티팩트(모델의 훈련된 가중치)와 모델의 추론 코드가 모두 포함되어야 합니다.
추론 파이프라인은 추론 요청을 처리하는 2~15개 컨테이너의 선형 시퀀스로 구성된 SageMaker 모델입니다. 컨테이너와 관련 환경 변수를 지정하여 추론 파이프라인을 등록합니다. 추론 형식에 대한 자세한 정보는 하나의 엔드포인트 이면의 직렬 추론 파이프라인으로서 전처리 로직과 더불어 모델 호스트.섹션을 참조하세요.
컨테이너와 관련 환경 변수를 지정하여 추론 파이프라인이 있는 모델을 등록합니다. Amazon SageMaker Studio 콘솔을 사용하거나 모델 구축 파이프라인의 단계를 생성하여 추론 파이프라인이 포함된 SageMaker 모델 버전을 생성하려면 다음 단계를 사용하십시오. AWS SDK for Python (Boto3)
모델 버전 등록 (SageMaker파이프라인)
모델 구축 파이프라인을 사용하여 SageMaker 모델 버전을 등록하려면 파이프라인에서 RegisterModel 단계를 생성하세요. 파이프라인의 일부로 RegisterModel단계 생성에 대한 자세한 내용은 8단계: 모델 패키지 생성 RegisterModel 단계 정의섹션을 참조하세요.
모델 버전 등록(Boto3)
Boto3를 사용하여 모델 버전을 등록하려면 create_model_package API 작업을 호출하십시오.
먼저 create_model_package API 작업에 전달할 매개변수 사전을 설정합니다.
# Specify the model source model_url = "s3://your-bucket-name/model.tar.gz" modelpackage_inference_specification = { "InferenceSpecification": { "Containers": [ { "Image":image_uri, "ModelDataUrl":model_url} ], "SupportedContentTypes": [ "text/csv" ], "SupportedResponseMIMETypes": [ "text/csv" ], } } # Alternatively, you can specify the model source like this: # modelpackage_inference_specification["InferenceSpecification"]["Containers"][0]["ModelDataUrl"]=model_url create_model_package_input_dict = { "ModelPackageGroupName" : model_package_group_name, "ModelPackageDescription" : "Model to detect 3 different types of irises (Setosa, Versicolour, and Virginica)", "ModelApprovalStatus" : "PendingManualApproval" } create_model_package_input_dict.update(modelpackage_inference_specification)
그런 다음 방금 설정한 파라미터 사전을 전달하여 create_model_package API 작업을 호출합니다.
create_model_package_response = sm_client.create_model_package(**create_model_package_input_dict)
model_package_arn = create_model_package_response["ModelPackageArn"]
print('ModelPackage Version ARN : {}'.format(model_package_arn))
모델 버전 등록 (콘솔)
Amazon SageMaker Studio 콘솔에서 모델 버전을 등록하려면 Studio 또는 Studio Classic을 사용하는지 여부에 따라 다음 단계를 완료하십시오.
다른 계정에서 모델 버전 등록
다른 AWS 계정에서 만든 모델 그룹에 모델 버전을 등록하려면 교차 계정 AWS Identity and Access Management 리소스 정책을 추가하여 해당 계정을 활성화해야 합니다. 예를 들어 조직의 한 AWS 계정은 모델 교육을 담당하고 다른 계정은 모델 관리, 배포 및 업데이트를 담당합니다. IAM 리소스 정책을 생성하여 이 사례에 대한 액세스 권한을 부여하려는 특정 계정 리소스에 정책을 적용합니다. 의 교차 계정 리소스 정책에 대한 자세한 내용은 사용 AWS설명서의 교차 계정 정책 평가 로직을 참조하십시오.AWS Identity and Access Management
참고
또한 계정 간 모델 배포를 위한 훈련 중에 KMS 키를 사용하여 출력 데이터 구성 작업을 암호화해야 합니다.
에서 SageMaker 교차 계정 모델 레지스트리를 활성화하려면 모델 버전이 포함된 모델 그룹에 교차 계정 리소스 정책을 제공해야 합니다. 다음은 모델 그룹을 위한 교차 계정 정책을 생성하고 이러한 정책을 해당 특정 리소스에 적용하는 예시입니다.
모델 그룹에 모델 교차 계정을 등록하는 소스 계정에서 다음 구성을 설정해야 합니다. 이 예시에서 소스 계정은 모델 훈련 계정이며, 이 계정은 모델 교차 계정을 훈련한 다음 모델 레지스트리 계정의 모델 레지스트리에 등록합니다.
이 예시에서는 이전에 다음 변수를 정의했다고 가정합니다.
-
sm_client— SageMaker Boto3 클라이언트. -
model_package_group_name— 액세스 권한을 부여하려는 모델 그룹. -
model_package_group_arn— 계정 간 액세스 권한을 부여하려는 모델 그룹 ARN -
bucket— 모델 교육 아티팩트가 저장되는 Amazon S3 버킷입니다.
다른 계정에서 만든 모델을 배포하려면 사용자에게 SageMaker 작업에 액세스할 수 있는 역할 (예: AmazonSageMakerFullAccess 관리형 정책의 역할) 이 있어야 합니다. SageMaker 관리형 정책에 대한 자세한 내용은 AWS 아마존 관리형 정책 SageMaker 단원을 참조하십시오.
필수 IAM 리소스 정책
다음 다이어그램은 교차 계정 모델 등록을 허용하는 데 필요한 정책을 보여줍니다. 그림과 같이 모델을 모델 레지스트리 계정에 제대로 등록하려면 모델 훈련 중에 이러한 정책을 활성화해야 합니다.
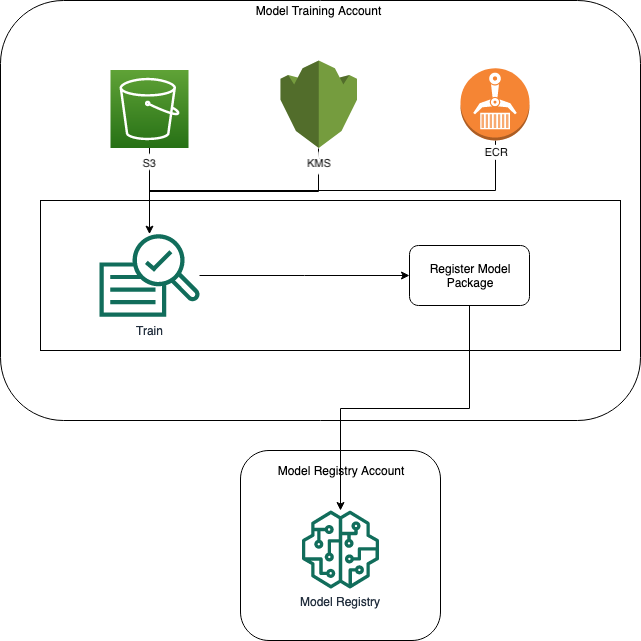
Amazon ECR, Amazon S3 및 AWS KMS 정책은 다음 코드 샘플에 나와 있습니다.
샘플 Amazon ECR 정책
{
  "Version": "2012-10-17",
  "Statement": [
    {
      "Sid": "AddPerm",
      "Effect": "Allow",
      "Principal": {
        "AWS": "arn:aws:iam::{model_registry_account}:root"
      },
      "Action": [
        "ecr:BatchGetImage",
        "ecr:Describe*"
      ]
    }
  ]
}
샘플 Amazon S3 정책
{
  "Version": "2012-10-17",
  "Statement": [
    {
      "Sid": "AddPerm",
      "Effect": "Allow",
      "Principal": {
        "AWS": "arn:aws:iam::{model_registry_account}:root"
      },
      "Action": [
        "s3:GetObject",
        "s3:GetBucketAcl",
        "s3:GetObjectAcl"
      ],
      "Resource": "arn:aws:s3:::{bucket}/*"
    }
  ]
}
샘플 정책 AWS KMS
{
  "Version": "2012-10-17",
  "Statement": [
    {
      "Sid": "AddPerm",
      "Effect": "Allow",
      "Principal": {
        "AWS": "arn:aws:iam::{model_registry_account}:root"
      },
      "Action": [
        "kms:Decrypt",
        "kms:GenerateDataKey*"
      ],
      "Resource": "*"
    }
  ]
}
계정에 리소스 정책 적용
다음 정책 구성은 이전 섹션에서 설명한 정책을 적용하며 모델 훈련 계정에 입력해야 합니다.
import json # The Model Registry account id of the Model Group model_registry_account = "111111111111" # The model training account id where training happens model_training_account = "222222222222" # 1. Create a policy for access to the ECR repository # in the model training account for the Model Registry account Model Group ecr_repository_policy = {"Version": "2012-10-17", "Statement": [{"Sid": "AddPerm", "Effect": "Allow", "Principal": { "AWS": f"arn:aws:iam::{model_registry_account}:root" }, "Action": [ "ecr:BatchGetImage", "ecr:Describe*" ] }] } # Convert the ECR policy from JSON dict to string ecr_repository_policy = json.dumps(ecr_repository_policy) # Set the new ECR policy ecr = boto3.client('ecr') response = ecr.set_repository_policy( registryId = model_training_account, repositoryName = "decision-trees-sample", policyText = ecr_repository_policy ) # 2. Create a policy in the model training account for access to the S3 bucket # where the model is present in the Model Registry account Model Group bucket_policy = {"Version": "2012-10-17", "Statement": [{"Sid": "AddPerm", "Effect": "Allow", "Principal": {"AWS": f"arn:aws:iam::{model_registry_account}:root" }, "Action": [ "s3:GetObject", "s3:GetBucketAcl", "s3:GetObjectAcl" ], "Resource": "arn:aws:s3:::{bucket}/*" }] } # Convert the S3 policy from JSON dict to string bucket_policy = json.dumps(bucket_policy) # Set the new bucket policy s3 = boto3.client("s3") response = s3.put_bucket_policy( Bucket =bucket, Policy = bucket_policy) # 3. Create the KMS grant for the key used during training for encryption # in the model training account to the Model Registry account Model Group client = boto3.client("kms") response = client.create_grant( GranteePrincipal=model_registry_account, KeyId=kms_key_id Operations=[ "Decrypt", "GenerateDataKey", ], )
모델 그룹이 있는 모델 레지스트리 계정에 다음 구성을 넣어야 합니다.
# The Model Registry account id of the Model Group model_registry_account = "111111111111" # 1. Create policy to allow the model training account to access the ModelPackageGroup model_package_group_policy = {"Version": "2012-10-17", "Statement": [ { "Sid": "AddPermModelPackageVersion", "Effect": "Allow", "Principal": {"AWS": f"arn:aws:iam::{model_training_account}:root"}, "Action": ["sagemaker:CreateModelPackage"], "Resource": f"arn:aws:sagemaker:{region}:{model_registry_account}:model-package/{model_package_group_name}/*" } ] } # Convert the policy from JSON dict to string model_package_group_policy = json.dumps(model_package_group_policy) # Set the new policy response = sm_client.put_model_package_group_policy( ModelPackageGroupName =model_package_group_name, ResourcePolicy = model_package_group_policy)
마지막으로, 모델 훈련 계정의 create_model_package작업을 사용하여 교차 계정에 모델 패키지를 등록합니다.
# Specify the model source model_url = "s3://{bucket}/model.tar.gz" #Set up the parameter dictionary to pass to the create_model_package API operation modelpackage_inference_specification = { "InferenceSpecification": { "Containers": [ { "Image": f"{model_training_account}.dkr.ecr.us-east-2.amazonaws.com/decision-trees-sample:latest", "ModelDataUrl": model_url } ], "SupportedContentTypes": [ "text/csv" ], "SupportedResponseMIMETypes": [ "text/csv" ], } } # Alternatively, you can specify the model source like this: # modelpackage_inference_specification["InferenceSpecification"]["Containers"][0]["ModelDataUrl"]=model_url create_model_package_input_dict = { "ModelPackageGroupName" :model_package_group_arn, "ModelPackageDescription" : "Model to detect 3 different types of irises (Setosa, Versicolour, and Virginica)", "ModelApprovalStatus" : "PendingManualApproval" } create_model_package_input_dict.update(modelpackage_inference_specification) # Create the model package in the Model Registry account create_model_package_response = sm_client.create_model_package(**create_model_package_input_dict) model_package_arn = create_model_package_response["ModelPackageArn"] print('ModelPackage Version ARN : {}'.format(model_package_arn))
