Secure your WordPress site with HTTPS on Lightsail
Enabling Hypertext Transfer Protocol Secure (HTTPS) for your WordPress website assures
visitors that your website is secure; that it's sending and receiving encrypted data. A
non-secure website has an address that starts with http, such as
http://example.com, while a secure website has an address that starts with
https, such as https://example.com. Even if your website is
primarily informational, it's still recommended that you enable HTTPS. This is because most web
browsers will notify website visitors that your website is not secure if HTTPS is not enabled,
and your website will rank lower in search engine results.
Tip
Lightsail offers a guided workflow that automates the installation and configuration of an SSL/TLS Let's Encrypt certificate on your WordPress instance. We highly recommend that you use the workflow instead of following the manual steps in this tutorial. For more information, see Launch and configure a WordPress instance.
This guide shows you how to use the Bitnami HTTPS configuration tool (bncert)
to enable HTTPS on your Certified by Bitnami WordPress instance on
Amazon Lightsail. It lets you request certificates only for the domains and subdomains that you
specify when making your request. Alternately, you can use the Certbot tool, which lets you
request a certificate for domains and a wildcard certificate for subdomains. A wildcard
certificate works for any subdomains of a domain, which is beneficial if
you don't know which subdomains you will use to direct traffic to your instance. However,
Certbot does not automatically renew your certificate like the bncert tool. If you
use Certbot, you have to manually renew your certificates every 90 days. For more information
about using Certbot to enable HTTPS, see Tutorial: Use Let’s
Encrypt SSL certificates with your WordPress instance.
Contents
Step 1: Learn about the process
Note
In this section, you get a high-level overview of the process. The specific steps to perform this process are included in the subsequent steps of this guide.
To enable HTTPS for your WordPress website, connect to your Lightsail instance using
SSH, and use the bncert tool to request an SSL/TLS certificate from the Let's Encryptexample.com)
and alternate domains (www.example.com, blog.example.com, etc.), if
any. Let's Encrypt validates that you own the domains either by asking you to create TXT
records in the DNS of your domains, or by verifying that those domains are already directing
traffic to the public IP address of the instance from which you make the request.
After your certificate is validated, you can configure your WordPress website to
automatically redirect visitors from HTTP to HTTPS (http://example.com redirects
to https://example.com) so that visitors are forced to use the encrypted
connection. You can also configure your website to automatically redirect the www
subdomain to the apex of your domain (https://www.example.com redirects to
https://example.com) or vice versa (https://example.com redirects
to https://www.example.com). These redirections are also configured using the
bncert tool.
Let's Encrypt requires that you renew your certificate every 90 days to maintain HTTPS on
your website. The bncert tool automatically renews your certificates for you, so
that you can spend more time focusing on your website.
Limitations of the bncert tool
The bncert tool has the following limitations:
-
It's not preinstalled on all Certified by Bitnami WordPress instances when they're created. WordPress instances that were created on Lightsail a while back will require that you manually install the
bncerttool. Step 4 of this guide shows you how to confirm that the tool is installed on your instance, and how to install it if it's not. -
You can request certificates only for the domains and subdomains that you specify when making your request. This is different than the Certbot tool, which lets you request a certificate for domains and a wildcard certificate for subdomains. A wildcard certificate works for any subdomains of a domain, which is beneficial if you don't know which subdomains you will use to direct traffic to your instance. However, Certbot does not automatically renew your certificate like the
bncerttool. If you use Certbot, you have to manually renew your certificates every 90 days. For more information about using Certbot to enable HTTPS, see Tutorial: Using Let’s Encrypt SSL certificates with your WordPress instance in Amazon Lightsail.
Step 2: Complete the prerequisites
Complete the following prerequisites if you haven’t already done so:
-
Create a WordPress instance in Lightsail, and configure your website on your instance. For more information, see Get started with Linux/Unix-based instances in Amazon Lightsail.
-
Attach a static IP to your instance. Your instance's public IP address changes if you stop and start your instance. A static IP does not change if you stop and start your instance. For more information, see Create a static IP and attach it to an instance in Amazon Lightsail.
-
Create a snapshot of your WordPress instance after you're done configuring it, or enable automatic snapshots. The snapshot can be used as a backup from which you can create another instance in case something goes wrong with your original instance. For more information, see Create a snapshot of your Linux or Unix instance or Enabling or disabling automatic snapshots for instances or disks in Amazon Lightsail.
-
Add DNS records to the DNS of your domain that directs traffic for the apex of your domain (
example.com) and for itswwwsubdomain (www.example.com) to the public IP address of your WordPress instance in Lightsail. You can complete these actions at your domain's current DNS hosting provider. Or if you transferred management of your domain's DNS to Lightsail, you can complete these actions using a DNS zone in Lightsail. To learn more, see DNS.Important
Add DNS records to the DNS of all domains that you want use with your WordPress website. All of those domains should be routing traffic to the public IP address of your WordPress website. The
bncerttool will issue certificates only for domains that are currently directing traffic to the public IP address of your WordPress instance.
Step 3: Connect to your instance
Complete the following steps to connect to your instance using the browser-based SSH client in the Lightsail console.
-
Sign in to the Lightsail console
. -
In the left navigation pane, choose the SSH quick connect icon for your WordPress instance.
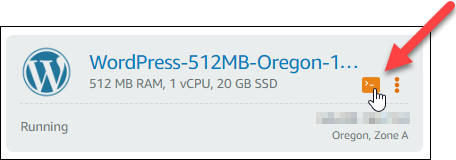
The browser-based SSH client terminal window opens. You are successfully connected to your instance via SSH if you see the Bitnami logo as shown in the following example.

Step 4: Confirm the bncert tool is installed on your instance
Complete the following steps to ensure the Bitnami HTTPS configuration tool
(bncert) is installed on your instance. It's not preinstalled on all
Certified by Bitnami WordPress instances when they're created.
WordPress instances that were created on Lightsail a while back will require that you
manually install the bncert tool. This procedure includes the steps to install
the tool if it's is not installed.
-
Enter the following command to run the
bncerttool.sudo /opt/bitnami/bncert-tool-
If you see
command not foundin the response as shown in the following example, then thebncerttool is not installed on your instance. Continue to the next step in this procedure to install thebncerttool on your instance.Important
The
bncerttool can only be used on WordPress instances that are Certified by Bitnami. Alternately, you can use the Certbot tool to enable HTTPS on your WordPress instance. For more information, see Tutorial: Use Let’s Encrypt SSL certificates with your WordPress instance.
-
If you see
Welcome to the Bitnami HTTPS configuration toolin the response as shown in the following example, then thebncerttool is installed on your instance. Continue to the Step 5: Enable HTTPS on your WordPress instance section of this guide.
-
-
Enter the following command to download the
bncertrun file to your instance.wget -O bncert-linux-x64.run https://downloads.bitnami.com/files/bncert/latest/bncert-linux-x64.run -
Enter the following command to create a directory for the
bncertrun file on your instance.sudo mkdir /opt/bitnami/bncert -
Enter the following command to move the downloaded
bncertrun file to the new directory you created.sudo mv bncert-linux-x64.run /opt/bitnami/bncert/ -
Enter the following command to make the
bncertrun a file that can be executed as a program.sudo chmod +x /opt/bitnami/bncert/bncert-linux-x64.run -
Enter the following command to create a symbolic link that runs the
bncerttool when you enter thesudo /opt/bitnami/bncert-toolcommand.sudo ln -s /opt/bitnami/bncert/bncert-linux-x64.run /opt/bitnami/bncert-toolYou are now done installing the
bncerttool on your instance. Continue to the Step 5: Enable HTTPS on your WordPress instance section of this guide.
Step 5: Enable HTTPS on your WordPress instance
Complete the following procedure to enable HTTPS on your WordPress instance after you have
confirmed that the bncert tool is installed on your instance.
-
Enter the following command to run the
bncerttool.sudo /opt/bitnami/bncert-toolYou should see a message similar to the following example.

If the
bncerttool has been installed on your instance for a while, then you might see a message indicating that an updated version of the tool is available. Choose to download it as shown in the following example, and then enter thesudo /opt/bitnami/bncert-toolcommand to run thebncerttool again.
-
Enter your primary domain name and alternate domain names separated by a space as shown in the following example.
If your domain is not configured to route traffic to the public IP address of your instance, the
bncerttool will ask you to make that configuration before continuing. Your domain must be routing traffic to the public IP address of the instance from which you are using thebncerttool to enable HTTPS on the instance. This confirms that you own the domain, and serves as the validation for your certificate.
-
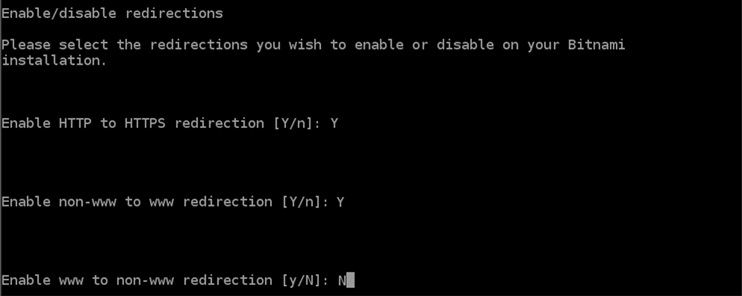
The
bncerttool will ask you how you want your website's redirection to be configured. These are the options available:-
Enable HTTP to HTTPS redirection - Specifies whether users who browse to the HTTP version of your website (i.e.,
http:/example.com) are automatically redirected to the HTTPS version (i.e.,https://example.com). We recommend enabling this option because it forces all visitors to use the encrypted connection. TypeYand press Enter to enable it. -
Enable non-www to www redirection - Specifies whether users who browse to the apex of your domain (i.e.,
https://example.com) are automatically redirected to your domain'swwwsubdomain (i.e.,https://www.example.com). We recommend enabling this option. However, you may want to disable it and enable the alternate option (enablewwwto non-wwwredirection) if you have specified the apex of your domain as your preferred website address in search engine tools like Google's webmaster tools, or if your apex points directly to your IP and yourwwwsubdomain references your apex via a CNAME record. TypeYand press Enter to enable it. -
Enable www to non-www redirection - Specifies whether users who browse to your domain's
wwwsubdomain (i.e.,https://www.example.com) are automatically redirected to the apex of your domain (i.e.,https://example.com). We recommend disabling this, if you enabled non-wwwredirection towww. TypeNand press Enter to disable it.
Your selections should look like the following example.
-
-
The changes that are going to be made are listed. Type
Yand press Enter to confirm and continue.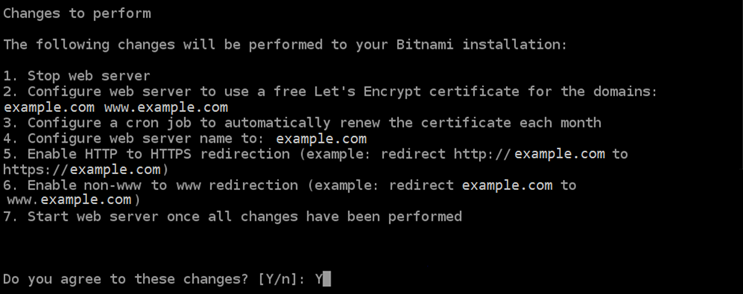
-
Enter your email address to associate with your Let's Encrypt certificate and press Enter.

-
Review the Let's Encrypt Subscriber Agreement. Type
Yand press Enter to accept the agreement and continue.
The actions are performed to enable HTTPS on your instance, including requesting the certificate and configuring the redirections you specified.

Your certificate is successfully issued and validated, and the redirections are successfully configured on your instance if you see a message similar to the following example.
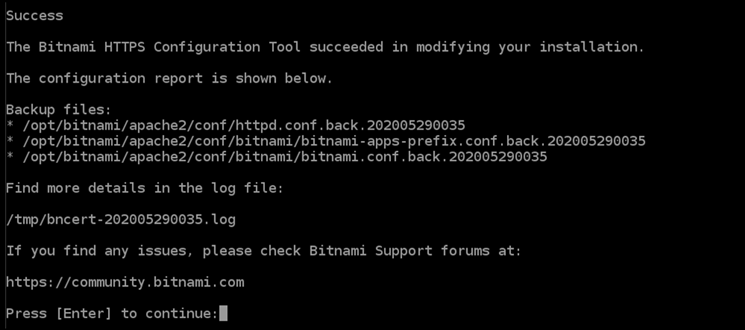
The
bncerttool will perform an automatic renewal of your certificate every 80 days before it expires. Repeat the above steps if you wish to use additional domains and subdomains with your instance, and you want to enable HTTPS for those domains.You are now done enabling HTTPS on your WordPress instance. Continue to the Step 6: Test that your website is using HTTPS section of this guide.
Step 6: Test that your website is using HTTPS
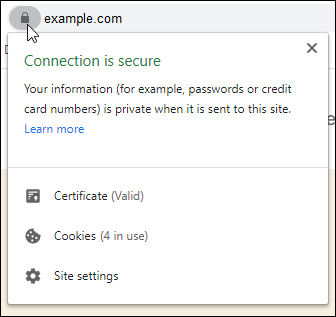
After you enable HTTPS on your WordPress instance, you should confirm that your website is
using HTTPS by browsing to all of the domains that you specified when using the
bncert tool. When you visit each domain, you should see that they use a secure
connection as shown in the following example.
Note
You might have to refresh, and clear your browser's cache to see the change.
You might also notice that the non-www address redirects to the
www subdomain of your domain, or vice versa depending on the option you
selected when running the bncert tool.