Working with Ethereum nodes using AMB Access
You can use AMB Access Ethereum to create nodes and join them to Ethereum public networks. A node is a computer that connects to a blockchain network. A blockchain network consists of multiple parties (or peers) that are connected to each other in a decentralized way. When you use AMB Access Ethereum, you pay for the nodes, the storage that you use, and the requests that are made between the nodes and the network.
Creating a node
When you create an Ethereum node, you select the network that the node joins and the configuration details such as the instance type and the Ethereum node type. When you create an Ethereum node in Amazon Managed Blockchain (AMB), a full Geth node on the selected Ethereum network is created. The IAM principal (user or group) that you use must have permissions to create nodes and view node information. For more information, see Performing all available actions for AMB Access Ethereum.
To create an Ethereum node, you must consider and select the following characteristics:
-
Blockchain network – Amazon Managed Blockchain (AMB) supports the following public Ethereum networks:
Mainnet – The proof-of-stake network of the primary public Ethereum blockchain. Transactions on Mainnet have actual value (that is, they incur real costs) and are recorded on the distributed ledger. This network supports the JSON-RPC and Consensus API operations.
-
Blockchain instance type – This determines the computational and memory capacity allocated to this node for the blockchain workload. If you anticipate a more demanding workload for each node, you can choose more CPU and RAM. For example, your nodes might need to process a higher rate of transactions. Different instance types are subject to different pricing.
Note
For optimal performance and minimal degradation, we recommend the
bc.t3.xlarge(or larger) instance size. -
Ethereum node type – The only node type that is currently supported is Full node (Geth). The node uses the Geth execution client and the Lighthouse consensus client. For more information about node types, see Node Types
in the Ethereum developer documentation. For more information on Execution clients such as Geth, see Execution clients in the Ethereum developer documentation. For more information on Consensus clients such as Lighthouse, see Consensus clients in the Ethereum developer documentation. -
Availability Zone – You can select the Availability Zone to launch the Ethereum node in. You can distribute nodes across different Availability Zones. This way, you can design your blockchain application for resiliency. For more information, see Regions and Availability Zones in the Amazon EC2 User Guide.
Open the AMB Access console at https://console.aws.amazon.com/managedblockchain/
. Choose Networks from the Access header in the left navigation.
Choose the Dedicated networks tab and select Ethereum Mainnet as your network to the details page.
Choose Create node.
In the Create node page, choose the Blockchain instance type suitable for your application. If your nodes need to process a higher rate of transactions more efficiently, choose an instance type with more CPU and RAM.
Choose the Ethereum node type, choose Full node (Geth).
Choose the Availability zone such as us-east-1.
Optional, choose Add new tag in the Tags section.
Choose Create node.
Note
Amazon Managed Blockchain (AMB) Access Ethereum provisions and configures the node for you. The length of this process is not instantaneous depends on many variables.
The following example shows how to use the create-node command. Replace the
value of --network-id, InstanceType, and
AvailabilityZone as appropriate.
aws managedblockchain create-node \ --node-configuration '{"InstanceType":"bc.t3.xlarge","AvailabilityZone":"us-east-1a"}' \ --network-idn-ethereum-mainnet
Ethereum public networks have the following network IDs:
-
n-ethereum-mainnet
The command returns the node ID, as shown in the following snippet.
{
    "NodeId": "nd-RG3GM4U7HFFHHHGJHHU7UNPCLU"
}
After you create the node, the Node details page in the AWS Management Console displays the endpoints that you can use to make Ethereum API calls from code on a client. There are separate endpoints for HTTP connections and WebSocket connections. For more information about sending API calls to an Ethereum node in Amazon Managed Blockchain (AMB) to interact with smart contracts, see Using Ethereum APIs with Amazon Managed Blockchain (AMB).
Viewing node details
After you create a node, you can view administrative properties for each node that your AWS account owns. For example, you can view the endpoints to use for Ethereum API calls on HTTP and WebSocket (JSON-RPC API only) connections, the node status, and important performance metrics for the node. The IAM principal (user or group) that you use must have permissions to list and get node information. For more information, see Identity-based policy examples.
Information such as the AMB Access instance type, Availability Zone, and creation date, is available for the node. The following properties are also available:
Status
Creating
AMB Access is provisioning and configuring the AMB Access instance for the node. The amount of time that it takes to create a node depends on many factors. Nodes on testnets typically take a few minutes to create. Nodes on mainnet might take an hour or longer to create.
Available
The node is running and available on the network.
Unhealthy
AMB Access detected a problem and is automatically replacing the blockchain instance that the node runs on. Nodes in an unhealthy state typically return to an available state in approximately five minutes.
Failed
The node has an issue that caused AMB Access to add it to the deny list on the network. This usually indicates that the node reached its memory or storage capacity. As a first step, we recommend that you delete the instance and provision an instance type with more capability.
Create Failed
The node couldn't be created with the AMB Access instance type and the Availability Zone specified. We recommend trying another availability zone, a different instance type, or both.
Deleting
The node is being deleted.
Deleted
The node is now deleted. For possible reasons, see the previous item.
-
Endpoints
Endpoints are used to make Ethereum API calls to the node. When AMB Access creates the node, it assigns unique endpoints. Nodes support connections over HTTP and WebSockets (JSON-RPC API only). You use a different endpoint for each connection. For more information, see Using Ethereum APIs with Amazon Managed Blockchain (AMB).
Open the AMB Access console at https://console.aws.amazon.com/managedblockchain/
. If the console doesn't open to the Networks list, choose Networks from the navigation pane.
Choose the Name of the Ethereum network that the node belongs to from the list.
On the network details page, under Nodes, choose the Node ID.
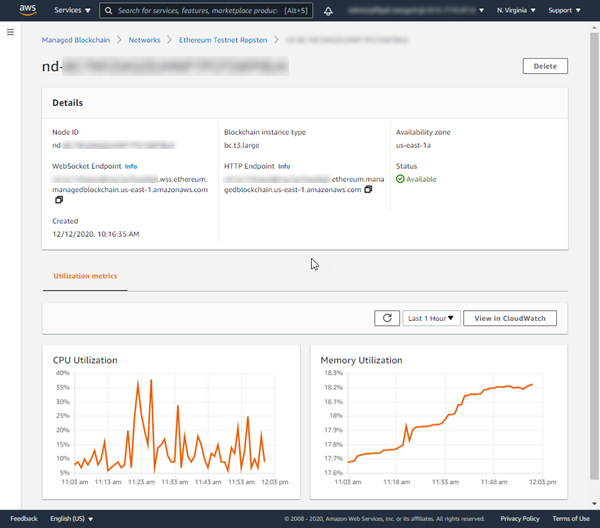
The following example shows how the node details page displays key properties and metrics for the node.
The following example shows how to use the get-node command to view Ethereum
node information. Replace the value of --network-id and --node-id as
appropriate.
aws managedblockchain get-node \ --network-idn-ethereum-mainnet\ --node-idnd-RG3GM4U7HFFHHHGJHHU7UNPCLU
The command returns the following output that includes the node's
HttpEndpoint, WebSocketEndpoint, and other key properties.
{
    "Node": {
        "NetworkId": "n-ethereum-mainnet",
        "Id": "nd-RG3GM4U7HFFHHHGJHHU7UNPCLU",
        "InstanceType": "bc.t3.xlarge",
        "AvailabilityZone": "us-east-1a",
        "FrameworkAttributes": {
            "Ethereum": {
                "HttpEndpoint": "nd-rg3gm4u7hffhhhgjhhu7unpclu.ethereum.managedblockchain.us-east-1.amazonaws.com",
                "WebSocketEndpoint": "nd-rg3gm4u7hffhhhgjhhu7unpclu.wss.ethereum.managedblockchain.us-east-1.amazonaws.com"
            }
        },
        "Status": "CREATING",
        "CreationDate": "2021-06-25T20:10:18.555000+00:00",
        "Tags": {},
        "Arn": "arn:aws:managedblockchain:us-east-1:111122223333:nodes/nd-RG3GM4U7HFFHHHGJHHU7UNPCLU"
    }
}
Deleting a node
When you delete an Ethereum node from AMB Access, all resources that are stored on that node are immediately deleted. The IAM principal (user or group) that you use must have permissions to delete nodes. For more information, see Performing all available actions for AMB Access Ethereum.
Open the AMB Access console at https://console.aws.amazon.com/managedblockchain/
. If the console doesn't open to the Networks list, choose Networks from the navigation pane.
Choose the Name of the Ethereum network that the node belongs to from the list.
On the network details page, under Nodes, select the Node ID, and then choose Delete.
Use the delete-node command to delete an Ethereum node. Replace the value of
--network-id and --node-id as appropriate.
aws managedblockchain delete-node \ --network-idn-ethereum-mainnet\ --node-idnd-RG3GM4U7HFFHHHGJHHU7UNPCLU
