Tutorial: Visualizing customer support calls with OpenSearch Service and OpenSearch Dashboards
This chapter is a full walkthrough of the following situation: a business receives some number of customer support calls and wants to analyze them. What is the subject of each call? How many were positive? How many were negative? How can managers search or review the the transcripts of these calls?
A manual workflow might involve employees listening to recordings, noting the subject of each call, and deciding whether or not the customer interaction was positive.
Such a process would be extremely labor-intensive. Assuming an average time of 10 minutes per call, each employee could listen to only 48 calls per day. Barring human bias, the data they generate would be highly accurate, but the amount of data would be minimal: just the subject of the call and a boolean for whether or not the customer was satisfied. Anything more involved, such as a full transcript, would take a huge amount of time.
Using Amazon S3
While you can use this walkthrough as-is, the intent is to spark ideas about how to enrich your JSON documents before you index them in OpenSearch Service.
Estimated Costs
In general, performing the steps in this walkthrough should cost less than $2. The walkthrough uses the following resources:
-
S3 bucket with less than 100 MB transferred and stored
To learn more, see Amazon S3 Pricing
. -
OpenSearch Service domain with one
t2.mediuminstance and 10 GiB of EBS storage for several hoursTo learn more, see Amazon OpenSearch Service Pricing
. -
Several calls to Amazon Transcribe
To learn more, see Amazon Transcribe Pricing
. -
Several natural language processing calls to Amazon Comprehend
To learn more, see Amazon Comprehend Pricing
.
Topics
Step 1: Configure prerequisites
Before proceeding, you must have the following resources.
| Prerequisite | Description |
|---|---|
| Amazon S3 bucket | For more information, see Creating a Bucket in the Amazon Simple Storage Service User Guide. |
| OpenSearch Service domain | The destination for data. For more information, see Creating OpenSearch Service domains. |
If you don't already have these resources, you can create them using the following AWS CLI commands:
aws s3 mb s3://my-transcribe-test --region us-west-2
aws opensearch create-domain --domain-name my-transcribe-test --engine-version OpenSearch_1.0 --cluster-config InstanceType=t2.medium.search,InstanceCount=1 --ebs-options EBSEnabled=true,VolumeType=standard,VolumeSize=10 --access-policies '{"Version": "2012-10-17", "Statement":[{"Effect":"Allow","Principal":{"AWS":"arn:aws:iam::123456789012:root"},"Action":"es:*","Resource":"arn:aws:es:us-west-2:123456789012:domain/my-transcribe-test/*"}]}' --region us-west-2
Note
These commands use the us-west-2 Region, but you can
use any Region that Amazon Comprehend supports. To learn more, see the AWS General Reference.
Step 2: Copy sample code
-
Copy and paste the following Python 3 sample code into a new file named
call-center.py:import boto3 import datetime import json import requests from requests_aws4auth import AWS4Auth import time import urllib.request # Variables to update audio_file_name = '' # For example, 000001.mp3 bucket_name = '' # For example, my-transcribe-test domain = '' # For example, https://search-my-transcribe-test-12345.us-west-2.es.amazonaws.com index = 'support-calls' type = '_doc' region = 'us-west-2' # Upload audio file to S3. s3_client = boto3.client('s3') audio_file = open(audio_file_name, 'rb') print('Uploading ' + audio_file_name + '...') response = s3_client.put_object( Body=audio_file, Bucket=bucket_name, Key=audio_file_name ) # # Build the URL to the audio file on S3. # # Only for the us-east-1 region. # mp3_uri = 'https://' + bucket_name + '.s3.amazonaws.com/' + audio_file_name # Get the necessary details and build the URL to the audio file on S3. # For all other regions. response = s3_client.get_bucket_location( Bucket=bucket_name ) bucket_region = response['LocationConstraint'] mp3_uri = 'https://' + bucket_name + '.s3-' + bucket_region + '.amazonaws.com/' + audio_file_name # Start transcription job. transcribe_client = boto3.client('transcribe') print('Starting transcription job...') response = transcribe_client.start_transcription_job( TranscriptionJobName=audio_file_name, LanguageCode='en-US', MediaFormat='mp3', Media={ 'MediaFileUri': mp3_uri }, Settings={ 'ShowSpeakerLabels': True, 'MaxSpeakerLabels': 2 # assumes two people on a phone call } ) # Wait for the transcription job to finish. print('Waiting for job to complete...') while True: response = transcribe_client.get_transcription_job(TranscriptionJobName=audio_file_name) if response['TranscriptionJob']['TranscriptionJobStatus'] in ['COMPLETED', 'FAILED']: break else: print('Still waiting...') time.sleep(10) transcript_uri = response['TranscriptionJob']['Transcript']['TranscriptFileUri'] # Open the JSON file, read it, and get the transcript. response = urllib.request.urlopen(transcript_uri) raw_json = response.read() loaded_json = json.loads(raw_json) transcript = loaded_json['results']['transcripts'][0]['transcript'] # Send transcript to Comprehend for key phrases and sentiment. comprehend_client = boto3.client('comprehend') # If necessary, trim the transcript. # If the transcript is more than 5 KB, the Comprehend calls fail. if len(transcript) > 5000: trimmed_transcript = transcript[:5000] else: trimmed_transcript = transcript print('Detecting key phrases...') response = comprehend_client.detect_key_phrases( Text=trimmed_transcript, LanguageCode='en' ) keywords = [] for keyword in response['KeyPhrases']: keywords.append(keyword['Text']) print('Detecting sentiment...') response = comprehend_client.detect_sentiment( Text=trimmed_transcript, LanguageCode='en' ) sentiment = response['Sentiment'] # Build the Amazon OpenSearch Service URL. id = audio_file_name.strip('.mp3') url = domain + '/' + index + '/' + type + '/' + id # Create the JSON document. json_document = {'transcript': transcript, 'keywords': keywords, 'sentiment': sentiment, 'timestamp': datetime.datetime.now().isoformat()} # Provide all details necessary to sign the indexing request. credentials = boto3.Session().get_credentials() awsauth = AWS4Auth(credentials.access_key, credentials.secret_key, region, 'opensearchservice', session_token=credentials.token) # Index the document. print('Indexing document...') response = requests.put(url, auth=awsauth, json=json_document, headers=headers) print(response) print(response.json()) -
Update the initial six variables.
-
Install the required packages using the following commands:
pip install boto3 pip install requests pip install requests_aws4auth -
Place your MP3 in the same directory as
call-center.pyand run the script. A sample output follows:$ python call-center.py Uploading 000001.mp3... Starting transcription job... Waiting for job to complete... Still waiting... Still waiting... Still waiting... Still waiting... Still waiting... Still waiting... Still waiting... Detecting key phrases... Detecting sentiment... Indexing document... <Response [201]> {u'_type': u'call', u'_seq_no': 0, u'_shards': {u'successful': 1, u'failed': 0, u'total': 2}, u'_index': u'support-calls4', u'_version': 1, u'_primary_term': 1, u'result': u'created', u'_id': u'000001'}
call-center.py performs a number of operations:
-
The script uploads an audio file (in this case, an MP3, but Amazon Transcribe supports several formats) to your S3 bucket.
-
It sends the audio file's URL to Amazon Transcribe and waits for the transcription job to finish.
The time to finish the transcription job depends on the length of the audio file. Assume minutes, not seconds.
Tip
To improve the quality of the transcription, you can configure a custom vocabulary for Amazon Transcribe.
-
After the transcription job finishes, the script extracts the transcript, trims it to 5,000 characters, and sends it to Amazon Comprehend for keyword and sentiment analysis.
-
Finally, the script adds the full transcript, keywords, sentiment, and current time stamp to a JSON document and indexes it in OpenSearch Service.
Tip
LibriVox
(Optional) Step 3: Index sample data
If you don't have a bunch of call recordings handy—and who does?—you can
index the sample documents in sample-calls.zip, which are comparable to
what call-center.py produces.
-
Create a file named
bulk-helper.py:import boto3 from opensearchpy import OpenSearch, RequestsHttpConnection import json from requests_aws4auth import AWS4Auth host = '' # For example, my-test-domain.us-west-2.es.amazonaws.com region = '' # For example, us-west-2 service = 'es' bulk_file = open('sample-calls.bulk', 'r').read() credentials = boto3.Session().get_credentials() awsauth = AWS4Auth(credentials.access_key, credentials.secret_key, region, service, session_token=credentials.token) search = OpenSearch( hosts = [{'host': host, 'port': 443}], http_auth = awsauth, use_ssl = True, verify_certs = True, connection_class = RequestsHttpConnection ) response = search.bulk(bulk_file) print(json.dumps(response, indent=2, sort_keys=True)) -
Update the initial two variables for
hostandregion. -
Install the required package using the following command:
pip install opensearch-py -
Download and unzip sample-calls.zip.
-
Place
sample-calls.bulkin the same directory asbulk-helper.pyand run the helper. A sample output follows:$ python bulk-helper.py { "errors": false, "items": [ { "index": { "_id": "1", "_index": "support-calls", "_primary_term": 1, "_seq_no": 42, "_shards": { "failed": 0, "successful": 1, "total": 2 }, "_type": "_doc", "_version": 9, "result": "updated", "status": 200 } },...], "took": 27 }
Step 4: Analyze and visualize your data
Now that you have some data in OpenSearch Service, you can visualize it using OpenSearch Dashboards.
-
Navigate to
https://search-.domain.region.es.amazonaws.com/_dashboards -
Before you can use OpenSearch Dashboards, you need an index pattern. Dashboards uses index patterns to narrow your analysis to one or more indices. To match the
support-callsindex thatcall-center.pycreated, go to Stack Management, Index Patterns, and define an index pattern ofsupport*, and then choose Next step. -
For Time Filter field name, choose timestamp.
-
Now you can start creating visualizations. Choose Visualize, and then add a new visualization.
-
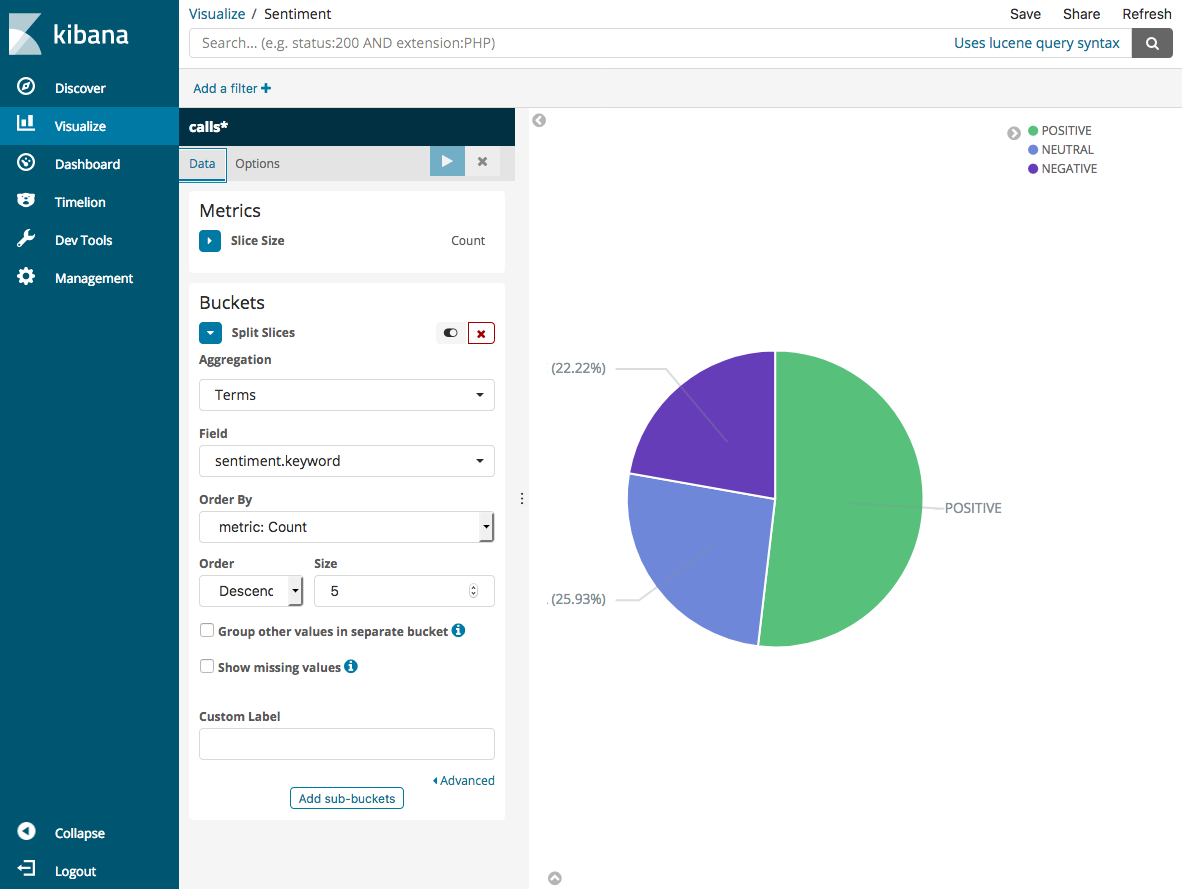
Choose the pie chart and the
support*index pattern. -
The default visualization is basic, so choose Split Slices to create a more interesting visualization.
For Aggregation, choose Terms. For Field, choose sentiment.keyword. Then choose Apply changes and Save.
-
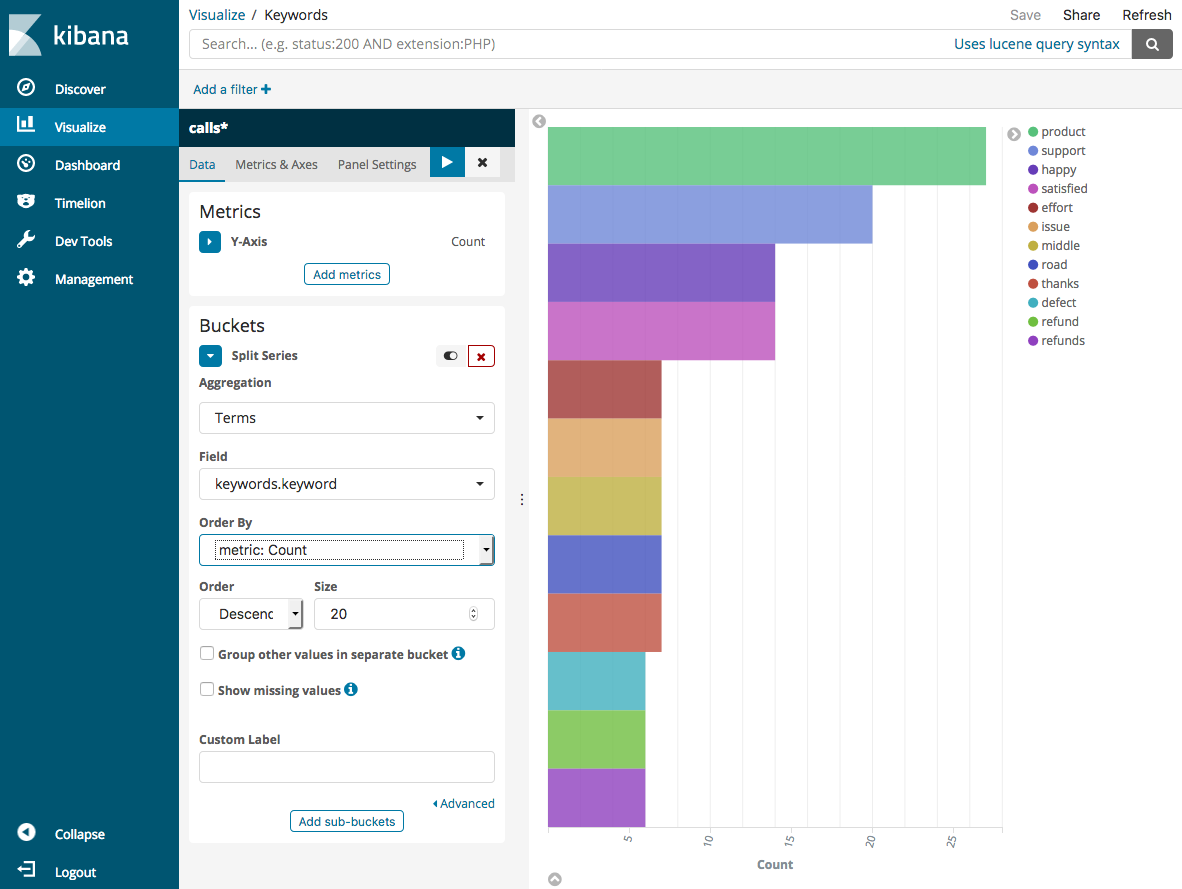
Return to the Visualize page, and add another visualization. This time, choose the horizontal bar chart.
-
Choose Split Series.
For Aggregation, choose Terms. For Field, choose keywords.keyword and change Size to 20. Then choose Apply Changes and Save.
-
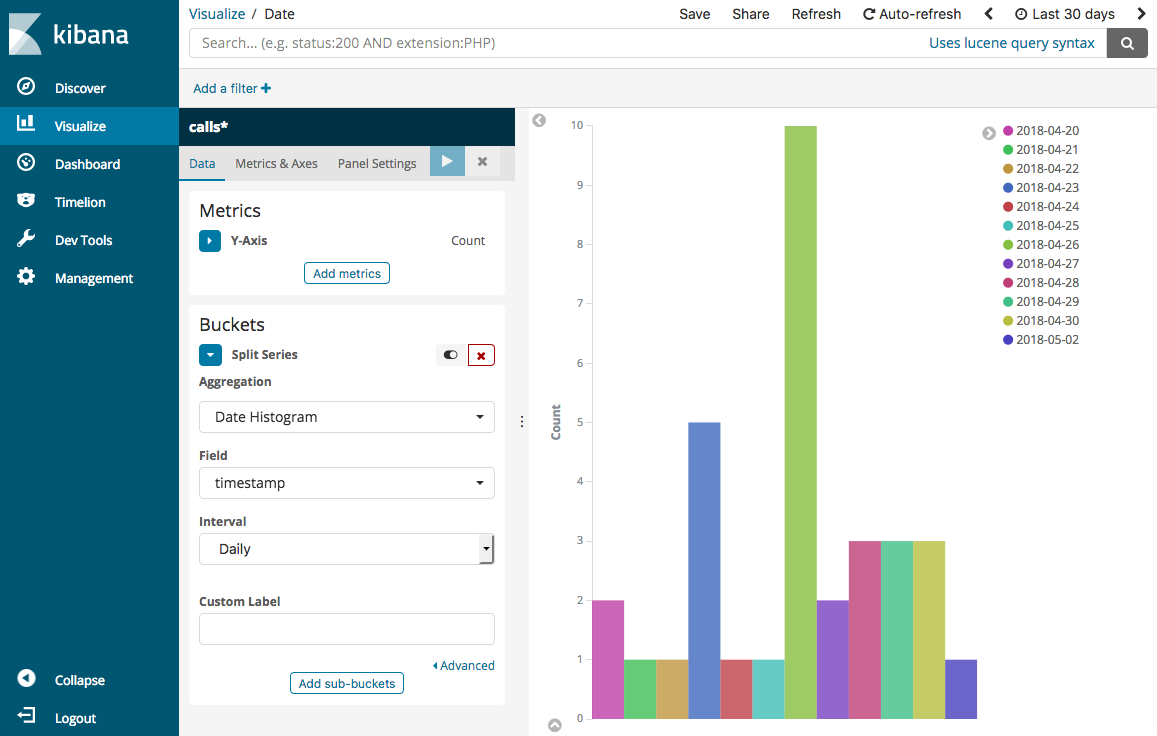
Return to the Visualize page and add one final visualization, a vertical bar chart.
-
Choose Split Series. For Aggregation, choose Date Histogram. For Field, choose timestamp and change Interval to Daily.
-
Choose Metrics & Axes and change Mode to normal.
-
Choose Apply Changes and Save.
-
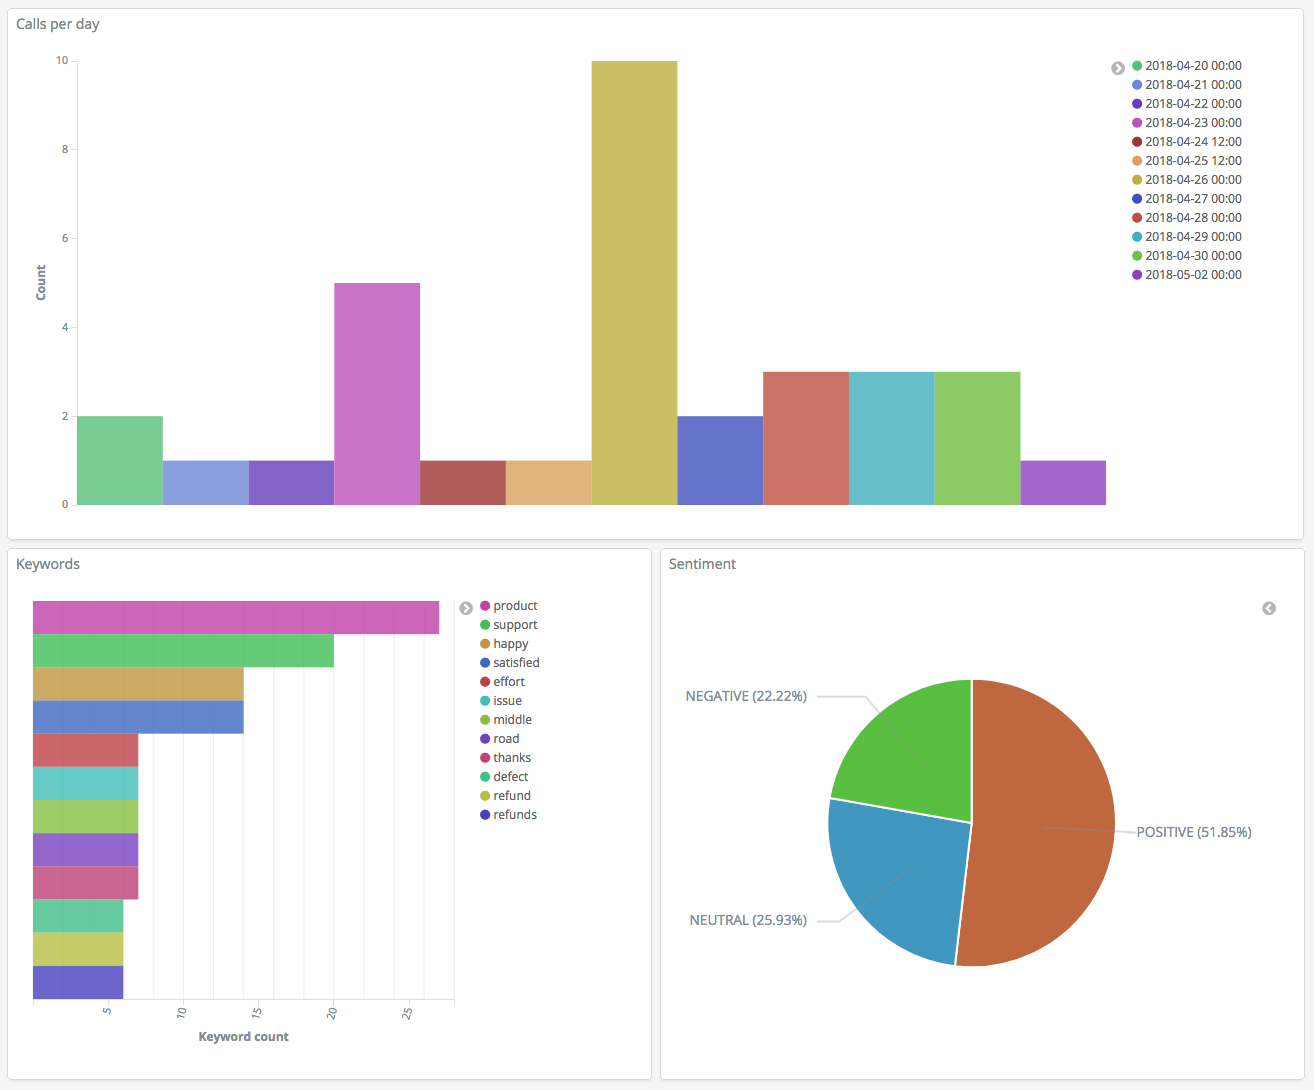
Now that you have three visualizations, you can add them to a Dashboards visualization. Choose Dashboard, create a dashboard, and add your visualizations.
Step 5: Clean up resources and next steps
To avoid unnecessary charges, delete the S3 bucket and OpenSearch Service domain. To learn more, see Delete a Bucket in the Amazon Simple Storage Service User Guide and Delete an OpenSearch Service domain in this guide.
Transcripts require much less disk space than MP3 files. You might be able to shorten your MP3 retention window—for example, from three months of call recordings to one month—retain years of transcripts, and still save on storage costs.
You could also automate the transcription process using AWS Step Functions and Lambda, add additional metadata before indexing, or craft more complex visualizations to fit your exact use case.
