Create an AWS OpsWorks for Chef Automate Server by using AWS CloudFormation
Important
AWS OpsWorks for Chef Automate reached end of life on May 5, 2024 and has been disabled for both new and existing customers. We recommend that existing customers migrate to Chef SaaS or an alternative solution. If you have questions,
you can reach out to the AWS Support Team on AWS re:Post
AWS OpsWorks for Chef Automate lets you run a Chef Automate
Starting May 3, 2021, AWS OpsWorks for Chef Automate stores some Chef Automate server attributes in AWS Secrets Manager. For more information, see Integration with AWS Secrets Manager.
The following walkthrough helps you create a server in AWS OpsWorks for Chef Automate by creating a stack in AWS CloudFormation.
Prerequisites
Before you create a new Chef Automate server, create the resources outside of AWS OpsWorks for Chef Automate that you'll need to access and manage your Chef server. For more information, see Prerequisites in the Getting Started section of this guide.
Review the OpsWorks-CM section of the AWS CloudFormation User Guide Template Reference to learn about the supported and required values in the AWS CloudFormation template that you use to create your server.
If you are creating a server that uses a custom domain, you need a custom domain,
certificate, and private key. You must specify values for all three of these parameters in
your AWS CloudFormation template. For more information about requirements for the
CustomDomain, CustomCertificate, and
CustomPrivateKey parameters, see CreateServer in the OpsWorks CM API Reference.
Create a password value for the CHEF_AUTOMATE_ADMIN_PASSWORD engine
attribute. The password length is a minimum of eight characters, and a maximum of 32. The
password can contain letters, numbers, and special characters (!/@#$%^+=_).
The password must contain at least one lower case letter, one upper case letter, one
number, and one special character. You specify this password in your AWS CloudFormation template, or as
the value of the CHEF_AUTOMATE_ADMIN_PASSWORD parameter when you are creating
your stack.
Generate a base64-encoded RSA key pair before you get started creating a Chef Automate
server in AWS CloudFormation. The pair’s public key is the value of
CHEF_AUTOMATE_PIVOTAL_KEY, the Chef- specific EngineAttributes from the CreateServer API. This key is provided as the value of
Parameters in the AWS CloudFormation console, or in the
create-stack command in the AWS CLI. To generate this key, we suggest
the following methods.
-
On Linux-based computers, you can generate this key by running the following OpenSSL
command. openssl genrsa -outpivotal_key_file_name.pem 2048Then, export the RSA public key portion of the pair to a file. The public key becomes the value of
CHEF_AUTOMATE_PIVOTAL_KEY.openssl rsa -inpivotal_key_file_name.pem -pubout -out public.pem -outform PEM -
On Windows-based computers, you can use the PuTTYgen utility to generate a base64-encoded RSA key pair. For more information, see PuTTYgen - Key Generator for PuTTY on Windows
on SSH.com.
Create a Chef Automate Server in AWS CloudFormation
This section describes how to use an AWS CloudFormation template to build a stack that creates an
AWS OpsWorks for Chef Automate server. You can do this by using the AWS CloudFormation console or the AWS CLI. An example AWS CloudFormation template is available for you
to use to build an AWS OpsWorks for Chef Automate server stack. Be sure to update the example template with your
own server name, IAM roles, instance profile, server description, backup retention count,
maintenance options, and optional tags. If your server will use a custom domain, you must
specify values for the CustomDomain, CustomCertificate, and
CustomPrivateKey parameters in your AWS CloudFormation template. You can specify the
CHEF_AUTOMATE_ADMIN_PASSWORD and CHEF_AUTOMATE_PIVOTAL_KEY
engine attributes and their values in the AWS CloudFormation template, or provide just the attributes,
and then specify values for the attributes in the AWS CloudFormation Create Stack
wizard or create-stack command. For more information about these
attributes, see Create a Chef Automate server in
the AWS Management Console in the Getting
Started section of this guide.
Topics
Create a Chef Automate Server by using AWS CloudFormation (Console)
Sign in to the AWS Management Console and open the AWS CloudFormation console at https://console.aws.amazon.com/cloudformation
. -
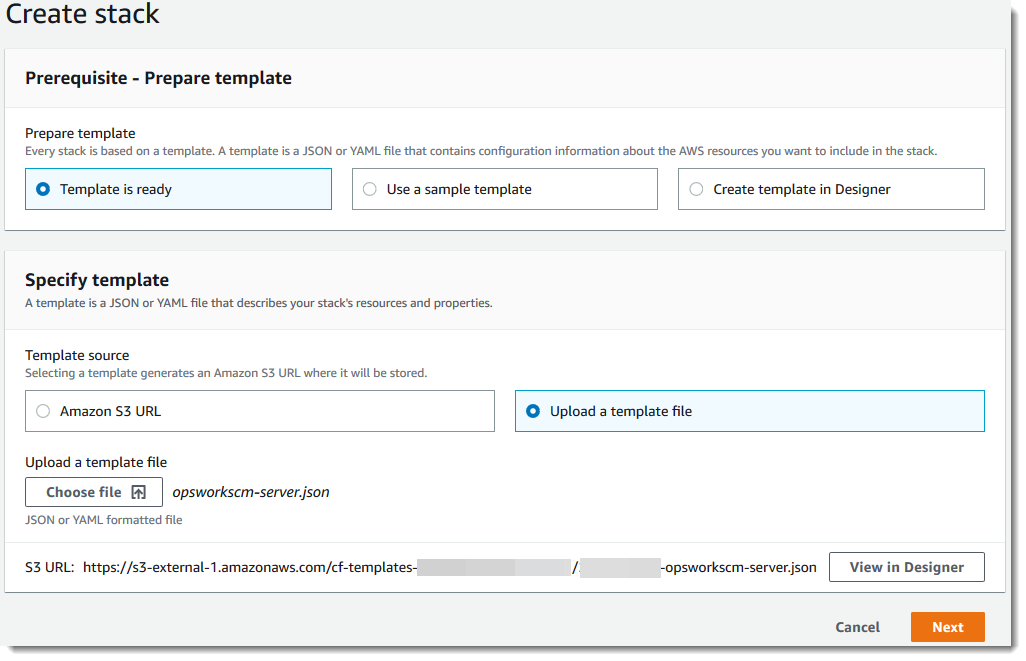
On the AWS CloudFormation home page, choose Create stack.
-
In Prerequisite - Prepare template, if you are using the example AWS CloudFormation template, choose Template is ready.
-
In Specify template, choose the source of your template. For this walkthrough, choose Upload a template file, and upload an AWS CloudFormation template that creates a Chef Automate server. Browse for your template file, and then choose Next.
An AWS CloudFormation template can be in either YAML or JSON format. An example AWS CloudFormation template is available for you to use; be sure to replace example values with your own. You can use the AWS CloudFormation template designer to build a new template or validate an existing one. For more information about how to do this, see AWS CloudFormation Designer Interface Overview in the AWS CloudFormation User Guide.
-
On the Specify stack details page, enter a name for your stack. This won't be the same as the name of your server, it is only a stack name. In the Parameters area, paste the values that you created in Prerequisites. Enter the password in Password.
Paste the contents of the RSA key file in PivotalKey. In the AWS CloudFormation console, you must add newline (
\n) characters at the end of each line of the pivotal key value, as shown in the following screenshot. Choose Next.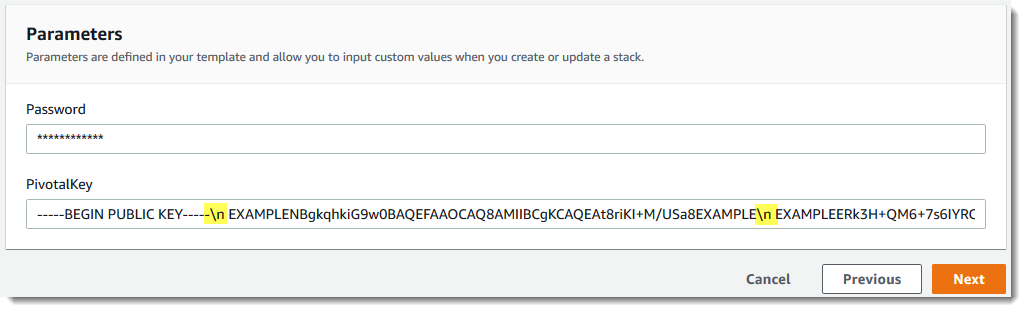
-
On the Configure stack options page, you can add tags to the server you're creating with the stack, and choose an IAM role for creating resources if you have not already specified an IAM role to use in your template. When you're finished specifying options, choose Next. For more information about advanced options such as rollback triggers, see Setting AWS CloudFormation Stack Options in the AWS CloudFormation User Guide.
-
On the Review page, review your choices. When you are ready to create the server stack, choose Create stack.
While you are waiting for AWS CloudFormation to create the stack, view the stack creation status. If stack creation fails, review the error messages shown in the console to help you resolve the issues. For more information about troubleshooting errors in AWS CloudFormation stacks, see Troubleshooting Errors in the AWS CloudFormation User Guide.
When server creation is finished, your Chef Automate server is available on the AWS OpsWorks for Chef Automate home page, with a status of online. Generate a new Starter Kit and the Chef Automate dashboard credentials from the server's Properties page. After the server is online, the Chef Automate dashboard is available on the server's domain, at a URL in the following format:
https://.your_server_name-randomID.region.opsworks-cm.ioNote
If you specified a custom domain, certificate, and private key for your server, create a CNAME entry in your enterprise's DNS management tool that maps your custom domain to the endpoint that AWS OpsWorks for Chef Automate automatically generated for the server. You cannot manage the server or connect to the Chef Automate dashboard for the server until you map the generated endpoint to your custom domain value.
To get the generated endpoint value, run the following AWS CLI command after your server is online:
aws opsworks describe-servers --server-nameserver_name
Create a Chef Automate Server by using AWS CloudFormation (CLI)
If your local computer is not already running the AWS CLI, download and install the AWS CLI by following installation instructions in the AWS Command Line Interface User Guide. This section does not describe all parameters that you can use with the create-stack command. For more information about create-stack parameters, see create-stack in the AWS CLI Reference.
-
Be sure to complete the Prerequisites for creating an AWS OpsWorks for Chef Automate server.
-
Create a service role and an instance profile.
Find and copy the ARNs of service roles in your account.
aws iam list-roles --path-prefix "/service-role/" --no-paginateIn the results of the
list-rolescommand, look for service role and instance profile entries that resemble the following. Make a note of the ARNs of the service role and instance profile, and add them to the AWS CloudFormation template that you are using to create your server stack. -
Create the AWS OpsWorks for Chef Automate server by running the create-stack command again.
-
Replace
stack_namewith the name of your stack. This is the name of the AWS CloudFormation stack, not your Chef Automate server. The Chef Automate server name is the value ofServerNamein your AWS CloudFormation template. -
Replace
templatewith the path to your template file, and the extensionyaml or jsonwith.yamlor.jsonas appropriate. -
The values for
--parameterscorrespond to EngineAttributes from the CreateServer API. For Chef, the user-provided engine attributes to create a server areCHEF_AUTOMATE_PIVOTAL_KEY, a base64-encoded RSA public key that you generate by using utilities described in Prerequisites, andCHEF_AUTOMATE_ADMIN_PASSWORD, a password of between eight and 32 characters that you create. For more information about theCHEF_AUTOMATE_ADMIN_PASSWORD, see Create a Chef Automate server by using the AWS CLI. You can provide a pointer to the PEM file that contains your pivotal key as the value of thePivotalKeyparameter, as shown in the example. If the values forCHEF_AUTOMATE_ADMIN_PASSWORDandCHEF_AUTOMATE_PIVOTAL_KEYare not specified in your template, you must provide the values in your AWS CLI command.
aws cloudformation create-stack --stack-namestack_name--template-body file://template.yaml or json--parameters ParameterKey=PivotalKey,ParameterValue="base64_encoded_RSA_public_key_value"The following is an example that includes sample values for the
CHEF_AUTOMATE_ADMIN_PASSWORDandCHEF_AUTOMATE_PIVOTAL_KEYattributes. Run a similar command if you did not specify values for these attributes in your AWS CloudFormation template.aws cloudformation create-stack --stack-name "OpsWorksCMChefServerStack" --template-body file://opsworkscm-server.yaml --parameters ParameterKey=PivotalKey,ParameterValue="$(openssl rsa -in "pivotalKey.pem" -pubout)" ParameterKey=Password,ParameterValue="SuPer\$ecret890" -
-
When the stack creation is finished, open the Properties page for the new server in the AWS OpsWorks for Chef Automate console, and download a starter kit. Downloading a new starter kit resets the Chef Automate dashboard administrator password.
-
If your server will use a custom domain, certificate, and private key, follow steps for configuring
knife.rbin (Optional) Configure knife to Work with a Custom Domain, and then go on to step 7. -
To use
knifecommands on the new server, update Chefknife.rbconfiguration file settings. An exampleknife.rbfile is included with the starter kit. The following example shows how to set upknife.rbon a server that does not use a custom domain. If you are using a custom domain, see (Optional) Configure knife to Work with a Custom Domain forknifeconfiguration instructions.-
Replace
ENDPOINTwith the server's endpoint value. This is part of the output of the stack creation operation. You can get the endpoint by running the following command.aws cloudformation describe-stacks --stack-namestack_name -
Replace
key_pair_file.pemin theclient_keyconfiguration with the name of the PEM file that contains theCHEF_AUTOMATE_PIVOTAL_KEYthat you used to create your server.base_dir = File.join(File.dirname(File.expand_path(__FILE__)), '..') log_level :info log_location STDOUT node_name 'pivotal' client_key File.join(base_dir, '.chef', 'key_pair_file.pem') syntax_check_cache_path File.join(base_dir, '.chef', 'syntax_check_cache') cookbook_path [File.join(base_dir, 'cookbooks')] chef_server_url 'ENDPOINT/organizations/default' ssl_ca_file File.join(base_dir, '.chef', 'ca_certs', 'opsworks-cm-ca-2020-root.pem') trusted_certs_dir File.join(base_dir, '.chef', 'ca_certs')
-
-
When the server creation process is finished, go on to Configure the Chef Server Using the Starter Kit. If stack creation fails, review the error messages shown in the console to help you resolve the issues. For more information about troubleshooting errors in AWS CloudFormation stacks, see Troubleshooting Errors in the AWS CloudFormation User Guide.
