Step 4: Create a pipeline in CodePipeline
Important
The AWS OpsWorks Stacks service reached end of life on May 26, 2024 and has been disabled for both new and existing customers.
We strongly recommend customers migrate their workloads to other solutions as soon as possible. If you have questions about migration, reach out to the AWS Support Team on AWS re:Post
After you have a stack with a layer and at least one instance configured in OpsWorks Stacks, create a pipeline in CodePipeline with OpsWorks Stacks as the provider to deploy apps or Chef cookbooks to your OpsWorks Stacks resources.
To create a pipeline
Open the CodePipeline console at https://console.aws.amazon.com/codepipeline/
. -
Choose Create pipeline.
-
On the Getting started with CodePipeline page, type
MyOpsWorksPipeline, or any other pipeline name that is unique to your account, and then choose Next step. -
On the Source Location page, select Amazon S3 from the Source provider drop-down list.
-
In the Amazon S3 details area, type your Amazon S3 bucket path, in the format
s3://. Refer to the link that you noted in step 10 of Step 2: Upload app code to an Amazon S3 bucket. In this walkthrough, the path isbucket-name/file names3://my-appbucket/opsworks-demo-php-simple-app-version1.zip. Choose Next step.
-
On the Build page, choose No Build from the drop-down list, and then choose Next step.
-
On the Deploy page, choose OpsWorks Stacks as the deployment provider.

-
In the Stack field, type
MyStack, or the name of the stack that you created in Step 1: Create a stack, layer, and an instance in OpsWorks Stacks. -
In the Layer field, type
MyLayer, or the name of the layer that you created in Step 1: Create a stack, layer, and an instance in OpsWorks Stacks. -
In the App field, select the app that you uploaded to Amazon S3 in Step 2: Upload app code to an Amazon S3 bucket, and then choose Next step.
-
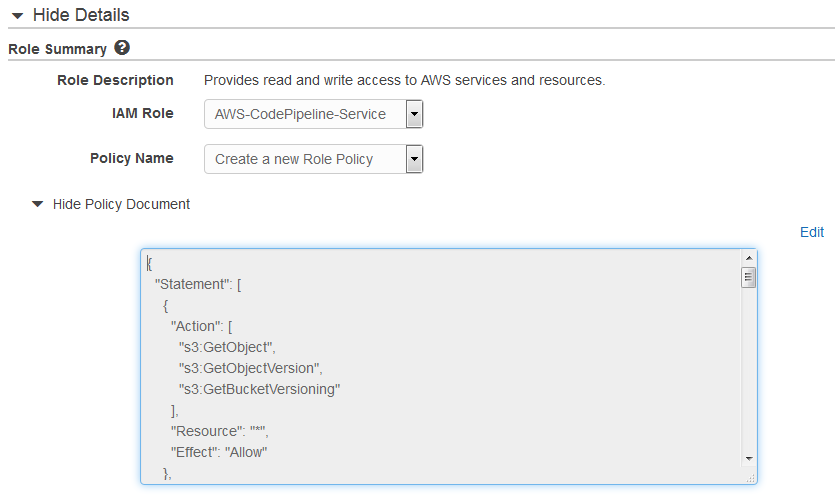
On the AWS Service Role page, choose Create Role.
A new window opens with an IAM console page that describes the role that will be created for you,
AWS-CodePipeline-Service. From the Policy name drop-down list, choose Create new policy. Be sure the policy document has the following content. Choose Edit to change the policy document, if required.{ "Statement": [ { "Action": [ "s3:GetObject", "s3:GetObjectVersion", "s3:GetBucketVersioning" ], "Resource": "*", "Effect": "Allow" }, { "Action": "opsworks:*", "Resource": "*", "Effect": "Allow" } ] }When you are finished making changes to the policy document, choose Allow. Your changes will be dislayed in the IAM console.
Note
If role creation fails, it might be because you already have an IAM role named AWS-CodePipeline-Service. If you have been using the AWS-CodePipeline-Service role before May 2016, the role might not have permissions to use OpsWorks Stacks as a deployment provider; in this case, you must update the policy statement as shown in this step. If you see an error message, go back to the beginning of this step, and choose Use existing role instead of Create role. If you use an existing role, the role should have a policy attached that includes the permissions shown in this step. For more information about the service role and its policy statement, see Edit a Policy for an IAM Service Role.
-
If the role creation process is successful, the IAM page will close, and you will be returned to the AWS Service Role page. Choose Next step.
-
On the Review your pipeline page, verify the choices shown on the page, and then choose Create pipeline.

-
When your pipeline is ready, it should start locating your source code and deploying your app to your stack automatically. This process can take several minutes.
