Local network interfaces for your Outposts servers
With Outposts servers, a local network interface is a logical networking component that connects the Amazon EC2 instances in your Outposts subnet to your on-premises network.
A local network interface runs directly on your local area network. With this type of local connectivity, you don't need routers or gateways to communicate with your on-premises equipment. Local network interfaces are named similarly to network interfaces or elastic network interfaces. We distinguish between the two interfaces by always using local when we refer to local network interfaces.
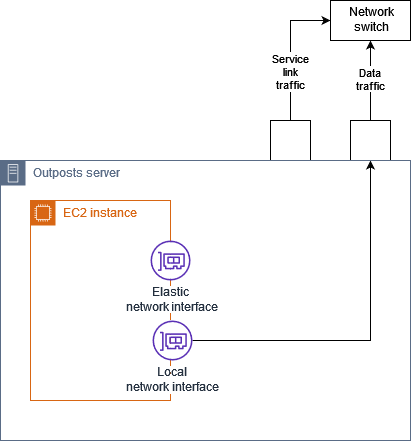
After you enable local network interfaces on an Outpost subnet, you can configure the EC2 instances in the Outpost subnet to include a local network interface in addition to the elastic network interface. The local network interface connects to the on-premises network while the network interface connects to the VPC. The following diagram shows an EC2 instance on an Outposts server with both an elastic network interface and a local network interface.
You must configure the operating system to enable the local network interface to communicate on your local area network, just as you would for any other on-premises equipment. You can't use DHCP option sets in a VPC to configure a local network interface because a local network interface runs on your local area network.
The elastic network interface works exactly as it does for instances in an Availability Zone subnet. For example, you can use the VPC network connection to access the public Regional endpoints for AWS services, or you can use interface VPC endpoints to access AWS services using AWS PrivateLink. For more information, see AWS Outposts connectivity to AWS Regions.
Contents
Local network interface basics
Local network interfaces provide access to a physical layer-two network. A VPC is a virtualized layer-three network. Local network interfaces do not support VPC networking components. These components include security groups, network access control lists, virtualized routers or route tables, and flow logs. The local network interface does not provide the Outposts server with visibility into VPC layer-three flows. The host operating system of the instance does have full visibility into frames from the physical network. You can apply standard firewall logic to information within these frames. However, this communication happens inside the instance but outside the purview of the virtualized constructs.
Considerations
-
Local network interfaces support ARP and DHCP protocols. They do not support general L2 broadcast messages.
-
Quotas for local network interfaces comes out of your quota for network interfaces. For more information, see Network interface quotas in the Amazon VPC User Guide.
-
Each EC2 instance can have one local network interface.
-
A local network interface can't use the primary network interface of the instance.
-
Outposts servers can host multiple EC2 instances, each with a local network interface.
Note
EC2 instances within the same server can communicate directly without sending data outside the Outposts server. This communication includes traffic over a local network interface or elastic network interfaces.
-
Local network interfaces are available only for instances running in an Outposts subnet on an Outposts server.
-
Local network interfaces do not support promiscuous mode or MAC address spoofing.
Performance
The local network interface of each instance size provides a portion of the physical 10 GbE available bandwidth. The following table lists the network performance for each instance type:
| Instance type | Baseline bandwidth (Gbps) | Burst bandwidth (Gbps) |
|---|---|---|
|
c6id.large |
0.15625 |
2.5 |
|
c6id.xlarge |
0.3125 |
2.5 |
|
c6id.2xlarge |
0.625 |
2.5 |
|
c6id.4xlarge |
1.25 |
2.5 |
|
c6id.8xlarge |
2.5 |
2.5 |
|
c6id.12xlarge |
3.75 |
3.75 |
|
c6id.16xlarge |
5 |
5 |
|
c6id.24xlarge |
7.5 |
7.5 |
|
c6id.32xlarge |
10 |
10 |
|
c6gd.medium |
0.15625 |
4 |
|
c6gd.large |
0.3125 |
4 |
|
c6gd.xlarge |
0.625 |
4 |
|
c6gd.2xlarge |
1.25 |
4 |
|
c6gd.4xlarge |
2.5 |
4 |
|
c6gd.8xlarge |
4.8 |
4.8 |
|
c6gd.12xlarge |
7.5 |
7.5 |
|
c6gd.16xlarge |
10 |
10 |
Security groups
By design, the local network interface does not use security groups in your VPC. A security group controls inbound and outbound VPC traffic. The local network interface is not attached to the VPC. The local network interface is attached to your local network. To control inbound and outbound traffic on the local network interface, use a firewall or similar strategy, just as you would with the rest of your on-premises equipment.
Monitoring
CloudWatch metrics are produced for each local network interface, just as they are for elastic network interfaces. For more information, see Monitor network performance for ENA settings on your EC2 instance in the Amazon EC2 User Guide.
MAC addresses
AWS provides MAC addresses for local network interfaces. Local network interfaces use locally administered addresses (LAA) for their MAC addresses. A local network interface uses the same MAC address until you delete the interface. After you delete a local network interface, remove the MAC address from your local configurations. AWS can reuse MAC addresses that are no longer in use.
