Create the AD infrastructure
Choose the Automated tab to create the Active Directory (AD) infrastructure with an CloudFormation quick create template.
Choose the Manual tab to manually create the AD infrastructure.
-
Sign in to the AWS Management Console.
-
Open CloudFormation Quick Create (region us-east-1)
to create the following resources in the CloudFormation console: -
A VPC with two subnets and routing for public access, if no VPC is specified.
-
An AWS Managed Microsoft AD.
-
An Amazon EC2 instance that's joined to the AD that you can use to manage the directory.
-
-
In the Quick create stack page Parameters section, enter passwords for the following parameters:
-
AdminPassword
-
ReadOnlyPassword
-
UserPassword
Make note of the passwords. You use them later on in this tutorial.
-
-
For DomainName, enter
corp.example.com -
For Keypair, enter the name of an Amazon EC2 key pair.
-
Check the boxes to acknowledge each of the access capabilities at the bottom of the page.
-
Choose Create stack.
-
After the CloudFormation stack has reached the
CREATE_COMPLETEstate, choose the Outputs tab of the stack. Make a note of the output resource names and IDs because you need to use them in later steps. The outputs provide the information that's needed to create the cluster.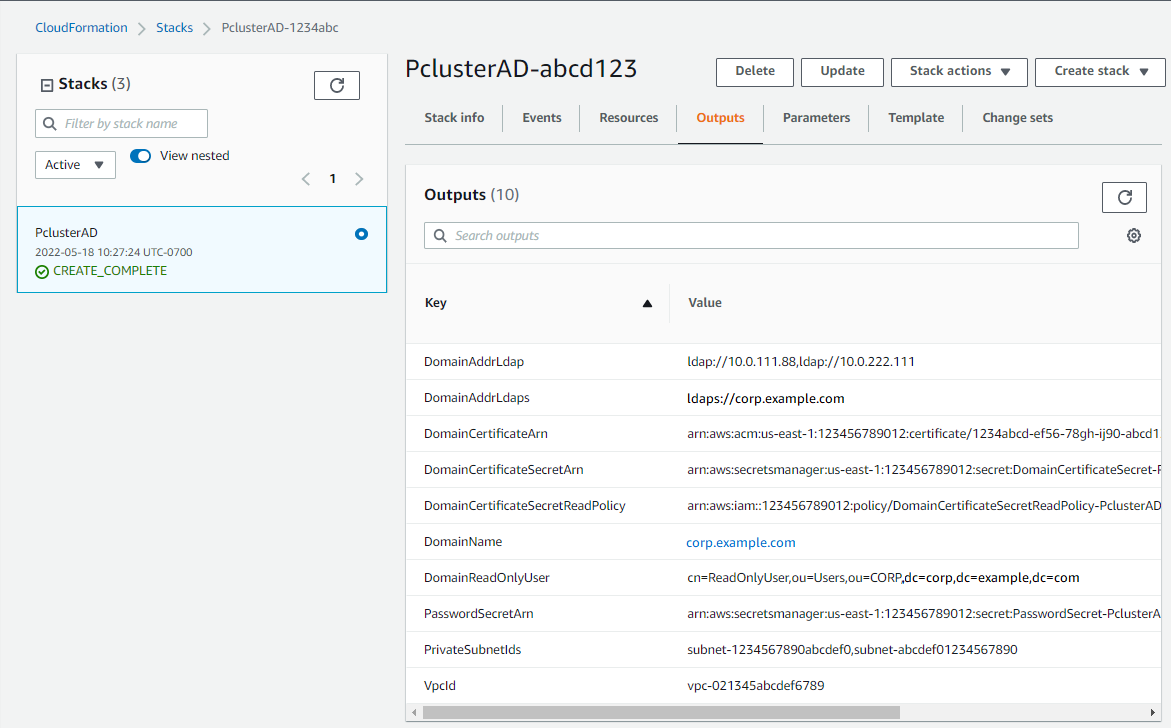
-
To complete the exercises (Optional) Manage AD users and groups, you need the directory ID. Choose Resources and scroll down to make note of the directory ID.
-
Continue at (Optional) Manage AD users and groups or Create the cluster.
Create a VPC for the directory service with two subnets in different Availability Zones and an AWS Managed Microsoft AD.
Note
-
The directory and domain name is
corp.example.com. The short name isCORP. -
Change the
Adminpassword in the script. -
The Active Directory (AD) takes at least 15 minutes to create.
Use the following Python script to create the VPC, subnets, and AD resources in your local AWS Region. Save this file as
ad.py and run it.
import boto3 import time from pprint import pprint vpc_name = "PclusterVPC" ad_domain = "corp.example.com" admin_password ="asdfASDF1234"ec2 = boto3.client("ec2") ds = boto3.client("ds") region = boto3.Session().region_name # Create the VPC, Subnets, IGW, Routes vpc = ec2.create_vpc(CidrBlock="10.0.0.0/16")["Vpc"] vpc_id = vpc["VpcId"] time.sleep(30) ec2.create_tags(Resources=[vpc_id], Tags=[{"Key": "Name", "Value": vpc_name}]) subnet1 = ec2.create_subnet(VpcId=vpc_id, CidrBlock="10.0.0.0/17", AvailabilityZone=f"{region}a")["Subnet"] subnet1_id = subnet1["SubnetId"] time.sleep(30) ec2.create_tags(Resources=[subnet1_id], Tags=[{"Key": "Name", "Value": f"{vpc_name}/subnet1"}]) ec2.modify_subnet_attribute(SubnetId=subnet1_id, MapPublicIpOnLaunch={"Value": True}) subnet2 = ec2.create_subnet(VpcId=vpc_id, CidrBlock="10.0.128.0/17", AvailabilityZone=f"{region}b")["Subnet"] subnet2_id = subnet2["SubnetId"] time.sleep(30) ec2.create_tags(Resources=[subnet2_id], Tags=[{"Key": "Name", "Value": f"{vpc_name}/subnet2"}]) ec2.modify_subnet_attribute(SubnetId=subnet2_id, MapPublicIpOnLaunch={"Value": True}) igw = ec2.create_internet_gateway()["InternetGateway"] ec2.attach_internet_gateway(InternetGatewayId=igw["InternetGatewayId"], VpcId=vpc_id) route_table = ec2.describe_route_tables(Filters=[{"Name": "vpc-id", "Values": [vpc_id]}])["RouteTables"][0] ec2.create_route(RouteTableId=route_table["RouteTableId"], DestinationCidrBlock="0.0.0.0/0", GatewayId=igw["InternetGatewayId"]) ec2.modify_vpc_attribute(VpcId=vpc_id, EnableDnsSupport={"Value": True}) ec2.modify_vpc_attribute(VpcId=vpc_id, EnableDnsHostnames={"Value": True}) # Create the Active Directory ad = ds.create_microsoft_ad( Name=ad_domain, Password=admin_password, Description="ParallelCluster AD", VpcSettings={"VpcId": vpc_id, "SubnetIds": [subnet1_id, subnet2_id]}, Edition="Standard", ) directory_id = ad["DirectoryId"] # Wait for completion print("Waiting for the directory to be created...") directories = ds.describe_directories(DirectoryIds=[directory_id])["DirectoryDescriptions"] directory = directories[0] while directory["Stage"] in {"Requested", "Creating"}: time.sleep(3) directories = ds.describe_directories(DirectoryIds=[directory_id])["DirectoryDescriptions"] directory = directories[0] dns_ip_addrs = directory["DnsIpAddrs"] pprint({"directory_id": directory_id, "vpc_id": vpc_id, "subnet1_id": subnet1_id, "subnet2_id": subnet2_id, "dns_ip_addrs": dns_ip_addrs})
The following is example output from the Python script.
{
  "directory_id": "d-abcdef01234567890",
  "dns_ip_addrs": ["192.0.2.254", "203.0.113.237"],
  "subnet1_id": "subnet-021345abcdef6789",
  "subnet2_id": "subnet-1234567890abcdef0",
  "vpc_id": "vpc-021345abcdef6789"
}
Make a note of the output resource names and IDs. You use them in later steps.
After the script completes, continue to the next step.
-
Connect to your instance and join the AD realm as
admin.Run the following commands to connect to the instance.
$INSTANCE_ID="i-1234567890abcdef0"$PUBLIC_IP=$(aws ec2 describe-instances \ --instance-ids $INSTANCE_ID \ --query "Reservations[0].Instances[0].PublicIpAddress" \ --output text)$ssh -i~/.ssh/keys/keypair.pemec2-user@$PUBLIC_IP -
Install necessary software and join the realm.
$sudo yum -y install sssd realmd oddjob oddjob-mkhomedir adcli samba-common samba-common-tools krb5-workstation openldap-clients policycoreutils-python -
Replace the admin password with your
adminpassword.$ADMIN_PW="asdfASDF1234"$echo $ADMIN_PW | sudo realm join -U Admincorp.example.comPassword for Admin:If the preceding has succeeded, you're joined to the realm and can proceed to the next step.
-
Create the ReadOnlyUser and an additional user.
In this step, you use adcli
and openldap-clients tools that you installed in a preceding step. $echo $ADMIN_PW | adcli create-user -x -U Admin --domain=corp.example.com--display-name=ReadOnlyUser ReadOnlyUser$echo $ADMIN_PW | adcli create-user -x -U Admin --domain=corp.example.com--display-name=user000 user000 -
Verify the users are created:
The directory DNS IP addresses are outputs of the Python script.
$DIRECTORY_IP="192.0.2.254"$ldapsearch -x -h $DIRECTORY_IP -D Admin -w $ADMIN_PW -b "cn=ReadOnlyUser,ou=Users,ou=CORP,dc=corp,dc=example,dc=com"$ldapsearch -x -h $DIRECTORY_IP -D Admin -w $ADMIN_PW -b "cn=user000,ou=Users,ou=CORP,dc=corp,dc=example,dc=com"By default, when you create a user with the
ad-cli, the user is disabled. -
Reset and activate the user passwords from your local machine:
Log out of your Amazon EC2 instance.
Note
-
ro-p@ssw0rdis the password ofReadOnlyUser, retrieved from AWS Secrets Manager. -
user-p@ssw0rdis the password of a cluster user that's provided when you connect (ssh) to the cluster.
The
directory-idis an output of the Python script.$DIRECTORY_ID="d-abcdef01234567890"$aws ds reset-user-password \ --directory-id $DIRECTORY_ID \ --user-name "ReadOnlyUser" \ --new-password"ro-p@ssw0rd"\ --region"region-id"$aws ds reset-user-password \ --directory-id $DIRECTORY_ID \ --user-name"user000"\ --new-password"user-p@ssw0rd"\ --region"region-id" -
-
Add the password to a Secrets Manager secret.
Now that you created a
ReadOnlyUserand set the password, store it in a secret that AWS ParallelCluster uses for validating logins.Use Secrets Manager to create a new secret to hold the password for the
ReadOnlyUseras the value. The secret value format must be plain text only (not JSON format). Make note of the secret ARN for future steps.$aws secretsmanager create-secret --name"ADSecretPassword"\ --regionregion_id\ --secret-string"ro-p@ssw0rd"\ --query ARN \ --output textarn:aws:secretsmanager:region-id:123456789012:secret:ADSecretPassword-1234
Make a note of resource IDs. You use them in steps later on.
-
Generate domain certificate, locally.
$PRIVATE_KEY="corp-example-com.key" CERTIFICATE="corp-example-com.crt" printf ".\n.\n.\n.\n.\ncorp.example.com\n.\n" | openssl req -x509 -sha256 -nodes -newkey rsa:2048 -keyout $PRIVATE_KEY -days 365 -out $CERTIFICATE -
Store the certificate to Secrets Manager to make it retrievable from within the cluster later on.
$aws secretsmanager create-secret --name example-cert \ --secret-string file://$CERTIFICATE \ --regionregion-id{ "ARN": "arn:aws:secretsmanager:region-id:123456789012:secret:example-cert-123abc", "Name": "example-cert", "VersionId": "14866070-092a-4d5a-bcdd-9219d0566b9c" } -
Add the following policy to the IAM role that you created to join the Amazon EC2 instance to the AD domain.
PutDomainCertificateSecrets{ "Statement": [ { "Action": [ "secretsmanager:PutSecretValue" ], "Resource": [ "arn:aws:secretsmanager:region-id:123456789012:secret:example-cert-123abc" ], "Effect": "Allow" } ] } -
Import the certificate to AWS Certificate Manager (ACM).
$aws acm import-certificate --certificate fileb://$CERTIFICATE \ --private-key fileb://$PRIVATE_KEY \ --regionregion-id{ "CertificateArn": "arn:aws:acm:region-id:123456789012:certificate/343db133-490f-4077-b8d4-3da5bfd89e72" } -
Create and the load balancer that is put in front of the Active Directory endpoints.
$aws elbv2 create-load-balancer --name CorpExampleCom-NLB \ --type network \ --scheme internal \ --subnetssubnet-1234567890abcdef0 subnet-021345abcdef6789\ --regionregion-id{ "LoadBalancers": [ { "LoadBalancerArn": "arn:aws:elasticloadbalancing:region-id:123456789012:loadbalancer/net/CorpExampleCom-NLB/3afe296bf4ba80d4", "DNSName": "CorpExampleCom-NLB-3afe296bf4ba80d4.elb.region-id.amazonaws.com", "CanonicalHostedZoneId": "Z2IFOLAFXWLO4F", "CreatedTime": "2022-05-05T12:56:55.988000+00:00", "LoadBalancerName": "CorpExampleCom-NLB", "Scheme": "internal", "VpcId": "vpc-021345abcdef6789", "State": { "Code": "provisioning" }, "Type": "network", "AvailabilityZones": [ { "ZoneName": "region-idb", "SubnetId": "subnet-021345abcdef6789", "LoadBalancerAddresses": [] }, { "ZoneName": "region-ida", "SubnetId": "subnet-1234567890abcdef0", "LoadBalancerAddresses": [] } ], "IpAddressType": "ipv4" } ] } -
Create the target group that's targeting the Active Directory endpoints.
$aws elbv2 create-target-group --name CorpExampleCom-Targets --protocol TCP \ --port 389 \ --target-type ip \ --vpc-idvpc-021345abcdef6789\ --regionregion-id{ "TargetGroups": [ { "TargetGroupArn": "arn:aws:elasticloadbalancing:region-id:123456789012:targetgroup/CorpExampleCom-Targets/44577c583b695e81", "TargetGroupName": "CorpExampleCom-Targets", "Protocol": "TCP", "Port": 389, "VpcId": "vpc-021345abcdef6789", "HealthCheckProtocol": "TCP", "HealthCheckPort": "traffic-port", "HealthCheckEnabled": true, "HealthCheckIntervalSeconds": 30, "HealthCheckTimeoutSeconds": 10, "HealthyThresholdCount": 3, "UnhealthyThresholdCount": 3, "TargetType": "ip", "IpAddressType": "ipv4" } ] } -
Register the Active Directory (AD) endpoints into the target group.
$aws elbv2 register-targets --target-group-arn arn:aws:elasticloadbalancing:region-id:123456789012:targetgroup/CorpExampleCom-Targets/44577c583b695e81\ --targets Id=192.0.2.254,Port=389 Id=203.0.113.237,Port=389 \ --regionregion-id -
Create the LB listener with the certificate.
$aws elbv2 create-listener --load-balancer-arn arn:aws:elasticloadbalancing:region-id:123456789012:loadbalancer/net/CorpExampleCom-NLB/3afe296bf4ba80d4\ --protocol TLS \ --port 636 \ --default-actions Type=forward,TargetGroupArn=arn:aws:elasticloadbalancing:region-id:123456789012:targetgroup/CorpExampleCom-Targets/44577c583b695e81\ --ssl-policy ELBSecurityPolicy-TLS-1-2-2017-01 \ --certificates CertificateArn=arn:aws:acm:region-id:123456789012:certificate/343db133-490f-4077-b8d4-3da5bfd89e72\ --regionregion-id"Listeners": [ { "ListenerArn": "arn:aws:elasticloadbalancing:region-id:123456789012:listener/net/CorpExampleCom-NLB/3afe296bf4ba80d4/a8f9d97318743d4b", "LoadBalancerArn": "arn:aws:elasticloadbalancing:region-id:123456789012:loadbalancer/net/CorpExampleCom-NLB/3afe296bf4ba80d4", "Port": 636, "Protocol": "TLS", "Certificates": [ { "CertificateArn": "arn:aws:acm:region-id:123456789012:certificate/343db133-490f-4077-b8d4-3da5bfd89e72" } ], "SslPolicy": "ELBSecurityPolicy-TLS-1-2-2017-01", "DefaultActions": [ { "Type": "forward", "TargetGroupArn": "arn:aws:elasticloadbalancing:region-id:123456789012:targetgroup/CorpExampleCom-Targets/44577c583b695e81", "ForwardConfig": { "TargetGroups": [ { "TargetGroupArn": "arn:aws:elasticloadbalancing:region-id:123456789012:targetgroup/CorpExampleCom-Targets/44577c583b695e81" } ] } } ] } ] } -
Create the hosted zone to make the domain discoverable within the cluster VPC.
$aws route53 create-hosted-zone --name corp.example.com \ --vpc VPCRegion=region-id,VPCId=vpc-021345abcdef6789\ --caller-reference "ParallelCluster AD Tutorial"{ "Location": "https://route53.amazonaws.com/2013-04-01/hostedzone/Z09020002B5MZQNXMSJUB", "HostedZone": { "Id": "/hostedzone/Z09020002B5MZQNXMSJUB", "Name": "corp.example.com.", "CallerReference": "ParallelCluster AD Tutorial", "Config": { "PrivateZone": true }, "ResourceRecordSetCount": 2 }, "ChangeInfo": { "Id": "/change/C05533343BF3IKSORW1TQ", "Status": "PENDING", "SubmittedAt": "2022-05-05T13:21:53.863000+00:00" }, "VPC": { "VPCRegion": "region-id", "VPCId": "vpc-021345abcdef6789" } } -
Create a file that's named
recordset-change.jsonwith the following content.HostedZoneIdis the canonical hosted zone ID of the load balancer.{ "Changes": [ { "Action": "CREATE", "ResourceRecordSet": { "Name": "corp.example.com", "Type": "A", "Region":"region-id", "SetIdentifier": "example-active-directory", "AliasTarget": { "HostedZoneId":"Z2IFOLAFXWLO4F", "DNSName": "CorpExampleCom-NLB-3afe296bf4ba80d4.elb.region-id.amazonaws.com", "EvaluateTargetHealth": true } } } ] } -
Submit the recordset change to the hosted zone, this time using the hosted zone ID.
$aws route53 change-resource-record-sets --hosted-zone-idZ09020002B5MZQNXMSJUB\ --change-batch file://recordset-change.json{ "ChangeInfo": { "Id": "/change/C0137926I56R3GC7XW2Y", "Status": "PENDING", "SubmittedAt": "2022-05-05T13:40:36.553000+00:00" } } -
Create a policy document
policy.jsonwith the following content. -
Create a policy document that is named
policy.jsonwith the following content.$aws iam create-policy --policy-name ReadCertExample \ --policy-document file://policy.json{ "Policy": { "PolicyName": "ReadCertExample", "PolicyId": "ANPAUUXUVBC42VZSI4LDY", "Arn": "arn:aws:iam::123456789012:policy/ReadCertExample-efg456", "Path": "/", "DefaultVersionId": "v1", "AttachmentCount": 0, "PermissionsBoundaryUsageCount": 0, "IsAttachable": true, "CreateDate": "2022-05-05T13:42:18+00:00", "UpdateDate": "2022-05-05T13:42:18+00:00" } } -
Continue to follow the steps at (Optional) Manage AD users and groups or Create the cluster.
