Step 3: Send additional requests
When you finish configuring and testing Postman, you can start sending additional requests to the Amazon Pinpoint API. This section includes information that you must know before you start sending requests. It also includes two sample requests that describe how to use the Amazon Pinpoint collection.
Important
When you complete the procedures in this section, you submit requests to the Amazon Pinpoint API. These requests create new resources in your Amazon Pinpoint account, modify existing resources, send messages, change the configuration of your Amazon Pinpoint projects, and use other Amazon Pinpoint features. Use caution when you carry out these requests.
You must configure most of the operations in the Amazon Pinpoint Postman collection before you
can use them. For GET and DELETE operations, you typically
only need to modify the variables that are set on the Pre-request
Script tab.
Note
When you use the IAM policy that's shown in Create an IAM policy, you
can't carry out any of the DELETE requests that are included in this
collection.
For example, the GetCampaign operation requires you to specify a
projectId and a
campaignId. On the Pre-request
Script tab, both of these variables are present, and are populated with
example values. Delete the example values and replace them with the applicable values
for your Amazon Pinpoint project and campaign.
Of these variables, the most commonly used is the
projectId variable. The value for this variable
should be the unique identifier for the project that your request applies to. To get a
list of these identifiers for your projects, refer to the response to the
GetApps request that you sent in the preceding step of this tutorial.
In that response, the Id field provides the unique identifier for a
project. To learn more about the GetApps operation and the meaning of each
field in the response, see Apps in the
Amazon Pinpoint API Reference.
Note
In Amazon Pinpoint, a "project" is the same as an "app" or "application."
For POST and PUT operations, you must also modify the
request body to include the values that you want to send to the API. For example, when
you submit a CreateApp request, which is a POST request, you
must specify a name for the project that you create. You can modify the request on the
Body tab. In this example, replace the value next to
"Name" with the name of the project. If you want to add tags to the
project, you can specify them in the tags object. Or, if you don't want to
add tags, you can delete the entire tags object.
Note
The UntagResource operation also requires you to specify URL
parameters. You can specify these parameters on the Params tab.
Replace the values in the VALUE column with the tags that you
want to delete for the specified resource.
Before you create segments and campaigns in Amazon Pinpoint, you first have to create a project. In Amazon Pinpoint, a project consists of segments, campaigns, configurations, and data that are united by a common purpose. For example, you could use a project to contain all of the content that's related to a particular app, or to a specific brand or marketing initiative. When you add customer information to Amazon Pinpoint, that information is associated with a project.
To create a project by sending a CreateApp API request
-
On the Environments menu, choose the AWS Region that you want to create the project in.
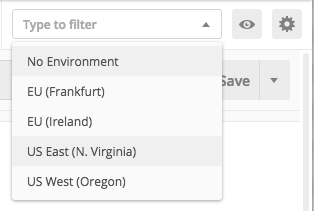
In this example, Postman has been configured so that the Environments menu shows the following four options:
-
US East (N. Virginia)
-
US West (Oregon)
-
Europe (Frankfurt)
-
Europe (Ireland)
-
-
In the Apps folder, choose the CreateApp operation>.
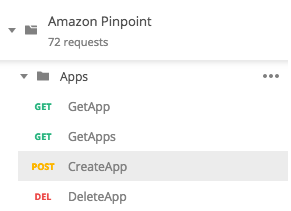
The Apps folder in the Amazon Pinpoint Postman collection are expanded and show the following requests:
-
GetApp -
GetApps -
CreateApp -
DeleteApp
-
-
On the Body tab, next to
"Name", replace the placeholder value ("string") with a name for the campaign, such as"MySampleProject". -
Delete the comma after the campaign name, and then delete the entire
tagsobject on lines 3 through 5. When you finish, your request should resemble the example that's shown in the following code snippet.{ "Name": "MySampleProject" }Postman is configured to send the request as a raw JSON payload.
-
Choose Send. If the campaign is created successfully, the response pane shows a status of
201 Created.{ "Name": "MySampleProject" "Id": "12345678901234567890123456789012", "Arn": "arn:aws:mobiletargeting:us-east-1:123456789012:apps/12345678901234567890123456789012", "tags": {} }
It's very common to use the Amazon Pinpoint SendMessages API to send transactional
messages. One advantage to sending messages by using the SendMessages API
as opposed to creating campaigns, is that you can send messages to any address, such as
an email address, phone number, or device token. The address that you send messages to
doesn't have to exist in your Amazon Pinpoint account. Let's compare this method to sending
messages by creating campaigns. Before you send a campaign in Amazon Pinpoint, you must add
endpoints to your Amazon Pinpoint account, create segments, create the campaign, and carry out the
campaign.
The example in this section shows you how to send a transactional email message directly to a specific email address. You can modify this request to send messages through other channels, such as SMS, mobile push, or voice.
To send an email message by submitting a SendMessages request
-
Verify that the email channel is enabled for the project and the email address or domain that you want to use to send and receive the message is configured. For more information, see Enabling and disabling the email channel and Verifying email identities in the Amazon Pinpoint User Guide.
Note
To complete the procedure in this section, you must verify and email address
-
On the Environments menu, choose the AWS Region that you want to send the message from.
In this example, Postman has been configured so that the Environments menu shows the following four options:
-
US East (N. Virginia)
-
US West (Oregon)
-
Europe (Frankfurt)
-
Europe (Ireland)
-
-
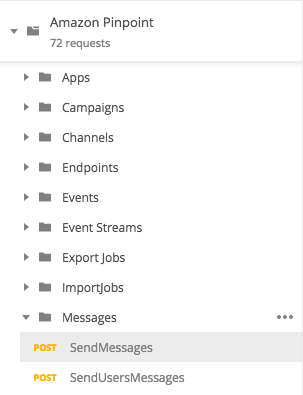
In the Messages folder, choose the SendMessages operation.
-
On the Pre-request Script tab, replace the value of the
projectIdvariable with the ID of a project that already exists in the Region that you selected in step 2 of this section. -
On the Body tab, delete the example request that's shown in the request editor. Paste the following code:
{ "MessageConfiguration":{ "EmailMessage":{ "FromAddress":"sender@example.com", "SimpleEmail":{ "Subject":{ "Data":"Sample Amazon Pinpoint message" }, "HtmlPart":{ "Data":"<h1>Test message</h1><p>This is a sample message sent from <a href=\"https://aws.amazon.com/pinpoint\">Amazon Pinpoint</a> using the SendMessages API.</p>" }, "TextPart":{ "Data":"This is a sample message sent from Amazon Pinpoint using the SendMessages API." } } } }, "Addresses":{ "recipient@example.com": { "ChannelType": "EMAIL" } } } -
In the preceding code, replace
sender@example.comwith your verified email address. Replacerecipient@example.comwith the verified email address that you want to send the message to.Note
If your account is still in the Amazon Pinpoint email sandbox, you can only send emails to addresses or domains that are verified in your Amazon Pinpoint account. For more information about having your account removed from the sandbox, see Requesting production access for email in the Amazon Pinpoint User Guide.
-
Choose Send. If the message is sent successfully, the response pane shows a status of
200 OK.{ "ApplicationId": "12345678901234567890123456789012", "RequestId": "<sampleValue>", "Result": { "recipient@example.com": { "DeliveryStatus": "SUCCESSFUL", "StatusCode": 200, "StatusMessage": "<sampleValue>", "MessageId": "<sampleValue>" } } }
