End of support notice: On October 30, 2026, AWS will end support for Amazon Pinpoint. After October 30, 2026, you will no longer be able to access the Amazon Pinpoint console or Amazon Pinpoint resources (endpoints, segments, campaigns, journeys, and analytics). For more information, see Amazon Pinpoint end of support. Note: APIs related to SMS, voice, mobile push, OTP, and phone number validate are not impacted by this change and are supported by AWS End User Messaging.
Amazon Pinpoint domain reputation page
The Domain reputation page contains information about the domains that you use to send email, including their engagement rates, inbox placement rates, and denylist activities.
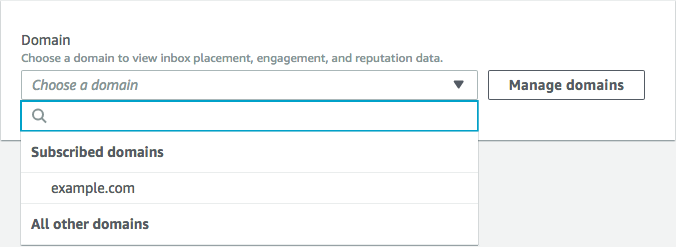
Choose a domain from the Domain menu to see information about that domain, as shown in the following image.
Summary
This section contains information about the percentage of emails from a specific domain that arrived in your customers' inboxes. It also provides information about the percentage of emails that your customers engaged with by opening them or by clicking links in them. Finally, it shows the number of denylists that the IP addresses associated with the domain are on.
Note
The information in this section contains general guidance, as opposed to exact metrics. If you need precise metrics related to the delivery of your mail and engagement with it, we recommend that you set up Streaming events with Amazon Pinpoint.
To view data in this section, choose a subscribed domain, as shown in the following image. When you choose a domain, data appears in the Summary, Inbox placement by email provider, and Denylist activities sections.
When you choose a domain and a date range, the Deliverability overview section shows the following information:
-
Engagement rate – The percentage of email sent from the selected domain that recipients opened or clicked links in. When determining whether to deliver your email to recipient's inboxes, many email providers (especially larger ones) consider how often recipients engaged with email sent from your domain in the past month or two. For this reason, you should try to maintain an engagement rate of at least 25%.
-
Inbox placement rate – The percentage of email sent from the selected domain that arrived in recipients' inboxes. An inbox placement rate of around 80% is considered average.
-
Denylist activities – The number of denylists that IP addresses associated with the domain appear on. To learn more about denylists, see Denylist activities.
Alarms
On the Alarms tab, you can create alarms that send you notifications for any of the metrics in the Summary section.
To create an alarm
Open the Amazon Pinpoint console at https://console.aws.amazon.com/pinpoint/
. -
In the navigation pane, choose Deliverability dashboard.
-
On the Alarms tab, choose Create alarm.
-
On the Create alarm page, do the following:
-
For Alarm name, enter a name that helps you easily identify the alarm.
-
For Send notification when the, choose one of the following options:
-
Inbox placement rate – When you choose this option, the alarm considers the inbox placement rate across all email providers.
-
Inbox placement rate – When you choose this option, the alarm considers the inbox placement rate for specific email providers, such as Gmail or Yahoo. When you choose this option, you also have to choose the email provider that the alarm applies to.
-
-
Configure the values that cause the alarm to be triggered. For example, if you want to be notified when the inbox placement rate for your account is 75% or less, choose <=. Then enter a value of
75, as shown in the following image.
-
Specify the amount of time that has to elapse before the alarm is triggered. For example, you can configure the alarm so that it only sends a notification when the inbox placement rate goes below a certain rate and stays below that rate for more than two days. In this example, next to for at least, enter a value of
2. Then, next to consecutive period(s) of, choose 1 day, as shown in the following image.
-
Under Notification method, choose one of the following options:
-
Use an existing SNS topic – Choose this option if you've already created an Amazon SNS topic and subscribed endpoints to it.
-
Create a new topic – Choose this option if you haven't yet created an Amazon SNS topic, or if you want to create a new topic.
Note
When you create a new topic, you must subscribe one or more endpoints to it. For more information, see Subscribing an Amazon SNS topic in the Amazon Simple Notification Service Developer Guide.
-
-
(Optional) You can choose or create more than one Amazon SNS topic. To add a topic, choose Notify an additional SNS topic.
-
When you finish, choose Create.
-
Inbox placement by email provider
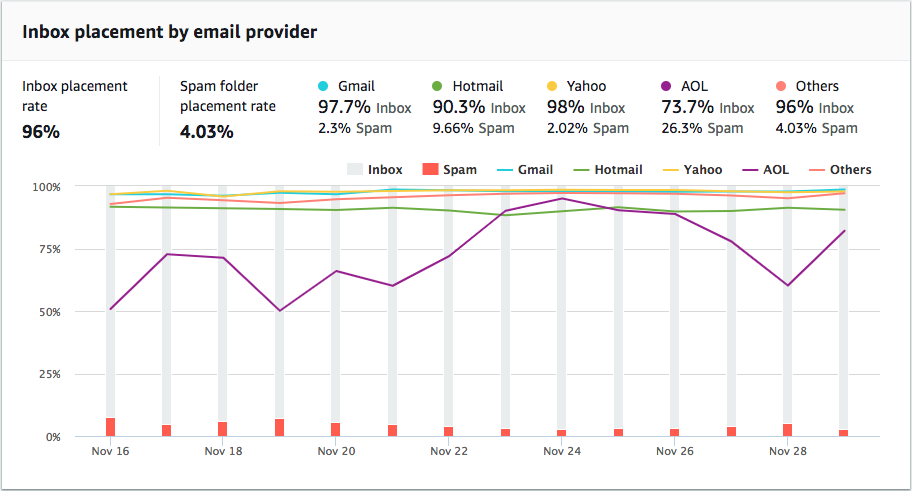
This section shows you how different email providers handled the email that was sent from your domain during the selected time period. The email providers analyzed in this section include Gmail, Hotmail, Yahoo, and AOL. This section also contains a category called Others. This category includes internet service providers and regional providers. When combined, the delivery metrics in this section represent a vast majority of all consumer email sent worldwide.
This section includes average rates for inbox placement and spam folder placement for each email provider. It also includes a chart, shown in the following image, that displays the inbox placement rate for each provider for every day in the analysis period. You can use the information in this chart to help identify campaigns that resulted in poor delivery rates.
Note
You can use the date filter to choose a date range that contains up to 30 days.
Denylist activities
This section helps you to quickly identify denylist events that could impact the delivery of emails sent from your domain. A denylist is a list of IP addresses that are suspected of sending unsolicited or malicious email. Different denylist providers have different criteria for adding IP addresses to their lists, and for removing ("delisting") IP addresses from their lists. Additionally, each email provider uses a different denylist or set of denylists. Also, each provider weighs denylisting events differently. If one of your dedicated IP addresses is listed in this section, it doesn't necessarily mean that there will be any impact on the delivery of your email.
If one of your dedicated IP addresses appears in this section, contact the organization that manages the denylist, and request that your IP address be removed. The following table includes a list of denylist operators that are considered in this section, and includes links to their procedures for delisting an IP address.
| Denylist operator | Link to delisting procedures |
|---|---|
| Spamhaus | Spamhaus
website |
| Barracuda | Barracuda website |
| Cloudmark Sender Intelligence (CSI) | Cloudmark sender
intelligence website |
| LashBack | LashBack website |
| Passive Spam Block List (PSBL) | Passive spam block list
website |
| SpamCop | SpamCop
website |
Domain authentication
This section contains information about the various methods that you can use to authenticate your domains. To configure DKIM or SPF authentication for a domain, you must add specific records to the DNS configuration for the domain. To view these records, choose View the DNS record.
The procedures for updating the DNS records for a domain vary depending on which DNS or web hosting provider that you use. See your provider's documentation for more information about adding DNS records.
