End of support notice: On October 30, 2026, AWS will end support for Amazon Pinpoint. After October 30, 2026, you will no longer be able to access the Amazon Pinpoint console or Amazon Pinpoint resources (endpoints, segments, campaigns, journeys, and analytics). For more information, see Amazon Pinpoint end of support. Note: APIs related to SMS, voice, mobile push, OTP, and phone number validate are not impacted by this change and are supported by AWS End User Messaging.
Create a journey
You can use the Amazon Pinpoint console to create powerful journeys through a graphical editor. The first step in building your journey is to create and configure it. You can configure the journey to begin immediately, or at a certain date and time. You can also configure it to end at a specific date and time.
To configure a journey
-
On the All projects page, choose the Amazon Pinpoint project that you want to create a journey in.
Note
In Amazon Pinpoint, segments and endpoints are unique to each project. The project that you choose should contain the segments and endpoints that you want to engage with this journey.
-
In the navigation pane, choose Journeys.
-
Choose Create journey. The journey workspace appears.
-
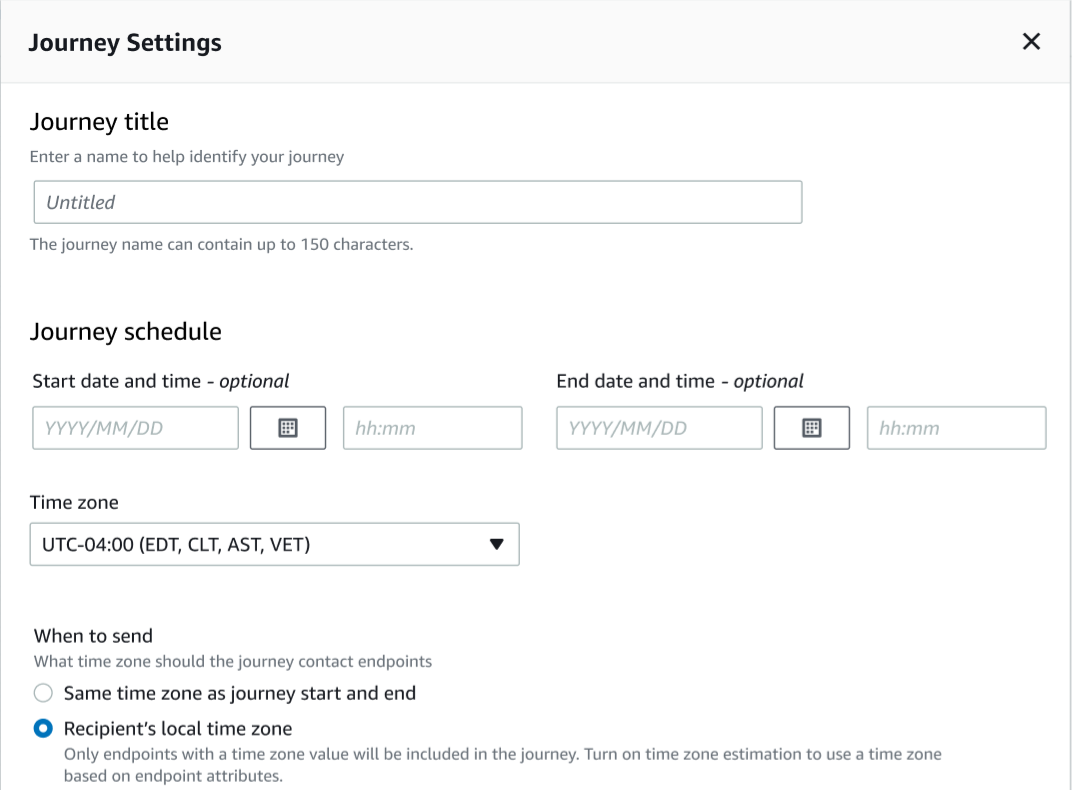
On the Actions menu, choose Settings. The Journey Settings dialog box appears. An example of this dialog box is shown in the following image.
-
In the Journey Settings dialog box, do the following:
-
For Journey title, enter a name that describes the journey.
-
(Optional) For Journey schedule, enter a Start date and time and End date and time. If you don't enter a start date, customers enter the journey 5 minutes after you launch it. If you don't enter an end date, the journey runs continuously for up to 3600 days (approximately 120 months).
-
(Optional) For Time zone, choose the time zone that the Start date and time and End date and time should be based on. By default, Amazon Pinpoint chooses a time zone from this list based on your location. You only need to complete this step if you set a start date or end date.
-
For When to send choose either:
-
Use the same time zone as journey start and end – To use the journey's Time zone, Start date and time, and End date and time when sending messages.
Tip
Only send messages to recipients during business hours, see Send at appropriate times in the AWS End User Messaging SMS User Guide. If recipients are multiple time zones away from the Journey's Time zone they could receive messages outside of business hours.
-
Recipient's local time zone – To automatically adjust the sending time to the time zone value in the endpoint's
Demographic.Timezoneattribute.Important
-
An endpoint without a
Demographic.Timezoneattribute isn't included in the journey. Use Time zone estimation for endpoints without aDemographic.Timezoneattribute to estimate the endpoints time zone and include it in the journey. -
Recipient's local time zone isn't supported for event-triggered journeys. For event-triggered journeys, time zone estimation is still supported for time zone related features like quiet time.
-
-
-
Under Time zone estimation choose:
Note
Time zone estimation is used for estimating a recipient's local time zone that is used for journey scheduling and quiet time.
-
No time zone estimation (default) – Time zone estimation isn't performed and Amazon Pinpoint uses the value in the
Demographic.Timezoneattribute. -
Estimate by using phone number (for example area code) – The geographic information of the endpoints phone number and country are used to estimate the time zone. The
Endpoint.Addressattribute must be a phone number andEndpoint.Location.Countryattribute must have a value. For more information about theEndpoint.AddressandEndpoint.Location.Countryattributes, see Endpoint in the Amazon Pinpoint API Reference. -
Estimate by using region (for example zip or postal code) – The endpoints country and postal code are used to estimate the time zone. Both the
Endpoint.Location.PostalCodeandEndpoint.Location.Countryattribute must have a value. For more information about theEndpoint.Location.PostalCodeattribute, see Endpoint in the Amazon Pinpoint API Reference.Note
Postal code estimation is only supported in the United States, United Kingdom, Australia, New Zealand, Canada, France, Italy, Spain, Germany, and in AWS Regions where Amazon Pinpoint is available. Time zone estimation isn't supported in AWS GovCloud (US-West).
-
Estimate by using phone number and region – Use both Estimate by using phone number (for example area code) and Estimate by using region (for example zip or postal code) to estimate the recipients time zone.
For more information about time zone processing rules, see Time zone estimation.
Important
Time zone estimation is only performed on endpoints that don't have a value for the
Demographic.Timezoneattribute. If Time zone estimation is unable to estimate a time zone or the estimated time zone isn't part of theEndpoint.Location.Country, then the endpoint will not be added to the journey. For more information, see Time zone estimation. -
-
-
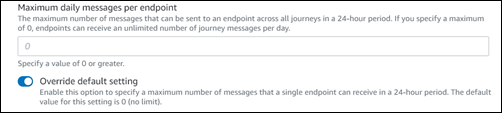
Under Journey limits (advanced), set options for message processing. For example, this might be changing the number of journey messages per second or changing the number of entries per endpoint. Endpoints will only re-enter a journey if allowed by limits.
-
Maximum daily messages per endpoint – Choose Override default setting to override the maximum daily message setting for the project that contains this journey. If you specify a value in this section, Amazon Pinpoint limits the number of messages that are sent to each individual endpoint.
-
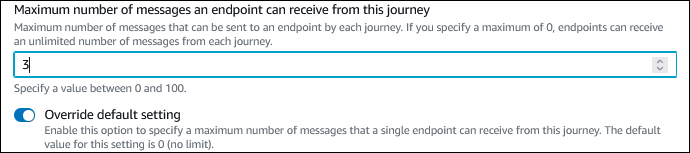
Maximum number of messages an endpoint can receive from this journey – Choose Override default setting to override the maximum messages an endpoint can receive from this journey. The default setting is 0, which means that there's no limit on the number of messages that endpoints in the journey can receive. When you enable this feature, other limits (such as Maximum daily messages per endpoint) still apply.
-
Maximum number of journey messages per second – Choose Override default setting to override the maximum messages per second setting for the project that contains this journey. If you specify a value in this section, Amazon Pinpoint limits the number of messages that the journey can send each second. The value that you specify should be less than or equal to the maximum sending rate for your account. You can find the maximum sending rate for your account on the Email settings page on the Amazon Pinpoint console.

-
Maximum entries per endpoint – Choose this setting to override the maximum entry setting for the project that contains this journey. If you specify a value in this section, Amazon Pinpoint limits the number of times that a participant can enter the journey. For example, if you specify a value greater than 1, a participant could enter a journey, complete several activities in the journey, arrive at an End activity, and start the journey again. If a participant is eligible for a journey, but they've already entered the journey the maximum number of times, they are prevented from entering the journey again. For example, if you have a maximum entry endpoint limit of
2, and a participant has already entered and exited the journey two times, they will not re-enter that journey again.If you choose a value greater than
1for the default, you can then choose Endpoint re-entry interval, setting how long to wait before an endpoint re-enters a journey. For example, you might set a re-entry interval if you want to space out messages sent to your users, thus preventing your users from being spammed.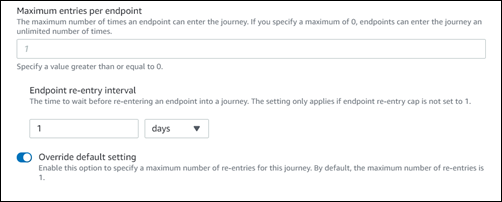
-
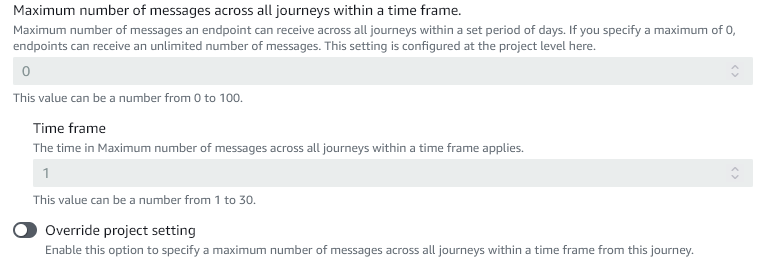
Maximum number of messages across all journeys within a time frame
Use this setting to specify the maximum number of times a message can be sent to a single endpoint within the specified Timeframe. For example, if you want to send a maximum of 3 messages within a Timeframe of 7 days to each endpoint. The default setting is 0, which means that there's no limit on the number of messages that endpoints in the journey can receive.
-
Timeframe
The number of days applied to the Maximum number of messages across all journeys within a time frame if not set to 0. The default setting is 0, which means that there's no limit on the number of days that endpoints in the journey can receive.
-
-
Choose Confirm
(Optional) Configuring journey schedule settings
When you create a journey, you can specify a sending schedule for that journey. There
are two schedule settings that you can configure. The first setting is do not
send time, which refers to a range of hours during which Amazon Pinpoint won't
deliver messages to journey participants. The second setting is sending
time, which refers to ranges of hours during which Amazon Pinpoint will deliver
messages to journey participants. The sending time setting allows
for more granular customization of time and channels than do not send
time. These settings use each endpoint's time zone settings. To use
journey schedule settings, each of the endpoints in your journey must include the
Demographic.Timezone attribute.
Important
To use the Use recipient's local time zone settings, each of
the endpoints in your journey must include the Demographic.Timezone
attribute. A participant won't be included in the journey if you choose this option
and the participant's endpoint record doesn't specify a time zone.
You can configure the schedule settings for a journey by choosing the Schedule button at the top of the journey workspace. Then, on the Schedule settings window, specify the Start time and End time for Do not send time. You can also choose to enable the following settings:
-
Resume sending after quiet times – When you enable this feature, Amazon Pinpoint holds any messages that would have been sent during Do not send time, and then delivers them when Do not send time ends. If you don't enable this option, messages that would have been sent are dropped and not sent.
-
Configure sending time to define each day of a week – Enable this option to configure different sending time hours for different days of the week. For example, if your Do not send time is scheduled between 8:00 AM and 8:00 PM (20:00), you can set sending time for Sunday between 8:00 AM and end at 6:00 PM (18:00), and set the sending time for all other days to begin at 8:00 AM and end at 8:00 PM (20:00). You can add up to four time ranges per day.
You can also specify exceptions for specific days of the year. For example, if you want to make sure that you don't send any messages on New Year's Day, you can create an exception that begins on December 31st at 8:00 PM and ends on January 2nd at 8:00 AM. You can add up to 20 exceptions.
Note
The hours that you specify for days of the week or for exceptions must respect the quiet time hours that you specify for the journey. In other words, if you set the journey quiet time hours to 8:00 PM through 8:00 AM, you can't set the quiet time hours for Monday to 8:30 PM through 7:30 AM.
-
Apply this schedule to all channels – Enable this feature to automatically set the sending time setting for each channel to equal the Start time and End time that you specified for the Do not send time setting. If you don't enable this feature, you can define different sending time hours for different channels. For example, you can configure the email channel so that messages are sent from 6:00 AM to 10:00 PM (22:00), and configure the SMS channel so that messages are sent from 8:00 AM to 8:00 PM (20:00).
Next: Set up the journey entry activity
