Use the Porting Assistant for .NET assessment tool
This section contains information to help you get started with the Porting Assistant for .NET assessment tool. When you start the assessment tool for the first time, you are prompted to enter your AWS CLI profile information so that the Porting Assistant for .NET can collect metrics to improve your experience. These metrics also help flag issues with the software for AWS to quickly address. If you have not set up your AWS profile, see Configuring the AWS CLI.
Assessment tool topics
Set up Porting Assistant for .NET
The following steps guide you through the Porting Assistant for .NET settings for collecting solutions data.
-
Verify the Prerequisites.
-
From the Set up Porting Assistant for .NET page of the assessment tool, select an AWS name profile from the dropdown list or Add a named profile. Porting Assistant for .NET uses your AWS profile to share your solution information with AWS to make the Porting Assistant for .NET tool better.
-
Under Porting Assistant for .NET data usage sharing, clear the check box if you do not want to share your Porting Assistant for .NET solution information with AWS.
If you accept the data collection option, the following application data is collected:
-
Application errors generated when running assessments, porting, or when performing other functions provided by the Porting Assistant for .NET tool.
-
Names and versions of public NuGet packages assessed by the Porting Assistant for .NET tool.
-
Metrics for assessments run by the Porting Assistant for .NET tool on public NuGet packages, such as the number of packages and solutions, and the amount of time taken to create a solution.
You can change your data collection settings at any time in the Settings menu.
-
-
Choose Next to assess your solution.
Assess a new solution using the assessment tool
The following steps guide you through the creation of a new assessment solution.
-
From the Assess a new solution page of the assessment tool, Specify a solution file path. Choose your source solution (.sln) file to start an assessment for your .NET Framework application.
Note
The project is assessed using the version selected in your settings. The default version is .NET Core 6.0.
-
Choose Assess. You will be taken to the Assessed solutions page, where you can view a list of your solutions and the following details about each solution:
-
Ported projects — The number of projects in the solution that have been ported.
-
Incompatible packages — The number of packages in the solution that are incompatible with .NET Core .
-
Incompatible APIs — The number of API calls in the solution that are incompatible with .NET Core.
-
Build errors — The number of build errors in a solution after it has been assessed.
-
-
The status of your assessment appears at the top of the page. Choose View details to see an overview of your solution assessment, which includes a breakdown of the incompatible NuGet packages and APIs. You can also view the project references and source files from this page.
-
From the solution assessment page, choose Export assessment report to download a .csv file with your report details. Under the overview, you can choose the following tabs:
-
Projects — this tab lists the projects in your solution, the Target framework for the solution, the number of Referenced projects in the solution, the number of Incompatible packages in the solution, the number of Incompatible APIs in the solution, the Portability score (the number of compatible APIs over the number of incompatible APIs in the solution, represented as a percentage), and the Port status (ported or not ported) of the solution.
-
Project references — this tab displays the project references graph, which is a graphical representation of your projects and references. Select a node to see its project dependencies. To port your projects, we recommend that you start by selecting the base of your library, and then moving outward to test each layer. You should first port base libraries with the most dependencies from other projects. In other words, port libraries that show more inward arrows than outward arrows.
To view details about a node, select the node and choose View details.
-
NuGet packages — this tab lists the number of NuGet packages in your solutions file, the Name of the NuGet packages, the Version number of the packages, the Source files in the package, the number of compatible APIs in the package, the compatibility Status of each package (compatible/incompatible), and the Suggested replacement for each package.
-
APIs — this tab lists the Name of each API call in the solution, the name of the Package within which the API call appears, the number of Source files that include each API call, the Suggested replacement for the API call, and the compatibility Status of the API call (compatible/incompatible).
Note
A small number of APIs might show an "Incompatible" status. This can happen when an API is not found in the Porting Assistant for .NET database and the status is unknown to the Porting Assistant for .NET system.
-
Source files — this tab lists the Source file name in the solution, the number of Incompatible API calls over the total number of API calls for each source file, and the Portability score of the source file, which is the number of compatible APIs over the number of incompatible APIs in the solution, represented as a percentage. You can select a source file to view the incompatible API calls and replacement suggestions in the source code.
In each source file, any section of code that is detected as incompatible will be highlighted as follows:
-
Porting action — code that initiates a porting action in the project.
-
Incompatible method invocation — an API that is incompatible with .NET Core.
-
-
-
After you make changes to your solution file, you can choose Reassess solution to start a new assessment of your solution.
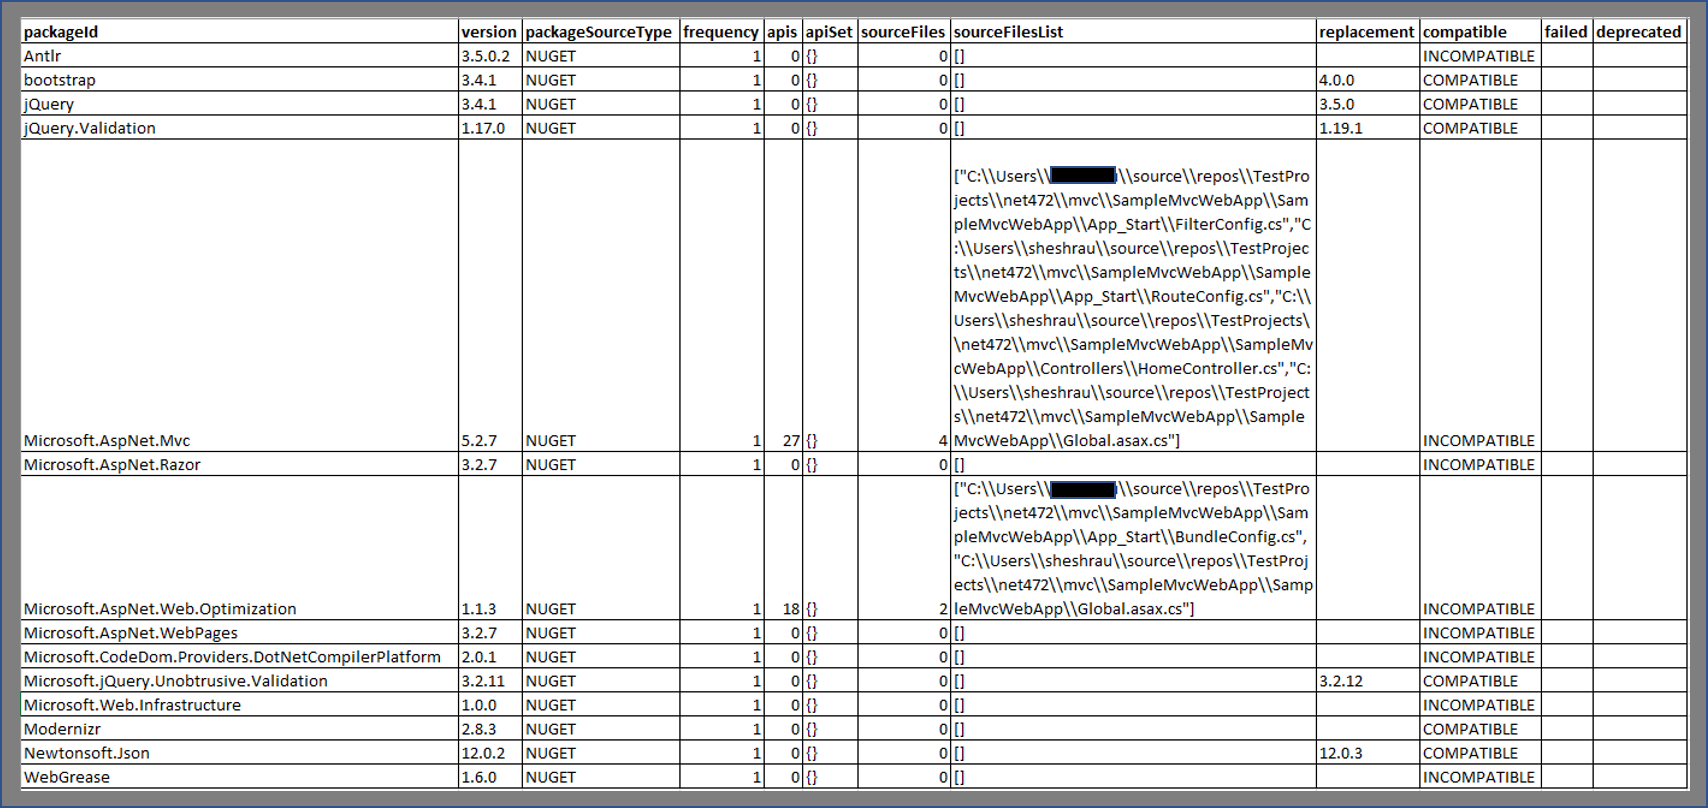
The following example shows the sample .csv output for a NuGet assessment report, as part of the larger compatibility assessment report.
Assess a new solution using the Porting Assistant CLI console application
The following steps guide you through the creation of a new assessment solution
using the Porting Assistant CLI console application. The CLI is packaged with the Porting Assistant for .NET tool.
After you install the Porting Assistant for .NET tool, the CLI can be found in the following location:
C:\Users\.<user_name>\AppData\Local\Programs\Porting
Assistant for
.NET\resources\netcore_build\PortingAssistant.Client.CLI.exe
To assess a new solution using the Porting Assistant CLI console application, run the following commands.
-
--solution-path (-s)Definition: The path to your solution file
Required: Yes
-
--output-path (-o)Definition: The path where the assessment JSON file is stored.
Required: Yes
-
--target (-t)Definition: The .NET version to use for the assessment.
Required: No
Options:
-
netcore3.1 -
net5.0 -
net6.0(default) -
net7.0
-
-
--ignore-projects (-i)Definition: Projects that are not assessed.
Required: No
Value:
Comma separated project names. For example
project1,
                        project2
.
Example 1
& 'C:\Users\<username>\AppData\Local\Programs\Porting Assistant for .NET\resources\netcore_build\PortingAssistant.Client.CLI.exe' assess --solution-path "<path_to_solution/example_solution.sln>" --output-path "<path_to_output_dir>” --target “net5.0”
Example 2
& 'C:\Users\<username>\AppData\Local\Programs\Porting Assistant for .NET\resources\netcore_build\PortingAssistant.Client.CLI.exe' assess -s "<path_to_solution/example_solution.sln>" -o "<path_to_output_dir>” -t “net5.0”
Example 3
& 'C:\Users\<username>\AppData\Local\Programs\Porting Assistant for .NET\resources\netcore_build\PortingAssistant.Client.CLI.exe' assess -s "<path_to_solution/example_solution.sln>" -o "<path_to_output_dir>” -t “net5.0” -i “project1,project2”
Analyze NuGet dependencies per project
The following steps guide you through an analysis of the NuGet dependencies per project within an assessment.
-
From the main page of Porting Assistant for .NET, select Assessed solutions from the left navigation pane.
-
On the Assessed Solutions page, select a solutions file. You will be directed to theAssessment overview page.
-
Choose a project from the list at the bottom of the page. You will be directed to the NuGet dependencies page.
-
The NuGet dependencies page displays a list of compatible and incompatible NuGet packages, as well as each NuGet package Version, the number of Projects that include each NuGet package, the number of Source files that include each NuGet package, the number of compatible APIs in the package, the compatibility Status of each package (compatible/incompatible), and the Suggested replacement for each package. Porting Assistant for .NET identifies potential .NET Core replacement libraries with similar or identical APIs for some incompatible dependencies.
-
To view a graphical representation of the information, choose the Project references tab. This tab shows a graphical representation of your projects and references. Select a node to see its project dependencies. To port your projects, we recommend that you start by selecting the base of your library, and then moving outward to test each layer. You should first port base libraries with the most dependencies from other projects. In other words, port libraries that show more inward arrows than outward arrows.
