Using Amazon API Gateway to integrate your identity provider
This topic describes how to use an AWS Lambda function to back an API Gateway method. Use this option if you need a RESTful API to integrate your identity provider or if you want to use AWS WAF to leverage its capabilities for geo-blocking or rate-limiting requests.
For most use cases, the recommended way to configure a custom identity provider is to use the Custom identity provider solution.
Limitations if using an API Gateway to integrate your identity provider
-
This configuration does not support custom domains.
-
This configuration does not support a private API Gateway URL.
If you need either of these, you can use Lambda as an identity provider, without API Gateway. For details, see Using AWS Lambda to integrate your identity provider.
Authenticating using an API Gateway method
You can create an API Gateway method for use as an identity provider for Transfer Family. This approach provides a highly secure way for you to create and provide APIs. With API Gateway, you can create an HTTPS endpoint so that all incoming API operations are transmitted with greater security. For more details about the API Gateway service, see the API Gateway Developer Guide.
API Gateway offers an authorization method named AWS_IAM, which gives you
the same authentication based on AWS Identity and Access Management (IAM) that AWS uses internally. If
you enable authentication with AWS_IAM, only callers with explicit
permissions to call an API can reach that API's API Gateway method.
To use your API Gateway method as a custom identity provider for Transfer Family, enable IAM for your API Gateway method. As part of this process, you provide an IAM role with permissions for Transfer Family to use your gateway.
Note
To improve security, you can configure a web application firewall. AWS WAF is a web application firewall that lets you monitor the HTTP and HTTPS requests that are forwarded to an Amazon API Gateway. For details, see Add a web application firewall.
Do not enable API Gateway caching
Do not enable caching for your API Gateway method when using it as a custom identity provider for Transfer Family. Caching is inappropriate and invalid for authentication requests because:
Each authentication request is unique and requires a live response, not a cached response
Caching provides no benefits since Transfer Family never sends duplicate or repeated requests to the API Gateway
Enabling caching will cause the API Gateway to respond with mismatched data, resulting in invalid responses to authentication requests
To use your API Gateway method for custom authentication with Transfer Family
-
Create an AWS CloudFormation stack. To do this:
Note
The stack templates have been updated to use BASE64-encoded passwords: for details, see Improvements to the AWS CloudFormation templates.
-
Open the AWS CloudFormation console at https://console.aws.amazon.com/cloudformation
. -
Follow the instructions for deploying an AWS CloudFormation stack from an existing template in Selecting a stack template in the AWS CloudFormation User Guide.
-
Use one of the following basic templates to create an AWS Lambda-backed API Gateway method for use as a custom identity provider in Transfer Family.
-
By default, your API Gateway method is used as a custom identity provider to authenticate a single user in a single server using a hard-coded SSH (Secure Shell) key or password. After deployment, you can modify the Lambda function code to do something different.
-
AWS Secrets Manager stack template
By default, your API Gateway method authenticates against an entry in Secrets Manager of the format
aws/transfer/. Additionally, the secret must hold the key-value pairs for all user properties returned to Transfer Family. After deployment, you can modify the Lambda function code to do something different. For more information, see the blog postEnable password authentication for AWS Transfer Family using AWS Secrets Managerserver-id/username. -
Your API Gateway method integrates with Okta as a custom identity provider in Transfer Family. For more information, see the blog post Using Okta as an identity provider with AWS Transfer Family
.
-
Deploying one of these stacks is the easiest way to integrate a custom identity provider into the Transfer Family workflow. Each stack uses the Lambda function to support your API method based on API Gateway. You can then use your API method as a custom identity provider in Transfer Family. By default, the Lambda function authenticates a single user called
myuserwith a password ofMySuperSecretPassword. After deployment, you can edit these credentials or update the Lambda function code to do something different.Important
We recommend that you edit the default user and password credentials.
After the stack has been deployed, you can view details about it on the Outputs tab in the CloudFormation console. These details include the stack's Amazon Resource Name (ARN), the ARN of the IAM role that the stack created, and the URL for your new gateway.
Note
If you are using the custom identity provider option to enable password–based authentication for your users, and you enable the request and response logging provided by API Gateway, API Gateway logs your users' passwords to your Amazon CloudWatch Logs. We don't recommend using this log in your production environment. For more information, see Set up CloudWatch API logging in API Gateway in the API Gateway Developer Guide.
-
-
Check the API Gateway method configuration for your server. To do this:
-
Open the API Gateway console at https://console.aws.amazon.com/apigateway/
. -
Choose the Transfer Custom Identity Provider basic template API that the AWS CloudFormation template generated. You might need to select your region to see your gateways.
-
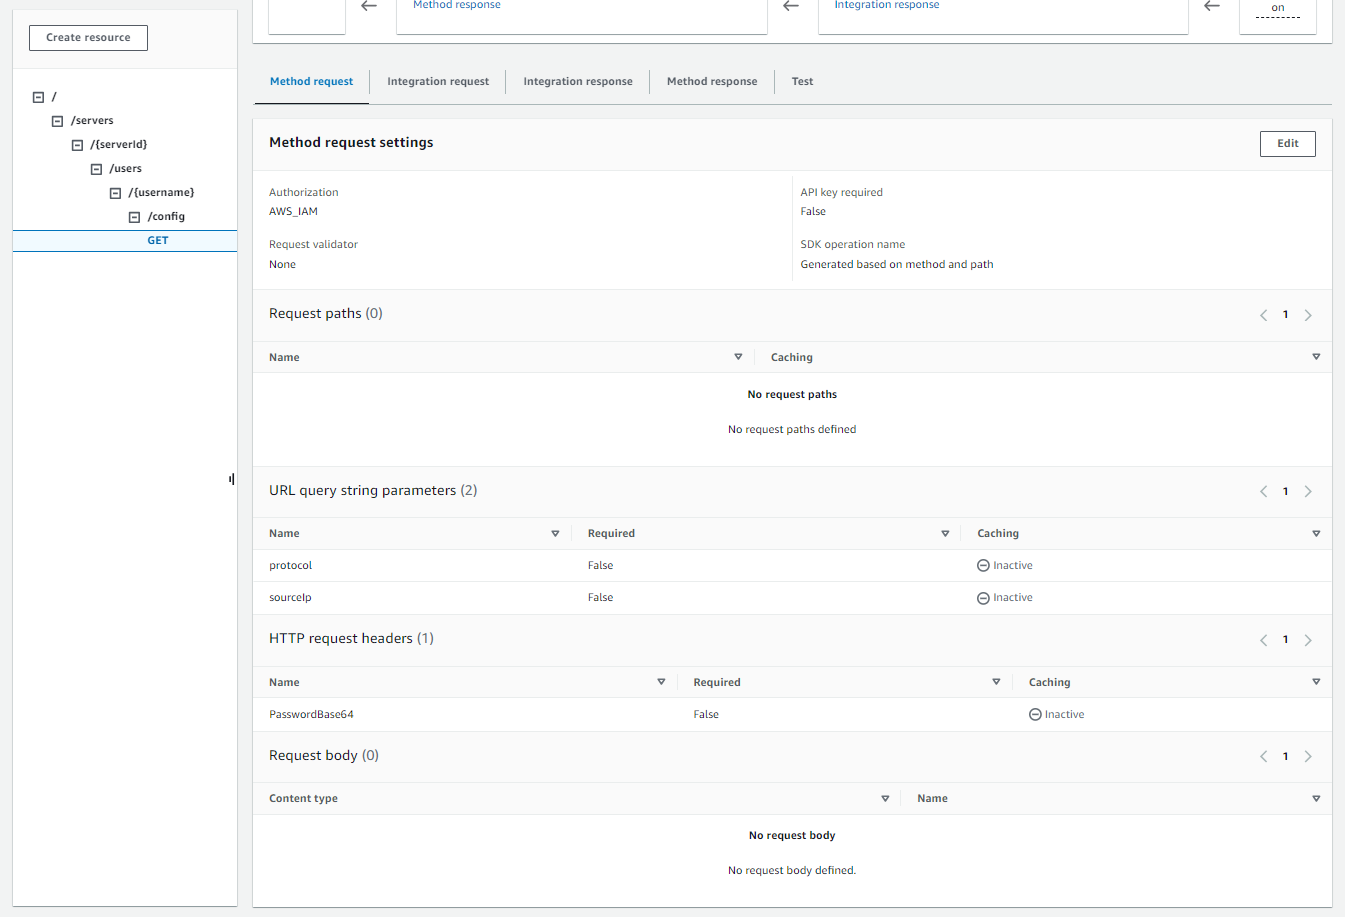
In the Resources pane, choose GET. The following screenshot shows the correct method configuration.
At this point, your API gateway is ready to be deployed.
-
-
For Actions, choose Deploy API. For Deployment stage, choose prod, and then choose Deploy.
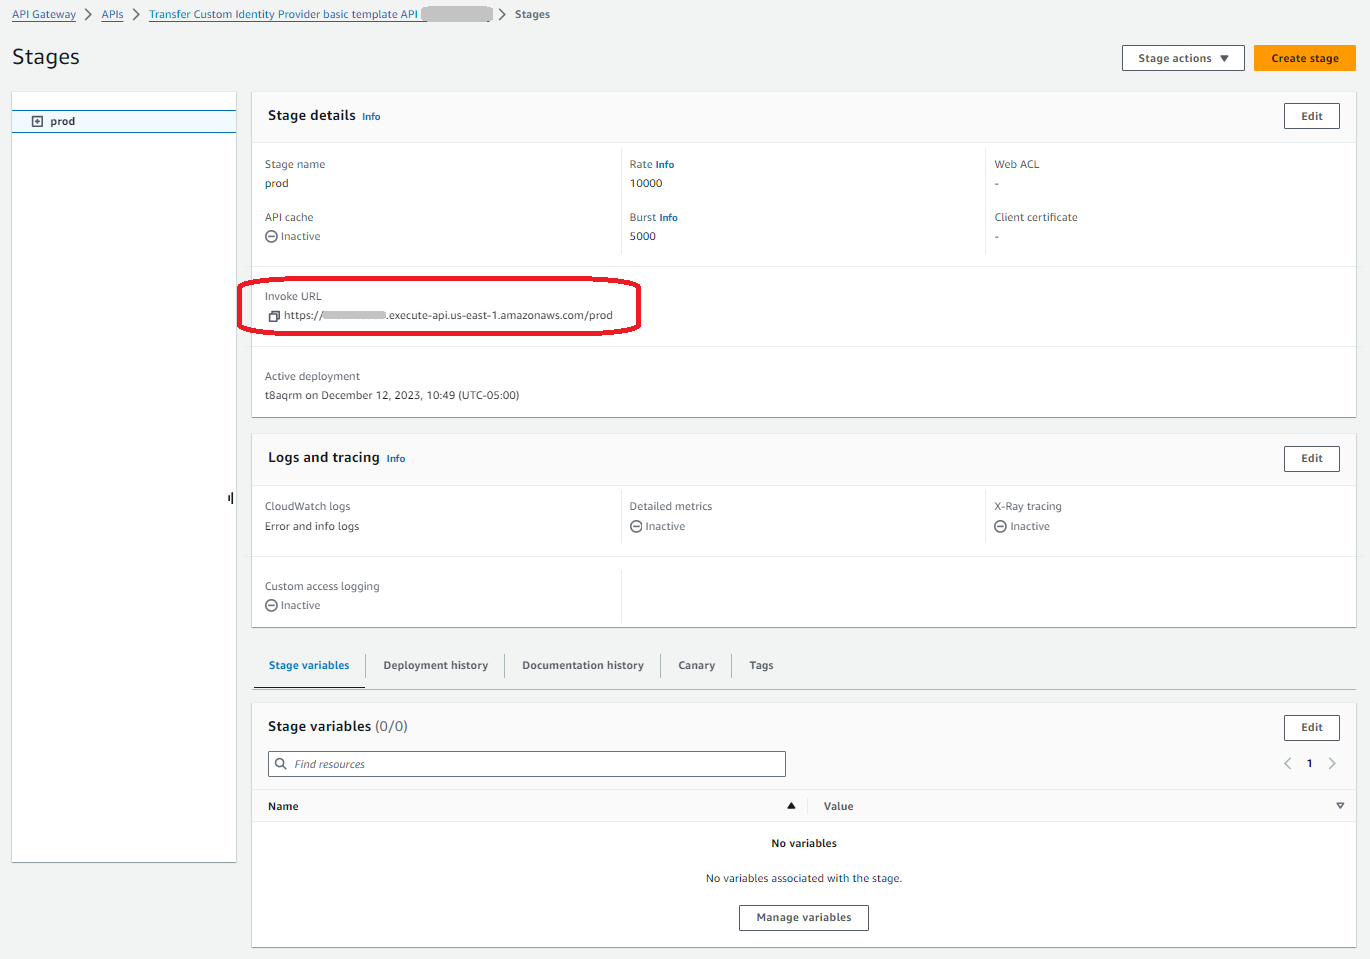
After the API Gateway method is successfully deployed, view its performance in Stages > Stage details, as shown in the following screenshot.
Note
Copy the Invoke URL address that appears at the top of the screen. You might need it for the next step.
-
Open the AWS Transfer Family console at https://console.aws.amazon.com/transfer/
. -
A Transfer Family should have been created for you, when you created the stack. If not, configure your server using these steps.
-
Choose Create server to open the Create server page. For Choose an identity provider, choose Custom, then select Use Amazon API Gateway to connect to your identity provider, as shown in the following screenshot.

-
In the Provide an Amazon API Gateway URL text box, paste the Invoke URL address of the API Gateway endpoint that you created in step 3 of this procedure.
-
For Role, choose the IAM role that was created by the AWS CloudFormation template. This role allows Transfer Family to invoke your API gateway method.
The invocation role contains the AWS CloudFormation stack name that you selected for the stack that you created in step 1. It has the following format:
CloudFormation-stack-name-TransferIdentityProviderRole-ABC123DEF456GHI -
Fill in the remaining boxes, and then choose Create server. For details on the remaining steps for creating a server, see Configuring an SFTP, FTPS, or FTP server endpoint.
-
Implementing your API Gateway method
To create a custom identity provider for Transfer Family, your API Gateway method must implement a
single method that has a resource path of
/servers/.
The serverId/users/username/configserverIdusernamesourceIp and protocol as
URL Query String Parameters in the Method
Request, as shown in the following image.

Note
The username must be a minimum of 3 and a maximum of 100 characters. You can use the following characters in the username: a–z, A-Z, 0–9, underscore '_', hyphen '-', period '.' and at sign '@'. The username can't start with a hyphen '-', period '.' or at sign '@'.
If Transfer Family attempts password authentication for your user, the service supplies a
Password: header field. In the absence of a Password:
header, Transfer Family attempts public key authentication to authenticate your user.
When you are using an identity provider to authenticate and authorize end users,
in addition to validating their credentials, you can allow or deny access requests
based on the IP addresses of the clients used by your end users. You can use this
feature to ensure that data stored in your S3 buckets or your Amazon EFS file system can
be accessed over the supported protocols only from IP addresses that you have
specified as trusted. To enable this feature, you must include sourceIp
in the Query string.
If you have multiple protocols enabled for your server and want to provide access
using the same username over multiple protocols, you can do so as long as the
credentials specific to each protocol have been set up in your identity provider. To
enable this feature, you must include the
protocol
Your API Gateway method should always return HTTP status code 200. Any
other HTTP status code means that there was an error accessing the API.
Amazon S3 example response
The example response body is a JSON document of the following form for Amazon S3.
{ "Role": "IAM role with configured S3 permissions", "PublicKeys": [ "ssh-rsapublic-key1", "ssh-rsapublic-key2" ], "Policy": "STS Assume role session policy", "HomeDirectory": "/amzn-s3-demo-bucket/path/to/home/directory" }
Note
The policy is escaped JSON as a string. For example:
"Policy":
"{
  \"Version\": \"2012-10-17\",
  \"Statement\":
     [
     {\"Condition\":
        {\"StringLike\":
            {\"s3:prefix\":
               [\"user/*\", \"user/\"]}},
     \"Resource\": \"arn:aws:s3:::amzn-s3-demo-bucket\",
     \"Action\": \"s3:ListBucket\",
     \"Effect\": \"Allow\",
     \"Sid\": \"ListHomeDir\"},
     {\"Resource\": \"arn:aws:s3:::*\",
        \"Action\": [\"s3:PutObject\",
        \"s3:GetObject\",
        \"s3:DeleteObjectVersion\",
        \"s3:DeleteObject\",
        \"s3:GetObjectVersion\",
        \"s3:GetObjectACL\",
        \"s3:PutObjectACL\"],
     \"Effect\": \"Allow\",
     \"Sid\": \"HomeDirObjectAccess\"}]
}"
The following example response shows that a user has a logical home directory type.
{
   "Role": "arn:aws:iam::123456789012:role/transfer-access-role-s3",
   "HomeDirectoryType":"LOGICAL",
   "HomeDirectoryDetails":"[{\"Entry\":\"/\",\"Target\":\"/amzn-s3-demo-bucket1\"}]",
   "PublicKeys":[""]
}
Amazon EFS example response
The example response body is a JSON document of the following form for Amazon EFS.
{ "Role": "IAM role with configured EFS permissions", "PublicKeys": [ "ssh-rsapublic-key1", "ssh-rsapublic-key2" ], "PosixProfile": { "Uid": "POSIX user ID", "Gid": "POSIX group ID", "SecondaryGids": [Optional list of secondary Group IDs], }, "HomeDirectory": "/fs-id/path/to/home/directory" }
The Role field shows that successful authentication occurred. When
doing password authentication (when you supply a Password: header), you
don't need to provide SSH public keys. If a user can't be authenticated,
for example, if the password is incorrect, your method should return a response
without Role set. An example of such a response is an empty JSON
object.
The following example response shows a user that has a logical home directory type.
{
    "Role": "arn:aws:iam::123456789012:role/transfer-access-role-efs",
    "HomeDirectoryType": "LOGICAL",
    "HomeDirectoryDetails":"[{\"Entry\":\"/\",\"Target\":\"/faa1a123\"}]",
    "PublicKeys":[""],
    "PosixProfile":{"Uid":65534,"Gid":65534}
}
You can include user policies in the Lambda function in JSON format. For more information about configuring user policies in Transfer Family, see Managing access controls.
Default Lambda function
To implement different authentication strategies, edit the Lambda function that your gateway uses. To help you meet your application's needs, you can use the following example Lambda functions in Node.js. For more information about Lambda, see the AWS Lambda Developer Guide or Building Lambda functions with Node.js.
The following example Lambda function takes your username, password (if you're performing password authentication), server ID, protocol, and client IP address. You can use a combination of these inputs to look up your identity provider and determine if the login should be accepted.
Note
If you have multiple protocols enabled for your server and want to provide access using the same username over multiple protocols, you can do so as long as the credentials specific to the protocol have been set up in your identity provider.
For File Transfer Protocol (FTP), we recommend maintaining separate credentials from Secure Shell (SSH) File Transfer Protocol (SFTP) and File Transfer Protocol over SSL (FTPS). We recommend maintaining separate credentials for FTP because, unlike SFTP and FTPS, FTP transmits credentials in clear text. By isolating FTP credentials from SFTP or FTPS, if FTP credentials are shared or exposed, your workloads using SFTP or FTPS remain secure.
This example function returns the role and logical home directory details, along with the public keys (if it performs public key authentication).
When you create service-managed users, you set their home directory, either logical or physical. Similarly, we need the Lambda function results to convey the desired user physical or logical directory structure. The parameters you set depend on the value for the HomeDirectoryType field.
-
HomeDirectoryTypeset toPATH– theHomeDirectoryfield must then be an absolute Amazon S3 bucket prefix or Amazon EFS absolute path that is visible to your users. -
HomeDirectoryTypeset toLOGICAL– Do not set aHomeDirectoryfield. Instead, we set aHomeDirectoryDetailsfield that provides the desired Entry/Target mappings, similar to the described values in the HomeDirectoryDetails parameter for service-managed users.
The example functions are listed in Example Lambda functions.
Lambda function for use with AWS Secrets Manager
To use AWS Secrets Manager as your identity provider, you can work with the Lambda function in the sample AWS CloudFormation template. The Lambda function queries the Secrets Manager service with your credentials and, if successful, returns a designated secret. For more information about Secrets Manager, see the AWS Secrets Manager User Guide.
To download a sample AWS CloudFormation template that uses this Lambda function, go to the
Amazon S3 bucket provided by AWS Transfer Family
Improvements to the AWS CloudFormation templates
Improvements to the API Gateway interface have been made to the published CloudFormation templates. The templates now use BASE64-encoded passwords with the API Gateway. Your existing deployments continue to work without this enhancement, but don't allow for passwords with characters outside the basic US-ASCII character set.
The changes in the template that enable this capability are as follows:
-
The
GetUserConfigRequest AWS::ApiGateway::Methodresource has to have thisRequestTemplatescode (the line in italics is the updated line)RequestTemplates: application/json: | { "username": "$util.urlDecode($input.params('username'))", "password": "$util.escapeJavaScript($util.base64Decode($input.params('PasswordBase64'))).replaceAll("\\'","'")", "protocol": "$input.params('protocol')", "serverId": "$input.params('serverId')", "sourceIp": "$input.params('sourceIp')" } -
The
RequestParametersfor theGetUserConfigresource must change to use thePasswordBase64header (the line in italics is the updated line):RequestParameters: method.request.header.PasswordBase64: false method.request.querystring.protocol: false method.request.querystring.sourceIp: false
To check if the template for your stack is the latest
Open the AWS CloudFormation console at https://console.aws.amazon.com/cloudformation
. -
From the list of stacks, choose your stack.
-
From the details panel, choose the Template tab.
-
Look for the following:
-
Search for
RequestTemplates, and make sure you have this line:"password": "$util.escapeJavaScript($util.base64Decode($input.params('PasswordBase64'))).replaceAll("\\'","'")", -
Search for
RequestParameters, and make sure you have this line:method.request.header.PasswordBase64: false
-
If you don't see the updated lines, edit your stack. For details on how to update your AWS CloudFormation stack, see Modifying a stack template in the AWS CloudFormation; User Guide.
