Running queries as an IAM role in Amazon QuickSight
You can enhance data security by using fine-grained access policies rather than broader permissions for data sources connected to Amazon Athena, Amazon Redshift or Amazon S3. You start by creating an AWS Identity and Access Management (IAM) role with permissions to be activated when a person or an API starts a query. Then, an Amazon QuickSight administrator or a developer assigns the IAM Role to an Athena or Amazon S3 data source. With the role in place, any person or API that runs the query has the exact permissions necessary to run the query.
Here are some things to consider before you commit to implementing run-as roles to enhance data security:
-
Articulate how the additional security works to your advantage.
-
Work with your QuickSight administrator to learn if adding roles to data sources helps you to better meet your security goals or requirements.
-
Ask if this type of security, for the number of data sources and people and applications involved, can be feasibly documented and maintained by your team? If not, then who will undertake that part of the work?
-
In a structured organization, locate stakeholders in parallel teams in Operations, Development, and IT Support. Ask for their experience, advice, and willingness to support your plan.
-
Before you launch your project, consider doing a proof of concept that involves the people who need access to the data.
The following rules apply to using run-as roles with Athena, Amazon Redshift, and Amazon S3:
-
Each data source can have only one associated RoleArn. Consumers of the data source, who typically access datasets and visuals, can generate many different types of queries. The role places boundaries on which queries work and which don't work.
-
The ARN must correspond to an IAM role in the same AWS account as the QuickSight instance that uses it.
-
The IAM role must have a trust relationship allowing QuickSight to assume the role.
-
The identity that calls QuickSight's APIs must have permission to pass the role before they can update the
RoleArnproperty. You only need to pass the role when creating or updating the role ARN. The permissions aren't re-evaluated later on. Similarly, the permission isn't required when the role ARN is omitted. -
When the role ARN is omitted, the Athena or Amazon S3 data source uses the account-wide role and scope-down policies.
-
When the role ARN is present, the account-wide role and any scope-down policies are both ignored. For Athena data sources, Lake Formation permissions are not ignored.
-
For Amazon S3 data sources, both the manifest file and the data specified by the manifest file must be accessible using the IAM role.
-
The ARN string needs to match an existing IAM role in the AWS account and AWS Region where the data is located and queried.
When QuickSight connects to another service in AWS, it uses an IAM role. By default, this less granular version of the role is created by QuickSight for each service it uses, and the role is managed by AWS account administrators. When you add an IAM role ARN with a custom permissions policy, you override the broader role for your data sources that need extra protection. For more information about policies, see Create a customer managed policy in the IAM User Guide.
Run queries with Athena data sources
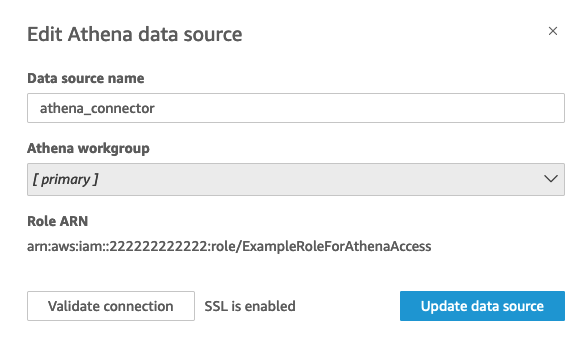
Use the API to attach the ARN to the Athena data source. To do so, add the role ARN in the RoleArn property of AthenaParameters. For verification, you can see the role ARN on the Edit Athena data source dialog box. However, Role ARN is a read-only field.
To get started, you need a custom IAM role, which we demonstrate in the following example.
Keep in mind that the following code example is for learning purposes only. Use this example in a temporary development and testing environment only, and not in a production environment. The policy in this example doesn't secure any specific resource, which must be in a deployable policy. Also, even for development, you need to add your own AWS account information.
The following commands create a simple new role and attach a few policies that grant permissions to QuickSight.
aws iam create-role \
        --role-name TestAthenaRoleForQuickSight \
        --description "Test Athena Role For QuickSight" \
        --assume-role-policy-document '{
            "Version": "2012-10-17",
            "Statement": [
                {
                    "Effect": "Allow",
                    "Principal": {
                        "Service": "quicksight.amazonaws.com"
                    },
                    "Action": "sts:AssumeRole"
                }
            ]
        }'
After you've identified or created an IAM role to use with each data source, attach the policies by using the attach-role-policy.
aws iam attach-role-policy \
        --role-name TestAthenaRoleForQuickSight \
        --policy-arn arn:aws:iam::222222222222:policy/service-role/AWSQuickSightS3Policy1

    aws iam attach-role-policy \
        --role-name TestAthenaRoleForQuickSight \
        --policy-arn arn:aws:iam::aws:policy/service-role/AWSQuicksightAthenaAccess1

    aws iam attach-role-policy \
        --role-name TestAthenaRoleForQuickSight \
        --policy-arn arn:aws:iam::aws:policy/AmazonS3Access1
After you verify your permissions, you can use the role in QuickSight data sources by creating a new role or updating an existing role. When using these commands, update the AWS account ID and AWS Region to match your own.
Remember, these example code snippets are not for production environments. AWS strongly recommends that you identify and use a set of least privilege policies for your production cases.
aws quicksight create-data-source
        --aws-account-id 222222222222 \
        --region us-east-1 \
        --data-source-id "athena-with-custom-role" \
        --cli-input-json '{
            "Name": "Athena with a custom Role",
            "Type": "ATHENA",
            "data sourceParameters": {
                "AthenaParameters": {
                    "RoleArn": "arn:aws:iam::222222222222:role/TestAthenaRoleForQuickSight"
                }
            }
        }'
Run queries with Amazon Redshift data sources
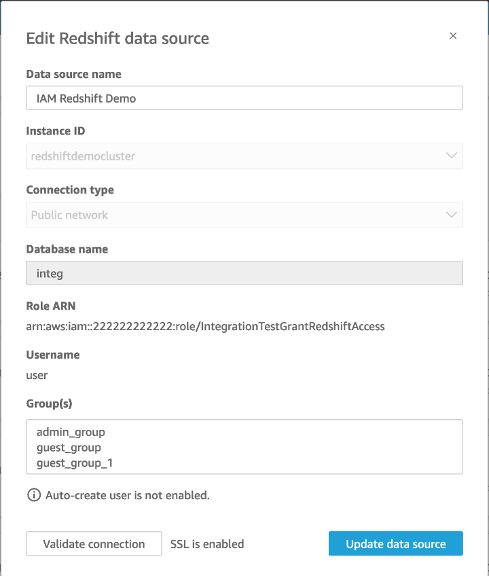
Connect your Amazon Redshift data with the run-as role to enhance your data security with fine-grained access policies. You can create a run-as role for Amazon Redshift data sources that use a public network or a VPC connection. You specify the connection type that you want to use in the Edit Amazon Redshift data source dialog box. The run-as role is not supported for Amazon Redshift Serverless data sources.
The image below shows an Amazon Redshift data source that uses the Public network connection type.
To get started, you need a custom IAM role, which we demonstrate in the following example. The following commands create a sample new role and attach policies that grant permissions to QuickSight.
aws iam create-role \
--role-name TestRedshiftRoleForQuickSight \
--description "Test Redshift Role For QuickSight" \
--assume-role-policy-document '{
    "Version": "2012-10-17",
    "Statement": [
        {
            "Effect": "Allow",
            "Principal": {
                "Service": "quicksight.amazonaws.com"
            },
            "Action": "sts:AssumeRole"
        }
    ]
}'
After you identify or create an IAM role to use with each data source, attach the policies with an attach-role-policy. If the redshift:GetClusterCredentialsWithIAM permission is attached to the role that you want to use, the values for DatabaseUser and DatabaseGroups are optional.
aws iam attach-role-policy \
--role-name TestRedshiftRoleForQuickSight \
--policy-arn arn:aws:iam:111122223333:policy/service-role/AWSQuickSightRedshiftPolicy


aws iam create-policy --policy-name RedshiftGetClusterCredentialsPolicy1 \
--policy-document file://redshift-get-cluster-credentials-policy.json


aws iam attach-role-policy \
--role-name TestRedshiftRoleForQuickSight \
--policy-arn arn:aws:iam:111122223333:policy/RedshiftGetClusterCredentialsPolicy1
// redshift-get-cluster-credentials-policy.json
{
    "Version": "2012-10-17",
    "Statement": [
        {
            "Sid": "RedshiftGetClusterCredentialsPolicy",
            "Effect": "Allow",
            "Action": [
                "redshift:GetClusterCredentials"
            ],
            "Resource": [
                "*"
            ]
        }
    ]
}
The example above creates a data source that uses the RoleARN, DatabaseUser, and DatabaseGroups IAM parameters. If you want to establish the connection only through the IAM RoleARN parameter, attach the redshift:GetClusterCredentialsWithIAM permission to your role, shown in the example below.
aws iam attach-role-policy \
--role-name TestRedshiftRoleForQuickSight \
--policy-arn arn:aws:iam:111122223333:policy/RedshiftGetClusterCredentialsPolicy1 // redshift-get-cluster-credentials-policy.json {
    "Version": "2012-10-17",
    "Statement": [
        {
            "Sid": "RedshiftGetClusterCredentialsPolicy",
            "Effect": "Allow",
            "Action": [ "redshift:GetClusterCredentialsWithIAM" ],
            "Resource": [ "*" ]
        }
    ]
}"
After you verify your permissions, you can use the role in QuickSight data sources by creating a new role or updating an existing role. When using these commands, update the AWS account ID and AWS Region to match your own.
aws quicksight create-data-source \ --region us-west-2 \ --endpoint https://quicksight.us-west-2.quicksight.aws.com/ \ --cli-input-json file://redshift-data-source-iam.json \ redshift-data-source-iam.json is shown as below { "AwsAccountId": "AWSACCOUNTID", "DataSourceId": "DATSOURCEID", "Name": "Test redshift demo iam", "Type": "REDSHIFT", "DataSourceParameters": { "RedshiftParameters": { "Database": "integ", "Host": "redshiftdemocluster.us-west-2.redshift.amazonaws.com", "Port":8192, "ClusterId": "redshiftdemocluster", "IAMParameters": { "RoleArn": "arn:aws:iam::222222222222:role/TestRedshiftRoleForQuickSight", "DatabaseUser": "user", "DatabaseGroups": ["admin_group", "guest_group", "guest_group_1"] } } }, "Permissions": [ { "Principal": "arn:aws:quicksight:us-east-1:AWSACCOUNTID:user/default/demoname", "Actions": [ "quicksight:DescribeDataSource", "quicksight:DescribeDataSourcePermissions", "quicksight:PassDataSource", "quicksight:UpdateDataSource", "quicksight:DeleteDataSource", "quicksight:UpdateDataSourcePermissions" ] } ] }
If your data source uses the VPC connection type, use the following VPC configuration.
{ "AwsAccountId": "AWSACCOUNTID", "DataSourceId": "DATSOURCEID", "Name": "Test redshift demo iam vpc", "Type": "REDSHIFT", "DataSourceParameters": { "RedshiftParameters": { "Database": "mydb", "Host": "vpcdemo.us-west-2.redshift.amazonaws.com", "Port":8192, "ClusterId": "vpcdemo", "IAMParameters": { "RoleArn": "arn:aws:iam::222222222222:role/TestRedshiftRoleForQuickSight", "DatabaseUser": "user", "AutoCreateDatabaseUser": true } } }, "VpcConnectionProperties": { "VpcConnectionArn": "arn:aws:quicksight:us-west-2:222222222222:vpcConnection/VPC Name" }, "Permissions": [ { "Principal": "arn:aws:quicksight:us-east-1:222222222222:user/default/demoname", "Actions": [ "quicksight:DescribeDataSource", "quicksight:DescribeDataSourcePermissions", "quicksight:PassDataSource", "quicksight:UpdateDataSource", "quicksight:DeleteDataSource", "quicksight:UpdateDataSourcePermissions" ] } ] }
If your data source uses the redshift:GetClusterCredentialsWithIAM permission and doesn't use the DatabaseUser or DatabaseGroups parameters, grant the role access to some or all tables in the schema. To see if a role has been granted SELECT permissions to a specific table, input the following command into the Amazon Redshift Query Editor.
SELECT u.usename, t.schemaname||'.'||t.tablename, has_table_privilege(u.usename,t.tablename,'select') AS user_has_select_permission FROM pg_user u CROSS JOIN pg_tables t WHERE u.usename = 'IAMR:RoleName' AND t.tablename =tableName
For more information about the SELECT action in the Amazon Redshift Query Editor, see SELECT.
To grant SELECT permisions to the role, input the following command in the Amazon Redshift Query Editor.
GRANT SELECT ON { [ TABLE ] table_name [, ...] | ALL TABLES IN SCHEMA
schema_name [, ...] } TO "IAMR:Rolename";
For more information about the GRANT action in the Amazon Redshift Query Editor, see GRANT.
Run queries with Amazon S3 data sources
Amazon S3 data sources contain a manifest file that QuickSight uses to find and parse your data. You can upload a JSON manifest file through the QuickSight console, or you can provide a URL that points to a JSON file in an S3 bucket. If you choose to provide a URL, QuickSight must be granted permission to access the file in Amazon S3. Use the QuickSight administration console to control access to the manifest file and the data that it references.
With the RoleArn property, you can grant access to the manifest file and the data that it references through a custom IAM role that overrides the account-wide role. Use the API to attach the ARN to the manifest file of the Amazon S3 data source. To do so, include the role ARN in the RoleArn property of S3Parameters. For verification, you can see the role ARN in the Edit S3 data source dialog box. However, Role ARN is a read-only field, as shown in the following screenshot.

To get started, create an Amazon S3 manifest file. Then, you can either upload it to Amazon QuickSight when you create a new Amazon S3 dataset or place the file into the Amazon S3 bucket that contains your data files. View the following example to see what a manifest file might look like:
{
    "fileLocations": [
        {
            "URIPrefixes": [
                "s3://quicksightUser-run-as-role/data/"
            ]
        }
    ],
    "globalUploadSettings": {
        "format": "CSV",
        "delimiter": ",",
        "textqualifier": "'",
        "containsHeader": "true"
    }
}
For instructions on how to create a manifest file, see Supported formats for Amazon S3 manifest files.
After you have created a manifest file and added it to your Amazon S3 bucket or uploaded it to
QuickSight, create or update an existing role in IAM that grants s3:GetObject access.
The following example illustrates how to update an existing IAM role with the AWS API:
aws iam put-role-policy \
    --role-name QuickSightAccessToS3RunAsRoleBucket \
    --policy-name GrantS3RunAsRoleAccess \
    --policy-document '{
        "Version": "2012-10-17",
        "Statement": [
            {
                "Effect": "Allow",
                "Action": "s3:ListBucket",
                "Resource": "arn:aws:s3:::s3-bucket-name"
            },
            {
                "Effect": "Allow",
                "Action": "s3:GetObject",
                "Resource": "arn:aws:s3:::s3-bucket-name/manifest.json"
            },
            {
                "Effect": "Allow",
                "Action": "s3:GetObject",
                "Resource": "arn:aws:s3:::s3-bucket-name/*"
            }
        ]
    }'
After your policy grants s3:GetObject access, you can begin creating data sources that apply the updated put-role-policy to the Amazon S3 data source's manifest file.
aws quicksight create-data-source --aws-account-id111222333444--regionus-west-2--endpointhttps://quicksight.us-west-2.quicksight.aws.com/\ --data-source-id "s3-run-as-role-demo-source" \ --cli-input-json '{ "Name": "S3 with a custom Role", "Type": "S3", "DataSourceParameters": { "S3Parameters": { "RoleArn": "arn:aws:iam::111222333444:role/QuickSightAccessRunAsRoleBucket", "ManifestFileLocation": { "Bucket": "s3-bucket-name", "Key": "manifest.json" } } } }'
After you verify your permissions, you can use the role in QuickSight data sources, either by creating a new role or updating an existing role. When using these commands, be sure to update the AWS account ID and AWS Region to match your own.
